JVx Reference, the FormLayout
Let's talk about the FormLayout, and why the anchor system makes it much more flexible than just a simple grid.
Basics
JVx comes with 5 layouts by default:
- null/none/manual
- BorderLayout
- FlowLayout
- GridLayout
- FormLayout
From these five the first four are easily explained, only the FormLayout needs some more information because it might not be as easy to grasp in the first moment than the others.
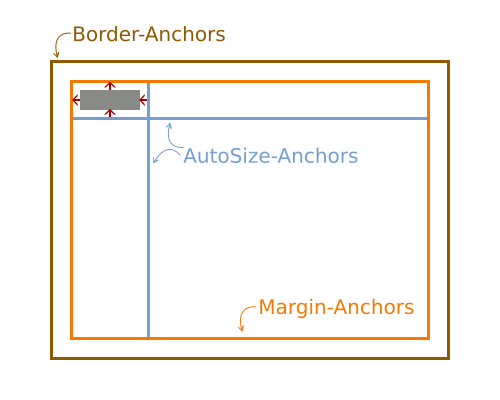
The FormLayout uses a dependent anchor system. An Anchor in this context is a position inside the layout which is calculated from parent anchors and either the size of the component or a fixed value. So we can say there are two different types of Anchors inside the FormLayout which we are concerned about:
- AutoSize-Anchors, its position is calculated from the component assigned to it.
- Fixed-Anchors, its position is fixed.
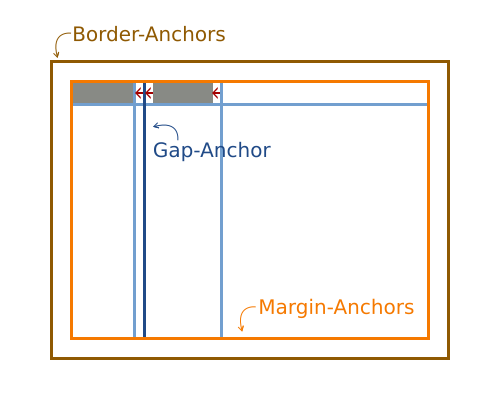
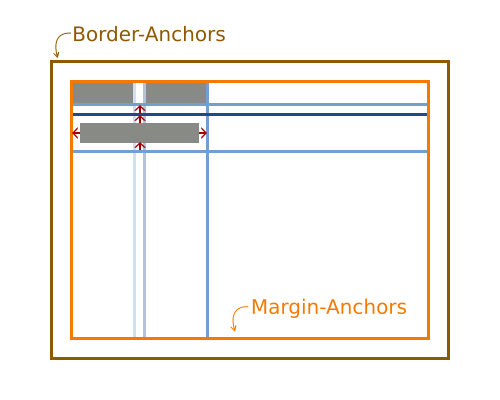
Additionally, there are three special cases of Fixed-Anchors:
- Border-Anchors, which surround the FormLayout at its border.
- Margin-Anchors, which are inset from the border by the defined value.
- Gap-Anchors, which are added to create a gap between components.
When it comes to calculating the position of an anchor, the position of the parent anchor is determined and then the value of the current anchor is added (which is either the size of a component or a fixed value). Simplified and in pseudo-code it can expressed like this:
-
public int getPosition(Anchor pAnchor)
-
{
-
int parentPosition = 0;
-
-
if (pAnchor.getParent() != null)
-
{
-
parentPosition = getPosition(pAnchor.getParent());
-
}
-
-
if (pAnchor.isAutoSize())
-
{
-
return parentPosition + pAnchor.getComponent().getWidth();
-
}
-
else
-
{
-
return parentPosition + pAnchor.getValue();
-
}
-
}
With this knowledge, we are nearly done with completely understanding the FormLayout.
Creating constraints
Now, the second important part after the basics is knowing how the constraints are created. For example this:
-
panel.add(component, layout.getConstraints(0, 0));
With the coordinates of 0,0, no new anchors are created but instead the component is attached to the top and left margin anchor. Two new AutoSize-Anchors (horizontally and vertically) are created and attached to the component.
If we now add a second component in the same row:
-
panel.add(component, layout.getConstraints(0, 0));
-
panel.add(component, layout.getConstraints(1, 0));
Because we are still on row 0 the component is attached to the top margin anchor and the previous AutoSize-Anchor for this row. Then, a new Gap-Anchor will be created which is attached to the trailing AutoSize-Anchor of the previous component.
We can of course also add items to the right and bottom:
-
panel.add(component, layout.getConstraints(0, 0));
-
panel.add(component, layout.getConstraints(1, 0));
-
panel.add(component, layout.getConstraints(-1, -1));
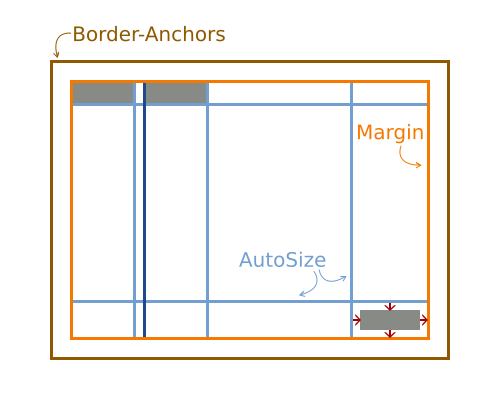
What happens is the same as when adding a component at the coordinates 0,0, except that the reference is the lower right corner. The component is attached to the bottom and right margin anchors, with trialing AutoSize-Anchors.
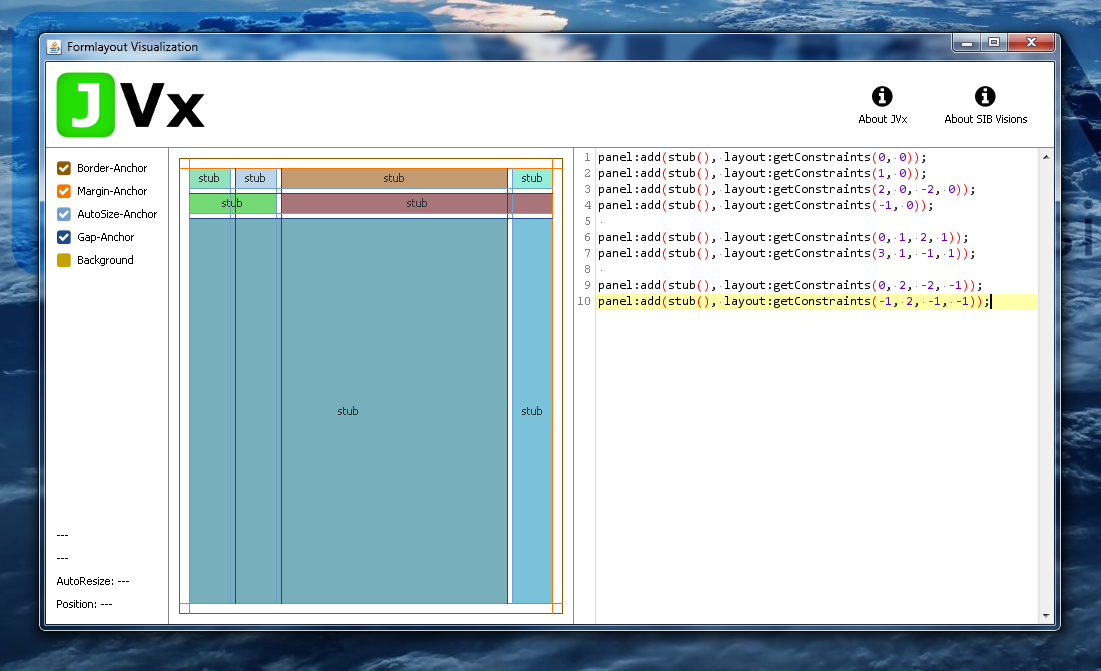
Last but not least, we can add components which span between anchors:
-
panel.add(component, layout.getConstraints(0, 0));
-
panel.add(component, layout.getConstraints(1, 0));
-
panel.add(component, layout.getConstraints(-1, -1));
-
panel.add(component, layout.getConstraints(2, 1, -2, -2));
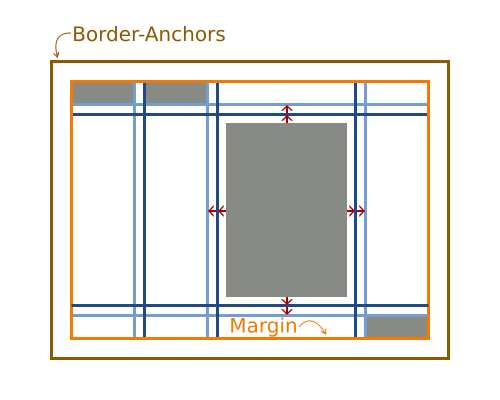
Again, the same logic applies as previously, with the notable exception that new Gap-Anchors are created for all four sides. That includes variants which span over anchors:
-
panel.add(component, layout.getConstraints(0, 0));
-
panel.add(component, layout.getConstraints(1, 0));
-
panel.add(component, layout.getConstraints(0, 1, 2, 1));
The component is horizontally attached to the left Margin-Anchor and additionally to the AutoSize-Anchor of the second column. The AutoSize- and Gap-Anchor of the first column are not ignored, they are not relevant to this case.
At this point it is important to note that spanning and stretched components are disregarded for the preferred size calculation of the layout. So whenever you span or stretch a component, it is not taken into account when the preferred size of the layout is calculated, which can lead to unexpected results.
Interactive demo
Sometimes, however, it might not be obvious what anchors are created and how they are used. For this we have created a simple interactive demonstration application which allows to inspect the created anchors of a layout, the JVx FormLayout Visualization.
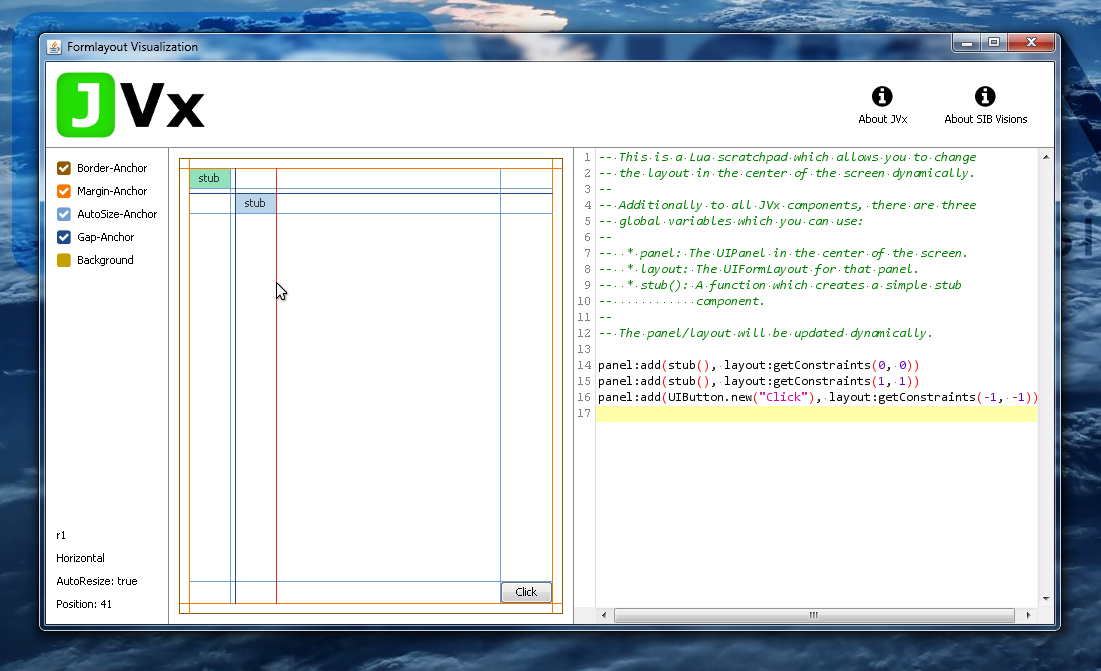
On the left is the possibility to show and hide anchors together with the information about the currently highlighted anchor. On the right is a Lua scripting area which allows you to quickly and easily rebuild and test layouts. It utilizes the JVx-Lua bridge from a previous blog post and so any changes to the code are directly applied.
The most simple usage: Flow-like
Enough of the internals, let's talk use-cases. The most simple use-case for the FormLayout can be a container which flows its contents in a line until a certain number of items is reach, at which it breaks into a new line:
-
layout.setNewlineCount(3);
-
-
panel.add(component);
-
panel.add(component);
-
panel.add(component);
-
panel.add(component);
-
panel.add(component);
-
panel.add(component);
-
panel.add(component);
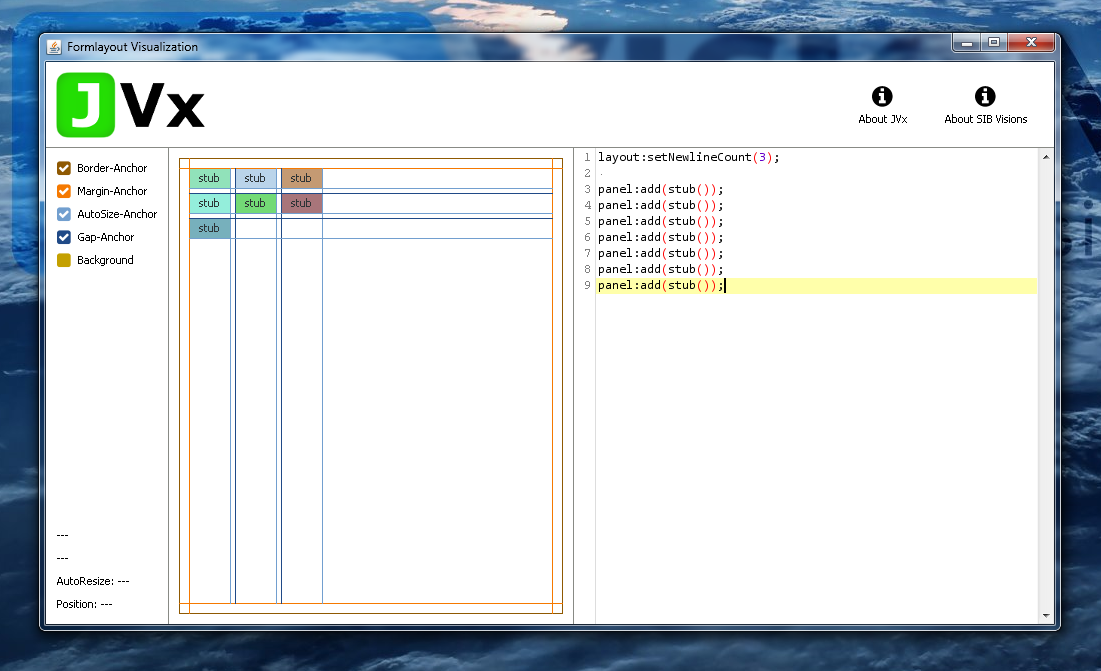
It does not require any interaction from us except adding components. In this case, when three components have been added, the next one will be added to the next line and so on. This is quite useful when all you want to do is display components in a fixed horizontal grid.
The obvious usage: Grid-like
The FormLayout can also be used to align components in a grid, and actually layout them in a grid-like fashion:
-
panel.add(component, layout.getConstraints(0, 0));
-
panel.add(component, layout.getConstraints(1, 0));
-
panel.add(component, layout.getConstraints(2, 0, -2, 0));
-
panel.add(component, layout.getConstraints(-1, 0));
-
-
panel.add(component, layout.getConstraints(0, 1, 2, 1));
-
panel.add(component, layout.getConstraints(3, 1, -1, 1));
-
-
panel.add(component, layout.getConstraints(0, 2, -2, -1));
-
panel.add(component, layout.getConstraints(-1, 2, -1, -1));
With the main difference being that the columns and rows are sized according to the components in it and not given a fixed slice of the width of the panel.
The advanced usage: Anchor Configuration
Additionally, the FormLayout offers the possibility to manually set the anchor positions, for example when it is necessary to give the first elements a certain size:
-
panel.add(component, layout.getConstraints(0, 0));
-
panel.add(component, layout.getConstraints(1, 0));
-
panel.add(component, layout.getConstraints(2, 0));
-
-
panel.add(component, layout.getConstraints(0, 1));
-
panel.add(component, layout.getConstraints(1, 1));
-
panel.add(component, layout.getConstraints(2, 1));
-
-
panel.add(component, layout.getConstraints(0, 2));
-
panel.add(component, layout.getConstraints(1, 2));
-
panel.add(component, layout.getConstraints(2, 2));
-
-
layout.setAnchorConfiguration("r0=64,r1=8,r2=128,b1=32");
Together with the ability to span components, this allows to create complex and rich layouts.

Conclusion
The JVx FormLayout allows to quickly and easily create complex, good looking and working layouts which are still flexible enough for the cases when a component is swapped, removed or added. It can be used in many different circumstances and is still easy enough to use to make sure that even beginners are able to create a basic layout within seconds.
![]() API, Development | rzenz | 15/11/2017 |
API, Development | rzenz | 15/11/2017 | ![]() Comments (0)
Comments (0)
 RSS-Feed