This website uses cookies for visitor traffic analysis. By using the website, you agree with storing the cookies on your computer.More information

Posts tagged: JVx Reference

JVx Reference, CellEditors

Let's talk about CellEditors, and how they are decoupled from the surrounding GUI.

What are they?

While we've already covered large parts of how the GUI layer and the model of JVx works, the CellEditors have been left completely untouched and unmentioned. One might believe that they can be easily explained together with the Editors, however, they are a topic on their own, and a complex one from time to time that is.

The difference between Editors (the UIEditor for the most part) and CellEditors is that the Editors only provide the high-level GUI control, while the CellEditors provide the actual functionality. Let's take a look at a quite simple screen.

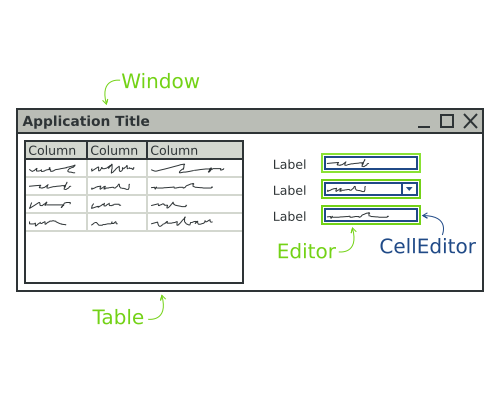
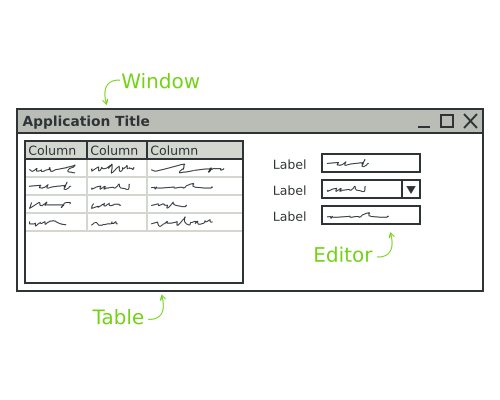
The layout of a simple screen with a table and a few editors.

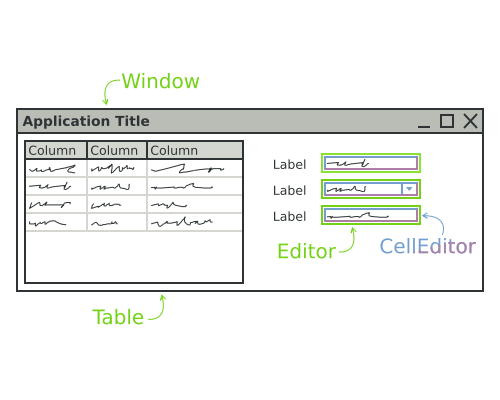
We see a window with a table on the left and some editors on the right, simple enough. Now these components we are seeing are UIEditors, not CellEditors. The CellEditors themselves are only added as child components to the Editors, so the Editors are basically just panels which contain the actual CellEditor.

The same scree but with the CellEditors differentiated from the UIEditors which contain them.

So technically every UIEditor is just another panel which gets the CellEditor added. The CellEditors themselves follow the same pattern as all GUI components in JVx, there is the base interface, an eventual extension of technology components, the implementation and finally the UI object. They are, however, rarely directly used in building the GUI, but mostly only referenced when building the model.

Why are they?

If you want to make GUI editor components, I know of two possible ways from the top of my head to achieve that: You create dedicated editor components for the datatypes that are available, for example a NumberEditor, TextEditor and so forth. Or you create one editor component which acts as a mere container and allows to plug in any wanted behavior for the type you're editing.

We've opted for the second option, because it means that the GUI is actually decoupled from the datatypes (and in extension the data) of the model. If we'd have separate components for each datatype, changing the datatype of a single column would mean that you'd have to touch all editors associated with that column and change that code, maybe with rippling effects on the rest of the GUI. With the CellEditors, one can change the datatype of a column and not worry about the GUI that is associated with that column. The CellEditor is changed on the model once and that change is automatically picked up by all Editors. Which also means that one can define and change defaults very easily and globally.

Of course one can also set the preferred or wanted CellEditor directly on the Editor, instead of using the one defined in the model, should the need arise.

And the table?

The same applies to the Table. Theoretically, every cell of the Table can be viewed as a single Editor, for this context at least. So a single cell behaves the same as an Editor when it comes to how the CellEditors are handled.

How many are there?

JVx comes with a variety of CellEditors out of the box:

  • Boolean
  • Choice
  • Date/Time
  • List
  • Number
  • Text
    • HTML
    • Multiline
    • Password
    • Standard

With these nearly all needs can be covered. If there is need for a new one, it can be created and added like any other UI component.

Using CellEditors

As said previously, which CellEditor is used is defined primarily with the model, for example:

  1. private void initiliazeModel() throws ModelException
  2. {
  3.     dataBook = new MemDataBook();
  4.    
  5.     ICellEditor cellEditor = new UITextCellEditor();
  6.     IDataType dataType = new StringDataType(cellEditor);
  7.     ColumnDefinition column = new ColumnDefinition("COLUMN", dataType);
  8.  
  9.     RowDefinition rowDefinition = dataBook.getRowDefinition();
  10.     rowDefinition.addColumnDefinition(column);
  11.    
  12.     dataBook.open();
  13. }
  14.  
  15. private void initializeUI() throws ModelException
  16. {
  17.     editor = new UIEditor(dataBook, "COLUMN");
  18.    
  19.     add(editor);
  20. }

We can see that every column has a datatype and every datatype has a CellEditor. That allows the model to provide the actual editing functionality without changing the GUI code. The Editor, when notifyRepaint() is called, will fetch the CellEditor from the datatype and use it. Additionally, there is a technology dependent default mechanism which allows this system to work even when the UI classes are not used.

Let's do a step by step explanation of what happens:

  1. The model is created.
  2. The GUI is created.
  3. The model invokes notifyRepaint() on all bound controls.
  4. The Editor gets the CellEditor from the model and adds it to itself.

One moment, instance sharing?

If we revisit at the example code from above, we will notice that the CellEditor instance is set on the model and must then be used by the Editor. That means that a single CellEditor instance is used for all bound Editors. We all know that sharing instances in such a way can be fun, but in this case it is not a problem because CellEditors are only "factories" for the actual editing components.

The ICellEditor interface does actually only specify two methods, whether it is a direct cell editor, and the factory method for creating an ICellEditorHandler. The CellEditorHandler is the manager of the instance of the component that is going to be embedded into the Editor.

  1. notifyRepaint() is called on the editor.
  2. The Editor gets the CellEditorHandler from the CellEditor.
  3. The Editor gets the component from the CellEditorHandler and embeds it.

This mechanism makes sure that no component instances end up shared between different GUI components.

A closer look at the CellEditorHandler

If we take a good look at the CellEditorHandler interface, we see that it contains everything that is required for setting up a component to be able to edit data coming from a DataRow. One method is especially important, the getCellEditorComponent() function. It returns the actual technology component that is to be embedded into the Editor. That means that even though there are implementations for the CellEditors on the UI layer, the actual components which will provide the functionality for editing the data are implemented on the technology layer. A short refresher:

The different layers of JVx.

Revisiting our simple screen from above, we'd actually need to represent it as something like this:

FormLayout with one added component.

Because the embedded components in the Editor are actually on the technology layer.

CellRenderers

There is another small topic we need to discuss, CellRenderers. They follow nearly the same schematics as CellEditors but are used to display values directly, for example values in a table cell. The Table is also the primary component which uses them to display the cell values until the editing is started. For simplicity reasons, most CellEditors implement ICellRenderer directly and provide management of the created component. That is because the reuse of components for barely displaying values is easier does not contain as much error potential.

Conclusion

CellEditors provide an easy mechanic to allow to edit data, and more important, they are decoupled from the GUI code in which they are used in a way which allows the model to change, even dynamically. That enables programmers to create and edit screens and models quickly without the need to check if the GUI and the model fit together, they always do.

JVx Reference, the FormLayout

Let's talk about the FormLayout, and why the anchor system makes it much more flexible than just a simple grid.

Basics

JVx comes with 5 layouts by default:

  • null/none/manual
  • BorderLayout
  • FlowLayout
  • GridLayout
  • FormLayout

From these five the first four are easily explained, only the FormLayout needs some more information because it might not be as easy to grasp in the first moment than the others.

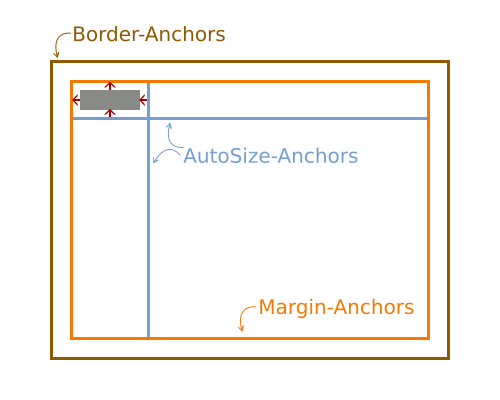
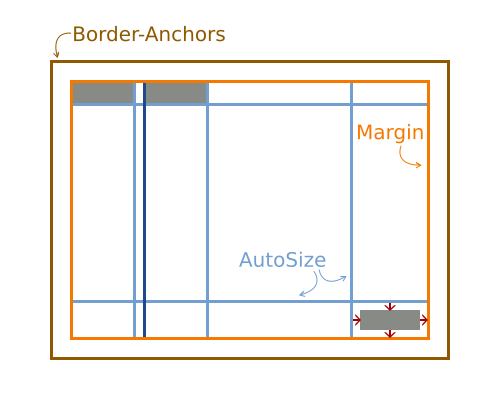
The FormLayout uses a dependent anchor system. An Anchor in this context is a position inside the layout which is calculated from parent anchors and either the size of the component or a fixed value. So we can say there are two different types of Anchors inside the FormLayout which we are concerned about:

  • AutoSize-Anchors, its position is calculated from the component assigned to it.
  • Fixed-Anchors, its position is fixed.

Additionally, there are three special cases of Fixed-Anchors:

  • Border-Anchors, which surround the FormLayout at its border.
  • Margin-Anchors, which are inset from the border by the defined value.
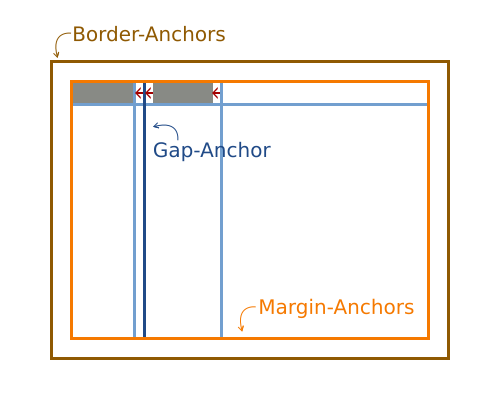
  • Gap-Anchors, which are added to create a gap between components.

When it comes to calculating the position of an anchor, the position of the parent anchor is determined and then the value of the current anchor is added (which is either the size of a component or a fixed value). Simplified and in pseudo-code it can expressed like this:

  1. public int getPosition(Anchor pAnchor)
  2. {
  3.     int parentPosition = 0;
  4.    
  5.     if (pAnchor.getParent() != null)
  6.     {
  7.         parentPosition = getPosition(pAnchor.getParent());
  8.     }
  9.  
  10.     if (pAnchor.isAutoSize())
  11.     {
  12.         return parentPosition + pAnchor.getComponent().getWidth();
  13.     }
  14.     else
  15.     {
  16.         return parentPosition + pAnchor.getValue();
  17.     }
  18. }

With this knowledge, we are nearly done with completely understanding the FormLayout.

Creating constraints

Now, the second important part after the basics is knowing how the constraints are created. For example this:

  1. panel.add(component, layout.getConstraints(0, 0));

FormLayout with one added component.

With the coordinates of 0,0, no new anchors are created but instead the component is attached to the top and left margin anchor. Two new AutoSize-Anchors (horizontally and vertically) are created and attached to the component.

If we now add a second component in the same row:

  1. panel.add(component, layout.getConstraints(0, 0));
  2. panel.add(component, layout.getConstraints(1, 0));

FormLayout with two added components.

Because we are still on row 0 the component is attached to the top margin anchor and the previous AutoSize-Anchor for this row. Then, a new Gap-Anchor will be created which is attached to the trailing AutoSize-Anchor of the previous component.

We can of course also add items to the right and bottom:

  1. panel.add(component, layout.getConstraints(0, 0));
  2. panel.add(component, layout.getConstraints(1, 0));
  3. panel.add(component, layout.getConstraints(-1, -1));

FormLayout with three added components, one in the bottom right corner.

What happens is the same as when adding a component at the coordinates 0,0, except that the reference is the lower right corner. The component is attached to the bottom and right margin anchors, with trialing AutoSize-Anchors.

Last but not least, we can add components which span between anchors:

  1. panel.add(component, layout.getConstraints(0, 0));
  2. panel.add(component, layout.getConstraints(1, 0));
  3. panel.add(component, layout.getConstraints(-1, -1));
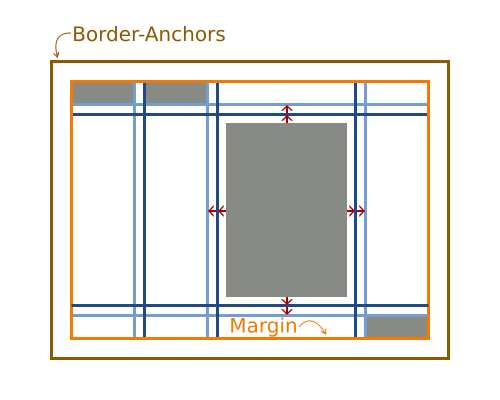
  4. panel.add(component, layout.getConstraints(2, 1, -2, -2));

FormLayout with four added components, one stretched.

Again, the same logic applies as previously, with the notable exception that new Gap-Anchors are created for all four sides. That includes variants which span over anchors:

  1. panel.add(component, layout.getConstraints(0, 0));
  2. panel.add(component, layout.getConstraints(1, 0));
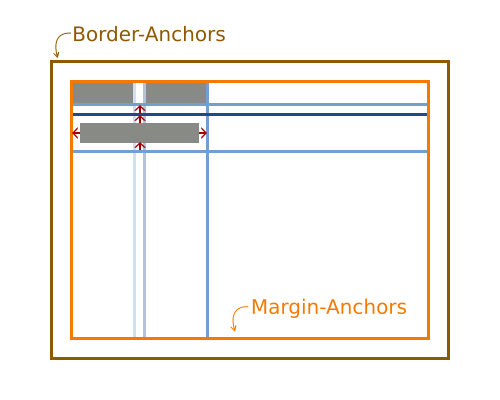
  3. panel.add(component, layout.getConstraints(0, 1, 2, 1));

FormLayout with three added components, one of them spans multiple anchors.

The component is horizontally attached to the left Margin-Anchor and additionally to the AutoSize-Anchor of the second column. The AutoSize- and Gap-Anchor of the first column are not ignored, they are not relevant to this case.

At this point it is important to note that spanning and stretched components are disregarded for the preferred size calculation of the layout. So whenever you span or stretch a component, it is not taken into account when the preferred size of the layout is calculated, which can lead to unexpected results.

Interactive demo

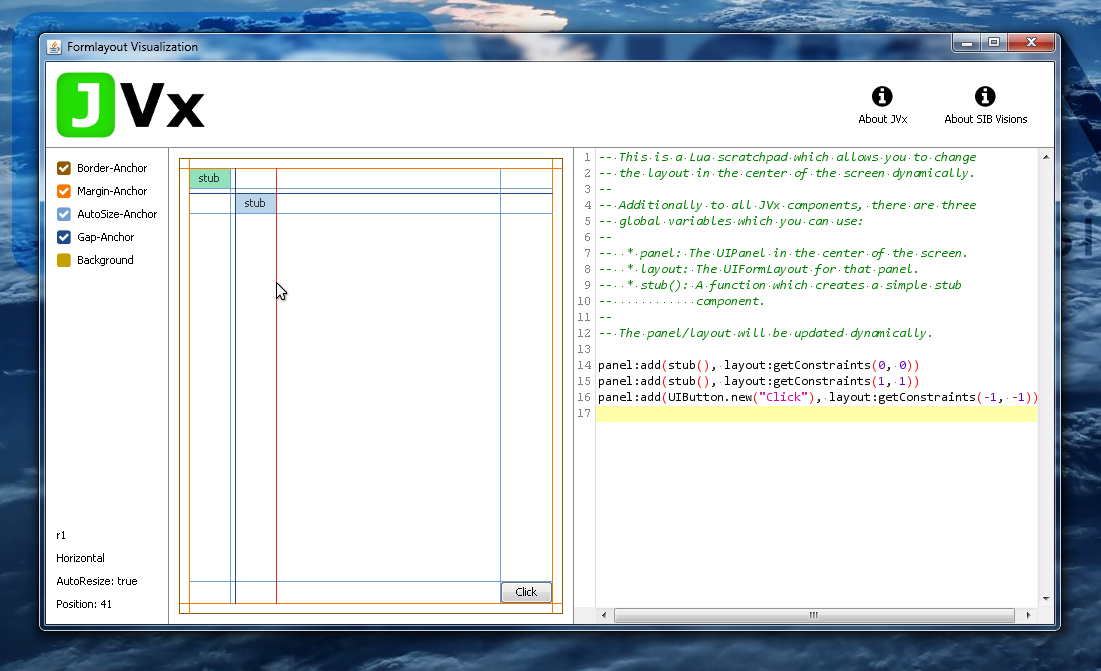
Sometimes, however, it might not be obvious what anchors are created and how they are used. For this we have created a simple interactive demonstration application which allows to inspect the created anchors of a layout, the JVx FormLayout Visualization.

FormLayout Visualization Demo

On the left is the possibility to show and hide anchors together with the information about the currently highlighted anchor. On the right is a Lua scripting area which allows you to quickly and easily rebuild and test layouts. It utilizes the JVx-Lua bridge from a previous blog post and so any changes to the code are directly applied.

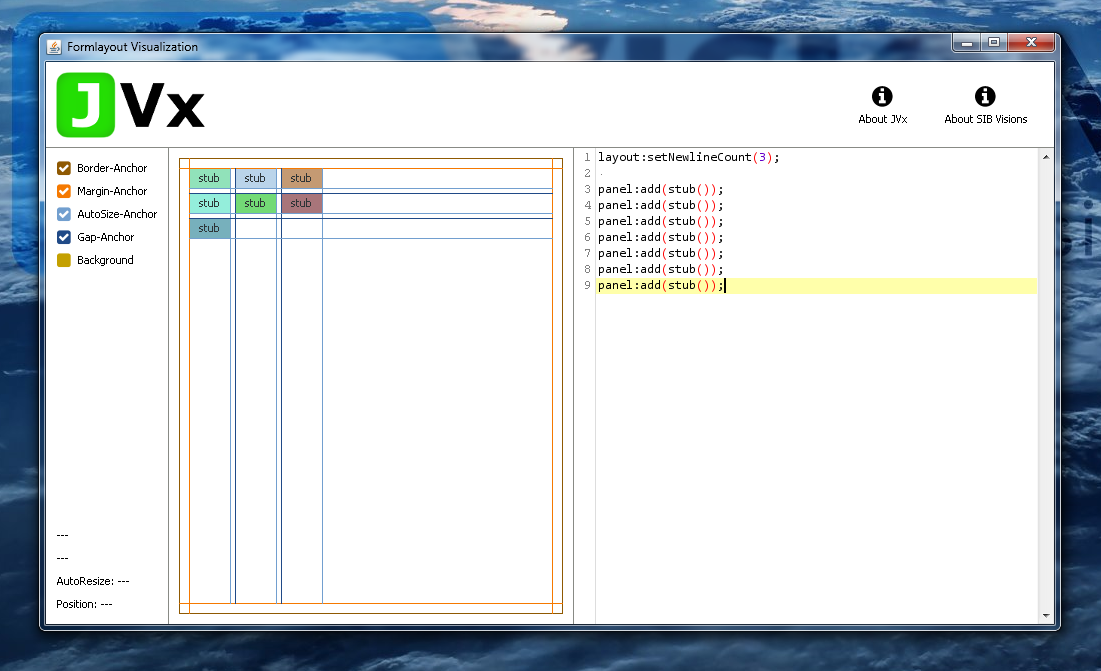
The most simple usage: Flow-like

Enough of the internals, let's talk use-cases. The most simple use-case for the FormLayout can be a container which flows its contents in a line until a certain number of items is reach, at which it breaks into a new line:

  1. layout.setNewlineCount(3);
  2.  
  3. panel.add(component);
  4. panel.add(component);
  5. panel.add(component);
  6. panel.add(component);
  7. panel.add(component);
  8. panel.add(component);
  9. panel.add(component);

FormLayout with a flow layout

It does not require any interaction from us except adding components. In this case, when three components have been added, the next one will be added to the next line and so on. This is quite useful when all you want to do is display components in a fixed horizontal grid.

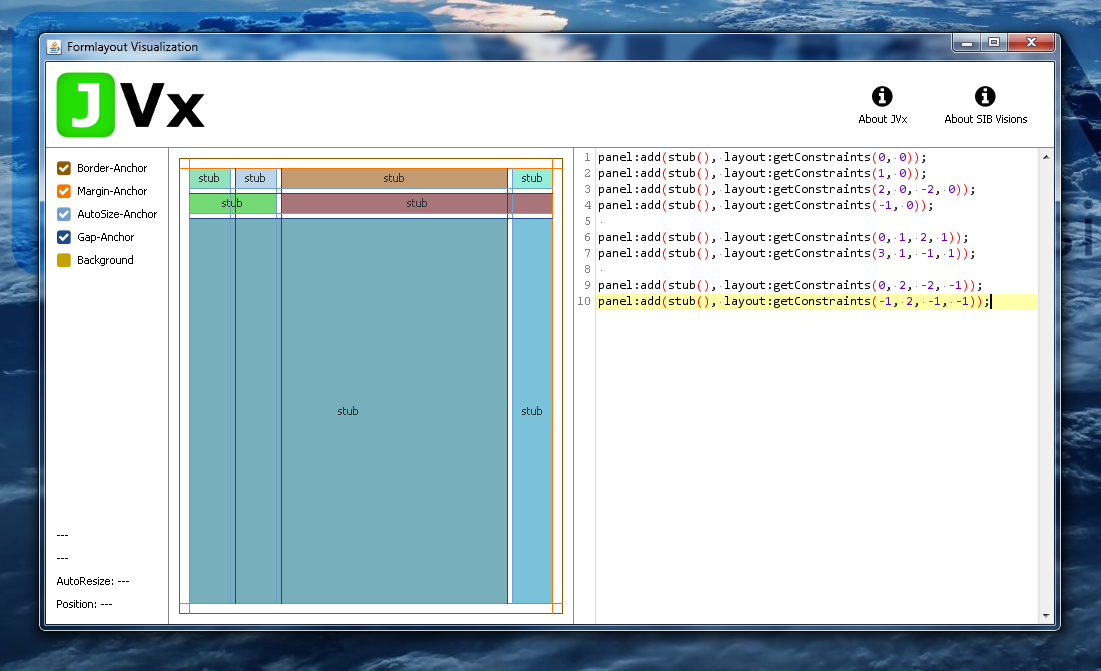
The obvious usage: Grid-like

The FormLayout can also be used to align components in a grid, and actually layout them in a grid-like fashion:

  1. panel.add(component, layout.getConstraints(0, 0));
  2. panel.add(component, layout.getConstraints(1, 0));
  3. panel.add(component, layout.getConstraints(2, 0, -2, 0));
  4. panel.add(component, layout.getConstraints(-1, 0));
  5.  
  6. panel.add(component, layout.getConstraints(0, 1, 2, 1));
  7. panel.add(component, layout.getConstraints(3, 1, -1, 1));
  8.  
  9. panel.add(component, layout.getConstraints(0, 2, -2, -1));
  10. panel.add(component, layout.getConstraints(-1, 2, -1, -1));

FormLayout with a grid layout

With the main difference being that the columns and rows are sized according to the components in it and not given a fixed slice of the width of the panel.

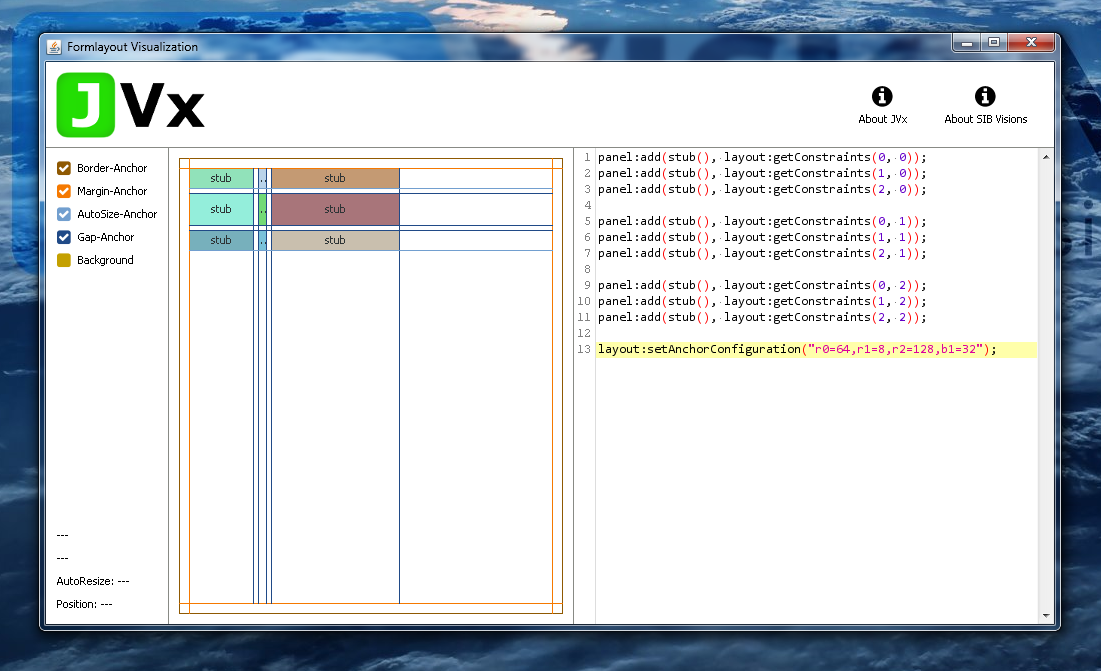
The advanced usage: Anchor Configuration

Additionally, the FormLayout offers the possibility to manually set the anchor positions, for example when it is necessary to give the first elements a certain size:

  1. panel.add(component, layout.getConstraints(0, 0));
  2. panel.add(component, layout.getConstraints(1, 0));
  3. panel.add(component, layout.getConstraints(2, 0));
  4.  
  5. panel.add(component, layout.getConstraints(0, 1));
  6. panel.add(component, layout.getConstraints(1, 1));
  7. panel.add(component, layout.getConstraints(2, 1));
  8.  
  9. panel.add(component, layout.getConstraints(0, 2));
  10. panel.add(component, layout.getConstraints(1, 2));
  11. panel.add(component, layout.getConstraints(2, 2));
  12.  
  13. layout.setAnchorConfiguration("r0=64,r1=8,r2=128,b1=32");

Together with the ability to span components, this allows to create complex and rich layouts.

FormLayout with a set anchor configuration

Conclusion

The JVx FormLayout allows to quickly and easily create complex, good looking and working layouts which are still flexible enough for the cases when a component is swapped, removed or added. It can be used in many different circumstances and is still easy enough to use to make sure that even beginners are able to create a basic layout within seconds.

JVx Reference series

We wrote a lot of useful articles about JVx in the past weeks. You can use them as reference:

Here's the search result and the direct links to the articles:

Technologies and Factories
Resource and UIResource
Launchers and Applications
Application Basics
Custom Components
Events
DataBooks
The FormLayout
CellEditors

And the link to our JVx documentation.

JVx Reference, Launchers and Applications

Let's talk about Launchers, and how they are used to start JVx applications.

Starting an application

We've previously outlined a simple way to start a JVx application, and now we're going to look at how to do it with a launcher to benefit from everything JVx has to offer. From a technical point of view, there are two prerequisites which must be fulfilled before a JVx application can run:

  1. the JVM must have started.
  2. the technology specific system must have started.

Then, and only then, the JVx application can run. Depending on the implementation that is used, that can be as easily as instancing the factory (Swing, JavaFX), but can also mean that a servlet server has to start (Vaadin). Because we do not wish to encumber our applications with technology specific code, we have to entrust all this to an encapsulated entity, meaning the implementations of ILauncher and IApplication.

Following the chain

The steps for getting an application to start are as follows:

  1. The first thing that must run is obviously the JVM, without it we won't have much luck starting anything.
  2. The launcher must be created and it must start the Technology.
  3. The launcher than creates the application which the user is seeing.

Launcher chain

So we need two classes, the ILauncher implementation which knows how to start the Technology and the IApplication implementation. That we already knew, so let's try to put this into code. For simplicity reasons (and because I don't want to write a complete factory from scratch for this example) we will reuse the Swing implementation and write a new launcher and application for it.

Entry point

The Main class that we will use as example is very straightforward:

  1. public class Main
  2. {
  3.     public static void main(String[] pArgs)
  4.     {
  5.         // All we have to do here is kickoff the creation of the launcher.
  6.         // The launcher will do everything that is required to start for us.
  7.         //
  8.         // In a real world scenario and/or application there might be more
  9.         // setup or groundwork required, for example processing the arguments,
  10.         // but we don't need any of that here.
  11.         new SwingLauncher();
  12.     }
  13. }

All we have to do there is start the launcher itself. As the comment suggests, there might be work required for a "real" application startup. For this example, it is all we need to do. Of course we could also directly embed this little function into the launcher implementation itself, to save us one class.

The launcher

The ILauncher implementation on the other hand contains quite some logic, but nothing not manageable:

  1. public class SwingLauncher extends SwingFrame
  2.                            implements ILauncher
  3. {
  4.     // We have to extend from SwingFrame because there is no factory
  5.     // instantiated at that point, so we can't use UI components.
  6.    
  7.     private IApplication application;
  8.    
  9.     public SwingLauncher()
  10.     {
  11.         super();
  12.        
  13.         try
  14.         {
  15.             SwingUtilities.invokeAndWait(this::startup);
  16.         }
  17.         catch (InvocationTargetException | InterruptedException e)
  18.         {
  19.             e.printStackTrace();
  20.         }
  21.     }
  22.  
  23.     @Override
  24.     public void dispose()
  25.     {
  26.         try
  27.         {
  28.             // We must notify the application that we are being disposed.
  29.             application.notifyDestroy();
  30.         }
  31.         catch (SecurityException e)
  32.         {
  33.             e.printStackTrace();
  34.         }
  35.        
  36.         super.dispose();
  37.        
  38.         // We have to make sure that the application is exiting when
  39.         // the frame is disposed of.
  40.         System.exit(0);
  41.     }
  42.  
  43.     private void startup()
  44.     {
  45.         // We create a new SwingFactory and it is directly registered as global
  46.         // instance, that means it will be used by all components which are
  47.         // created from now on.
  48.         UIFactoryManager.getFactoryInstance(SwingFactory.class);
  49.        
  50.         // Also we set it as our factory instance.
  51.         setFactory(UIFactoryManager.getFactory());
  52.        
  53.         // Because the IApplication implementation we use is based upon
  54.         // UI components (which is advisable) we have to wrap this launcher
  55.         // in an UILauncher.
  56.         UILauncher uiLauncher = new UILauncher(this);
  57.        
  58.         // Now we create the main application.
  59.         // Note that the ExampleApplication is already based upon
  60.         // UI components.
  61.         application = new ExampleApplication(uiLauncher);
  62.        
  63.         // Then we add the application as content to the launcher.
  64.         uiLauncher.add(application);
  65.        
  66.         // Perform some setup work and start everything.
  67.         uiLauncher.pack();
  68.         uiLauncher.setVisible(true);
  69.        
  70.         // We also have to notify the application itself.
  71.         application.notifyVisible();
  72.     }
  73.    
  74.     // SNIP
  75. }

In short, the launcher is kicking off the Swing thread by invoking the startup method on the main Swing thread. This startup method will instantiate the factory and then create the application. From there we only need to set it visible and then our application has started.

The launcher extends from SwingFrame, that is required because there hasn't been a factory created yet which could be used by UI components to create themselves. If we'd try to use an UI component before creating/setting a factory, we would obviously see the constructor of the component fail with a NullPointerException.

The method startup() is invoked on the main Swing thread, which also happens to be the main UI thread for JVx in this application. Once we are on the main UI thread we can create the application, add it and then set everything to visible.

The application

The IApplication implementation is quite short, because we extend com.sibvisions.rad.application.Application, an IApplication implementation created with UI components.

  1. public class ExampleApplication extends Application
  2. {
  3.     public ExampleApplication(UILauncher pParamUILauncher)
  4.     {
  5.         super(pParamUILauncher);
  6.     }
  7.    
  8.     @Override
  9.     protected IConnection createConnection() throws Exception
  10.     {
  11.         // Not required for this example.
  12.         return null;
  13.     }
  14.    
  15.     @Override
  16.     protected String getApplicationName()
  17.     {
  18.         return "Example Application";
  19.     }
  20. }

Because the launcher has previously started the technology and created the factory we can from here on now use UI components, which means we are already independent of the underlying technology. So the IApplication implementation can already be used with different technologies and is completely independent.

Notes on the launcher

As you might have noticed, in our example the launcher is a (window) frame, that makes sense for nearly every desktop GUI toolkit as they all depend upon a window as main method to display their applications. But the launcher could also be simpler, for example just a call to start the GUI thread. Or it could be something completely different, for example an incoming HTTP request.

Also don't forget that the launcher is providing additional functionality to the application, like saving file handles, reading and writing the configuration and similar platform and toolkit dependent operations, see the launcher for Swing for further details.

Conclusion

This example demonstrates how a simple launcher is implemented and why it is necessary to have a launcher in the first place. Compared with the "just set the factory" method this seems like a lot of work, but the launchers used by JVx are of course a lot more complex than these examples, that is because they implement all the required functionality and also take care of a lot of boiler plate operations. It is taking care of all technology specific code and allows to keep your application free from knowing about the platform it runs on.

JVx Reference, Resource and UIResource

Let's talk about Resources and UIResources, and why they sound similar but are not the same.

The Basics

We've previously covered how the JVx GUI layer works, now we are going to have a better look at the Resources and UIResources. With "Resource" we do not mean images or similar, we mean the implementation at the technology layer which is encapsulated by a wrapper class (Bridge Pattern). An "UIResource" on the other hand is an encapsulated concrete implementation of one of the interfaces on the UI layer.

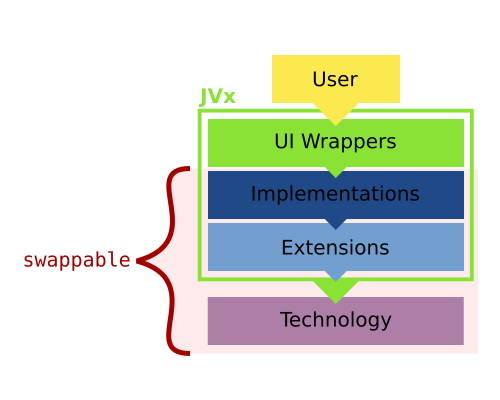
Let's do a short brush-up on how the JVx architecture looks like in regards to the GUI stack:

JVx Resource

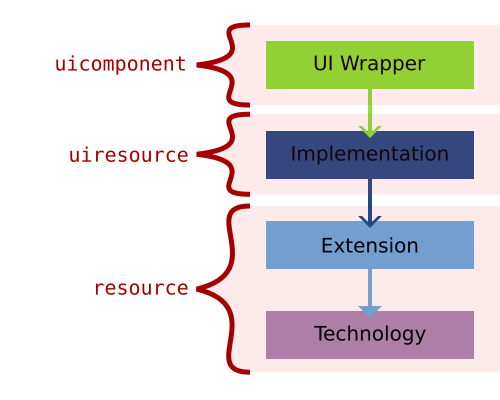
The UI Wrappers are the main UI classes which are used to create the GUI (f.e. UIButton). These are wrapping the Implementations (f.e. a SwingButton) which themselves are wrapping the Extension/Technology (f.e. a JVxButton/JButton). Only the UI and Implementation classes are implementing the interface required for the component (f.e. IButton). That also means that the Implementation is dependent on the Extension/Technology component, but the UI can use any object which implements the interface.

Now, with that knowledge we can start defining what is what:

JVx Resource 2

The resource itself, accessed by calling <uiwrapper>.getResource(), is the Extension/Technology component. The uiresource can be accessed by calling <uiwrapper>.getUIResource(). The uicomponent can be accessed by calling <uiwrapper>.getUIComponent() and is usually the UI Wrapper itself. If we use our previous Swing example, the resource would be a JVxButton/JButton, the uiresource would be the SwingPanel and the uicomponent would be the UIButton.

As one can see, access to all objects which are comprising the GUI is at all times possible. We, of course, have the UI component, we can access the Implementation component and we can access the Extension/Technology component. Theoretically we could also swap them at runtime, but in JVx this is limited to the construction of the object to greatly reduce the error potential.

Creating custom components

Equipped with that knowledge, we can revisit the previous guide on how to create custom components, the part about the BeepComponent to be exact:

  1. public class BeepComponent extends UIComponent<IPanel>
  2. {
  3.    public BeepComponent()
  4.    {
  5.       super(new UIPanel());
  6.        
  7.       UIButton highBeepButton = new UIButton("High Beep");
  8.       highBeepButton.eventAction().addListener(Beeper::playHighBeep);
  9.      
  10.       UIButton lowBeepButton = new UIButton("Low Beep");
  11.       highBeepButton.eventAction().addListener(Beeper::playLowBeep);
  12.      
  13.       UIFormLayout layout = new UIFormLayout();        
  14.      
  15.       uiResource.setLayout(layout);
  16.       uiResource.add(new UILabel("Beep"), layout.getConstraints(0, 0, -1, 0));
  17.       uiResource.add(highBeepButton, layout.getConstraints(0, 1));
  18.       uiResource.add(lowBeepButton, layout.getConstraints(1, 1));
  19.    }
  20. }

We are setting a new UIResource (an UIPanel) in the constructor (at line #5) which is to be used by the UIComponent. In this case it is not an Implementation, but another UI component, but that doesn't matter because the UIResource only must implement the expected interface. At line #15 we start using that custom UIResource.

Because UIComponent is an abstract component designed for exactly this usage, the example might not be the most exciting one, but it clearly illustrates the mechanic.

Bolting on functionality

Also from the previous guide on how to create custom components we can reuse the PostfixedLabel as example.

  1. private UILabel testLabel = new UILabel()
  2. {
  3.     public UILabel()
  4.     {
  5.         super(new PostfixedLabel("", "-trial"));
  6.     }
  7. };

Now testLabel will be using the PostfixedLabel internally, but with no indication to the user of the object that this is the case. This allows to extend the functionality of a component completely transparently, especially in combination with functions which do return an UIComponent and similar.

An important note about the component hierarchy

If we create a simple component extensions, like the BeepComponent above, it is important to note that there is one other layer of indirection in regards to the hierarchy on the technology layer. If we create a simple frame with the BeepComponent in it, one might expect the following hierarchy:

         UI                   Technology
---------------------    ----------------------
 UIFrame                  Frame
   \-UIPanel                \-Panel
       \-BeepComponent          \-BeepComponent
                                    \-Panel
                                        |-Label
                                        |-Button
                                        \-Button

With the BeepComponent added and its sub-components as its children. However, the actual hierarchy looks like this:

         UI                   Technology
---------------------    ----------------------
 UIFrame                  Frame
   \-UIPanel                \-Panel
       \-BeepComponent          \-Panel
                                    |-Label
                                    |-Button
                                    \-Button

That is because such extended components are not "passed" to the Technology, they do only exist on the UI layer because they do not have a Technology component which could be used. That is done by adding the UIComponent to the UI parent, but for adding the actual Technology component the set UIResource is used.

The special case of containers

Another special case are containers. For example we could create a panel which does display an overlay in certain situations and we will need to use that throughout the whole application.

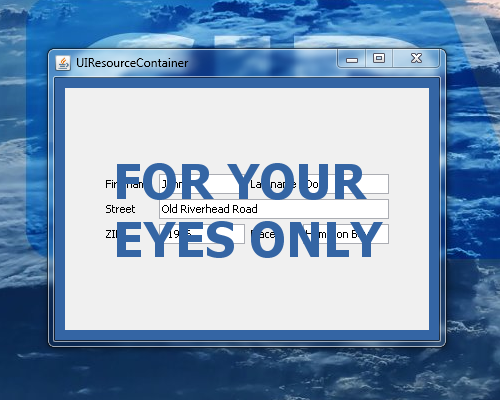
UIResourceContainer Example

That means we do not want to build it every time anew, so one option would be to use a factory method to "wrap" the content, something like this:

  1. UIFormLayout panelLayout = new UIFormLayout();
  2. panelLayout.setHorizontalAlignment(UIFormLayout.ALIGN_CENTER);
  3. panelLayout.setVerticalAlignment(UIFormLayout.ALIGN_CENTER);
  4.    
  5. UIPanel panel = new UIPanel();
  6. panel.setLayout(panelLayout);
  7. panel.add(new UILabel("Firstname"), panelLayout.getConstraints(0, 0));
  8. panel.add(new UITextField("John"), panelLayout.getConstraints(1, 0));
  9. panel.add(new UILabel("Lastname"), panelLayout.getConstraints(2, 0));
  10. panel.add(new UITextField("Doe"), panelLayout.getConstraints(3, 0));
  11. panel.add(new UILabel("Street"), panelLayout.getConstraints(0, 1));
  12. panel.add(new UITextField("Old R. Road"), panelLayout.getConstraints(1, 1, 3, 1));
  13. panel.add(new UILabel("ZIP"), panelLayout.getConstraints(0, 2));
  14. panel.add(new UITextField("11946"), panelLayout.getConstraints(1, 2));
  15. panel.add(new UILabel("Place"), panelLayout.getConstraints(2, 2));
  16. panel.add(new UITextField("Hampton Bays"), panelLayout.getConstraints(3, 2));
  17.    
  18. parentContainer.add(OverlayPanelFactory.wrap(panel), UIBorderLayout.CENTER);

And the wrap method itself:

  1. public static final UIPanel wrap(IComponent pContent)
  2. {
  3.     UILabel overlayLabel = new UILabel("FOR YOUR<br>EYES ONLY");
  4.     overlayLabel.setBackground(null);
  5.     overlayLabel.setFont(UIFont.getDefaultFont().deriveFont(UIFont.BOLD, 48));
  6.     overlayLabel.setForeground(UIColor.createColor("#3465a4"));
  7.     overlayLabel.setHorizontalAlignment(UILabel.ALIGN_CENTER);
  8.    
  9.     UIFormLayout layout = new UIFormLayout();
  10.    
  11.     UIPanel panel = new UIPanel();
  12.    
  13.     panel.setLayout(layout);
  14.     panel.setBackground(UIColor.createColor("#3465a4"));
  15.     panel.add(overlayLabel, layout.getConstraints(0, 0, -1, -1));
  16.     panel.add(pContent, layout.getConstraints(0, 0, -1, -1));
  17.    
  18.     return panel;
  19. }

Which is easy enough, but let's say we'd like to add logic to that wrapper, at that point it becomes more complicated. We can't use the same technique as for custom component from above, because in that case the "overlaying panel" would simply not be displayed. However, there is a similar mechanism for containers, setting the UIResourceContainer.

The UIResourceContainer is another special mechanism which works similar to setting the UIResource, but it works exactly the other way round. While setting the UIResource does "hide" components from the Technology which are there in UI layer, setting the UIResourceContainer does hide components from the UI layer while there are added in the Technology. A little bit complicated, here is our example again using this technique:

  1. public static class OverlayedPanel extends UIPanel
  2. {
  3.     public OverlayedPanel()
  4.     {
  5.         super();
  6.        
  7.         UILabel overlayLabel = new UILabel("FOR YOUR<br>EYES ONLY");
  8.         overlayLabel.setBackground(null);
  9.         overlayLabel.setFont(UIFont.getDefaultFont().deriveFont(UIFont.BOLD, 48));
  10.         overlayLabel.setForeground(UIColor.createColor("#3465a4"));
  11.         overlayLabel.setHorizontalAlignment(UILabel.ALIGN_CENTER);
  12.        
  13.         UIPanel innerPanel = new UIPanel();
  14.        
  15.         UIFormLayout layout = new UIFormLayout();
  16.        
  17.         setLayout(layout);
  18.         setBackground(UIColor.createColor("#3465a4"));
  19.         add(overlayLabel, layout.getConstraints(0, 0, -1, -1));
  20.         add(innerPanel, layout.getConstraints(0, 0, -1, -1));
  21.        
  22.         setUIResourceContainer(innerPanel);
  23.     }
  24. }

What we've done is extend an UIPanel (line #1), setting it up and adding children and then we've declared one of its children as the UIResourceContainer (line #22). So all methods which are specific to IContainer (adding children, setting a layout, etc.) are now forwarding to the innerPanel and manipulating the contents of the OverlayedPanel directly is not directly available.

And here is how it is used:

  1. UIFormLayout panelLayout = new UIFormLayout();
  2. panelLayout.setHorizontalAlignment(UIFormLayout.ALIGN_CENTER);
  3. panelLayout.setVerticalAlignment(UIFormLayout.ALIGN_CENTER);
  4.    
  5. UIPanel panel = new OverlayedPanel();
  6. panel.setLayout(panelLayout);
  7. panel.add(new UILabel("Firstname"), panelLayout.getConstraints(0, 0));
  8. panel.add(new UITextField("John"), panelLayout.getConstraints(1, 0));
  9. panel.add(new UILabel("Lastname"), panelLayout.getConstraints(2, 0));
  10. panel.add(new UITextField("Doe"), panelLayout.getConstraints(3, 0));
  11. panel.add(new UILabel("Street"), panelLayout.getConstraints(0, 1));
  12. panel.add(new UITextField("Old R. Road"), panelLayout.getConstraints(1, 1, 3, 1));
  13. panel.add(new UILabel("ZIP"), panelLayout.getConstraints(0, 2));
  14. panel.add(new UITextField("11946"), panelLayout.getConstraints(1, 2));
  15. panel.add(new UILabel("Place"), panelLayout.getConstraints(2, 2));
  16. panel.add(new UITextField("Hampton Bays"), panelLayout.getConstraints(3, 2));
  17.    
  18. parentContainer.add(panel, UIBorderLayout.CENTER);

Notice that we can use it is any other panel (line #5) and simply add it to the parent (line #18). For a user of the API it is transparent as to whether there are more components or not, this is also visible in the created component hierarchy:

         UI                   Technology
---------------------    ----------------------
 UIPanel                  Panel
   \-OverlayedPanel         \-Panel
       |-UILabel                |-Label
       |-UITextField                \-Panel
       |-UILabel                    |-Label
       |-UITextField                |-TextField
       |-UILabel                    |-Label
       |-UITextField                |-TextField
       |-UILabel                    |-Label
       |-UITextField                |-TextField
       |-UILabel                    |-Label
       \-UITextField                |-TextField
                                    |-Label
                                    \-TextField

This makes it very easy to have containers which add additional components without the actual GUI noticing or caring.

Conclusion

Because of the way the JVx framework is designed, it is easy to access all layers of the GUI framework and also facilitate the usage of these layers to create custom components and allow easy access to the wrapped components, no matter on what layer or of what kind they are.

JVx Reference, DataBooks

Let's talk about DataBooks, which allow access to data without any effort.

What is it?

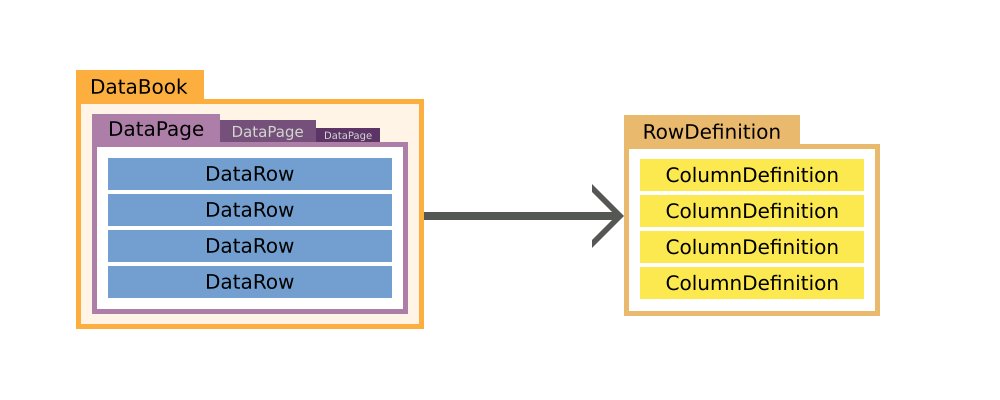
DataBooks are an active model, which allow you to directly query and manipulate the data. Contrary to many other systems JVx does not map the data into objects, but instead allows you to directly access it in a table like fashion, exposing columns, rows and values.

One could say that it is like a three dimensional array, with these dimensions:

  1. DataPages
  2. DataRows
  3. Columns/Values

With DataPages containing DataRows, which itself contain the values and everything is referencing the RowDefinition, which outlines how a row looks like.

DataBook Architecture

RowDefinition

The RowDefinition defines what columns are available in the row and stores some additional information about them, like the names of the primary key columns. You can think of the RowDefinition as the headers of a table.

Its creation and usage is rather simple, and if you're working with RemoteDataBooks there is no need to create one at all, as it is automatically created when the DataBook is opened. A RowDefinition holds and manages ColumnDefinitions, which define the columns.

RowDefinition rowDefinition = new RowDefinition();
rowDefinition.addColumnDefinition(columnDefinitionA);
rowDefinition.addColumnDefinition(columnDefinitionB);
rowDefinition.addColumnDefinition(columnDefinitionC);

dataBook.setRowDefinition(rowDefinition);

ColumnDefinition

The ColumnDefinition defines and provides all necessary information about the column, like its DataType, its size and if it is nullable or not. You can think of it as one column in a table.

ColumnDefinition columnDefinition = new ColumnDefinition("NAME", new StringDataType());
columnDefinition.setNullable(false);

MetaData

Most of the ColumnDefinition is additional information about the column, like if it is nullable, the label of the column, default values, allowed values and similar information.

DataType

Of course we must define what type the value in the column has, this is done by setting a DataType on the ColumnDefinition. The DataType defines what kind of values the column holds, like if it is a String, or a Number or something else. We do provide the widest used DataTypes out of the box:

  • BigDecimal
  • BinaryData
  • Boolean
  • Long
  • Object
  • String
  • Timestamp

It is possible to add new DataTypes by simply implementing IDataType.

DataRow

The DataRow repesents a single row of data, it holds/references its own RowDefinition and of course provides access to the values of the row. Accessing the DataRow can be done either by column index or column name, and the methods do either return or accept Objects. Let's look at a simple usage example:

DataRow dataRow = new MemDataRow(rowDefinition);

String value = (String)dataRow.getValue("COLUMN_A");

dataRow.setValue("COLUMN_A", "New Value");

DataPage

The DataPage is basically a list of DataRows, it also holds its own RowDefinition which is shared with all the contained DataRows.

The main usage of DataPages is to allow paging in a master/detail relationship. If the master selects a different row, the detail databook does select the related DataPage.

DataBook

The DataBook is the main model of JVx, it provides direct access to its current DataPage and DataRow by extending from IDataRow and IDataPage.

By default, the DataBook holds one DataPage and only has multiple DataPages if it is the detail in a master/detail relationship.

Usage example

Here is a simple usage example of a MemDataBook, an IDataBook implementation which does only operate in memory:

IDataBook dataBook = new MemDataBook();
dataBook.setName("test");
dataBook.getRowDefinition().addColumnDefinition(new ColumnDefinition("ID", new LongDataType()));
dataBook.getRowDefinition().addColumnDefinition(new ColumnDefinition("COLUMN_STRING", new StringDataType()));
dataBook.open();

dataBook.insert(false);
dataBook.setValue("ID", Long.valueof(0));
dataBook.setValue("COLUMN_STRING", "VALUE");

dataBook.insert(false);
dataBook.setValue("ID", Long.valueof(1));
dataBook.setValue("COLUMN_STRING", "VALUE_A");

dataBook.saveSelectedRow();

dataBook.setSelectedRow(0);

dataBook.setValue("COLUMN_STRING", "VALUE_NEW");

dataBook.saveSelectedRow();

dataBook.setSelectedRow(1);

dataBook.delete();

Accessing the data with Strings

One of the major advantages of the DataBook concept is that there is no need to create new classes to represent each table, view or query result. One can always use the DataBook, directly and easily and model changes don't necessitate changes on the client side. The downside to this approach is that we lose compile time checks because we access the data dynamically. However, This can be mitigated by using EPlug, an Eclipse plugin which provides compile time checks and many more features.

No primitives, Objects only

We do not provide overloads to fetch primitives, that is because there are mainly three types of data inside a database:

  1. Numbers
  2. Text
  3. Binary Data

Text and Binary Data are both objects (arrays of primitives are Objects after all) and Numbers are either primitives or Objects. Most of the time if we deal with numbers inside a database we want them to be of arbitrary precision, which means we must represent them as BigDecimal. Supporting double or float in these cases would be dangerously, because one might write a float into the database which might or might not end up with the correct value in the database. To completely eliminate such problems, we do only support Objects, which means that one is "limited" to the usage of Number extensions like BigLong and BigDecimal, which do not suffer from such problems.

Where are the DataPages?

What is not clear from this example is how and when DataPages are used. As a matter of fact, most of the time there is no need to think about DataPages because they are managed directly by the DataBook, and if used this like there is only one DataPage. Multiple DataPages will be used if there is a Master/Detail relationship defined in which case the DataBook does select the correct DataPage automatically.

Master/Detail

Master/Detail is something that occurs in nearly every data model. It means simply that there is one master dataset which is referenced by one or multiple detail datasets. Or to express it in SQL:

SELECT
  *
FROM
  MASTER m
  LEFT JOIN DETAIL d ON m.ID=d.MASTER_ID;

We can of course express a Master/Detail relationship when using DataBooks. For that we just create a ReferenceDefinition and assign it to the Detail DataBook:

IDataBook masterDataBook = new MemDataBook();
masterDataBook.setName("master");
masterDataBook.getRowDefinition().addColumnDefinition(new ColumnDefinition("ID", new LongDataType()));
masterDataBook.open();

IDataBook detailDataBook = new MemDataBook();
detailDataBook.setName("detail");
detailDataBook.getRowDefinition().addColumnDefinition(new ColumnDefinition("ID", new LongDataType()));
detailDataBook.getRowDefinition().addColumnDefinition(new ColumnDefinition("MASTER_ID", new LongDataType()));
detailDataBook.setReferenceDefinition(new ReferenceDefinition(new Streing[] {"MASTER_ID"}, masterDataBook, new String[] {"ID"});
detailDataBook.open();

Let's assume the following data for illustration purposes:

MASTER              DETAIL
======        =================
  ID            ID  | MASTER_ID
------        ------|----------
     1             1|         1
     2             2|         1
     3             3|         2
                   4|         2
                   5|         2
                   6|         3
                   7|         3
                   8|         3

Now if we select the second row in the masterDataBook, the detailDataBook will just contain the rows with the corresponding MASTER_ID, so 3, 4 and 5.

MASTER              DETAIL
======        =================
  ID            ID  | MASTER_ID
------        ------|----------
     1             3|         2
S    2             4|         2
     3             5|         2

The detailDataBook is automatically adjusted according to the selection in the masterDatabook. Of course this can have an arbitrary depth, too.

Conclusion

The DataBook is the backbone of JVx, it provides a clean and easy way to access and manipulate data. At the same time, it is flexible and can be customized to specific needs with ease.

JVx Reference, Application Basics

Let's talk about the basics, how a JVx application starts, works and how the connection strings together the client and server side.

Multitier Architecture

JVx is designed to be Multitier by default. It allows a clean and easy separation of processes and makes it easy to build, maintain and extend applications by separating the client, server and data storage.

Launchers

The following method is a simplified way to launch a JVx application. Normally, you'd use the technology specific launcher to launch the application. These launchers do know exactly what is required to set it up and start the technology and the application. However, covering the launchers is out of scope for this post, so we will review them and their mechanics in a follow-up.

The simplest JVx application: Just the GUI

But first, we will start without anything. The most simple application you can create with JVx is an application which does open a single window and only works with in memory data (if at all). This can be easily achieved by "just starting" the application.

The JVx GUI is a simple layer on top of the Technology which implements the actual functionality. So if we want to have a GUI we'll need to initialize the factory before doing anything else:

UIFactoryManager.getFactoryInstance(SwingFactory.class);

With this little code we have initialized everything we need to create a simple Swing application. Now we can start to create and populate a window with something:

UIFrame frame = new UIFrame();
frame.setLayout(new UIBorderLayout());
frame.addComponent(new UILabel("Hello World!"));

frame.pack();
frame.setVisible(true);

frame.eventWindowClosed().addListener(() -> System.exit(0));

We can start to create and manipulate the GUI, in this case we are building a simple window with a label inside. Last but not least, we make sure that the JVM will exit when the window is closed.

A very good example and showcase for that is the JVx Kitchensink.

That's it. That is the most simple way to start a JVx application. We can use all controls and we can use MemDataBooks without any problem or limitation. And best of all, we can simply switch to another Technology by using another factory.

Anatomy of a remote JVx application

Of course JVx wouldn't be that useful if it would just provide static GUI components. Now, to explain what else is required for a remote JVx application I have to go far afield, so let's head down the rabbit hole.
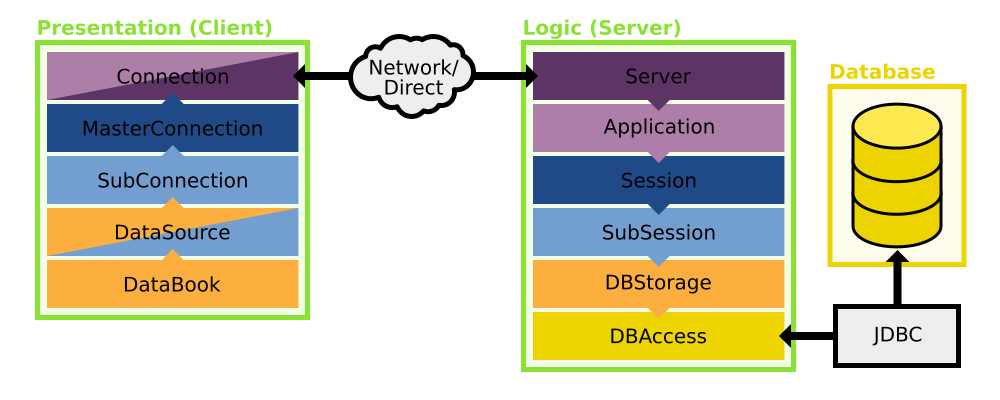
JVx Layers

What you are seeing here is a rough sketch of how the architecture of JVx looks like. Let's walk through the image step by step. We will look at each successive layer and work our way from the database on the server to the databook on the client.

DBAccess, accessing a database

Accessing a database is easy when using DBAccess. All we must do is to set the JDBC URL of the server and connect to it:

DBAccess dbAccess = DBAccess.getDBAccess(
           "jdbc:postgresql://server:5432/schema",
           "username",
           "password");
dbAccess.open();

As a note, the instance returned by getDBAccess is the database specific DBAccess extension, which does know how to handle its database.

We can of course use DBAccess to directly access the database:

dbAccess.executeStatement("insert into SOME_TABLE values (?, ?);",
        BigDecimal.valueOf(1),
        "Some Value");

List<Bean> data = dbAccess.executeQuery("select * from SOME_TABLE");

...or manipulate the database, or query information about the database or execute procedures or do anything else.

DBStorage, preparing the database access for databooks

The downside of using DBAccess is that everything must be database specific. To become database agnostic we must use DBStorage. DBStorage does not care which database it is connected to and can operate on any of them:

DBStorage storage = new DBStorage();
storage.setDBAccess(dbAccess);
storage.setWritebackTable("SOME_TABLE");
storage.open();

We can use this to insert, update, delete and fetch data. Additionally the DBStorage does retrieve and manage the metadata of the table we've set, which means that we can query all column names, what type they are, we can even access the indexes and the default values. Short, the DBStorage leaves little to be desired when it comes to operating on a database.

If we query data from the DBStorage we receive a List of rows. The rows are are either represented as Object array, IBean or a POJO and we can easily manipulate the data, like this:

for (IBean row : storage.fetchBean(null, null, 0, -1))
{
    row.put("SOME_COLUMN", "newvalue");
    storage.update(row);
}

As one can see, it looks quite familiar to the DataBook, which isn't a coincidence. The DBStorage "powers" the DataBooks on the server side, a DataBook will get its data from and will send its modified data to the DBStorage.

I've been using the DBStorage here as an example, but actually the Storage is not dependent on a database. IStorage can be implemented to provide any sort of data provider, like reading from an XML or JSON file, scraping data from a website, fetching data from a different process or reading it directly from a hardware sensor.

Life Cycle Objects, the business objects with all the logic

Life Cycle Objects, or LCOs, are the server side business objects which contain and provide the business logic. They are created and destroyed as is requested by the client-side and are used to provide specific functionality to the client, like providing functionality specific to one screen or workflow. This is done by RPC, Remote Procedure Calls, which means that the client is directly calling the methods defined in the LCOs, which includes getting the Storages for the DataBooks.

There is also a security aspect to these, as you can permit one client access to a certain LCO but lock out everyone else, which means that only that client can use the functionality provided by the LCO.

But let's not get ahead of our selves, there are three important "layers" of LCOs which we will look at.

Application

The LCO for the application represents the application itself and provides functionality on the application layer. It is created once for the lifetime of the application and this instance is shared by all sessions.

public class Application extends GenericBean
{
}
Session

The LCO for the session represents one session, which most of the time also equals one client connection. It provides functionality which should be session-local, like providing the database connection which can be used.

public class Session extends Application
{
    protected DBAccess getDBAccess() throws Exception
    {
        // Code for initialization and caching of DBAccess goes here.
    }
}
Sub-Session aka Screen

The sub-session, also known as screen, LCO is the last in the chain. It provides functionality specific to a certain part of the application, like a single screen, and provides the storages required to power the databooks and other functionality.

public class MySubSession extends Session
{
    public DBStorage getTablename() throws Exception
    {
        // Code for initialization and caching of DBStorage goes here.
    }
}

Server, serving it up

There really isn't much to say about the server, it accepts connections and hands out sessions. Of course it is not that easy, but for this guide we will not go into any further detail.

Connection, connecting to a server

The connection which strings together the client and the server is used for the communication between them, obviously. It can be anything, from a simple direct connection which strings two objects together to a HTTP connection which talks with a server on the other side of the planet.

By default we provide different IConnection implementations, the DirectServerConnection, DirectObjectConnection, the HttpConnection and the VMConnection. The DirectServerConnection is a simple IConnection implementation which does simply forward method calls to known Objects - without serialization - and is used when the client and server reside inside the same JVM. The HttpConnection communicates with the server over a HTTP connection and is used whenever the client and server are not inside the same JVM. The DirectObjectConnection and VMConnection are used for unit tests.

As example we will use the DirectServerConnection, which serves as Server and Connection. It is used if the server and client reside in the same JVM.

IConnection connection = new DirectServerConnection();
// The connection will be automatically opened by the MasterConnection.

Master- and SubConnections, client-side lifecycle management

The MasterConnection is the main connection which is used to access the server and its functionality. When a MasterConnection is established, a Session LCO on the server is created.

MasterConnection masterConnection = new MasterConnection(connection);
masterConnection.open();

A SubConnection is a sub connection of the MasterConnection and allows to access specific functionality encapsulated in an LCO. When a SubConnection is established, the requested/specified LCO on the server is created and can be accessed through the SubConnection.

SubConnection subConnection = masterConnection.createSubConnection("MySubSession");
subConnection.open();

The SubConnection can now access the functionality provided by the Application, the Session and the LCO which was specified.

subConnection.callAction("doSomethingOnTheServer");

DataSource, preparing the connection for the databook

To provide data to the databooks we can use the connection which we've described earlier. However, the DataBook does not directly know about the connection, it expects an IDataSource, which is used as an intermediate:

IDataSource dataSource = new RemoteDataSource(subConnection);
dataSource.open();

Of course the RemoteDataSource is just one possible implementation of IDataSource which can be used to provide data to the DataBook.

DataBook, accessing data

And now we are at the other end of the chain, at the databook on the client side. We just need to tell our databook what datasource to use, and we are done.

RemoteDataBook dataBook = new RemoteDataBook();
dataBook.setDataSource(dataSource);
dataBook.setName("storagename");
dataBook.open();

The name of the DataBook is used to access the DBStorage object in the LCO provided by the datasource. The mechanism for that is a simple search for a getter with the set name.

Interactive Demo

Here is an interactive demo which allows you to explore the connections between the client and server side. The complement classes are always highlighted and you can click on the names of the objects to receive additional information about them.

The JVx application: Manual example

Now that we have seen all layers that make up the architecture of JVx, let us put all of that into code:

public class JVxLocalMain
{
    public static void main(String[] pArgs) throws Throwable
    {
        // ############################## Server ##############################
       
        // ----------------------------- DBAccess -----------------------------
       
        // The DBAccess gives us access to the database.
        DBAccess dbAccess = DBAccess.getDBAccess(
                "jdbc:h2:mem:database",
                "",
                "");
        dbAccess.open();
       
        // We'll insert some data for this example.
        dbAccess.executeStatement("create table if not exists TEST("
                + "ID int primary key auto_increment,"
                + "NAME varchar(128) default '' not null);");
        dbAccess.executeStatement("insert into TEST values (1, 'Name A');");
        dbAccess.executeStatement("insert into TEST values (2, 'Name B');");
        dbAccess.executeStatement("insert into TEST values (3, 'Name C');");
       
        // ---------------------------- DBStorage -----------------------------
       
        // Our sole storage.
        DBStorage testStorage= new DBStorage();
        testStorage.setDBAccess(dbAccess);
        testStorage.setWritebackTable("TEST");
        testStorage.open();
       
        // -------------------- LCO / Session / Application -------------------
       
        // We are skipping the LCO, Session and Application in this example.
       
        // ####################### Network / Connection #######################
       
        // For this example we are initializing a DirectObjectConnection, which
        // does not require a server.
        // It is designed to be used mainly for unit testing.
        DirectObjectConnection connection = new DirectObjectConnection();
        connection.put("test", testStorage);
       
        // ############################## Client ##############################
       
        // ------------------------- MasterConnection -------------------------
       
        MasterConnection masterConnection = new MasterConnection(connection);
        masterConnection.open();
       
        // -------------------------- SubConnection ---------------------------
       
        // We are skipping the SubConnection in this example.
       
        // ---------------------------- DataSource ----------------------------
       
        IDataSource dataSource = new RemoteDataSource(masterConnection);
        dataSource.open();
       
        // ----------------------------- DataBook -----------------------------
       
        RemoteDataBook dataBook = new RemoteDataBook();
        dataBook.setDataSource(dataSource);
        dataBook.setName("test");
        dataBook.open();
       
        // You can use the DataBook here.
       
        // Perform cleanup of all opened objects here.
    }
}

With this little example we have a completely working JVx application. We provide ways to create most of this out of the box and read most of it from configuration files, so there really is just little code to be written, see the JVx FirstApp as a perfect example for that. So there is rarely any need to write code like this, all you have to do is create a new application and start it.

Additionally, we could combine this long example with the simple one from before to initialize and create a GUI which could use our RemoteDataBook, like this:

// Insert after the RemoteDataBook has been created.

// Set the UI factory which should be used, in this case it is
// the SwingFactory.
UIFactoryManager.getFactoryInstance(SwingFactory.class);

UIFrame frame = new UIFrame();
frame.setLayout(new UIBorderLayout());
frame.add(new UITable(dataBook));

frame.pack();
frame.setVisible(true);

frame.eventWindowClosed().addListener(() -> System.exit(0));

Abstractions on every step

As you can see, you always have full control over the framework and can always tailor it to your needs. There is always the possibility to provide a custom implementation to fulfill your needs:

  1. Accessing a not supported database can be achieved by extending DBAccess
  2. Having a different service/way of providing data can be implemented on top of IStorage
  3. Supporting a different connection can be implemented on top of IConnection
  4. And a completely different way of providing data can be implemented on top of IDataSource

You can swap out every layer and provide custom and customized implementations which exactly work as you require it.

Just like that

Just like that we've walked through the whole stack of a JVx application, from the database which holds the data all the way to the client GUI. Of course there is much more going on in a full-blown JVx application, for example I've spared you here the details of the configuration, server, network and providing actual LCOs and similar. But all in all, this should get you going.

JVx Reference, Custom Components

Let's talk about custom components, and how to create them.

The GUI of JVx

We've previously covered how the GUI of JVx works, and now we will have a look on how we can add custom components to the GUI.

In the terminology of JVx there are two different kinds of custom components:

  1. UI based
  2. Technology based

We will look at both, of course.

Custom components at the UI layer

The simplest way to create custom components is to extend and use already existing UI classes, like UIPanel or UIComponent. These custom components will be Technology independent because they use Technology independent components, there is no need to know about the underlying Technology. You can think of those as a "remix" of already existing components.

The upside is that you never have to deal with the underlying Technology, the downside is that you can only use already existing components (custom drawing is not possible, for example).

Let's look at a very simple example, we will extend the UILabel to always display a certain postfix along with the set text:

public class PostfixedLabel extends UILabel
{
    private String postfix = null;

    // We must store the original text so that we can return
    // it if requested. Otherwise we could only return the text
    // with the appended postfix, which works unless the postfix
    // changes.
    private String text = null;

    public PostfixedLabel()
    {
        super();
    }

    public PostfixedLabel(String pText)
    {
        super(pText);
    }

    public PostfixedLabel(String pText, String pPostfix)
    {
        super(pText);

        setPostfix(pPostfix);
    }

    @Override
    public String getText()
    {
        return text;
    }

    @Override
    public void setText(String pText)
    {
        text = pText;

        if (!StringUtil.isEmpty(postfix) &amp;&amp; !StringUtil.isEmpty(pText))
        {
            // We translate the text and the postfix now separately,
            // the underlying label will obviously try to translate
            // the concatenated version.
            super.setText(translate(pText) + translate(postfix));
        }
        else
        {
            super.setText(pText);
        }
    }

    public String getPostfix()
    {
        return postfix;
    }

    public void setPostfix(String pPostfix)
    {
        postfix = pPostfix;

        // If the postfix changed, we must update the text.
        setText(text);
    }
}

It will be treated just like another label, but every time a text is set, the postfix is appended to it.

Another example, we want a special type of component, one that always does the same but will be used in many different areas of the application, it should contain a label and two buttons. The best approach for a custom component which should not inherit any specific behavior is to extend UIComponent:

public class BeepComponent extends UIComponent
{
   public BeepComponent()
   {
       super(new UIPanel());
       
       UIButton highBeepButton = new UIButton("High Beep");
       highBeepButton.eventAction().addListener(Beeper::playHighBeep);
       
       UIButton lowBeepButton = new UIButton("Low Beep");
       highBeepButton.eventAction().addListener(Beeper::playLowBeep);
       
       UIFormLayout layout = new UIFormLayout();        

       uiResource.setLayout(layout);
       uiResource.add(new UILabel("Press for beeping..."), layout.getConstraints(0, 0, -1, 0));
       uiResource.add(highBeepButton, layout.getConstraints(0, 1));
       uiResource.add(lowBeepButton, layout.getConstraints(1, 1));
   }
}

So we extend UIComponent and set a new UIPanel as UIResource on it, which we can use later and which is the base for our new component. After that we added a label and two buttons which will play beep sounds if pressed. This component does not expose any specific behavior as it extends UIComponent, it only inherits the most basic properties, like background color and font settings, yet it can easily be placed anywhere in the application and will perform its duty.

Custom controls at the Technology layer

The more complex option is to create a custom component at the Technology layer. That means that we have to go through a multiple steps process to create and use the component:

  1. Create an interface for the functionality you'd like to expose
  2. Extend the Technology component (if needed)
  3. Implement the necessary interfaces for JVx
  4. Extend the factory to return the new component
  5. Create a UIComponent for the new component
  6. Use the new factory

I will walk you through this process, step by step.

The upside is that we can use any component which is available to us in the Technology, the downside is that it is quite some work to build the correct chain, ideally for every technology.

Creating an interface

The first step is to think about what functionality the component should expose, we will use a progress bar as example. We don't want anything fancy for now, a simple progress bar on which we set a percent value should be more than enough:

/**
 * The platform and technology independent definition for a progress bar.
 */

public interface IProgressBar extends IComponent
{
    /**
     * Gets the current value, in percent.
     *
     * @return the current value. Should be between {@code 0} and {@code 100}.
     */

    public int getValue();
   
    /**
     * Sets the current value, in percent.
     *
     * @param pValue the value. Should be between {@code 0} and {@code 100}.
     */

    public void setValue(int pValue);
}

Might not be the most sophisticated example (especially in regards to documentation) but it will do for now. This interface will be the foundation for our custom component.

Extending the component, if needed

We will be using Swing and the JProgressBar for this example, so the next step is to check if we must add additional functionality to the Technology component. In our case we don't, as we do not demand any behavior that is not provided by JProgressBar, but for the sake of the tutorial we will still create an extension on top of JProgressBar anyway.

public class ExtendedProgressBar extends JProgressBar
{
    public ExtendedProgressBar(int pMin, int pMax)
    {
        super(pMin, pMax);
    }
}

Within this class we could now implement additional behavior independent of JVx. For example, we provide many extended components for Swing, JavaFX and Vaadin with additional features but without depending on JVx. The extension layer is the perfect place to extend already existing components with functionality which will be used by, but is not depending on, JVx.

Creating the Implementation

The next step is to create an Implementation class which allows us to bind our newly extended JProgressBar to the JVx interfaces. Luckily there is the complete Swing Implementation infrastructure which we can use:

public class SwingProgressBar<ExtendedProgressBar> extends SwingComponent
                              implements IProgressBar
{
    public SwingProgressBar()
    {
        // We can hardcode the min and max values here, because
        // we do not support anything else.
        super(new ExtendedProgressBar(0, 100));
    }
   
    @Override
    public int getValue()
    {
        return resource.getValue();
    }
   
    @Override
    public void setValue(int pValue)
    {
        resource.setValue(pValue);
    }
}

That's it already. Again, in this case it is quite simple because we do not expect a lot of behavior. The implementation layer is the place to "glue" the component to the JVx interface, implementing missing functionality which is depending on JVx and "translating" and forwarding values and properties.

Extending the factory

Now we must extend the Factory to be aware of our new custom component, that is equally simple as our previous steps. First we extend the interface:

public interface IProgressBarFactory extends IFactory
{
    public IProgressBar createProgressBar();
}

And afterwards we extend the SwingFactory:

public class ProgressBarSwingFactory extends SwingFactory
                                     implements IProgressBarFactory
{
    @Override
    public IProgressBar createProgressBar()
    {
        SwingProgressBar progressBar = new SwingProgressBar();
        progressBar.setFactory(this);
        return progressBar;
    }
}

Again, it is that easy.

Creating the UIComponent

So that we can use our new and shiny progress bar easily, and without having to call the factory directly, we wrap it one last time in a new UIComponent:

public class UIProgressBar<IProgressBar> extends UIComponent
                           implements IProgressBar
{
    public UIProgressBar()
    {
        // We'll assume that, whoever uses this component,
        // is also using the correct factory.
        super(((IProgressBarFactory)UIFactoryManager.getFactory()).createProgressBar());
    }
   
    @Override
    public int getValue()
    {
        return uiResource.getValue();
    }
   
    @Override
    public void setValue(int pValue)
    {
        uiResource.setValue(pValue);
    }
}

Nearly done, we can nearly use our new and shiny component in our project.

Using thecustom factory

Of course we have to tell JVx that we want to use our factory, and not the default one. Depending on the technology which is used, this has to be done at different places:

Swing and JavaFX

Add the factory setting to the application.xml of the application:

<Launcher.uifactory>your.package.with.custom.components.SwingProgressBarFactory</Launcher.uifactory>
Vaadin

Add the following setting to the web.xml under the WebUI Servlet configuration:

<init-param>
    <param-name>Launcher.uifactory</param-name>
    <param-value>your.package.with.custom.components.VaadinProgressBarFactory</param-value>
</init-param>

Using our new component

And now we are done, from here we can use our custom component like any other.

UIProgressBar progressBar = new UIProgressBar();
progressBar.setValue(65);

// Skip

add(progressBar, constraints);

Wrapping custom components with UICustomComponent

There is a third way to have Technology dependent custom components in JVx, you can wrap them within a UICustomComponent:

JProgressBar progressBar = new JProgressBar(0, 100);
progressBar.setValue(100);

UICustomComponent customProgressBar = new UICustomComponent(progressBar);

// Skip

add(customProgressBar, constraints);

This has the upside of being fast and easy, but the downside is that your code has to know about the currently used Technology and is not easily portable anymore.

Conclusion

As you can see, there are multiple ways of extending the default set of components which are provided by JVx, depending on the use case and what custom components are required. It is very easy to extend JVx with all the components one does require.

JVx Reference, of Technologies and Factories

Let's talk about the UI layer, the implementations and the factory that powers it all.

The basics

For everyone who does not know, JVx allows you to write code once and run it on different GUI frameworks, without changing your code. This is achieved by hiding the concrete GUI implementations behind our own classes, the UI classes, and providing "bindings" for different GUI frameworks behind the scenes. Such a "Single Sourcing" approach has many advantages, and just one of them is that migrating to a new GUI framework requires only the change of a single line, the one which controls which factory is created.

The Factory Pattern

The Factory Pattern is an important pattern in Object-Oriented-Programming, it empowers us to delegate the creation of Objects to another Object which must not be known at design and/or compile time. That allows us to use Objects which have not been created by us but merely "provided" to us by an, for us unknown, implementation.

Like an onion

JVx is separated into different layers, with the UI layer being at the top and of the most concern to users.

JVx Layers

Technology

Obviously, the first one in the chain is the so called "technology" layer. It represents the UI technology, for example Swing, JavaFX or Vaadin, which is used to power the JVx application.

To put it into a more simple term:

public class JButton {}

Extension

Next comes the extension layer, components from the technology are extended to support needed features of JVx. This includes creating bindings for the databook, additional style options and changing of behavior if necessary. From time to time this also includes creating components from scratch if the provided ones do not meet the needs or there simply are none with the required functionality. For the most part, we do our best that these layers can be used without JVx, meaning that they represent a solitary extension to the technology. A very good example is our JavaFX implementation, which compiles into two separate jars, the first being the complete JVx/JavaFX stack, the second being stand-alone JavaFX extensions which can be used in any application and without JVx.

Theoretically one can skip this layer and directly jump to the Implementation layer, but so far it has proven necessary (for cleanliness of the code and object structure and sanity reasons) to create a separate extension layer.

public class JExtendedButton extends JButton {}

Implementation

After that comes the implementation layer. The extended components are extended to implement JVx interfaces. This is some sort of "glue" layer, it binds the technology or extended components against the interfaces which are provided by JVx.

public class SwingButton implements IButton {}

UI

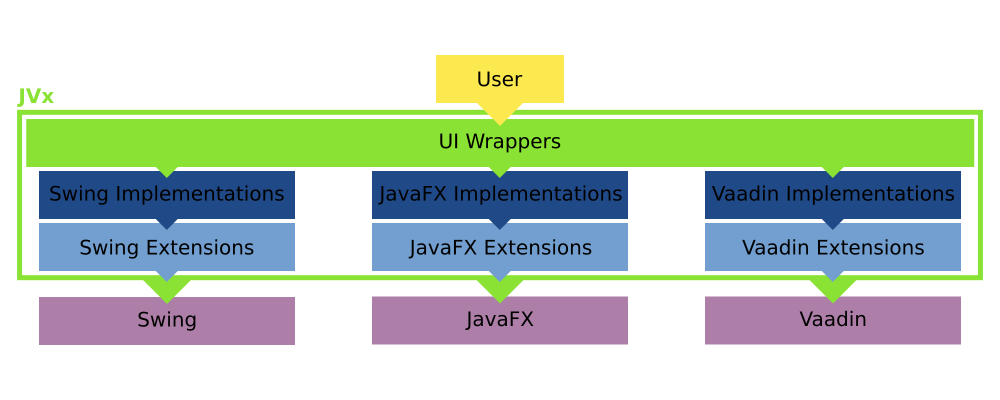
Last but for sure not least is the UI layer, which wraps the implementations. It is completely Implementation independent, that means that one can swap out the stack underneath:

JVx Layers

This is achieved because the UI layer is not extending the Implementation layer, but wrapping instances provided by the factory. It is oblivious to what Technology is actually underneath it.

public class UIButton implements IButton {}

SwingButton resource = SwingFactory.createButton()

Why is the UI layer necessary?

It isn't, not at all. The Implementations could be used directly without any problems, but having yet another layer has two key benefits:

  1. It allows easier usage.
  2. It allows to add Technology independent features.

By wrapping it one more time we gain a lot of freedom which we would not have otherwise, when it comes to features as when it comes to coding. The user does not need to call the factory directly and instead just needs to create a new object:

IButton button = new UIButton();

Internally, of course, the Factory is called and an implementation instance is created, but that is an implementation detail. If we would use the implementation layer directly, our code would either need to know about the implementations, which doesn't follow the Single-Sourcing principle:

IButton button = new SwingButton();

It also would be possible to directly use the factory (but this isn't modern coding style):

IButton button = UIFactoryManager.getFactory().createButton();

Both can be avoided by using another layer which does the factory calls for us:

public class UIButton implements IButton
{
    private IButton resource;

    public UIButton()
    {
        resource = UIFactoryManager.getFactory().createButton();
    }

    public void someInterfaceMethod()
    {
        resource.someInterfaceMethod();
    }
}

Additionally this layer allows us to implement features which can be technology independent, our naming scheme, which we created during stress testing of an Vaadin application, is a very good example of that. The names of the components are derived in the UI layer without any knowledge of the underlying Technology or Implementation.

Also it does provide us (and everyone else of course) with a layer which allows to rapidly and easily build compound components out of already existing ones, like this:

public class LabeledButton extends UIPanel
{
    private IButton button = null;
    private ILabel label = null;
   
    public LabeledButton ()
    {
        super();

        initializeUI();
    }

    private void initializeUI()
    {
        button = new UIButton();
        label = new UILabel();
       
        setLayout(new UIBorderLayout());
        add(label, UIBorderLayout.LEFT);
        add(button, UIBorderLayout.CENTER);
    }
}

Of course that is not even close to sophisticated, or a good example for that matter. But it shows that one can build new components out of already existing ones without having to deal with the Technology or Implementation at all, creating truly cross-technology controls.

The Factory

The heart piece of the UI layer is the Factory, which is creating the Implemented classes. It's a rather simple system, a Singleton which is set at the beginning to the Technology specific factory which can be retrieved later:

// At the start of the application.
UIFactoryManager.setFactoryInstance(new SwingFactory());
// Or alternately:
UIFactory.getFactoryInstance(SwingFactory.class());

// Later inside the UI wrappers.
IButton button = UIFactory.getFactory().createButton();

The complexity of the implementation of the factory is technology dependent, but for the most part it is devoid of any logic:

public class SwingFactory implements IFactory
{
    @Override
    public IButton createButton()
    {
        SwingButton button = new SwingButton();
        button.setFactory(this);

        return button;
    }
}

It "just returns new objects" from the implementation layer. That's about it when it comes to the factory, it is as simple as that.

Piecing it together

With all this in mind, we know now that JVx has swappable implementations underneath its UI layer for each technology it utilizes:

JVx Layers

Changing between them can be as easy as setting a different factory. I say "can", because that is only true for Swing, JavaFX and similar technologies, Vaadin, obviously, requires some more setup work. I mean, theoretically one could embed a complete application server and launch it when the factory for Vaadin is created, allowing the application to be basically stand-alone and be started as easily as a Swing application. That is possible.

What else?

That is how JVx works in regards to the UI layer. It depends on "technology specific stacks" which can be swapped out and implemented for pretty much every GUI framework out there. We currently provide support for Swing, JavaFX and Vaadin, but we also had implementations for GWT and Qt. Additionally we do support a "headless" implementation which allows to use lightweight objects which might be serialized and send over the wire without much effort.

Adding a new Technology

Adding support for a new Technology is as straightforward as one can imagine, simply creating the Extensions/Implementations layers and implementing the factory for that Technology. Giving a complete manual would be out for scope for this post, but the most simple approach to adding a new stack to JVx is to start with stubbing out the IFactory and implementing IWindow. Once that one window shows up, it's just implementing one interface after another in a quite straightforward manner. And in the end, your application can switch to yet another GUI framework without the need to change your code.

JVx Reference, Events

Let's talk about events and event handling in JVx.

What are events...

Events are an important mechanism no matter to what programming language or framework you turn to. It allows us to react on certain actions and "defer" actions until something triggered them. Such triggers can be anything, like a certain condition is hit in another thread, the user clicked a button or another action has finally finished. Long story short, you get notified that something happened, and that you can now do something.

...and why do I need to handle them?

Well, you can't skip events, they are a cornerstone of JVx. Theoretically, you could use JVx without using any of its events, but you would not only miss out on a lot of functionality but also be unable to do anything useful. But don't worry, understanding the event system is easy, using it even easier.

Terminology

For JVx the following terminology applies: An event is a property of an object, you can register listeners on that event which will get invoked if the event is dispatched (fired). Every event consists of the EventHandler class which allows to register, remove and manage the listeners and also dispatches the events, meaning invoking the listeners and notifying them that the event occurred. There is no single underlying listener interface.

Within the JVx framework, every event-property of an object does start with the prefix "event" to make it easily searchable and identifiable. But enough dry talk, let's get started.

Attaching listeners as class

The easiest way to get notified of events is to attach a class (which is implementing the listener interface) to an event as listener, like this:

public class MainFrame extends UIFrame
{
    public MainFrame()
    {
        super();
       
        UIButton button = new UIButton("Click me!");
        button.eventAction().addListener(new ActionListener());
       
        setLayout(new UIBorderLayout());
        add(button, UIBorderLayout.CENTER);
    }
}

private static final class ActionListener implements IActionListener
{
    public void action(UIActionEvent pActionEvent) throws Throwable
    {
        System.out.println("Button clicked!");
    }
}

Attaching listeners as inlined class

Of course we can inline this listener class:

public class MainFrame extends UIFrame
{
    public MainFrame()
    {
        super();
       
        UIButton button = new UIButton("Click me!");
        button.eventAction().addListener(new IActionListener()
        {
            public void action(UIActionEvent pActionEvent) throws Throwable
            {
                System.out.println("Button clicked!");
            }
        });
       
        setLayout(new UIBorderLayout());
        add(button, UIBorderLayout.CENTER);
    }
}

Attaching listeners JVx style

So far, so normal. But in JVx we have support to attach listeners based on reflection, like this:

public class MainFrame extends UIFrame
{
    public MainFrame()
    {
        super();
       
        UIButton button = new UIButton("Click me!");
        button.eventAction().addListener(this, "doButtonClick");
       
        setLayout(new UIBorderLayout());
        add(button, UIBorderLayout.CENTER);
    }
   
    public void doButtonClick(UIActionEvent pActionEvent) throws Throwable
    {
        System.out.println("Button clicked");
    }
}

What is happening here is that, internally, a listener is created which references the given object and the named method. This allows to easily add and remove listeners from events and keeping the classes clean by allowing to have all related event listeners in one place and without additional class definitions.

Attaching listeners as lambdas

Yet there is more, we can of course attach lambdas to the events as listeners, too:

public class MainFrame extends UIFrame
{
    public MainFrame()
    {
        super();
       
        UIButton button = new UIButton("Click me!");
        button.eventAction().addListener((pActionEvent) -> System.out.println("Button clicked"));
       
        setLayout(new UIBorderLayout());
        add(button, UIBorderLayout.CENTER);
    }
}

Attaching listeners as method references

And last but not least, thanks to the new capabilities of Java 1.8, we can also use method references:

public class MainFrame extends UIFrame
{
    public MainFrame()
    {
        super();
       
        UIButton button = new UIButton("Click me!");
        button.eventAction().addListener(this::doButtonClick);
       
        setLayout(new UIBorderLayout());
        add(button, UIBorderLayout.CENTER);
    }
   
    private void doButtonClick(UIActionEvent pActionEvent) throws Throwable
    {
        System.out.println("Button clicked");
    }
}

Parameters or no parameters? To throw or not to throw?

By default we actually support two different classes of listeners, the specified event/listener interface itself, and (javax.rad.util.)IRunnable. Which means that you can also attach methods which do not have any parameters, like this:

public class MainFrame extends UIFrame
{
    public MainFrame()
    {
        super();
       
        UIButton button = new UIButton("Click me!");
        button.eventAction().addListener(this::doButtonClickNoParameters);
        button.eventAction().addListener(this::doButtonClickWithParameters);
       
        setLayout(new UIBorderLayout());
        add(button, UIBorderLayout.CENTER);
    }
   
    private void doButtonClickNoParameters() throws Throwable
    {
        System.out.println("Button clicked");
    }

    private void doButtonClickWithParameters(UIActionEvent pActionEvent) throws Throwable
    {
        System.out.println("Button clicked");
    }
}

Additionally, all listeners and IRunnable itself do support to throw Throwable, which is then handled inside the EventHandler. So you are very flexible when it comes to what methods you can attach and use as listeners.

Creating your own events

You can, of course, create your own EventHandlers and listeners to create your own events. All you need are two classes, an extension of EventHandler and a listener interface.

public class CustomEvent extends EventHandler
{
    public CustomEvent()
    {
        super(ICustomListener.class);
    }
}

public interface ICustomListener
{
    public void somethingHappened(String pName);
}

And that's it, from here on you can use it:

CustomEvent event = new CustomEvent();
event.addListener((pName) -> System.out.println(pName + " 1"));
event.addListener((pName) -> System.out.println(pName + " 2"));
event.addListener((pName) -> System.out.println(pName + " 3"));

event.dispatchEvent("Adam");

More methods!

You can also use an interface for listeners which has multiple methods, specifying in the constructor which method to invoke:

public class CustomEvent extends EventHandler
{
    public CustomEvent()
    {
        super(ICustomListener.class, "somethingOtherHappened");
    }
}

public interface ICustomListener
{
    public void somethingHappened(String pName);
    public void somethingOtherHappened(String pName, BigDecimal pValue);
    public void nothingHappened();
}

Now every time the event is dispatched, the somethingOtherHappened method will be invoked. Anyway, don't use this. The upside of having a "simple" listener interface with just one method (SAM-type) is that it allows to use lambdas with it. A listener interface with multiple methods won't allow this.

In JVx we reduced our listener interfaces to just one method (in a backward compatible way) to make sure all events can be used with lambdas.

Fire away!

That's it for this short reference sheet, that is how our event system can and should be used. Of course, there is much more to it under the hood, for example listeners being wrapped in proxy classes, reflection used for invoking methods and some more stuff. If you feel adventurous, be my guest and have a good look at the internals of EventHandler, it is quite an interesting read.