This website uses cookies for visitor traffic analysis. By using the website, you agree with storing the cookies on your computer.More information

VisionX update release 2.2.135

The current update release of VisionX 2.2.135 is available for our customers or as trial. It's a smaller update release with two important new features:

  • Vaadin 7.4.2

    We've bundled vaadin 7.4 with our application and you can use all available features of vaadin 7.4. We currently don't use new Grid component of vaadin 7.4 because it's not implemented in our vaadin UI. We'll replace the Table with Grid as soon as possible.

  • Corporation view

    This awesome view is now available out-of-the-box. Simply enable the design via web application settings screen.

The rest are fixes for smaller bugs:

  • Support for username/password in Oracle JDBC Url
  • protected access instead of public, for DBAccess
  • Support all web setting in live preview (corporation design, navigation, mobile)
  • Support for loading resources form public content area
  • Don't delete unknown events from source file
  • Designer update for better free-form layouts

Have fun with VisionX 2.2.135.

One year SIB Visions, a look back and ahead

It's now been a year since I joined SIB Visions, I guess that's a good time to take a short break and look at everything that has happened so far.

Know the framework

The first day at SIB Visions was filled with getting familiar with the JVx application framework, including a crash course through the complete architecture of it. I have to be honest here and say that I have maybe understood half of what I was told, but it was an awesome and extremely useful overview over the framework.

Right after that I made myself roughly familiar with the framework by looking through the code, I got assigned my first tickets, simple feature requests and bugs, easy enough to do. The next weeks I read through quite many areas of the codebase and learned to navigate through it. Nothing too exciting.

FMB Importer - Oracle Forms to JVx

The first really big task I was assigned to was writing an FMB importer from scratch. In case you don't not know what FMB is, it is the file format used by Oracle Forms Builder to save the created forms. It basically comes in two flavors, binary and XML. The goal was to be able to import a form created with Oracle Forms Builder directly into VisionX, preserving as much information as possible and making the migration of the GUI as seamless as possible.

Reading the XML file is easy, processing its content not so much. The concepts of JVx UI and Oracle Forms UI are quite different. In JVx the controls are forming a tree structure/hierarchy, with the inheritance dictating the size and location of a control. Oracle Forms uses a coordinate approach, with each control knowing its exact coordinates and size on the form. This can be clearly seen in the following picture:

JVx/Swing and Forms hierarchy comparison

On the left is the JVx control tree (Swing), on the right the Summit example in Oracle Forms Builder, the XML format looks quite the same as the view in the designer. After some trial and error, I decided to take a two step approach to converting this structure:

  1. Convert the XML nodes into custom objects and place them in a tree structure.
  2. Convert the custom objects to JVx classes and perform the layouting in this step.

Step 1 starts rather easy, I encapsulated the XML nodes in a custom class to have a thin interface over them, that allowed me to be able to provide support methods and yet still have all the information of the XML node easily accessible. The tricky part becomes the creation of the tree structure and the conversion to the custom objects, because the controls of the form do not have any sort of structure and are split in two groups, graphical elements (lines, circles, etc.) and controls (text fields, radio button, etc.). The best working solution I found was to create a processor object that does know everything necessary to create the custom objects and also builds the tree structure. That processor starts with the window and finds all canvases that can be on that window, then it finds all controls and graphics that can be on these canvases. From there it recurses through all controls and graphical elements, always finding the children of the current one by checking their coordinates and size. Extremely simplified it looks like this:

function Container createContainer(Object parent)
    current = new Container

    foreach child on canvas
        if child is inside parent then
            if child is container then
                current.add(createContainer(child))
            else
                current.add(child)

    return current

"Extremely simplified" might be an understatement, because there are a lot of edge cases that need to be taken into account and you can't treat all elements the same, but basically that's the core principle of the processor. If you also go with naming your functions after what they are doing, don't be surprised if you end up with a function named transformItemNodesOnCanvasOnTabPageInBoundary. In the same step as the creation of the tree is the creation of a custom object hierarchy. I decided against converting them directly into JVx classes, because that would add a lot of logic to the processor and would mix two tasks, creating the tree structure and converting the objects.

Now that we have a nice tree of objects, converting them to JVx classes is easy. Ideally all custom objects that were created in the previous step would inherit from one base, and that base ideally would have a method like toJVxComponent(). With that in place converting the custom objects becomes only a matter of calling root.toJVxComponent() after the tree was generated. Again, the second part of this step is what gets you, the layouting. A lot of trial and error went into this one and while Oracle Forms does only support one layout, coordinates, JVx has multiple:

  • Pane
  • SplitPane
  • BorderPane
  • FormPane

So we need some form of heuristic approach to determine what layout we will be using for each container based on:

  • The number of children.
  • The position and size of these children.

Again, very simplified the approach might look like this:

function Layout determineLayout(Container container)
    if container.#children == 0 then
        return null
    else if container.#children == 1 then
        return container.firstChildren
    else if container.#children == 2 then
        return SplitPane
    else
        return FormPane

Again, this misses quite a few edge cases and optimizations. But now the really hard part is missing, how do we convert a coordinate base layout to a FormPane layout?

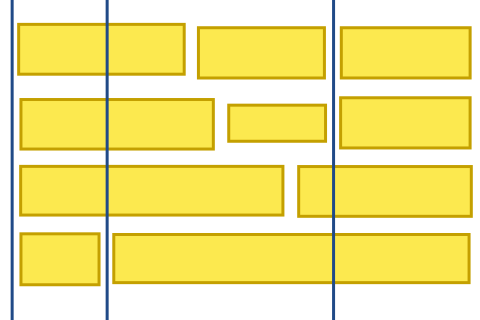
I tried many multiple methods but ended up using a Sweep line algorithm. The basic idea is to have a line sweep from left to right/top to bottom and creating anchors on the go as necessary.  We'll sweep from left to right, for example, and create a new anchor everytime we encounter the start of a new element and and element has ended before. Assume the following layout:

Layout

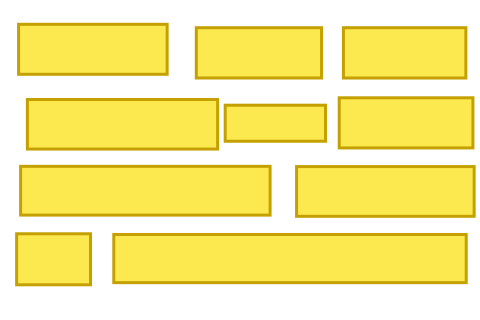
We'll sweep from left to right, create anchors and stretch all components to their respective anchors:

Second step, create anchors.

Secodn Step, stretch

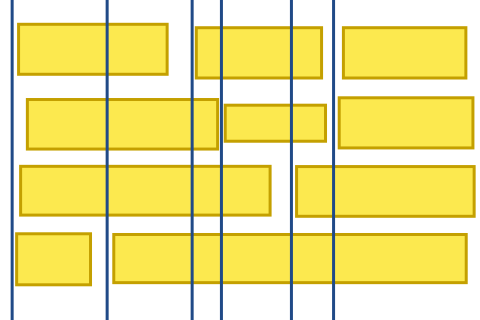
Even though the layout looks quite nice already, there are two problems here. First, the second/third and fourth/fifth anchors are empty, they do not contain a component ("contain" as in a component that does start and end in that anchor). So we can eliminate all anchors that do not contain a component.

Third step, eliminate empty anchors.

Third step, stretch

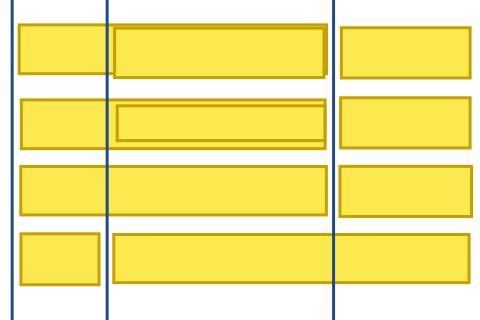
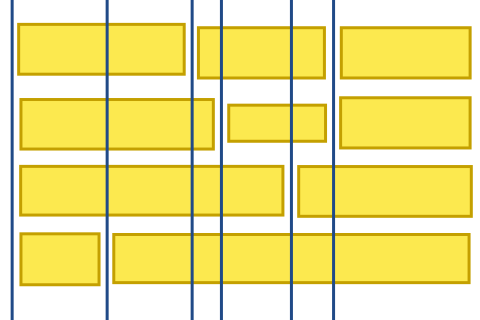
The second problem are the overlapping components in the middle. We can easily fix that by pushing the components around.

Fourth step, overlapping elimination

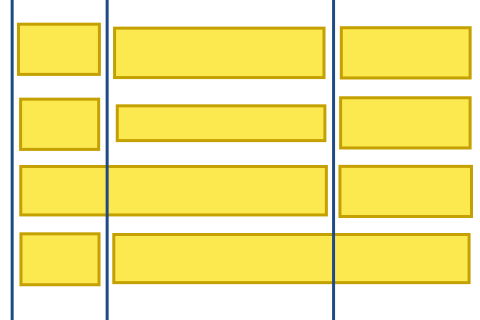
All that is missing now is to two a second pass from top to bottom. So we now have everything in place to import the UI. Of course there are still some parts missing, like data binding and wiring up events. But that wraps up the approach to importing FMB files.

EPlug - JVx Eclipse Plugin

I enjoyed working on the plugin very much. The Eclipse environment was a completely new system to work with and I had never before written a plugin for a development environment. After the basic functionality was determined, I set to work and made myself familiar with Eclipse. As it turns out, the Eclipse plugin system is quite huge, but once you know the basics it is very easy to use. Every plugin consists of a simple "core" of files:

  • plugin.xml
  • Manifest.mf
  • Activator

The plugin.xml contains all the needed information for the Eclipse runtime to load and run the plugin. Also this is where you register all the extensions you want either to use or provide. The Manifest.mf contains some additional information and the Activator is the main lifecycle class for the plugin. Registering extensions is as easy as implementing the interface required by the extension point and then adding your implementation to the list of the extension point. Your class will be automatically instantiated and used from the class it is registered at.

The first big obstacle was implementing auto completion for various code parts, for example our listeners. As it turned out JDT (Java Development Tools) does only have limited support for it. If you use their parser, you can only have complete lines, it was not possible to get incomplete statements. So we had to rely on internal classes provided by the "JavaCompletionProposalComputer" and the "JavaContentAssistInvocationContext" which also allowed us to get the information needed for incomplete statements.

The other big part of the plugin is launching an application in a container, that allows to extract information about it (like lifecycle objects, server metadata, etc.). That part is quite big and complicated, so let me shortly outline the approach for it:

  • Create a new Server.
  • Gather all necessary dependencies for the application.
  • Create a ClassLoader that contains all these dependencies and inject it into the ObjectProvider of the server.
  • Create yourself a new session.

Obviously this is only a rough outline, for example there's the security manager. We took the approach to change the configuration of the application on the fly and inject our own security manager that way, which obviously allowed us to do everything within the application. Also our session is a custom implementation that can never expire.

From there it is only a small step to receiving metadata and other information needed to provide auto completion and compile time errors. Speaking of compile time errors, implementing those was as easy as eating a cake. The only two things needed are to register a build watcher, which will be notified of every file that is touched by the build process, and to run the file you want through the parser to receive the AST. Walking the AST is thanks to the visitor pattern very easy and you can quickly select only those parts of the AST that you're interested in.

One of the biggest features we can offer is auto completion and compile time support of DataBook columns. From a technical point of view, the support for RemoteDataBooks is kinda boring, we simply query the server for the metadata. However the support for MemDataBooks was a challenge. Because of the very nature of MemDataBooks, there only were two options to receive the needed MetaData:

  1. Run the code and extract the needed information.
  2. Parse the code/AST.

The first possibility got axed extremely quickly, as it would be too hard, if not impossible to do it in a sane manner. So we ended up with parsing the code/AST directly for any information about the MemDataBook which we tried to provide support for. This is a tedious work, as you basically have to consider all the permutations of creating a MemDataBook and everything related with it, for example the following code:

IDataBook dataBook = new MemDataBook();
dataBook.getRowDefinition().addColumnDefinition(new ColumnDefinition("COLUMN"));
dataBook.setName("NAME");
dataBook.open();

If we now need to get the metadata for this MemDataBook, it would be roughly the following steps:

  • Find the variable that contains the MemDataBook.
  • Find the declaration or last assignment of that variable.
  • Find all usages of that variables.
  • Get all values from the .getRowDefinition().addColumnDefinition calls.

This is quite some work and that does not take into account that the row definition might be put into a variable, or might be provided by a different variable altogether. In the end, it comes down to implementing all the edge cases that you run across, and I think we did that very well.

Also we had to create a few GUI forms with SWT and I have to say that it is very good.

I'm looking forward to return to this project for the 1.2 release and implementing even more awesome features and doing some refactoring on the components I did not quite get right the first time.

GUI Tests - Stress testing Vaadin and automating JVx applications

I was looking forward to this research project. I was always fascinated with the idea to have GUI unit tests, now I had the chance to actually do some research on them and implement everything necessary in JVx to make them possible.

You can read about the results of the Vaadin stress tests on a previous blog post.

After trying different possibilities, including the awesome Sikuli, we settled with AssertJ-Swing for Swing and Selenium for Vaadin. The first rough tests showed that testing was only reasonable possible if we would name all components by default and so we derived a default naming scheme and implemented it. While experimenting with AssertJ-Swing I realized that one important thing was missing from it, the possibility to easily record tests. Selenium already offers a simple recorder for most browsers, which simply records all events and exports them in the correct format, however AssertJ-Swing does not have such a facility unfortunately.

Swing itself is build on top of AWT, which allows to register a global event listener by using the Toolkit which means that one can see all events that are happening, which itself makes it rather easy to record these events and put them in an easy to use format. The format in our case would be Java code that can be copied and pasted into our test cases. To have a reasonable layer of abstraction, the recorder would filter and prepare the events and forward them to a "plugin" that is able to omit Java code. With this facility in place it was easy to record tests for Swing, however replaying them was not so easy at first. AssertJ-Swing has very concrete requirements when it comes to how it is launched and JVx has its own ideas regarding that. The solution to this was to derive a test harness, which would manage both, the AssertJ-Swing setup and also the start of the JVx application. The unit tests would then simply extend said test harness and would be able to launch the application on their own, executing the test case and then shutting it down again. This worked extremely well and we were even able to record and replay test cases for VisionX with ease.

These experiments have shown that it is very easy to perform automated GUI tests on JVx applications, no matter if Swing or Vaadin is used as frontend. The created code during these experiments is not public at the moment, as there is still quite a lot to do and it's in dire need of some refactoring. But I'm very confident that we will be able to return to it and one day provide you with the tools to easily create automated GUI tests for JVx.

JavaFX - Thee shall be my nemesis

JavaFX has been in the works for quite some time now and has been coming along greatly. It was overdue that JVx does support JavaFX as a frontend and with the beginning of this year the work started to make that happen.

Event though JavaFX has been coming along greatly, it is still quite rough around the edges and contains bugs that we needed to work around and some missing features. Currently we are monitoring over 40 requests in the bug tracker of JavaFX that are either directly or indirectly related to our JVx implementation,  a little less than half of these were reported by us. Those span little bugs to quite big feature requests, some more critical than others.

One of the biggest missing features was the missing MDI system, which we simply need for ERP applications. There is RT-22856 which is concerned with creating such a system, but that hasn't moved in quite some time and so we set out to create our own. Our efforts are quite well covered by the blog post I linked to above, we managed to come up with a very nice implementation:

  • The FXInternalWindow can either be used with or without a desktop pane. They might as well live in a normal Pane (or any other).
  • The content of internal windows is not limited in any way (you could also nest another desktop pane into it).
  • The FXDesktopPane does offer various convenience features, like a pluggable window manager system.
  • Implementing a new and custom window manager is a breeze, there are already two implementations provided by us: The FXDesktopWindowManager and the FXTabWindowManager.

But the MDI system is not the only system or control that we created to aid in our implementation of JVx on top of JavaFX, there is a long list of controls that were created by us:

But one thing that really drove me up the wall several times was the usage of the "final" keyword and "package-private" modifiers. Multiple times problems could have been easily solved by overriding a method, which turned out to be final, or invoking a method or accessing a variable, which turned out to the be (package) private. Good API design dictates that both are used to protect the API from misuse, but for our work on the JVx/JavaFX project, most of the time it stood more in the way than helped. The take away for me personally is, that of course you need to design the API in a way that limits the possibility for abuse, but you also have to allow users to shoot themselves in the foot from time to time, that means that they can experiment and use the API for possibilities it might not have been intended for.

The look ahead

And now we're in the present, phew, what a year! There are already two projects waiting for me as soon as we're done with the first version of our JVx/JavaFX implementation.

I'm looking forward for another year with the awesome people at SIB Visions!

JavaFX custom controls

We started with our JavaFX UI in January and we are on the home stretch!
All features were implemented and we have some Feature Requests and known Bugs in our Ticketing system and some open Issues in the JavaFX ticketing system (JIRA, at the moment).

At the beginning we thought that 2 months will be sufficient to implement the whole UI :) We were very optimistic but not far away from the reality but we didn't know that JavaFX had a lot of missing pieces.

Missing pieces?

Don't get me wrong, because JavaFX is an awesome UI toolkit and will be a perfect replacement for Swing, but it needs some real world applications. Yes, applications and not fancy hello world examples. Sure, there are some great applications but most use custom controls because of problems with standard controls. The overall performance is still not perfect and there's still a lot of tuning potential. Currently a swing application acts faster without delays.

The biggest problem for us was that standard controls like Toolbar, Menus didn't work as expected and other controls like DesktopPane or Internal Frame weren't available. We didn't find a date + time combobox editor. Some standard controls like Button, CheckBox or RadioButon didn't offer specific alignment options and another problem was the coding philosophy because many useful methods are public final or private. You can't replace internal listeners or remove internal listeners because you can't access all list elements.

But this article shouldn't cover our development problems because many of them will be solved with Java8 u60 and we have custom controls for the rest. Currently we have many useful classes for our UI and also for you, because we tried to implement all extensions independent of JVx. This article gives a short overview.

Re-usable controls and classes

We have some additional classes without images:

  • FXNullPane

    Acts like a Swing panel with null layout.

  • FXSceneLocker

    From the javadoc: The FXSceneLocker is a static helper utility that allows to to lock a Scene, meaning that only events that belong to the locking Node or its children are processed. If a Scene is locked by multiple Nodes, that last one does receive events.

You'll find all other utilities and controls in the dev repositoriy. The ext Package is independent of JVx. We use it as base for our UI implementation.

JavaFX + Android + Live Preview

We had a lot of fun this week - with JavaFX :)

My last article was about JavaFX on mobile devices with JavaFXPorts. It was awesome that JavaFX worked without bigger problems on mobile devices but the number of needed re-deployments was high. The app build process needs some time (~2-3 mins) and if you do a lot of UI related changes in your application (CSS, layout, ...) you lose development time.

How to save deployment time?

Simply don't deploy!

We have our product VisionX and it has a Live Preview for applications while developing. Our idea was that we could use the existing functionality to show changes on mobile devices immediately. It should work with Android devices because dynamic class loading is possible with custom classloaders.

But as so often, things won't work as expected.

Android has support for URLClassLoader but it doesn't work because the implementation is "legacy" . This means that loading classes with URLClassLoader didn't work. Android has a DexClassLoader!

The DexClassLoader works great if you have the archive on the device. But it has no support for remote class loading. The other thing was that DexClassLoader needs a jar that contains a classes.dex archive. The classes.dex contains all class files (in dex format).

The first problem was: How to create the DEX archive?

Not too hard because Android comes with dx.bat and dx.jar. It's super easy to convert a jar file or a classes folder to a dex archive. After the hardest part was solved, it was simple to implement remote class loading with Android, for our JavaFX application! If you need more information, leave a comment!

Here's the result of our Live Preview experiment as Video:

Window shutter web control

It works great and reduces deployments to a bare minimum: 1

JVx' JavaFX UI with JavaFXPorts

A few hours ago, we published a screenshot from our Demo ERP application running on Nexus 9 (an Android tablet).
It wasn't a fake!

Before we'll show you more screenshots, we want say that we've reached a long awaited goal!

Use JVx and write an application for all polpular platforms and devices.
This is real "write once run anywhere".

Create an application for Windows, Linux, Mac, iOS, or Android, PS4, OUYA or WiiU. Run it as desktop application, as html5 application in web browsers, as native iOS or Android application or as JavaFX application on Android and iOS devices. There's nothing like JVx in the world - not with only one framework with such a small footprint as JVx and certainly not Open Source!

Here are the screenshots:

Maximized frame with charts

Maximized frame with charts

Frame with tree

Frame with tree

Also in portrait mode:

Portrait mode

Portrait mode


And now a very strange one. It's the application with our styled stage. It's crazy because you can drag the window around (makes no sense, but it just works):

Styled stage with tabset desktop

Styled stage

Sure, the application wasn't optimized for mobile devices. It has the same style as the desktop application. The mobile version should have bigger frame buttons and a bigger frame header :) To be honest - MDI on mobile devices? We were positively surprised about the usability. But, whatever. You have the option and decide what's best for your application (but please don't use MDI for smartphones).

Are you interested in some details?

We've used Netbeans IDE because there's a very useful plugin from gluon. We're Eclipse users but it was easier to use a preconfigured environment without doing everything manually. It was simple to configure Netbeans with gluon plugin and there's a video for your first steps. A "bigger" problem was gradle because the project was a gradle project and we've never used gradle. We love using ant.

We had a bad start with Hello World application because it didn't work. There were different problems: Missing ANDROID_HOME or DEX compiler problems. After reading the documentation it was possible to start compilation. The DEX problem was very strange because we had JVM 1.8 u31 and JVM 1.8 u40 configured in Netbeans, but Netbeans didn't use our configured JVM 1.8 u40. We removed the JVM 1.8 u31 from Netbeans and after that we successfully compiled our Hello World application. Very strange!

The next step was using JVx as library dependency for our project, but how did this work with gradle? We had the library in the libs directory of the project, in the file system. We didn't use a maven lib because it was easier to replace the library after recreation. We tried to find a solution in the official gradle documentation and found Chapter 51. C'mon gradle is a build tool and not a programming language! So much documentation means: complexity. Sure, ant wasn't the holy grale but it it's simple to understand and doesn't hide anything.

Our current gradle script:

buildscript {
    repositories {
        jcenter()
    }
    dependencies {
        classpath 'org.javafxports:jfxmobile-plugin:1.0.0-b7'

    }
}

apply plugin: 'org.javafxports.jfxmobile'

repositories {
    jcenter()
}

dependencies {
    compile fileTree(dir: 'libs', include: '*.jar')
    runtime fileTree(dir: 'libs', include: '*.jar')
}

mainClassName = 'com.sibvisions.gluon.JVxGluonApp'
   
jfxmobile {
   
    ios {
        forceLinkClasses = [ 'com.sibvisions.gluon.**.*' ]
    }
   
    android {
      androidSdk = 'C:/tools/android/android-sdk_r04-windows'
      compileSdkVersion = 21  
    }
}

It's short but we ddin't know what happened behind the scenes without additional research. But if it works it's good enough for many developers.

The integration of JVx was simple because JVx was compiled with JVM 1.6. The Dalvik VM or DART do support 1.6 and 1.7 syntax. It was cool to see that JVx and especially the communication worked without problems - Great job from Johan Vos and all people behind JavaFXPorts!

Our next step was the integration of additional dependencies like our JavaFX UI. It was based on JVM 1.8 u40 and heavily used lambdas. But lambda expressions weren't supported from Dalvik or ART. We thought that gluon plugin solves the problem for us, but it didn't. It contains retrolambda but only for project source files and it doesn't touch your dependencies. There was no additional gradle build task for that, so we had to convert the libs manually. Not a problem but you must be aware of it.

After we solved all dependency problems, we had the first version of our desktop ERP running on our android device. But don't think everything was trouble-free. We had problems with method references, Java Preferences because of write problems, new Date API, forEach calls, scene size and much more. We did solve most problems but not all - yet.

Charts with JVx and JavaFX

In my last article about JavaFX, JVx and data binding you saw a first impression of our chart binding. We have additional screenshots for you. The first two images show a Swing application with different charts. The next two images show the same application, with JavaFX. Which UI do you like more?

Bar chart with Swing

Bar chart with Swing

Line chart with Swing

Line chart with Swing

Bar chart with JavaFX

Bar chart with JavaFX

Line chart with JavaFX

Line chart with JavaFX

The JavaFX UI is clean and fresh. It looks modern compared to Swing. A desktop application should look modern and not dusty!

How about the data binding?

Our screen has two charts. Every chart gets its records from a data book (our model class). The labels and values are dynamic and every change in the databook updates the chart. Here's the source code for the chart definition:

//BAR chart
UIChart chartBar.setChartStyle(UIChart.STYLE_BARS);
chartBar.setTitle("Annual Statistics");
chartBar.setXAxisTitle("Year");
chartBar.setYAxisTitle("Grosstotalprice");
chartBar.setDataBook(rdbV_statistic_order_offer_year);
chartBar.setXColumnName("YEAR_");
chartBar.setYColumnNames(new String[] {"OFFER_GROSSTOTALPRICE", "ORDER_GROSSTOTALPRICE"});

//LINE chart
UIChart chartLineArea.setChartStyle(UIChart.STYLE_LINES);
chartLineArea.setTitle("Monthly Statistics");
chartLineArea.setXAxisTitle("Month");
chartLineArea.setYAxisTitle("Grosstotalprice");
chartLineArea.setDataBook(rdbV_statistic_order_offer_month);
chartLineArea.setXColumnName("MONTH");
chartLineArea.setYColumnNames(new String[] { "OFFER_GROSSTOTALPRICE", "ORDER_GROSSTOTALPRICE" });

The complete source code is available on sourceforge. It's from our Demo ERP application.

The databooks are remote databooks because our Demo ERP is a 3-tier application. The databook definition:

//BAR Chart
RemoteDataBook rdbV_statistic_order_offer_year = new RemoteDataBook();
rdbV_statistic_order_offer_year.setName("v_statistic_order_offer_year");
rdbV_statistic_order_offer_year.setDataSource(getDataSource());
rdbV_statistic_order_offer_year.setReadOnly(true);
rdbV_statistic_order_offer_year.open();

//LINE Chart
RemoteDataBook rdbV_statistic_order_offer_month = new RemoteDataBook();
rdbV_statistic_order_offer_month.setName("v_statistic_order_offer_month");
rdbV_statistic_order_offer_month.setDataSource(getDataSource());
rdbV_statistic_order_offer_month.setReadOnly(true);
rdbV_statistic_order_offer_month.setMasterReference(
                                      new ReferenceDefinition(new String[] { "YEAR_" },
                                                              rdbV_statistic_order_offer_year,
                                                              new String[] { "YEAR_" }));
rdbV_statistic_order_offer_month.open();

Both remote databooks are connected to a remote storage, identified by name (v_statistic_order_offer_year, v_statistic_order_offer_month). The storages are defined as server objects:

//Name: v_statistic_order_offer_year (BAR CHART)
DBStorage dbsV_statistic_order_offer_year = new DBStorage();
dbsV_statistic_order_offer_year.setWritebackTable("v_statistic_order_offer_year");
dbsV_statistic_order_offer_year.setDBAccess(getDBAccess());
dbsV_statistic_order_offer_year.open();

//Name: v_statistic_order_offer_month (LINE CHART)
DBStorage dbsV_statistic_order_offer_month = new DBStorage();
dbsV_statistic_order_offer_month.setWritebackTable("v_statistic_order_offer_month");
dbsV_statistic_order_offer_month.setDBAccess(getDBAccess());
dbsV_statistic_order_offer_month.open();

Both storages read data from database views (instead of tables). The views are not magic and could also be simple tables, but our Demo ERP has views for demonstration purposes.

Here's the definition of the view, used for the BAR chart:

CREATE OR REPLACE VIEW v_statistic_order_offer_year AS
SELECT ofe.YEAR_ AS YEAR_,
       sum(ofe.GROSSTOTALPRICE) AS OFFER_GROSSTOTALPRICE,
       sum(case when ord.GROSSTOTALPRICE IS NULL
                then 0
                else ord.GROSSTOTALPRICE
           end) AS ORDER_GROSSTOTALPRICE
  FROM (v_statistic_offer ofe
        LEFT JOIN v_statistic_order ord
               ON (((ofe.YEAR_ = ord.YEAR_) AND (ofe.MONTH = ord.MONTH))))
 GROUP BY ofe.YEAR_;

That's it. It's really simple to bind a JavaFX chart to a database table or view.

Style vaadin menubar popups

Our new application frame has two different vaadin menubars. One for the application menu and one as "hidden" menubar for the user options.

Here's a merged screenshot of both menubars:

Menubar popup

Menubar popup

As you can see, the left popup is dark and the right popup is bright. Usually, vaadin doesn't allow custom "additional" style definitions for menubar popups. The default style name is:

v-menubar-popup

The name is defined in the class com.vaadin.shared.ui.menubar.MenuBarState as

primaryStyleName = "v-menubar"

If you want to add an additional style class, it's simply not possible because the client implementation (com.vaadin.client.ui.VMenuBar) sets the primary style name, from the menubar, as style name for the popup overlay. The only thing you can do is, to change the primary stylename of your menubar. The problem is that you have to define all styles for the menubar-popup and menuitems, submenus, ... again in your style file. We tried it but it was horrible because you can't easily change the theme.

We tried to find a solution without changing vaadin client. We tried to set a primary style name as e.g. customstylepopup v-window-popup. But the client menu implementation has following code in getPrimaryStyleName:

protected static String getStylePrimaryName(Element elem) {
  String fullClassName = getStyleName(elem);

  // The primary style name is always the first token of the full CSS class
  // name. There can be no leading whitespace in the class name, so it's not
  // necessary to trim() it.
  int spaceIdx = fullClassName.indexOf(' ');
  if (spaceIdx >= 0) {
    return fullClassName.substring(0, spaceIdx);
  }
  return fullClassName;
}

(it makes sense to do this!)

So, it wasn't possible with simple tricks. The only solution - we found - was an extension of VMenuBar to override getPrimaryStyleName and return a custom style class concatenated with the default style class, something like this:

@Override
public String getStylePrimaryName()
{
    if (popupStyle != null)
    {
        return popupStyle + " " + super.getStylePrimaryName();
    }
       
    return super.getStylePrimaryName();
}

It wasn't our preferred solution, but we had another hack for setting ids of menu items. So it wasn't hard to add another hack for the style name :)

With our modification, it'll be possible to add custom style classes to menubar popups:

Custom style names

Custom style names

The source code is available on sourceforge.

ARC Welder - what else :)

Some days ago, ARC Welder popped up in the news. I guess it was Thursday?

What is ARC? (see Getting started with ARC)

The App Runtime for Chrome (Beta), or ARC, lets you run your favorite Android apps on Chrome OS.

and also in your Chrome browser.

It's strange, but a logical consequence.

We tried our native Android client with ARC Welder and it was working without bigger problems:

ARC Welder - JVx Android Client

ARC Welder - JVx Android Client

It wasn't possible to use the integrated MAPS API, maybe a problem of the beta version or our build?

I'm not sure if it's useful to run an android app on a desktop because the app was designed for mobile devices, usually. But as test environment...

But it could be interesting for JavaFX applications which were converted to Android apps? Not really for desktop pcs, but for Chromebooks.
While Applets will be banned from browsers, ARC could be something similar :)

It's still strange but we'll be ready for it.

JavaFX, JVx and data binding

We made great progress with our JavaFX UI for JVx. The whole UI stuff was already implemented and worked with some known problems. The next thing was data binding because this should fill the gap between UI and business logic. This means: bindings for a table, tree, chart, editors, cell editors, cell renderers, ... (hard work).

The data controls of JavaFX were very useful and we didn't implement our own controls because standard controls were working. Sure, we had a different model in JVx than the "model" in JavaFX, but also Swing and vaadin had different models. We're experts in such things.

We started with the table, because a table implementation should be easy without CRUD operations and of course, it was easy. The next thing was the integration of our cell renderers and cell editors because a date field should automatically use a date editor and a number field should use a number(only) editor. The same applies for checkboxes and comboboxes. This was a hard job because JavaFX' table had different concepts than e.g. swing. We're still working on the last bits but most functionality was implemented.

It's already possible to bind a database table/view to a JavaFX TableView without additional JDBC, ORM. Thanks to JVx, this works with all supported architectures (mem, 2-tier, 3-tier). Here's a first impression, followed by the source code:

TableView bound to JVx' DataBook

TableView bound to JVx' DataBook

UITable table = new UITable();
table.setDataBook(dataBook);

UIFormLayout editorsPaneLayout = new UIFormLayout();
editorsPaneLayout.setNewlineCount(2);

UIPanel editorsPane = new UIPanel();
editorsPane.setLayout(editorsPaneLayout);

addEditor(editorsPane, dataBook, "ID");
addEditor(editorsPane, dataBook, "BOOLEAN");
addEditor(editorsPane, dataBook, "STRING");
addEditor(editorsPane, dataBook, "CHOICE");
addEditor(editorsPane, dataBook, "DATETIME");
addEditor(editorsPane, dataBook, "NUMBER");
addEditor(editorsPane, dataBook, "TYPE_ID");
addEditor(editorsPane, dataBook, "TYPE_NAME");

UISplitPanel splitPanel = new UISplitPanel(UISplitPanel.SPLIT_LEFT_RIGHT);
splitPanel.setDividerAlignment(UISplitPanel.DIVIDER_BOTTOM_RIGHT);
splitPanel.setFirstComponent(table);
splitPanel.setSecondComponent(editorsPane);

UIPanel content = new UIPanel();
content.setLayout(new UIBorderLayout());
content.add(splitPanel, UIBorderLayout.CENTER);

(see Kitchensink application, hosted on github)

This was the whole source code for the table binding (= UI). The missing piece is the model. In our example, we've used the member dataBook. A databook is the model and controller of JVx. We have different implementations: MemDataBook, RemoteDataBook. A mem is like a database table, but in memory. A remote databook is connected to a remote/local storage. The storage provides data (from a database, filesystem, twitter, ...).

We didn't use a database in our kitchensink, so the dataBook was defined as MemDataBook:

RowDefinition rowdef = new RowDefinition();            
rowdef.addColumnDefinition(new ColumnDefinition("ID",
                                new BigDecimalDataType()));
rowdef.addColumnDefinition(new ColumnDefinition("STRING",
                                new StringDataType(new UITextCellEditor())));
rowdef.addColumnDefinition(new ColumnDefinition("BOOLEAN",
                                new BooleanDataType(new UICheckBoxCellEditor(
                                                    Boolean.TRUE, Boolean.FALSE))));
rowdef.addColumnDefinition(new ColumnDefinition("CHOICE",
                                new StringDataType(choiceCellEditor)));
rowdef.addColumnDefinition(new ColumnDefinition("DATETIME",
                                new TimestampDataType(new UIDateCellEditor("dd.MM.yyyy"))));
rowdef.addColumnDefinition(new ColumnDefinition("NUMBER",
                                new BigDecimalDataType(new UINumberCellEditor())));
rowdef.addColumnDefinition(new ColumnDefinition("TYPE_ID",
                                new BigDecimalDataType()));
rowdef.addColumnDefinition(new ColumnDefinition("TYPE_NAME",
                                new StringDataType(
                                    new UILinkedCellEditor(referenceDefinition))));
               
IDataBook dataBook = new MemDataBook(rowdef);
dataBook.setName("DATABINDING");               
dataBook.open();

It's the definition of a table with some columns and different column types, like String, Date, Number, ComboBox. It's easy to use a real database table if you read following article or this one.

The difference

What's the difference to standard JavaFX without JVx and why should you use JVx?

Here's the official documentation of Table View from Oracle. It's very complex to work with tables ;-) (seems to be so). The example in the official documentation doesn't use a database, like our example above!

The first difference: Save time and LoC.
This will reduce complexity and saves your dev time. It'll be easier to maintain an application with 1.000 LoC instead of 50.000.

Second difference: JVx already is a framework and library - don't create your own and waste dev time.

Advantage of JVx: Simply bind a database table with 10 LoC:

DBAccess dba = DBAccess.getDBAccess("jdbc:hsqldb:hsql://localhost/testdb");
dba.setUsername("sa");
dba.setPassword("");
dba.open();

DBStorage dbs = new DBStorage();
dbs.setDBAccess(dba);
dbs.setWritebackTable("testtable");
dbs.open();

StorageDataBook dataBook = new StorageDataBook(dbs);
dataBook.open();

This is enough to get full CRUD support for your tables.

This article was the first intro of our databinding implementation for JavaFX. The next artile will cover our chart implementation. Here's first a impression:

FX Chart binding

FX Chart binding

We love the clean UI of JavaFX and our maximized internal frames :)