This website uses cookies for visitor traffic analysis. By using the website, you agree with storing the cookies on your computer.More information

MacOS JInternalFrame border problem

With new MacOS versions, the good old Aqua LaF has some problems.

If you create a simple MDI application with JDesktopPane and JInternalFrame, following problem will occur:

Default JInternalFrame

Default JInternalFrame

The code for our problem:

import java.awt.BorderLayout;
import java.awt.Color;
import java.awt.Component;
import java.awt.Dimension;
import java.awt.Graphics;
import java.awt.Insets;
import java.awt.Rectangle;
import java.awt.event.WindowAdapter;
import java.awt.event.WindowEvent;

import javax.swing.JDesktopPane;
import javax.swing.JFrame;
import javax.swing.JInternalFrame;
import javax.swing.JLabel;
import javax.swing.JTabbedPane;
import javax.swing.border.Border;
import javax.swing.border.CompoundBorder;
import javax.swing.plaf.UIResource;

public class TestJVxTabbedPane
{
    public static void main(String[] args) throws Exception
    {
        new TestJVxTabbedPane();
    }
   
    public TestJVxTabbedPane()
    {
        JFrame frame = new JFrame();
        frame.setDefaultCloseOperation(JFrame.EXIT_ON_CLOSE);
        frame.getContentPane().setLayout(new BorderLayout());
       
        JDesktopPane dpan = new JDesktopPane();
        dpan.setBackground(Color.white);
               
        JInternalFrame fr = new JInternalFrame();
        fr.setTitle("Super Frame");
        fr.setPreferredSize(new Dimension(200, 200));
        fr.pack();
        fr.setResizable(true);
        fr.setMaximizable(true);
        fr.setIconifiable(true);
        fr.setClosable(true);
        fr.setVisible(true);
               
        dpan.add(fr);
       
        frame.getContentPane().add(dpan, BorderLayout.CENTER);
        frame.setSize(500, 400);
        frame.setLocationRelativeTo(null);

        frame.setVisible(true);      
    }
}

(nothing special, a simple JInternalFrame, JDesktopPane combination)

We don't like bad looking UIs, so we fixed the problem in JVx:

JInternalFrame without border problem

JInternalFrame without border problem

The fix will work without JVx as well. We made tests with different MacOS versions and our solution worked in all our tests.

JVx Reference, Launchers and Applications

Let's talk about Launchers, and how they are used to start JVx applications.

Starting an application

We've previously outlined a simple way to start a JVx application, and now we're going to look at how to do it with a launcher to benefit from everything JVx has to offer. From a technical point of view, there are two prerequisites which must be fulfilled before a JVx application can run:

  1. the JVM must have started.
  2. the technology specific system must have started.

Then, and only then, the JVx application can run. Depending on the implementation that is used, that can be as easily as instancing the factory (Swing, JavaFX), but can also mean that a servlet server has to start (Vaadin). Because we do not wish to encumber our applications with technology specific code, we have to entrust all this to an encapsulated entity, meaning the implementations of ILauncher and IApplication.

Following the chain

The steps for getting an application to start are as follows:

  1. The first thing that must run is obviously the JVM, without it we won't have much luck starting anything.
  2. The launcher must be created and it must start the Technology.
  3. The launcher than creates the application which the user is seeing.

Launcher chain

So we need two classes, the ILauncher implementation which knows how to start the Technology and the IApplication implementation. That we already knew, so let's try to put this into code. For simplicity reasons (and because I don't want to write a complete factory from scratch for this example) we will reuse the Swing implementation and write a new launcher and application for it.

Entry point

The Main class that we will use as example is very straightforward:

  1. public class Main
  2. {
  3.     public static void main(String[] pArgs)
  4.     {
  5.         // All we have to do here is kickoff the creation of the launcher.
  6.         // The launcher will do everything that is required to start for us.
  7.         //
  8.         // In a real world scenario and/or application there might be more
  9.         // setup or groundwork required, for example processing the arguments,
  10.         // but we don't need any of that here.
  11.         new SwingLauncher();
  12.     }
  13. }

All we have to do there is start the launcher itself. As the comment suggests, there might be work required for a "real" application startup. For this example, it is all we need to do. Of course we could also directly embed this little function into the launcher implementation itself, to save us one class.

The launcher

The ILauncher implementation on the other hand contains quite some logic, but nothing not manageable:

  1. public class SwingLauncher extends SwingFrame
  2.                            implements ILauncher
  3. {
  4.     // We have to extend from SwingFrame because there is no factory
  5.     // instantiated at that point, so we can't use UI components.
  6.    
  7.     private IApplication application;
  8.    
  9.     public SwingLauncher()
  10.     {
  11.         super();
  12.        
  13.         try
  14.         {
  15.             SwingUtilities.invokeAndWait(this::startup);
  16.         }
  17.         catch (InvocationTargetException | InterruptedException e)
  18.         {
  19.             e.printStackTrace();
  20.         }
  21.     }
  22.  
  23.     @Override
  24.     public void dispose()
  25.     {
  26.         try
  27.         {
  28.             // We must notify the application that we are being disposed.
  29.             application.notifyDestroy();
  30.         }
  31.         catch (SecurityException e)
  32.         {
  33.             e.printStackTrace();
  34.         }
  35.        
  36.         super.dispose();
  37.        
  38.         // We have to make sure that the application is exiting when
  39.         // the frame is disposed of.
  40.         System.exit(0);
  41.     }
  42.  
  43.     private void startup()
  44.     {
  45.         // We create a new SwingFactory and it is directly registered as global
  46.         // instance, that means it will be used by all components which are
  47.         // created from now on.
  48.         UIFactoryManager.getFactoryInstance(SwingFactory.class);
  49.        
  50.         // Also we set it as our factory instance.
  51.         setFactory(UIFactoryManager.getFactory());
  52.        
  53.         // Because the IApplication implementation we use is based upon
  54.         // UI components (which is advisable) we have to wrap this launcher
  55.         // in an UILauncher.
  56.         UILauncher uiLauncher = new UILauncher(this);
  57.        
  58.         // Now we create the main application.
  59.         // Note that the ExampleApplication is already based upon
  60.         // UI components.
  61.         application = new ExampleApplication(uiLauncher);
  62.        
  63.         // Then we add the application as content to the launcher.
  64.         uiLauncher.add(application);
  65.        
  66.         // Perform some setup work and start everything.
  67.         uiLauncher.pack();
  68.         uiLauncher.setVisible(true);
  69.        
  70.         // We also have to notify the application itself.
  71.         application.notifyVisible();
  72.     }
  73.    
  74.     // SNIP
  75. }

In short, the launcher is kicking off the Swing thread by invoking the startup method on the main Swing thread. This startup method will instantiate the factory and then create the application. From there we only need to set it visible and then our application has started.

The launcher extends from SwingFrame, that is required because there hasn't been a factory created yet which could be used by UI components to create themselves. If we'd try to use an UI component before creating/setting a factory, we would obviously see the constructor of the component fail with a NullPointerException.

The method startup() is invoked on the main Swing thread, which also happens to be the main UI thread for JVx in this application. Once we are on the main UI thread we can create the application, add it and then set everything to visible.

The application

The IApplication implementation is quite short, because we extend com.sibvisions.rad.application.Application, an IApplication implementation created with UI components.

  1. public class ExampleApplication extends Application
  2. {
  3.     public ExampleApplication(UILauncher pParamUILauncher)
  4.     {
  5.         super(pParamUILauncher);
  6.     }
  7.    
  8.     @Override
  9.     protected IConnection createConnection() throws Exception
  10.     {
  11.         // Not required for this example.
  12.         return null;
  13.     }
  14.    
  15.     @Override
  16.     protected String getApplicationName()
  17.     {
  18.         return "Example Application";
  19.     }
  20. }

Because the launcher has previously started the technology and created the factory we can from here on now use UI components, which means we are already independent of the underlying technology. So the IApplication implementation can already be used with different technologies and is completely independent.

Notes on the launcher

As you might have noticed, in our example the launcher is a (window) frame, that makes sense for nearly every desktop GUI toolkit as they all depend upon a window as main method to display their applications. But the launcher could also be simpler, for example just a call to start the GUI thread. Or it could be something completely different, for example an incoming HTTP request.

Also don't forget that the launcher is providing additional functionality to the application, like saving file handles, reading and writing the configuration and similar platform and toolkit dependent operations, see the launcher for Swing for further details.

Conclusion

This example demonstrates how a simple launcher is implemented and why it is necessary to have a launcher in the first place. Compared with the "just set the factory" method this seems like a lot of work, but the launchers used by JVx are of course a lot more complex than these examples, that is because they implement all the required functionality and also take care of a lot of boiler plate operations. It is taking care of all technology specific code and allows to keep your application free from knowing about the platform it runs on.

VisionX 2.4 u2 is out

We're happy to announce VisionX 2.4 Update Release 2. It's another milestone for us.

The new version is a bugfix release with some important features for all our customers. The top bug was a missing license check for our HTML5 implementation. With older versions it was possible to use our HTML5 application without valid license. This wasn't a hidden feature, it was a real bug. The new version has a clean license check and some of you will need a new license. This is no problem, simply contact us.

What's new?

  • Full-Screen mode

    Press F12 to maximize VisionX without frame border.

  • HTML5 Live preview options

    It supports "application per session", custom UI factory, custom Application setups, main, config and externalCss URL parameter.

  • VisionX is now http session ready

    It will be possible to use VisionX on server-side as backend for remote application development.

  • Fixed Copy/Paste for DnD fields

    It's now possible to Copy/Paste into field with DnD support.

  • Automatic UI tests

    VisionX now supports automatic UI tests with an optional AddOn. The mechanism isn't limited to our AddOn. It's also possible to create custom Modules/AddOns.

  • Tibero Database support

    VisionX has built-in support for Tibero Database (tested with version 6).

  • Auto-restart feature

    VisionX got a Preloader. This allows custom libraries without manually changing the classpath. The old classpath mechanism is still available, but we use the Preloader by default.

  • Action Editor with custom editor support

    It's now possible to add custom editors in the action editor via action.xml and/or a custom module.

  • GridLayout support

    It's now possible to use panels with GridLayout, if set in Source Code.

  • Custom vaadin widgetsets and themes

    It's now possible to create custom vaadin widgetsets, e.g. add an AddOn from the Vaadin Directory. It's super easy to create a custom theme and setting your custom css attributes.

  • Performance improvement

    We reduced the fetch calls during screen creation. This will improve performance with big tables and complex views.

  • New modules, AddOns and demo applications (optional)

    The VaadinAddon can be used to create a custom widgetset or theme. The AppTeste is an automatic UI test tool. There is a new demo application for testing Validators. The new reporting demo application will show all features of our reporting engine.

  • Configurable EPlug ports

    It's now possible to configure the EPlug communication ports via system properties.

  • Better Application signing

    Our signing mechanism now supports TSA Urls, Proxies, signing algorithms and much more.

  • Service module merging

    Newly created applications will automatically merge service modules. This is an important bugfix for e.g. the profiles module.

The new version is available in your download area or as Trial version.

VisionX Update Release for 2.4

We have awesome news for you. We'll release the 2nd update of VisionX 2.4 by the end of this week!

The update will come with some new features and many bugfixes. The most important feature is that all open source libraries were updated. You'll have access to new APIs and new feautres of all libraries. VisionX itself got some bugfixes regarding the visual designer. A great new feature is the support for AddOns with access to VisionX. It'll be possible to customize VisionX for your needs.

We also have some new AddOns and Demo Applications e.g. the VaadinAddOn which enables you to create your own vaadin widgetset/theme in seconds.

The 2.4 release of VisionX will be the last version with Vaadin 7 because we already work with Vaadin 8.1 in our development branches.

We'll also change the version number of VisionX with our next release. Instead of 2.5, it'll be 5.0.

Why?

Because VisionX is very mature and the version number 2 doesn't fit. The next release will be a major change because VisionX will contain Vaadin 8.1 and this library requires Java 8, so also our VisionX projects will require Java 8. This isn't a big change, because VisionX itself comes with Java 8. The difference is the project configuration for your IDE.

All planned changes shouldn't be a problem for you, because Java 9 is out and Java 8 is the Java version you should use for your projects. The Java version won't make any difference for our Oracle Forms users because our JVx library will be built with Java 6 - no changes for you.

JVx and Lua, a proof of concept

We've found the time to look at something that was floating around the office for quite some time. A few of us had previous experiences with Lua, a simple scripting language, but nothing too concrete and while doing a prototype a question popped up: Would it be easy to create a JVx GUI in Lua? As it turns out, the answer is "yes".

Lua, a short tour

Lua is a lightweight, multi-paradigm programming language designed primarily for embedded systems and clients.

Lua was originally designed in 1993 as a language for extending software applications to meet the increasing demand for customization at the time. It provided the basic facilities of most procedural programming languages, but more complicated or domain-specific features were not included; rather, it included mechanisms for extending the language, allowing programmers to implement such features. As Lua was intended to be a general embeddable extension language, the designers of Lua focused on improving its speed, portability, extensibility, and ease-of-use in development.

That is what Wikipedia has to say about Lua, but personally I like to think about it as "Basic done right", no insults intended. Lua is easy to write, easy to read and allows to quickly write and edit scripts. There are quite a few implementations for different languages and systems available which makes it very versatile and usable from in nearly every environment.

The most simple Lua script is one that prints "Hello World":

  1. print("Hello World")

Because it is a prototype based language, functions are first-class citizens, which can be easily created, passed around and invoked:

  1. local call = function()
  2.     print("Hello World")
  3. end
  4.  
  5. call()

Additionally, we can use tables to store state. They work like a simple key/value store:

  1. local operation = {
  2.     method = function(string)
  3.         print(string)
  4.     end,
  5.     value = "Hello World"
  6. }
  7.  
  8. operation.method(operation.value)
  1. local operation = {}
  2. operation.method = function(string)
  3.     print(string)
  4. end
  5. operation.value = "Hello World"
  6.  
  7. operation.method(operation.value)

Additionally, with some syntactic sugar, we can even emulate "real" objects. This is done by using a colon for invoking functions, which means that the table on which the function is invoked from will be provided as first parameter:

  1. local operation = {
  2.     method = function(valueContainer, string)
  3.         print(valueContainer.value .. " " .. string)
  4.     end,
  5.     value = "Hello World"
  6. }
  7.  
  8. operation:method("and others")

Last but not least, the rules about "new lines" and "end of statements" are very relaxed in Lua, we can either write everything on one line or use semicolons as statement end:

  1. local call = function(value) return value + 5 end print(call(10))
  2.  
  3. local call = function(value)
  4.     return value + 5;
  5. end
  6.  
  7. print(call(10));

But enough of the simple things, let's jump right to the case.

World, meet JVx.Lua

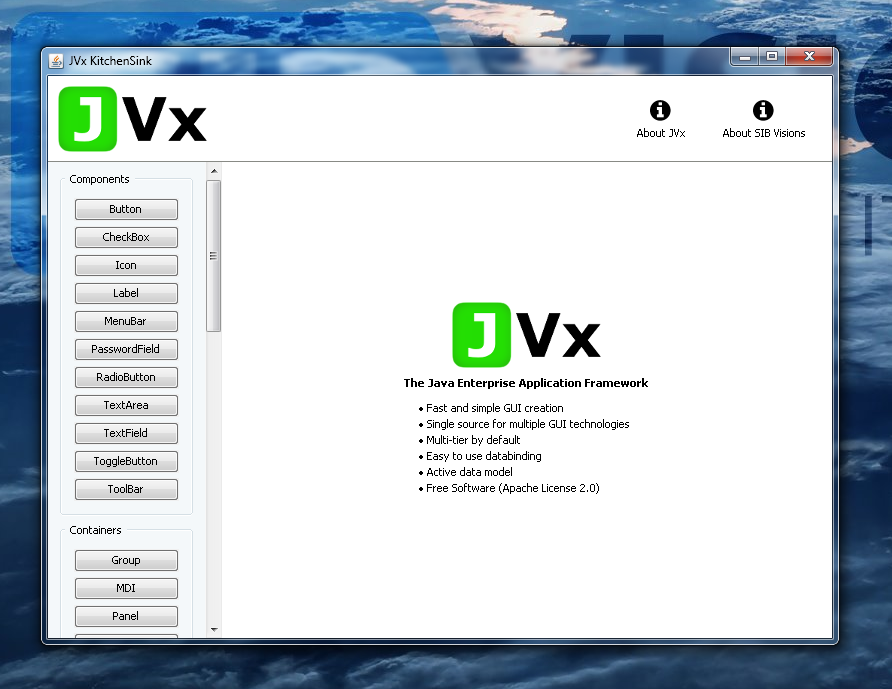
JVx.Lua is a proof of concept Java/Lua bridge, which allows to use the JVx classes in Lua scripts. Additionally, we've created a short demo application, JVx.Lua Live, which allows to directly write Lua code and see the output live in the application.

JVx/Lua live demo

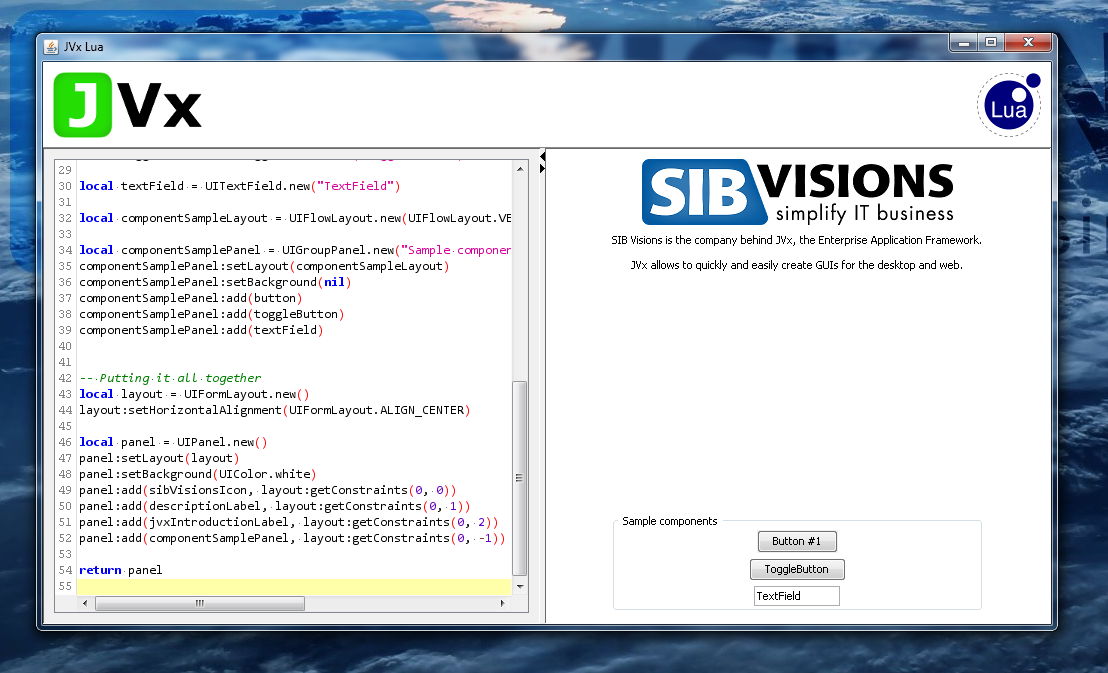
The example code should be self-explanatory and the API is as close to the Java one as is possible. If an exception is thrown by the Lua environment it will be displayed in the live preview.

JVx/Lua live demo

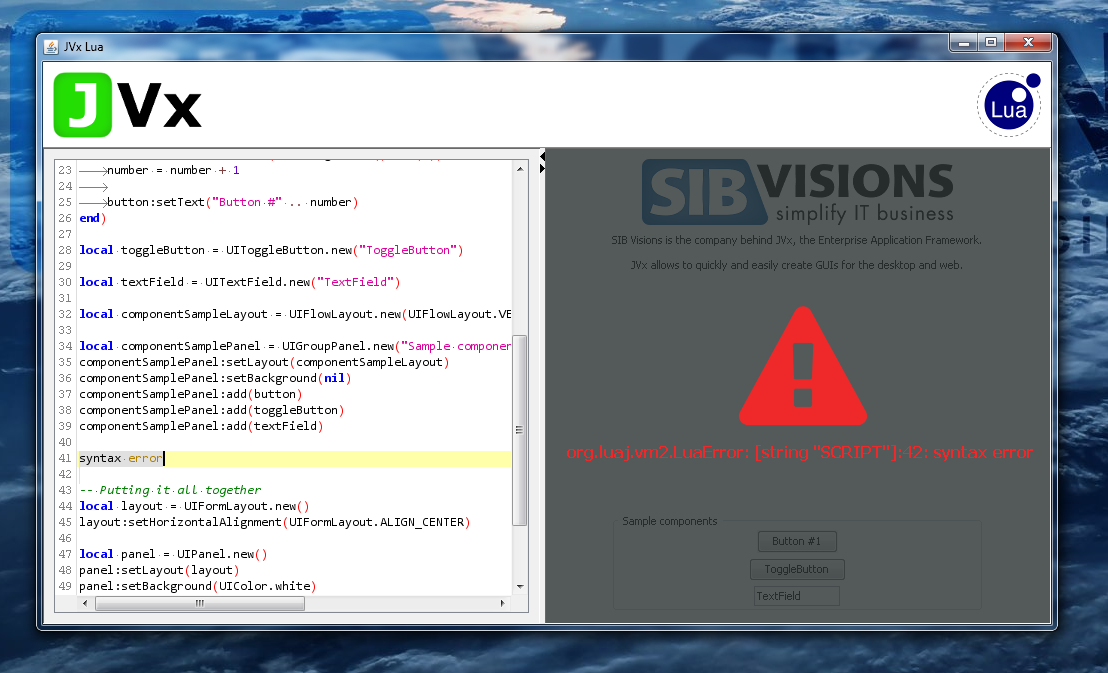
This allows to quickly test out the Lua bindings and create a simple GUI in no time. But note that this simple demo application does not store what you've created, when you close it, it will be gone.

How does it work?

Glad you asked! The demo application is, of course, a simple GUI build with JVx, there are two core components which make it possible:

  1. RSyntaxTextArea, a Swing component for displaying and editing code.
  2. LuaJ, a Lua interpreter and compiler which allows to compile Lua directly to Java bytecode.

RSyntaxTextArea does not need to be further explained, it just works, and working very well it does. So does LuaJ, but that one has to be explained.

To create a new "Lua environment" one has to instance a new set of Globals and install the Lua-to-Lua-Bytecode and Lua-Bytecode-to-Java-Bytecode compilers into it.

  1. Globals globals = new Globals();
  2. LuaC.install(globals);
  3. LuaJC.install(globals);
  4.  
  5. globals.load("print(\"Hello World\")");

And that's it! With this we can already execute Lua code directly in Java, and most importantly, at runtime.

By default, LuaJ does provide nothing for the Lua environment, which means that it is sandboxed by default. If we want to add functionality and libraries, we'll have to load it into the Globals as so called "libs". For example if we want to provide all functions which can be found inside the string table, we'll have to load the StringLib:

  1. Globals globals = new Globals();
  2. LuaC.install(globals);
  3. LuaJC.install(globals);
  4.  
  5. globals.load(new StringLib());
  6.  
  7. globals.load("print(string.sub(\"Hello World\", 7))");

There are multiple libs provided with LuaJ which contain the standard library functions of Lua or provide access directly into the Java environment. For example we can coerce Java objects directly into Lua ones:

  1. BigDecimal value = new BigDecimal("-5.1234");
  2.  
  3. globals.set("value", CoerceJavaToLua.coerce(value));
  1. local absoluteValue = value:abs()
  2. local squaredValue = absoluteValue:pow(2)
  3.  
  4. print(squaredValue:toString())

Which gives us all the power of Java at our fingertips in Lua.

JVx bindings for Lua

Armed with that knowledge, we can have a look at the bindings which make it possible to use the JVx classes. JVxLib and LuaUtil are the main classes which coerce a single class to be used by Lua, the procedure looks as follows:

  1. Create a LuaTable to hold the class and register it globally.
  2. Add all public static fields (constants) to it.
  3. Add all static methods to it.
  4. Add a single constructor with a vararg argument to it.

The most interesting point is the constructor call, we simply register a method called "new" on the table and give it a vararg argument, which means that it can be called with any number of arguments. When this function is invoked the arguments are processed and a fitting constructor for the object is chosen. The found constructor is invoked and the created object is coerced to a Lua object, that created Lua object is returned.

This allows us to use a clean syntax when it comes to accessing the static or instance state of the objects. Static methods and constants, including constructors, are always accessed using the "dot" notation, while everything related to the instance is accessed using the "colon" notation.

Downside, binding events

For events and event handlers we had to dig a little deeper into LuaJ. The main problem with our EventHandler is that it has two methods: addListener(L) and addListener(IRunnable), at runtime the first one is reduced to addListener(Object). Let's assume the following code:

  1. button:eventAction():addListener(listener)

With such a construct LuaJ had a hard time finding the correct overload to use even when listener was a coerced IRunnable. This turned out to be undefined behavior, because the order of methods returned by a class object during runtime is undefined, sometimes LuaJ would choose the correct method and all other times it would use the addListener(Object) method. Which had "interesting" side effects, obviously, because an IRunnable object ended up in a list which should only hold objects of type L.

We've added a workaround so that functions with no parameters can be easily used, but for "full blown listener" support we'd have to invest quite some time. Which we might do at some point, but currently this is alright for a proof of concept.

Conclusion

Using Lua from Java is easy thanks to LuaJ, another possible option is Rembulan, which can not go unmentioned when one talks about Java and Lua. It does not only allow to quickly and easily write logic, but with the right bindings one can even create complete GUIs and applications in it and thanks to the ability to compile it directly to Java bytecode it is nearly as fast as the Java code. But, with the big upside that it can be easily changed at runtime, even by users.

Vaadin, let's hack the Profiler

Vaadin comes with a builtin Profiler which is only available during debug mode, which might not be available or reasonable. So, let us see if we can use it without the debug mode enabled.

It has a profiler?

Yes, there is one right builtin on the client side. You can activate it easily enough by adding the following to the widgetset:

  1. <set-property name="vaadin.profiler" value="true" />

But to see the results, you also have to switch the application into debug mode by changing the web.xml to the following:

  1. <context-param>
  2.     <description>Vaadin production mode</description>
  3.     <param-name>productionMode</param-name>
  4.     <param-value>false</param-value>
  5. </context-param>

This allows you to enter the debug mode of an application, though, that requires to restart the application (or in the worst case, a redeploy). One upside of testing new Widgetsets can be that one can apply them to any running application without modifications, because that is purely client-side. So changing the configuration of the application might not be possible or desirable.

There are some forum posts out there which talk about that it is enough to enable the profiler and see the the output of it being logged to the debug console of the browser, but that is not the case anymore.

Let's have a deeper look

The Profiler can be found in the class com.vaain.vaadin.client.Profiler and is comletely client-side. It will store all gathered information until the function logTimings() is called, which then will hand the gathered information to a consumer which can do with it whatever it wants. Now comes the interesting part, there is no public default implementation for the consumer provided. If you want to log what was profiled to the debug console you'll have to write your own. Even if there were, the function setProfilerResultConsumer(ProfilerResultConsumer) is commented with a warning that it might change in future versions without notice and should not be used - interesting. Also interesting is the fact that it can only be set once. Once set, it can not be changed.

Hm, looks a little bare bone. Of course there is an "internal" class that is utilizing it to send its output to the debug window, but we can't use any of that code, unfortunately. So let's see what we can do with it.

Send everything to the debug console

The easiest thing is to simply send all the output to the debug console of the browser, we can do this easily enough:

  1. import java.util.LinkedHashMap;
  2. import java.util.List;
  3.  
  4. import com.vaadin.client.Profiler.Node;
  5. import com.vaadin.client.Profiler.ProfilerResultConsumer;
  6.  
  7. /**
  8.  * A simple {@link ProfilerResultConsumer} which is outputting everything to the
  9.  * debug console of the browser.
  10.  *
  11.  * @author Robert Zenz
  12.  */
  13. public class DebugConsoleProfilerResultConsumer implements ProfilerResultConsumer
  14. {
  15.     //~~~~~~~~~~~~~~~~~~~~~~~~~~~~~~~~~~~~~~~~~~~~~~~~~~~~~~~~~~~~~~~~
  16.     // Initialization
  17.     //~~~~~~~~~~~~~~~~~~~~~~~~~~~~~~~~~~~~~~~~~~~~~~~~~~~~~~~~~~~~~~~~
  18.    
  19.     /**
  20.      * Creates a new instance of {@link DebugConsoleProfilerResultConsumer}.
  21.      */
  22.     public DebugConsoleProfilerResultConsumer()
  23.     {
  24.         super();
  25.     }
  26.    
  27.     //~~~~~~~~~~~~~~~~~~~~~~~~~~~~~~~~~~~~~~~~~~~~~~~~~~~~~~~~~~~~~~~~
  28.     // Interface implementation
  29.     //~~~~~~~~~~~~~~~~~~~~~~~~~~~~~~~~~~~~~~~~~~~~~~~~~~~~~~~~~~~~~~~~
  30.    
  31.     /**
  32.      * {@inheritDoc}
  33.      */
  34.     @Override
  35.     public void addProfilerData(Node pRootNode, List pTotals)
  36.     {
  37.         debug(pRootNode);
  38.        
  39.         for (Node node : pTotals)
  40.         {
  41.             debug(node);
  42.         }
  43.     }
  44.    
  45.     /**
  46.      * {@inheritDoc}
  47.      */
  48.     @Override
  49.     public void addBootstrapData(LinkedHashMap pTimings)
  50.     {
  51.         // TODO We'll ingore this for now.
  52.     }
  53.    
  54.     //~~~~~~~~~~~~~~~~~~~~~~~~~~~~~~~~~~~~~~~~~~~~~~~~~~~~~~~~~~~~~~~~
  55.     // User-defined methods
  56.     //~~~~~~~~~~~~~~~~~~~~~~~~~~~~~~~~~~~~~~~~~~~~~~~~~~~~~~~~~~~~~~~~
  57.    
  58.     /**
  59.      * Sends the given {@link Node} to the debug console if it is
  60.      * {@link #isValid(Node) valid}.
  61.      *
  62.      * @param pNode the {@link Node} to log.
  63.      * @see #isValid(Node)
  64.      */
  65.     private void debug(Node pNode)
  66.     {
  67.         if (isValid(pNode))
  68.         {
  69.             debug(pNode.getStringRepresentation(""));
  70.         }
  71.     }
  72.    
  73.     /**
  74.      * Tests if the given {@link Node} is valid, meaning not {@code null}, has a
  75.      * {@link Node#getName() name} and was {@link Node#getCount() invoked at
  76.      * all}.
  77.      *
  78.      * @param pNode the {@link Node} to test}.
  79.      * @return {@code true} if the given {@link Node} is considered valid.
  80.      */
  81.     private boolean isValid(Node pNode)
  82.     {
  83.         return pNode != null && pNode.getName() != null && pNode.getCount() > 0;
  84.     }
  85.    
  86.     //~~~~~~~~~~~~~~~~~~~~~~~~~~~~~~~~~~~~~~~~~~~~~~~~~~~~~~~~~~~~~~~~
  87.     // Native methods
  88.     //~~~~~~~~~~~~~~~~~~~~~~~~~~~~~~~~~~~~~~~~~~~~~~~~~~~~~~~~~~~~~~~~
  89.    
  90.     /**
  91.      * Logs the given message to the debug console.
  92.      *
  93.      * @param pMessage the message to log.
  94.      */
  95.     private native void debug(String pMessage)
  96.     /*-{
  97.         console.debug(pMessage);
  98.     }-*/;
  99.    
  100. }    // DebugConsoleProfilerResultConsumer

And we can attach it rather easily, too:

  1. Profiler.setProfilerResultConsumer(new DebugConsoleProfilerResultConsumer());

Make sure to do this only once, otherwise an Exception will be thrown, stating that it can only be done once. Also the application should not be in debug mode, otherwise the Vaadin consumer will be attached. Now that we've attached a consumer we can recompile the Widgetset and actually try it, and low and behold, we see output in the debug window of the browser. Quite a lot, actually, seems like the Profiler is used often, which is good.

Filter the results

Skimming through the results is tedious, luckily most browsers come with the possibility to filter the results, but that possibility is quite limited. If we are interested in multiple results, the easiest way will be to filter them on the server side, obviously we can do that just as easily:

  1. import java.util.HashSet;
  2. import java.util.LinkedHashMap;
  3. import java.util.List;
  4. import java.util.Set;
  5.  
  6. import com.vaadin.client.Profiler.Node;
  7. import com.vaadin.client.Profiler.ProfilerResultConsumer;
  8.  
  9. /**
  10.  * A simple {@link ProfilerResultConsumer} which is outputting everything to the
  11.  * debug console of the browser.
  12.  *
  13.  * @author Robert Zenz
  14.  */
  15. public class DebugConsoleProfilerResultConsumer implements ProfilerResultConsumer
  16. {
  17.     //~~~~~~~~~~~~~~~~~~~~~~~~~~~~~~~~~~~~~~~~~~~~~~~~~~~~~~~~~~~~~~~~
  18.     // Class members
  19.     //~~~~~~~~~~~~~~~~~~~~~~~~~~~~~~~~~~~~~~~~~~~~~~~~~~~~~~~~~~~~~~~~
  20.    
  21.     /** The names of nodes we want to output. */
  22.     private Set wantedNames = new HashSet();
  23.    
  24.     //~~~~~~~~~~~~~~~~~~~~~~~~~~~~~~~~~~~~~~~~~~~~~~~~~~~~~~~~~~~~~~~~
  25.     // Initialization
  26.     //~~~~~~~~~~~~~~~~~~~~~~~~~~~~~~~~~~~~~~~~~~~~~~~~~~~~~~~~~~~~~~~~
  27.    
  28.     /**
  29.      * Creates a new instance of {@link DebugConsoleProfilerResultConsumer}.
  30.      *
  31.      * @param pWantedNames the names of the profiler data which should be
  32.      *            displayed.
  33.      */
  34.     public DebugConsoleProfilerResultConsumer(String... pWantedNames)
  35.     {
  36.         super();
  37.        
  38.         if (pWantedNames != null && pWantedNames.length > 0)
  39.         {
  40.             for (String wantedName : pWantedNames)
  41.             {
  42.                 wantedNames.add(wantedName);
  43.             }
  44.         }
  45.     }
  46.    
  47.     //~~~~~~~~~~~~~~~~~~~~~~~~~~~~~~~~~~~~~~~~~~~~~~~~~~~~~~~~~~~~~~~~
  48.     // Interface implementation
  49.     //~~~~~~~~~~~~~~~~~~~~~~~~~~~~~~~~~~~~~~~~~~~~~~~~~~~~~~~~~~~~~~~~
  50.    
  51.     /**
  52.      * {@inheritDoc}
  53.      */
  54.     @Override
  55.     public void addProfilerData(Node pRootNode, List pTotals)
  56.     {
  57.         debug(pRootNode);
  58.        
  59.         for (Node node : pTotals)
  60.         {
  61.             debug(node);
  62.         }
  63.     }
  64.    
  65.     /**
  66.      * {@inheritDoc}
  67.      */
  68.     @Override
  69.     public void addBootstrapData(LinkedHashMap pTimings)
  70.     {
  71.         // TODO We'll ingore this for now.
  72.     }
  73.    
  74.     //~~~~~~~~~~~~~~~~~~~~~~~~~~~~~~~~~~~~~~~~~~~~~~~~~~~~~~~~~~~~~~~~
  75.     // User-defined methods
  76.     //~~~~~~~~~~~~~~~~~~~~~~~~~~~~~~~~~~~~~~~~~~~~~~~~~~~~~~~~~~~~~~~~
  77.    
  78.     /**
  79.      * Sends the given {@link Node} to the debug console if it is
  80.      * {@link #isValid(Node) valid}.
  81.      *
  82.      * @param pNode the {@link Node} to log.
  83.      * @see #isValid(Node)
  84.      */
  85.     private void debug(Node pNode)
  86.     {
  87.         if (isValid(pNode))
  88.         {
  89.             debug(pNode.getStringRepresentation(""));
  90.         }
  91.     }
  92.    
  93.     /**
  94.      * Tests if the given {@link Node} is valid, meaning not {@code null}, has a
  95.      * {@link Node#getName() name} and was {@link Node#getCount() invoked at
  96.      * all}.
  97.      *
  98.      * @param pNode the {@link Node} to test}.
  99.      * @return {@code true} if the given {@link Node} is considered valid.
  100.      */
  101.     private boolean isValid(Node pNode)
  102.     {
  103.         return pNode != null
  104.                 && pNode.getName() != null
  105.                 && pNode.getCount() > 0
  106.                 && (wantedNames.isEmpty() || wantedNames.contains(pNode.getName()));
  107.     }
  108.    
  109.     //~~~~~~~~~~~~~~~~~~~~~~~~~~~~~~~~~~~~~~~~~~~~~~~~~~~~~~~~~~~~~~~~
  110.     // Native methods
  111.     //~~~~~~~~~~~~~~~~~~~~~~~~~~~~~~~~~~~~~~~~~~~~~~~~~~~~~~~~~~~~~~~~
  112.    
  113.     /**
  114.      * Logs the given message to the debug console.
  115.      *
  116.      * @param pMessage the message to log.
  117.      */
  118.     private native void debug(String pMessage)
  119.     /*-{
  120.         console.debug(pMessage);
  121.     }-*/;
  122.    
  123. }    // DebugConsoleProfilerResultConsumer

Now we can simply pass the list of "interesting" event names to the consumer and see only these.

JavaScript hacking

But there is more, instead of setting a consumer we can attach ourselves to the JavaScript function and instead process each profiled section individually. So in the debug console we can simply run something like this:

  1. window.__gwtStatsEvent = function(event)
  2. {
  3.     console.debug(event);
  4. };

This will output every single profiler event into the console. Now, if we want to process these events, we must first understand there is always a "begin" and an "end" event, which respectively are marking the begin and end of an event.

We can now listen for a certain event and simply output how long it took, like this:

  1. window.__profiler = {};
  2.  
  3. window.__gwtStatsEvent = function(event)
  4. {
  5.     if (event.subSystem === "Layout pass")
  6.     {
  7.         if (event.type === "begin")
  8.         {
  9.             window.__profiler[event.subSystem] = event.millis;
  10.         }
  11.         else
  12.         {
  13.             console.log(
  14.                     event.subSystem
  15.                     + ": "
  16.                     + (event.millis - window.__profiler[event.subSystem]).toFixed(0)
  17.                     + "ms");
  18.         }
  19.     }
  20. };

Or, to go over the top, we could create a generic listener which informs us about everything:

  1. window.__wantedEvents = [
  2.     "Layout pass",
  3.     "Layout measure connectors",
  4.     "layout PostLayoutListener"
  5. ];
  6.  
  7. window.__profiler = {};
  8.  
  9. window.__gwtStatsEvent = function(event)
  10. {
  11.     if (window.__wantedEvents.indexOf(event.subSystem) >= 0)
  12.     {
  13.         if (typeof window.__profiler[event.subSystem] === "undefined")
  14.         {
  15.             window.__profiler[event.subSystem] = {
  16.                 averageRuntime : 0,
  17.                 count : 0,
  18.                 lastBegin : 0,
  19.                 lastEnd : 0,
  20.                 lastRuntime: 0,
  21.                 lastRuntimes : new Array(),
  22.                 minRuntime : 999999999,
  23.                 maxRuntime : -999999999,
  24.                 totalRuntime : 0
  25.             }
  26.         }
  27.        
  28.         var info = window.__profiler[event.subSystem];
  29.        
  30.         if (event.type === "begin")
  31.         {
  32.             info.count = info.count + 1;
  33.             info.lastBegin = event.millis;
  34.         }
  35.         else
  36.         {
  37.             info.lastEnd = event.millis;
  38.            
  39.             info.lastRuntime = info.lastEnd - info.lastBegin;
  40.             info.lastRuntimes.push(info.lastRuntime);
  41.             info.minRuntime = Math.min(info.lastRuntime, info.minRuntime);
  42.             info.maxRuntime = Math.max(info.lastRuntime, info.maxRuntime);
  43.             info.totalRuntime = info.totalRuntime + info.lastRuntime;
  44.            
  45.             info.averageRuntime = 0;
  46.             for (var index = 0; index < info.lastRuntimes.length; index++)
  47.             {
  48.                 info.averageRuntime = info.averageRuntime + info.lastRuntimes[index];
  49.             }
  50.             info.averageRuntime = info.averageRuntime / info.lastRuntimes.length;
  51.            
  52.             console.log(
  53.                     event.subSystem
  54.                     + ": "
  55.                     + info.count.toFixed(0)
  56.                     + " times at "
  57.                     + info.averageRuntime.toFixed(3)
  58.                     + " totaling "
  59.                     + info.totalRuntime.toFixed(0)
  60.                     + "ms with current at "
  61.                     + info.lastRuntime.toFixed(0)
  62.                     + "ms ("
  63.                     + info.minRuntime.toFixed(0)
  64.                     + "ms/"
  65.                     + info.maxRuntime.toFixed(0)
  66.                     + "ms)");
  67.         }
  68.     }
  69. };

And we now have a neat little system in place which displays everything we'd like to know, and it is easily extendable and modifiable, too.

Conclusion

As we see, we have quite a few ways to get the information from the profiler even without the application running in debug mode, some might not be as obvious as others, though. The interesting part is that many things are easily accessible on the JavaScript side of Vaadin, directly from the debug console of the browser, one only has to look for it.

VisionX, a short look at Validators

It is time to have a short look at Validators, what they are, how they work and how they can be used.

Okay, what are they?

A Validator is a component which is available to our customers who have purchased VisionX, it allows to quickly and easily add field validation to a form or any screen with records.

Validators in VisionX

Validators are readily available in VisionX as components which can be added to the screen.

VisionX Validators - Toolbox

It can be added to the screen by simply dragging it like any other component, but must be configured afterwards to know which field required validation.

VisionX Validators - Properties

There are three important properties to the Validator:

  • Binding: The field to which the Validator should be bound to. This works analog to selecting to a field for an Editor.
  • Automatic validate: If the validation process should be automatically performed on value changes.
    If this is checked, the Validator will listen for value changes on the specified field and will automatically run the validation action on every change. If not checked, the validation process must be run manually by calling Validator.validate() as needed.
  • Hide until first validate: If the Validator should stay hidden until at least one validation was performed.
    If this is checked, the Validator will not be visible until at least its validation has been called once, afterwards it will always be visible.

Validating values

To actually validate something, we have to attach an action to the Validator which will perform the validation. This can be readily done through the VisionX action designer, which provides everything needed to create such an action and we will not go into detail on how to do this.

We will, however, have a short look at the code of a simple action.

  1. public void doValidateNonEmpty(Validator pValidator) throws Throwable
  2. {
  3.     if (Logical.equals(rdbData.getValue("COLUMN"), ""))
  4.     {
  5.         throw new Exception("A value for the COLUMN must be entered.");
  6.     }
  7. }

It is a very simple action, the current value of the DataBook is checked and if it is empty, an Exception is. This is the most simple validation action one can create.

Validators in action

Once we have everything setup, we can put the Validators to good use. When the validation is performed, may it be automatically or manually, the validation actions will be invoked and if all of them return without throwing an Exception, the Validator will display a green check mark. However, if the actions should throw an Exception, the Validator will display a red "X".

VisionX Validators - Failed

Manual validation

Manually invoking the validation process as needed is quite simple by calling Validator.isValid(), which will return either true or false.

  1. public void doSaveButtonPressed(UIActionEvent pEvent) throws Throwable
  2. {
  3.     if (validator.isValid())
  4.     {
  5.         rdbData.saveSelectedRow();
  6.     }
  7.     else
  8.     {
  9.         labelError.setVisible(true);
  10.     }
  11. }

Above you see a sample action which manually performs the validation process and either saves the data or sets an error label to visible.

The ValidationResult

One can quickly end up with many Validators in a single screen, which might make it difficult for the user to directly see why a field is not correctly validated. So it suggest itself that there should be a short summary close to the save button to make sure that the user is readily provided with the information why the action could not be performed. For this scenario there is the ValidationResult, which is another component which can be added to the screen from the toolbox.

It will automatically find all Validators in the screen and will perform their validation as needed. Afterwards it will gather all error messages and display them in a list.

VisionX Validators - ValidationResult

The ValidationResult can be used similar to the Validator in an action.

  1. public void doSaveButtonPressed(UIActionEvent pEvent) throws Throwable
  2. {
  3.     if (validationResult.isValid())
  4.     {
  5.         rdbData.saveSelectedRow();
  6.     }
  7.     else
  8.     {
  9.         labelError.setVisible(true);
  10.     }
  11. }

Additionally, there is the clearMessage() method which allows to clear the list of errors.

Conclusion

The Validator and ValidationResult provide quick and easy means to add data validation to forms and screens with records and can be added and configured completely through the VisionX designer. Additionally, it provides a rich API which allows it to be easily used when writing the code manually or extending it with additional functionality.

Wordpress/Contact Form 7 post request to Java Servlet

This article is an upgraded version of Joomla/RSForms post request to Java Servlet.

The use case is the same: Calling a Java Servlet, after submitting a form. The servlet should read the form data and start e.g. the creation of a license file.

The form plugin Contact Form 7 is very popular for Wordpress. It's powerful and easy to use.

But sadly, it doesn't support custom php scripts, only custom Javascript calls. So it's possible to add custom javascript calls with predefined hooks. Not exactly what we want because Javascript functions run on client side and not in the same context as the php backend.

It wasn't possible to implement missing features without coding php, but it was not tricky.

What we did to call a Java Servlet?

1. Register a custom module

Modified wp-content/plugins/contact-form-7/settings.php

public static function load_modules() {
    ...
    self::load_module( 'submit' );
    self::load_module( 'text' );
    self::load_module( 'textarea' );
    self::load_module( 'hidden' );

    self::load_module( 'sibvisions' );
}

Added load_module('sibvisions');

2. Create the new module

Created wp-content/plugins/contact-form-7/modules/sibvisions.php

<?php
/**
 ** Module for SIB Visions.
 **/

add_action('wpcf7_submit', 'wpcf7_sibvisions_submit', 10, 2);

function wpcf7_sibvisions_submit($contactform, $result)
{
    if ($contactform->in_demo_mode() || $contactform->is_true('do_not_store'))
    {
        return;
    }

    $servletURL = $contactform->additional_setting('sib_servletURL');

    if (empty($servletURL[0]))
    {
        error_log('Servlet URL is not set in form!');
        return;
    }

    $cases = (array)apply_filters('wpcf7_sibvisions_submit_if',
                                  array('spam', 'mail_sent', 'mail_failed'));

    if (empty($result['status']) || ! in_array($result['status'], $cases ))
    {
        return;
    }

    $submission = WPCF7_Submission::get_instance();

    if (!$submission || ! $posted_data = $submission->get_posted_data())
    {
        return;
    }

    if (isset($posted_data['g-recaptcha-response']))
    {
        if (empty($posted_data['g-recaptcha-response']))
        {
            return;
        }
    }

    $fields_senseless = $contactform->scan_form_tags(
                                        array('feature' => 'do-not-store'));

    $exclude_names = array();

    foreach ( $fields_senseless as $tag )
    {
        $exclude_names[] = $tag['name'];
    }

    $exclude_names[] = 'g-recaptcha-response';

    foreach ($posted_data as $key => $value)
    {
        if ('_' == substr($key, 0, 1) || in_array($key, $exclude_names))
        {
            unset($posted_data[$key]);
        }
    }

    $url = str_replace('"', "", $servletURL[0]);
    $url = str_replace("'", "", $url);

    $ch = curl_init();

    curl_setopt($ch, CURLOPT_URL, $url);
    curl_setopt($ch, CURLOPT_RETURNTRANSFER, 1);
    curl_setopt($ch, CURLOPT_POST, 1);
    curl_setopt($ch, CURLOPT_CONNECTTIMEOUT, 5);
    //curl_setopt($ch, CURLOPT_SSL_VERIFYHOST, 0);
    //curl_setopt($ch, CURLOPT_SSL_VERIFYPEER, 0);

    $data = array();

    foreach ($posted_data as $post => $value)
    {
        if (is_array($value))
        {
            foreach ($value as $post2 => $value2)
            {
                $data[] = $post.'[]='.urlencode($value2);
            }
        }
        else
        {
            $data[] = $post.'='.urlencode($value);
        }
    }

    curl_setopt($ch, CURLOPT_POSTFIELDS, implode('&', $data));
 
    $data = curl_exec($ch);

    if (curl_errno($ch))
    {
        wp_mail('noreply@sibvisions.com', 'Service error',
                'Call to service ('.$url.') failed with error ('.curl_error($ch).')');
    }
    else
    {
        $http_code = curl_getinfo($ch, CURLINFO_HTTP_CODE)
       
        if ($http_code != 200)
        {
            wp_mail('noreply@sibvisions.com', 'Service error',
                    'Call to service ('.$url.') failed with error ('.$data.')');
        }
    }
   
    curl_close($ch);
}

The script is based on module flamingo.php because it had all useful validations.

Be careful, because the script will be applied to all your forms. It's form independent.

3. Additional setting

The only thing you'll need is am additional setting (for your form):

sib_servletURL:'https://server/services/registration'

This setting configures the servlet to use for the form. If you don't configure a servlet, the module will do nothing!

DONE

The new module will forward all form data to the servlet. The servlet is the same as in our original article - no changes needed.

JVx Kitchensink, a simple JVx showcase application

As we've just noticed, we've neglected so far to properly introduce the JVx Kitchensink, a (very) simple showcase application for JVx and its controls. We'd like to rectify that now.

A simple showcase, not a demo application

The JVx Kitchensink can be found on GitHub and is available under an Apache 2.0 License. It demonstrates nearly all controls and components of the JVx framework and simple and easy to digest examples.

JVx Kitchensink

As some of you might know, there is also the JVx Hello World Application. The Kitchensink does not intend to supersede the Hello World Application, quite the opposite, the intention is to complement it. The Hello World Application is demonstrating how to quickly and easily set up a complete JVx application and have it up and running in mere minutes, with focus on the lifecycle of the application. The Kitchensink on the other hand demonstrates each individual component and control of JVx, and completely neglects the "normal" lifecycle of a JVx application.

Samples

The button bar on the left allows you to quickly access each example, for example the one about databinding.

JVx Kitchensink - Databinding

Newly added has been the feature that you can now see the source code of the selected sample right inside the Kitchensink, simply select the "Source" tab.

JVx Kitchensink - Databinding (Source)

Here I have to mention the awesome RSyntaxTextArea, which is a Swing component and provides highlighting and editing functionalities for source code, and is obviously used by us.

Regarding the lifecycle

As said before, the Kitchensink as not a good example of the lifecycle of a JVx application, as outlined in JVx Reference, Application Basics.

Packaged and ready

The Kitchensink does already come as a ready to use Eclipse project with launchers, so all you have to do is import it into Eclipse and be ready to go. There is also an Ant build script and instructions on how to launch the readily compiled jars.

Last but not least, it does provide a nice test bed for most of the functionality of JVx and demonstrates most concepts in a neatly packaged manner. We've been using it excessively during the development of the JVx JavaFX frontend bindings and it can be as simply used to test new concepts and custom components.

Once again, the link to the KitchenSink GitHub repository