JVx Reference, Application Basics
Let's talk about the basics, how a JVx application starts, works and how the connection strings together the client and server side.
Multitier Architecture
JVx is designed to be Multitier by default. It allows a clean and easy separation of processes and makes it easy to build, maintain and extend applications by separating the client, server and data storage.
Launchers
The following method is a simplified way to launch a JVx application. Normally, you'd use the technology specific launcher to launch the application. These launchers do know exactly what is required to set it up and start the technology and the application. However, covering the launchers is out of scope for this post, so we will review them and their mechanics in a follow-up.
The simplest JVx application: Just the GUI
But first, we will start without anything. The most simple application you can create with JVx is an application which does open a single window and only works with in memory data (if at all). This can be easily achieved by "just starting" the application.
The JVx GUI is a simple layer on top of the Technology which implements the actual functionality. So if we want to have a GUI we'll need to initialize the factory before doing anything else:
With this little code we have initialized everything we need to create a simple Swing application. Now we can start to create and populate a window with something:
frame.setLayout(new UIBorderLayout());
frame.addComponent(new UILabel("Hello World!"));
frame.pack();
frame.setVisible(true);
frame.eventWindowClosed().addListener(() -> System.exit(0));
We can start to create and manipulate the GUI, in this case we are building a simple window with a label inside. Last but not least, we make sure that the JVM will exit when the window is closed.
A very good example and showcase for that is the JVx Kitchensink.
That's it. That is the most simple way to start a JVx application. We can use all controls and we can use MemDataBooks without any problem or limitation. And best of all, we can simply switch to another Technology by using another factory.
Anatomy of a remote JVx application
Of course JVx wouldn't be that useful if it would just provide static GUI components. Now, to explain what else is required for a remote JVx application I have to go far afield, so let's head down the rabbit hole.
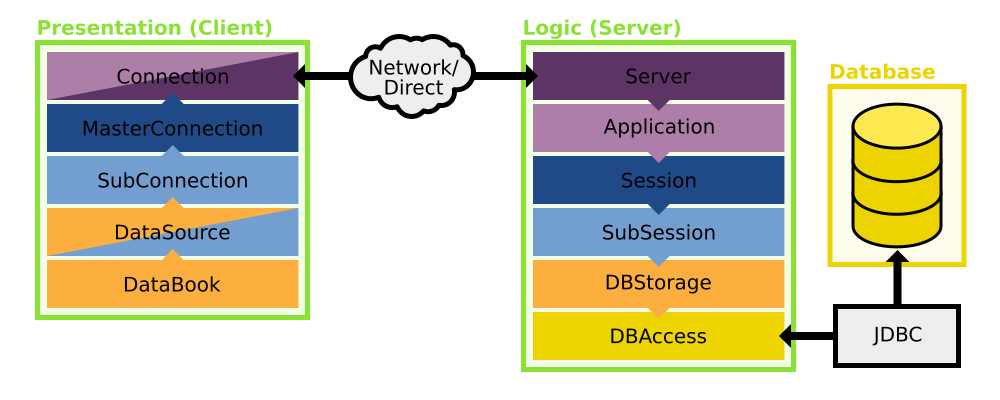
What you are seeing here is a rough sketch of how the architecture of JVx looks like. Let's walk through the image step by step. We will look at each successive layer and work our way from the database on the server to the databook on the client.
DBAccess, accessing a database
Accessing a database is easy when using DBAccess. All we must do is to set the JDBC URL of the server and connect to it:
"jdbc:postgresql://server:5432/schema",
"username",
"password");
dbAccess.open();
As a note, the instance returned by getDBAccess is the database specific DBAccess extension, which does know how to handle its database.
We can of course use DBAccess to directly access the database:
BigDecimal.valueOf(1),
"Some Value");
List<Bean> data = dbAccess.executeQuery("select * from SOME_TABLE");
...or manipulate the database, or query information about the database or execute procedures or do anything else.
DBStorage, preparing the database access for databooks
The downside of using DBAccess is that everything must be database specific. To become database agnostic we must use DBStorage. DBStorage does not care which database it is connected to and can operate on any of them:
storage.setDBAccess(dbAccess);
storage.setWritebackTable("SOME_TABLE");
storage.open();
We can use this to insert, update, delete and fetch data. Additionally the DBStorage does retrieve and manage the metadata of the table we've set, which means that we can query all column names, what type they are, we can even access the indexes and the default values. Short, the DBStorage leaves little to be desired when it comes to operating on a database.
If we query data from the DBStorage we receive a List of rows. The rows are are either represented as Object array, IBean or a POJO and we can easily manipulate the data, like this:
{
row.put("SOME_COLUMN", "newvalue");
storage.update(row);
}
As one can see, it looks quite familiar to the DataBook, which isn't a coincidence. The DBStorage "powers" the DataBooks on the server side, a DataBook will get its data from and will send its modified data to the DBStorage.
I've been using the DBStorage here as an example, but actually the Storage is not dependent on a database. IStorage can be implemented to provide any sort of data provider, like reading from an XML or JSON file, scraping data from a website, fetching data from a different process or reading it directly from a hardware sensor.
Life Cycle Objects, the business objects with all the logic
Life Cycle Objects, or LCOs, are the server side business objects which contain and provide the business logic. They are created and destroyed as is requested by the client-side and are used to provide specific functionality to the client, like providing functionality specific to one screen or workflow. This is done by RPC, Remote Procedure Calls, which means that the client is directly calling the methods defined in the LCOs, which includes getting the Storages for the DataBooks.
There is also a security aspect to these, as you can permit one client access to a certain LCO but lock out everyone else, which means that only that client can use the functionality provided by the LCO.
But let's not get ahead of our selves, there are three important "layers" of LCOs which we will look at.
Application
The LCO for the application represents the application itself and provides functionality on the application layer. It is created once for the lifetime of the application and this instance is shared by all sessions.
{
}
Session
The LCO for the session represents one session, which most of the time also equals one client connection. It provides functionality which should be session-local, like providing the database connection which can be used.
{
protected DBAccess getDBAccess() throws Exception
{
// Code for initialization and caching of DBAccess goes here.
}
}
Sub-Session aka Screen
The sub-session, also known as screen, LCO is the last in the chain. It provides functionality specific to a certain part of the application, like a single screen, and provides the storages required to power the databooks and other functionality.
{
public DBStorage getTablename() throws Exception
{
// Code for initialization and caching of DBStorage goes here.
}
}
Server, serving it up
There really isn't much to say about the server, it accepts connections and hands out sessions. Of course it is not that easy, but for this guide we will not go into any further detail.
Connection, connecting to a server
The connection which strings together the client and the server is used for the communication between them, obviously. It can be anything, from a simple direct connection which strings two objects together to a HTTP connection which talks with a server on the other side of the planet.
By default we provide different IConnection implementations, the DirectServerConnection, DirectObjectConnection, the HttpConnection and the VMConnection. The DirectServerConnection is a simple IConnection implementation which does simply forward method calls to known Objects - without serialization - and is used when the client and server reside inside the same JVM. The HttpConnection communicates with the server over a HTTP connection and is used whenever the client and server are not inside the same JVM. The DirectObjectConnection and VMConnection are used for unit tests.
As example we will use the DirectServerConnection, which serves as Server and Connection. It is used if the server and client reside in the same JVM.
// The connection will be automatically opened by the MasterConnection.
Master- and SubConnections, client-side lifecycle management
The MasterConnection is the main connection which is used to access the server and its functionality. When a MasterConnection is established, a Session LCO on the server is created.
masterConnection.open();
A SubConnection is a sub connection of the MasterConnection and allows to access specific functionality encapsulated in an LCO. When a SubConnection is established, the requested/specified LCO on the server is created and can be accessed through the SubConnection.
subConnection.open();
The SubConnection can now access the functionality provided by the Application, the Session and the LCO which was specified.
DataSource, preparing the connection for the databook
To provide data to the databooks we can use the connection which we've described earlier. However, the DataBook does not directly know about the connection, it expects an IDataSource, which is used as an intermediate:
dataSource.open();
Of course the RemoteDataSource is just one possible implementation of IDataSource which can be used to provide data to the DataBook.
DataBook, accessing data
And now we are at the other end of the chain, at the databook on the client side. We just need to tell our databook what datasource to use, and we are done.
dataBook.setDataSource(dataSource);
dataBook.setName("storagename");
dataBook.open();
The name of the DataBook is used to access the DBStorage object in the LCO provided by the datasource. The mechanism for that is a simple search for a getter with the set name.
Interactive Demo
Here is an interactive demo which allows you to explore the connections between the client and server side. The complement classes are always highlighted and you can click on the names of the objects to receive additional information about them.
The JVx application: Manual example
Now that we have seen all layers that make up the architecture of JVx, let us put all of that into code:
{
public static void main(String[] pArgs) throws Throwable
{
// ############################## Server ##############################
// ----------------------------- DBAccess -----------------------------
// The DBAccess gives us access to the database.
DBAccess dbAccess = DBAccess.getDBAccess(
"jdbc:h2:mem:database",
"",
"");
dbAccess.open();
// We'll insert some data for this example.
dbAccess.executeStatement("create table if not exists TEST("
+ "ID int primary key auto_increment,"
+ "NAME varchar(128) default '' not null);");
dbAccess.executeStatement("insert into TEST values (1, 'Name A');");
dbAccess.executeStatement("insert into TEST values (2, 'Name B');");
dbAccess.executeStatement("insert into TEST values (3, 'Name C');");
// ---------------------------- DBStorage -----------------------------
// Our sole storage.
DBStorage testStorage= new DBStorage();
testStorage.setDBAccess(dbAccess);
testStorage.setWritebackTable("TEST");
testStorage.open();
// -------------------- LCO / Session / Application -------------------
// We are skipping the LCO, Session and Application in this example.
// ####################### Network / Connection #######################
// For this example we are initializing a DirectObjectConnection, which
// does not require a server.
// It is designed to be used mainly for unit testing.
DirectObjectConnection connection = new DirectObjectConnection();
connection.put("test", testStorage);
// ############################## Client ##############################
// ------------------------- MasterConnection -------------------------
MasterConnection masterConnection = new MasterConnection(connection);
masterConnection.open();
// -------------------------- SubConnection ---------------------------
// We are skipping the SubConnection in this example.
// ---------------------------- DataSource ----------------------------
IDataSource dataSource = new RemoteDataSource(masterConnection);
dataSource.open();
// ----------------------------- DataBook -----------------------------
RemoteDataBook dataBook = new RemoteDataBook();
dataBook.setDataSource(dataSource);
dataBook.setName("test");
dataBook.open();
// You can use the DataBook here.
// Perform cleanup of all opened objects here.
}
}
With this little example we have a completely working JVx application. We provide ways to create most of this out of the box and read most of it from configuration files, so there really is just little code to be written, see the JVx FirstApp as a perfect example for that. So there is rarely any need to write code like this, all you have to do is create a new application and start it.
Additionally, we could combine this long example with the simple one from before to initialize and create a GUI which could use our RemoteDataBook, like this:
// Set the UI factory which should be used, in this case it is
// the SwingFactory.
UIFactoryManager.getFactoryInstance(SwingFactory.class);
UIFrame frame = new UIFrame();
frame.setLayout(new UIBorderLayout());
frame.add(new UITable(dataBook));
frame.pack();
frame.setVisible(true);
frame.eventWindowClosed().addListener(() -> System.exit(0));
Abstractions on every step
As you can see, you always have full control over the framework and can always tailor it to your needs. There is always the possibility to provide a custom implementation to fulfill your needs:
- Accessing a not supported database can be achieved by extending DBAccess
- Having a different service/way of providing data can be implemented on top of IStorage
- Supporting a different connection can be implemented on top of IConnection
- And a completely different way of providing data can be implemented on top of IDataSource
You can swap out every layer and provide custom and customized implementations which exactly work as you require it.
Just like that
Just like that we've walked through the whole stack of a JVx application, from the database which holds the data all the way to the client GUI. Of course there is much more going on in a full-blown JVx application, for example I've spared you here the details of the configuration, server, network and providing actual LCOs and similar. But all in all, this should get you going.
![]() API, Development, Information | rzenz | 24/04/2017
API, Development, Information | rzenz | 24/04/2017
 RSS-Feed