This website uses cookies for visitor traffic analysis. By using the website, you agree with storing the cookies on your computer.More information

Category: Development

EPlug 1.2.6

We're happy to announce the release of EPlug 1.2.6. Again this small version bump does not only yield important bug fixes, but also new features which will make your life a lot easier.

Fixes

This release includes bug fixes along with new features. One of the most notable problems fixed was that compile time checks might not be run if the communication with VisionX was active.

Cleaner context menu with more actions

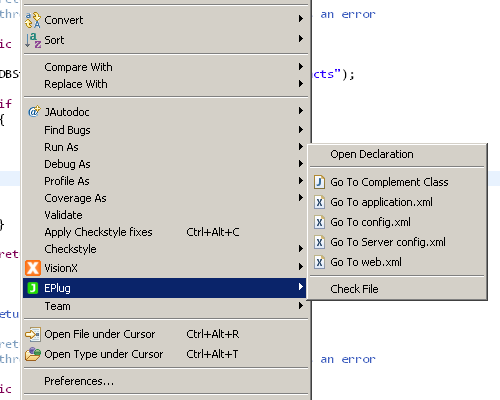
We have restructured our approach to the context menu entries and introduced a new menu item which holds all EPlug related actions:

New context menu

As you can see we've also added new actions to jump to the configuration files.

Resources outside of source folders

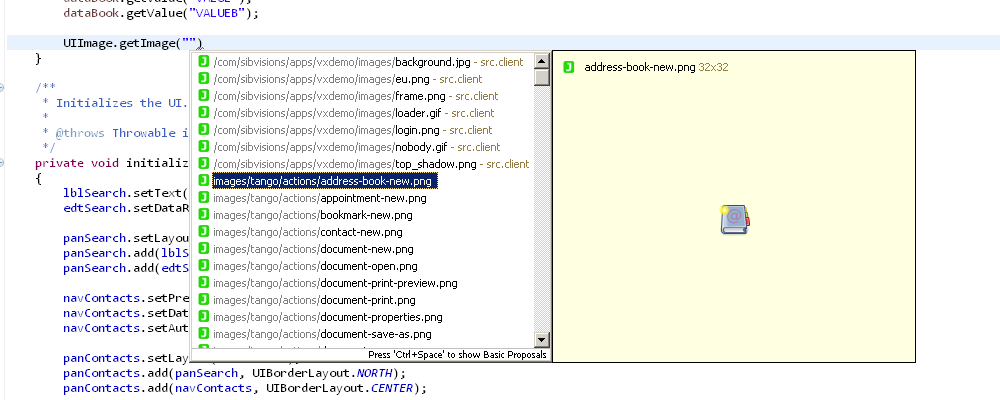
We do support autocompletion and compile time checks for resources, like images. But we only supported resources inside of source folders, with this version we do now also support resources anywhere in the project.

Resources

Improved DataBook handling

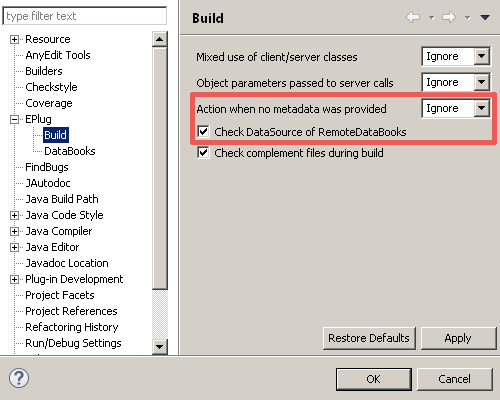
DataBook handling has been improved once more. There are now additional checks which make sure that a RemoteDataBook receives the correct DataSource and there for if the MetaData can reliably be determined.

Additionally, the type of flag issued if no MetaData could be determined is now a configurable build option on the project.

New context menu

An example:

private void changeSomeValues(RemoteDataBook pDataBook)
{
    pDataBook.setValue("COLUMN_A", "A");
    pDataBook.setValue("COLUMN_B", "B");
    pDataBook.setValue("COLUMN_C", "C");
}

This would have been flagged as warning, because no MetaData could be determined for pDataBook. Now the check determines that determining MetaData for this DataBook is impossible and flags it accordingly. You can configure whether you want to see this flag or not in the project settings.

EPlug does also recognize if a "foreign" datasource has been set:

RemoteDataBook dataBookA = new RemoteDataBook();
dataBookA.setDataSource(getDataSource());
dataBookA.setName("a");
dataBookA.open();

RemoteDataBook dataBookB = new RemoteDataBook();
dataBookB.setDataSource(dataSourceFromSomewhereElse);
dataBookB.setName("a");
dataBookB.open();

// This will be flagged as error.
dataBookA.setValue("NON_EXISTING", BigDecimal.ZERO);

// This will be flagged according to the settings.
dataBookB.setValue("NON_EXISTING", BigDecimal.ZERO);

Usernames for sessions

Last but not least, there is now a project setting which allows to set the username which is used by EPlug for the session it creates.

A little background, to acquire the MetaData (and some other information about the application) EPlug creates a session of the application and executes the server side code. It could be that projects do have checks and manipulations on the username somewhere in their code on the server. Previously EPlug would set null as username, but now it does either use the configured autologin username or the username configured in the project settings. That allows server side code which does operate on the username of the session to run without a problem, which means that there are no checks necessary if the session was initialized by EPlug or not.

How to get it?

Simply update EPlug via Eclipse!

Jasperreports integration

Jasperreports is a wonderful Reporting library/product. It's OpenSource and great for commercial products. There are several products like JasperReports Server and Jaspersoft Studio. Especially the Jaspersoft Studio is very useful for creating reports with a WYSIWYG editor. Simply use the tool and create your reports.

The most insteresting part is the integration of Jasperreports in a JVx application. It's super easy to start Jasperreports programmatically:

//database connection
DBAccess dba = DBAccess.getDBAccess("jdbc:hsqldb:hsql://localhost/personsdb", "sa", "");
dba.open();

HashMap<String, Object> hmpParams = new HashMap<String, Object>();
hmpParams.put("ID" , Integer.valueOf(1));
//external connection as parameter
hmpParams.put("REPORT_CONNECTION", dba.getConnection()); // String

// compile report
JasperReport jasperReport = JasperCompileManager.compileReport(ResourceUtil.getResourceAsStream("Leaf_Grey.jrxml"));
 
// fill report (connection as parameter)
JasperPrint jasperPrint = JasperFillManager.fillReport(jasperReport, hmpParams);
// fill report (hardcoded connection)
//JasperPrint jasperPrint = JasperFillManager.fillReport(jasperReport, hmpParams, dba.getConnection());
 
File fiPdf = File.createTempFile("report", ".pdf");

// export report to PDF
JasperExportManager.exportReportToPdfFile(jasperPrint, fiPdf.getAbsolutePath());

// JVx usage
RemoteFileHandle rfh = new RemoteFileHandle(fiPdf);

// open with PDF viewer
//FileViewer.open(fiPdf);

Our example was created with Jasperreports 6.3.1. The library has some dependencies:

  • Apache Commons Logging
  • Apache Commons Digester 2
  • Apache Commons Collections
  • Apache Commons BeanUtils
  • iText 2.1.7 (unpatched) or iText 2.1.7.js5 (jaspersoft patched)

A complete Eclipse example project can be found here. It connects to a HSQLDB with following tables:

CREATE CACHED TABLE POSTLEITZAHLEN
(
 ID INTEGER IDENTITY,
 PLZ VARCHAR(5) NOT NULL,
 ORT VARCHAR(100) NOT NULL,
 CONSTRAINT UK_POST_PLZ_ORT UNIQUE(PLZ, ORT)
)

CREATE CACHED TABLE STRASSEN
(
 ID INTEGER IDENTITY,
 NAME VARCHAR(200) NOT NULL,
 CONSTRAINT UK_STRA_NAME UNIQUE(NAME)
)

CREATE CACHED TABLE ADRESSEN
(
 ID INTEGER IDENTITY,
 POST_ID INTEGER NOT NULL,
 STRA_ID INTEGER NOT NULL,
 HAUSNUMMER INTEGER NOT NULL,
 STIEGE INTEGER,
 TUERNUMMER INTEGER,
 CONSTRAINT FK_ADRE_POST_ID FOREIGN KEY (POST_ID) REFERENCES POSTLEITZAHLEN (ID),
 CONSTRAINT FK_ADRE_STRA_ID FOREIGN KEY (STRA_ID) REFERENCES STRASSEN (ID)
)

CREATE CACHED TABLE ANREDEN
(
 ID INTEGER IDENTITY,
 BEZEICHNUNG VARCHAR(20) NOT NULL,
 CONSTRAINT UK_ANRE_BEZEICHNUNG UNIQUE(BEZEICHNUNG)
)

CREATE CACHED TABLE TITEL
(
 ID INTEGER IDENTITY,
 BEZEICHNUNG VARCHAR(20) NOT NULL,
 CONSTRAINT UK_TITE_BEZEICHNUNG UNIQUE(BEZEICHNUNG)
)

CREATE CACHED TABLE PERSONEN
(
 ID INTEGER IDENTITY,
 PERS_ID INTEGER,
 ANRE_ID INTEGER NOT NULL,
 TITE_ID INTEGER,
 ADRE_ID INTEGER,
 VORNAME VARCHAR(100) NOT NULL,
 NACHNAME VARCHAR(100) NOT NULL,
 GEBDAT DATE NOT NULL,
 CONSTRAINT FK_PERS_ANRE_ID FOREIGN KEY (ANRE_ID) REFERENCES ANREDEN (ID),
 CONSTRAINT FK_PERS_TITE_ID FOREIGN KEY (TITE_ID) REFERENCES TITEL (ID),
 CONSTRAINT FK_PERS_PERS_ID FOREIGN KEY (PERS_ID) REFERENCES PERSONEN (ID),
 CONSTRAINT FK_PERS_ADRE_ID FOREIGN KEY (ADRE_ID) REFERENCES ADRESSEN (ID)
)

The final step for the integration into a JVx application is the integration in a life-cycle object, e.g.

public IFileHandle createReport() throws Exception
{
    JasperReport jasperReport = JasperCompileManager.compileReport(
                                   ResourceUtil.getResourceAsStream("person.jrxml"));
     
    JasperPrint jasperPrint = JasperFillManager.fillReport(jasperReport,
                                                           null,
                                                           getDBAccess().getConnection());
     
    File fiPdf = File.createTempFile("report", ".pdf");
   
    // export report to PDF
    JasperExportManager.exportReportToPdfFile(jasperPrint, fiPdf.getAbsolutePath());
   
    return new RemoteFileHandle(fiPdf);
}

JVx 2.6 is available

We're happy to announce that JVx 2.6 is available.

What's new?

  • Configuration via ServiceLoader

    It's now possible to use the ServiceLoader to configure an application (IApplicationSetup). It's enough to add a library to the classpath. It's not needed to extend anything.

  • Save bounds

    The Swing launcher now restores last frame bounds. The size and position of your application will be automatically saved and restored after an application restart. This feature takes care of multi monitor environments.

  • Better XmlNode API
    public XmlNode get(int pIndex)
    public XmlNode getFirstTextNode() // Getting the root node in xml file
    public void addAll(Collection<XmlNode> pNodes)
    public void insertAll(int pIndex, Collection<XmlNode> pNodes)
    public void setNodes(List<XmlNode> pNodes) // replaces setSubNodes
    public List<XmlNode> getNodes() // gets sub nodes never null and readonly
    public List<XmlNode> getNodes(short pType) // Gets sub nodes of given type
    public XmlNode remove(int pIndex)
  • Session states

    It's now possible to detect whether a session is initializing or destroying/expiring.

  • Message class improvements

    Simple support for Yes, No, Cancel messages.

  • preAuthentication support

    It's now possible to configure your sessions before authenticating without custom security managers.

  • BFILE and lazy loading

    New support for BFILE database columns and improved lazy loading mechanism.

  • Many Bugfixes

The full changelog is available here.

VisionX 2.4 is here

VisionX 2.4 was released yesterday! It's the biggest update since 1.5. We've spent more time for developing and testing than ever before. The new version has power under the hood. It contains everything which is needed to customize VisionX for your needs. It's possible to create your own VisionX. We have a great set of AddOns which will improve the quality of your applications and some very useful new Features.

What's new?

  • HTML5 Live Reload

    It's now possible to update the application in the browser automatically after design changes. The live preview wizard got a new option for this feature:

    Live reload option

    Live reload option

  • One-click HTML5 live preview

    The application menu got a new icon. A single click is enough to show the application in the web browser.

    One-click live preview

    One-click live preview

  • VisionX Menu

    The VisionX menu in the application has two new items:

    VisionX application menu

    VisionX application menu

    The modules screen is a complete new feature and the Live preview is now available without leaving the application.

  • Module management

    It's now possible to manage application modules. Simply install a module from the solution store or create your own re-usable application modules. The installation is super easy with our new modules screen:

    Super easy module installation

    Super easy module installation

  • Data Links

    The Designer got a new group with the name Data Links:

    Data Links

    Data Links

    All elements in the Data Links group depend on data and will update the shown value automatically on data changes.

    • The Label Control will show the current value of a specific column, as Label instead of an Editor.
    • The Selection Button will show a popup with possible values for a specific column.
    • The Filter Control requires the Profiles AddOn and allows an application user to apply and save custom filter settings, e.g. filter custom columns
  • Application frame automatically saves the last position and your application will be shown at the same position after a restart.

    The Profiles AddOn makes it possible to save also the frames within the application. Your users will love it because they can save their own desktop and continue the work after an application start.

  • Remove HTML5

    It's possible to create smaller application bundles if you remove the HTML5 feature from the bundle, via Deployment Wizard:

    Remove HTML5

    Remove HTML5

  • Customize screen generators

    It's super easy to use your own screen generators:

    Custom screen generators

    Custom screen generators

  • Multiple storages with same database table

    It's now possible to add multiple storages for the same database table. This was a limitation in earlier versions of VisionX.

All customers will find the new version in their download area!

JVx Reference, of Technologies and Factories

Let's talk about the UI layer, the implementations and the factory that powers it all.

The basics

For everyone who does not know, JVx allows you to write code once and run it on different GUI frameworks, without changing your code. This is achieved by hiding the concrete GUI implementations behind our own classes, the UI classes, and providing "bindings" for different GUI frameworks behind the scenes. Such a "Single Sourcing" approach has many advantages, and just one of them is that migrating to a new GUI framework requires only the change of a single line, the one which controls which factory is created.

The Factory Pattern

The Factory Pattern is an important pattern in Object-Oriented-Programming, it empowers us to delegate the creation of Objects to another Object which must not be known at design and/or compile time. That allows us to use Objects which have not been created by us but merely "provided" to us by an, for us unknown, implementation.

Like an onion

JVx is separated into different layers, with the UI layer being at the top and of the most concern to users.

JVx Layers

Technology

Obviously, the first one in the chain is the so called "technology" layer. It represents the UI technology, for example Swing, JavaFX or Vaadin, which is used to power the JVx application.

To put it into a more simple term:

public class JButton {}

Extension

Next comes the extension layer, components from the technology are extended to support needed features of JVx. This includes creating bindings for the databook, additional style options and changing of behavior if necessary. From time to time this also includes creating components from scratch if the provided ones do not meet the needs or there simply are none with the required functionality. For the most part, we do our best that these layers can be used without JVx, meaning that they represent a solitary extension to the technology. A very good example is our JavaFX implementation, which compiles into two separate jars, the first being the complete JVx/JavaFX stack, the second being stand-alone JavaFX extensions which can be used in any application and without JVx.

Theoretically one can skip this layer and directly jump to the Implementation layer, but so far it has proven necessary (for cleanliness of the code and object structure and sanity reasons) to create a separate extension layer.

public class JExtendedButton extends JButton {}

Implementation

After that comes the implementation layer. The extended components are extended to implement JVx interfaces. This is some sort of "glue" layer, it binds the technology or extended components against the interfaces which are provided by JVx.

public class SwingButton implements IButton {}

UI

Last but for sure not least is the UI layer, which wraps the implementations. It is completely Implementation independent, that means that one can swap out the stack underneath:

JVx Layers

This is achieved because the UI layer is not extending the Implementation layer, but wrapping instances provided by the factory. It is oblivious to what Technology is actually underneath it.

public class UIButton implements IButton {}

SwingButton resource = SwingFactory.createButton()

Why is the UI layer necessary?

It isn't, not at all. The Implementations could be used directly without any problems, but having yet another layer has two key benefits:

  1. It allows easier usage.
  2. It allows to add Technology independent features.

By wrapping it one more time we gain a lot of freedom which we would not have otherwise, when it comes to features as when it comes to coding. The user does not need to call the factory directly and instead just needs to create a new object:

IButton button = new UIButton();

Internally, of course, the Factory is called and an implementation instance is created, but that is an implementation detail. If we would use the implementation layer directly, our code would either need to know about the implementations, which doesn't follow the Single-Sourcing principle:

IButton button = new SwingButton();

It also would be possible to directly use the factory (but this isn't modern coding style):

IButton button = UIFactoryManager.getFactory().createButton();

Both can be avoided by using another layer which does the factory calls for us:

public class UIButton implements IButton
{
    private IButton resource;

    public UIButton()
    {
        resource = UIFactoryManager.getFactory().createButton();
    }

    public void someInterfaceMethod()
    {
        resource.someInterfaceMethod();
    }
}

Additionally this layer allows us to implement features which can be technology independent, our naming scheme, which we created during stress testing of an Vaadin application, is a very good example of that. The names of the components are derived in the UI layer without any knowledge of the underlying Technology or Implementation.

Also it does provide us (and everyone else of course) with a layer which allows to rapidly and easily build compound components out of already existing ones, like this:

public class LabeledButton extends UIPanel
{
    private IButton button = null;
    private ILabel label = null;
   
    public LabeledButton ()
    {
        super();

        initializeUI();
    }

    private void initializeUI()
    {
        button = new UIButton();
        label = new UILabel();
       
        setLayout(new UIBorderLayout());
        add(label, UIBorderLayout.LEFT);
        add(button, UIBorderLayout.CENTER);
    }
}

Of course that is not even close to sophisticated, or a good example for that matter. But it shows that one can build new components out of already existing ones without having to deal with the Technology or Implementation at all, creating truly cross-technology controls.

The Factory

The heart piece of the UI layer is the Factory, which is creating the Implemented classes. It's a rather simple system, a Singleton which is set at the beginning to the Technology specific factory which can be retrieved later:

// At the start of the application.
UIFactoryManager.setFactoryInstance(new SwingFactory());
// Or alternately:
UIFactory.getFactoryInstance(SwingFactory.class());

// Later inside the UI wrappers.
IButton button = UIFactory.getFactory().createButton();

The complexity of the implementation of the factory is technology dependent, but for the most part it is devoid of any logic:

public class SwingFactory implements IFactory
{
    @Override
    public IButton createButton()
    {
        SwingButton button = new SwingButton();
        button.setFactory(this);

        return button;
    }
}

It "just returns new objects" from the implementation layer. That's about it when it comes to the factory, it is as simple as that.

Piecing it together

With all this in mind, we know now that JVx has swappable implementations underneath its UI layer for each technology it utilizes:

JVx Layers

Changing between them can be as easy as setting a different factory. I say "can", because that is only true for Swing, JavaFX and similar technologies, Vaadin, obviously, requires some more setup work. I mean, theoretically one could embed a complete application server and launch it when the factory for Vaadin is created, allowing the application to be basically stand-alone and be started as easily as a Swing application. That is possible.

What else?

That is how JVx works in regards to the UI layer. It depends on "technology specific stacks" which can be swapped out and implemented for pretty much every GUI framework out there. We currently provide support for Swing, JavaFX and Vaadin, but we also had implementations for GWT and Qt. Additionally we do support a "headless" implementation which allows to use lightweight objects which might be serialized and send over the wire without much effort.

Adding a new Technology

Adding support for a new Technology is as straightforward as one can imagine, simply creating the Extensions/Implementations layers and implementing the factory for that Technology. Giving a complete manual would be out for scope for this post, but the most simple approach to adding a new stack to JVx is to start with stubbing out the IFactory and implementing IWindow. Once that one window shows up, it's just implementing one interface after another in a quite straightforward manner. And in the end, your application can switch to yet another GUI framework without the need to change your code.

JVx Reference, Events

Let's talk about events and event handling in JVx.

What are events...

Events are an important mechanism no matter to what programming language or framework you turn to. It allows us to react on certain actions and "defer" actions until something triggered them. Such triggers can be anything, like a certain condition is hit in another thread, the user clicked a button or another action has finally finished. Long story short, you get notified that something happened, and that you can now do something.

...and why do I need to handle them?

Well, you can't skip events, they are a cornerstone of JVx. Theoretically, you could use JVx without using any of its events, but you would not only miss out on a lot of functionality but also be unable to do anything useful. But don't worry, understanding the event system is easy, using it even easier.

Terminology

For JVx the following terminology applies: An event is a property of an object, you can register listeners on that event which will get invoked if the event is dispatched (fired). Every event consists of the EventHandler class which allows to register, remove and manage the listeners and also dispatches the events, meaning invoking the listeners and notifying them that the event occurred. There is no single underlying listener interface.

Within the JVx framework, every event-property of an object does start with the prefix "event" to make it easily searchable and identifiable. But enough dry talk, let's get started.

Attaching listeners as class

The easiest way to get notified of events is to attach a class (which is implementing the listener interface) to an event as listener, like this:

public class MainFrame extends UIFrame
{
    public MainFrame()
    {
        super();
       
        UIButton button = new UIButton("Click me!");
        button.eventAction().addListener(new ActionListener());
       
        setLayout(new UIBorderLayout());
        add(button, UIBorderLayout.CENTER);
    }
}

private static final class ActionListener implements IActionListener
{
    public void action(UIActionEvent pActionEvent) throws Throwable
    {
        System.out.println("Button clicked!");
    }
}

Attaching listeners as inlined class

Of course we can inline this listener class:

public class MainFrame extends UIFrame
{
    public MainFrame()
    {
        super();
       
        UIButton button = new UIButton("Click me!");
        button.eventAction().addListener(new IActionListener()
        {
            public void action(UIActionEvent pActionEvent) throws Throwable
            {
                System.out.println("Button clicked!");
            }
        });
       
        setLayout(new UIBorderLayout());
        add(button, UIBorderLayout.CENTER);
    }
}

Attaching listeners JVx style

So far, so normal. But in JVx we have support to attach listeners based on reflection, like this:

public class MainFrame extends UIFrame
{
    public MainFrame()
    {
        super();
       
        UIButton button = new UIButton("Click me!");
        button.eventAction().addListener(this, "doButtonClick");
       
        setLayout(new UIBorderLayout());
        add(button, UIBorderLayout.CENTER);
    }
   
    public void doButtonClick(UIActionEvent pActionEvent) throws Throwable
    {
        System.out.println("Button clicked");
    }
}

What is happening here is that, internally, a listener is created which references the given object and the named method. This allows to easily add and remove listeners from events and keeping the classes clean by allowing to have all related event listeners in one place and without additional class definitions.

Attaching listeners as lambdas

Yet there is more, we can of course attach lambdas to the events as listeners, too:

public class MainFrame extends UIFrame
{
    public MainFrame()
    {
        super();
       
        UIButton button = new UIButton("Click me!");
        button.eventAction().addListener((pActionEvent) -> System.out.println("Button clicked"));
       
        setLayout(new UIBorderLayout());
        add(button, UIBorderLayout.CENTER);
    }
}

Attaching listeners as method references

And last but not least, thanks to the new capabilities of Java 1.8, we can also use method references:

public class MainFrame extends UIFrame
{
    public MainFrame()
    {
        super();
       
        UIButton button = new UIButton("Click me!");
        button.eventAction().addListener(this::doButtonClick);
       
        setLayout(new UIBorderLayout());
        add(button, UIBorderLayout.CENTER);
    }
   
    private void doButtonClick(UIActionEvent pActionEvent) throws Throwable
    {
        System.out.println("Button clicked");
    }
}

Parameters or no parameters? To throw or not to throw?

By default we actually support two different classes of listeners, the specified event/listener interface itself, and (javax.rad.util.)IRunnable. Which means that you can also attach methods which do not have any parameters, like this:

public class MainFrame extends UIFrame
{
    public MainFrame()
    {
        super();
       
        UIButton button = new UIButton("Click me!");
        button.eventAction().addListener(this::doButtonClickNoParameters);
        button.eventAction().addListener(this::doButtonClickWithParameters);
       
        setLayout(new UIBorderLayout());
        add(button, UIBorderLayout.CENTER);
    }
   
    private void doButtonClickNoParameters() throws Throwable
    {
        System.out.println("Button clicked");
    }

    private void doButtonClickWithParameters(UIActionEvent pActionEvent) throws Throwable
    {
        System.out.println("Button clicked");
    }
}

Additionally, all listeners and IRunnable itself do support to throw Throwable, which is then handled inside the EventHandler. So you are very flexible when it comes to what methods you can attach and use as listeners.

Creating your own events

You can, of course, create your own EventHandlers and listeners to create your own events. All you need are two classes, an extension of EventHandler and a listener interface.

public class CustomEvent extends EventHandler
{
    public CustomEvent()
    {
        super(ICustomListener.class);
    }
}

public interface ICustomListener
{
    public void somethingHappened(String pName);
}

And that's it, from here on you can use it:

CustomEvent event = new CustomEvent();
event.addListener((pName) -> System.out.println(pName + " 1"));
event.addListener((pName) -> System.out.println(pName + " 2"));
event.addListener((pName) -> System.out.println(pName + " 3"));

event.dispatchEvent("Adam");

More methods!

You can also use an interface for listeners which has multiple methods, specifying in the constructor which method to invoke:

public class CustomEvent extends EventHandler
{
    public CustomEvent()
    {
        super(ICustomListener.class, "somethingOtherHappened");
    }
}

public interface ICustomListener
{
    public void somethingHappened(String pName);
    public void somethingOtherHappened(String pName, BigDecimal pValue);
    public void nothingHappened();
}

Now every time the event is dispatched, the somethingOtherHappened method will be invoked. Anyway, don't use this. The upside of having a "simple" listener interface with just one method (SAM-type) is that it allows to use lambdas with it. A listener interface with multiple methods won't allow this.

In JVx we reduced our listener interfaces to just one method (in a backward compatible way) to make sure all events can be used with lambdas.

Fire away!

That's it for this short reference sheet, that is how our event system can and should be used. Of course, there is much more to it under the hood, for example listeners being wrapped in proxy classes, reflection used for invoking methods and some more stuff. If you feel adventurous, be my guest and have a good look at the internals of EventHandler, it is quite an interesting read.

EPlug 1.2.5

We're happy to announce the release of EPlug 1.2.5. Even though the change in the version number is quite small, the changes which have gone into this version are very interesting.

Better hover information and improved DataBookView

The biggest visual change in this new version is the new hover information for columns:

New hover information

New hover information

As you can see it has been vastly extended, with nearly all information about the column which you might want to know about, including its type, the label and all other properties.

Also the image preview is now more useful and is displaying the complete image but scaled to fit the hover:

New hover information

Additionally the DataBookView has been restructured to display the information in a more easily digestible way, structured by variable name and source of the columns:

Improved DataBookView

Improved DataBook support

The support for DataBooks/DataRows has been greatly improved and the plugin does now support a lot more variations on how to achieve the metadata. For example cloning of ColumnDefinitions, assigning of RowDefinitions and even getDataRow(...) and similar methods are now processed to acquire the metadata and column information.

Objects in server calls

One of the build-time checks is the type-check of parameters in server calls. Let's look at a simple example:

// Server side
public void serverSideAction(ActionType pActionType, String pLogMessage, BigDecimal pId);

// Client side
getConnection().callAction(
    "serverSideAction",
    ActionType.DO_IT_LATER,
    "Some message which will be logged",
    dataBook.getValue("ID"));

While this compiles completely fine in pure Java (because callAction(...) does accept an Object vararg), EPlug would flag it with an error because getValue(...) returns an Object but the server-side expects a BigDecimal. With this update there is now a build option available in the Project/EPlug settings to ignore such errors, allowing to pass Objects to the server side without checks.

Misspelled a column name? No problem!

We do now offer QuickFixes for column names with typos:

Column name QuickFixes

Automatic check of complement files

There is now a new build option in the Project/EPlug settings which allows to enable the automatic check of complement files. A "complement" file is simply the "other side", for example for the lifecycle-object the complement file is the workscreen, and vice versa. That means that now workscreens are automatically checked if the lifecycle object changes.

Preliminary String array support

There are various functions which do accept a String array of column names, for example getValues(...). Because of limitations coming up from the JDT infrastructure which we are using, we've been unable to provide autocompletion for column names in such circumstances:

dataBook.getValues(new String[] { "|

We are still unable to determine the exact databook in such circumstances, but we do now simply provide all columns as completion suggestions. What we can do is provide full hover and build support for these functions.

Improved VisionX/EPlug communication

VisionX is now a lot more talkative, it informs EPlug about file changes. If "Auto Reload" is enabled in EPlug, all files that have been changed by VisionX will now be reloaded and checked automatically. The same accounts for changed metadata.

Changes

  • Updated JVx version
  • Cached MetaData is now correctly invalidated and refreshed
  • DataBookView is now not constantly refreshed
  • Markers (Errors, Warnings) are now only placed on the names of the columns, instead of the whole statement
  • Inserted methods (from quick fixes) should now always be correctly formed
  • Fixed "phantom" markers which could pop up during build
  • Fixed that the DataBookView might not display all metadata
  • Fixed that folding nodes in the DataBookView made the child-nodes vanish
  • Various bug fixes

Simply update EPlug via Eclipse!

JVx 2.5.1 is available

We're happy to announce that JVx 2.5.1 is available.

What's new?

  • Push-light

    Our push support has nothing to do with Websockets. It's a technology independent solution for JVx. The Push-light mechanism is available on server-side and enables you to send objects from the server to the client. If you use a direct connection betwenn client and server, the objects wil be sent immediate (e.g. vaadin UI). If you use a serialized connection, the objects will be sent with next client call or alive check.

    The API is simple:

    SessionContext.publishCallBackResult("MESSAGE", "Please logout!");

    or, in a Thread

    final ICallBackBroker broker = SessionContext.getCurrentInstance().getCallBackBroker();

    Thread th = new Thread(new Runnable()
    {
        public void run()
        {
            try
            {
                int i = 0;

                while (isMessageLoopEnabled(i))
                {
                    Thread.sleep(200);
                   
                    broker.publish("MESSAGE", getMessage(i++));
                }
            }
            catch (InterruptedException ie)
            {
                //done
            }
        }
    });
    th.start();

    It's also possible to publish to all clients, via ICallBackBroker.

    The client code is short and simple:

    connection.addCallBackResultListener(new ICallBackResultListener()
    {
        public void callBackResult(CallBackResultEvent pEvent)
        {
            if ("MESSAGE".equals(pEvent.getInstruction()))
            {
                showMessage((String)pEvent.getObject());
            }
        }
    });

    More details: Tickets #25, #1635

  • H2 DB support

    We support H2 with a custom H2DBAccess. The auto detection works with URLs: jdbc:h2:.

  • SQLite DB support

    We support SQLite with a custom SQLiteDBAccess. The auto detection works with URLs: jdbc:sqlite:.

  • MySql limit support

    Read more...

  • Life-cylcle object method inheritance
  • Pie control
  • Set individual cells of a table readonly
  • Connection retries

    We try to re-send requests, if errors occur during transmission. This feature will be available for serialized connections only.

  • Security improvements

    see Tickets: #1605, #1606, #630.

  • Session validator

    We introduced ISessionValidator interface. It allows you to cancel the session after successful authentication. You don't need a custom security manager for this!
    Simply configure the validator in your config.xml:

    <lifecycle>
      <mastersession postAuthClass="com.sibvisions.apps.server.MySessionValidator">
    com.sibvisions.apps.demo.MySession
      </mastersession>
    </lifecycle>
  • API changes

    ICellFormat got a Style attribute and the createCellFormat of IFactory got one more parameter.

The full changelog is available here.

Eclipse NEON with ANT and JRE6

This is a follow-up post for: Eclipse MARS with ANT and JRE 6 (story).

New Eclipse version, same problem. We have an updated ant plugin for you.
The plugin was created for:

Version: Neon Release (4.6.0)
Build id: 20160613-1800

Don't forget the -clean start (read the original article for more details).

Download the plugin from here. It works for us - no warranty!

JVx and MySQL, Limited Edition

If you work with JDBC and MySQL, you will most likely be aware of one shortcoming: MySQL can not stream the results from a query (well, actually it can, but the feature is quite limited). That means that up until now JVx has always received and stored the full result set in memory which it received from MySQL. No paging was performed as it was done in the Oracle implementation.

Limit to the rescue!

MySQL does support the limit clause, which allows to limit the results to either a certain number of rows, or a certain range of rows. How does it look like?

SELECT
    ID,
    NAME
FROM
    TEST
WHERE
    NAME LIKE 'Hans%'
LIMIT 5, 10;

This will fetch the data starting by the 5th row up to the 15th row, so it will skip the first five rows and then return the next ten. As this is a database builtin, no additional data is send over the wire except the actual requested rows. This is perfect if you want to limit your queries, for example, because you know that you don't need more than 5 rows even though there are 50,000 rows.

Fetch all the things!

With the old behavior, without limit clause, the JDBC MySQL driver would fetch the complete result of the query and only we would do some cutting on it (mainly dropping not needed rows at the start). That meant that the complete result set was always loaded into memory, which itself might have caused that you were unable to execute certain queries, especially if they contained bigger blob columns.

Limit all the things!

With the new behavior, the limit clause is appended to the query as needed, which means that the JDBC MySQL driver has to load a lot less data and a lot less data is send over the wire.

The MySQL giveth, the MySQL taketh away...

But there is an additional cost associated with the usage of the limit clause. Because the fetches are separate statements, all rows leading up to the beginning row have to be selected, too. Let us return to our first example, the query of the TEST table. We only want 10 rows starting from the 5th row, that means our result set only contains 10 rows. However, MySQL has (obviously) to query, select and discard the first five rows so that it can start sending us the rows that we actually want. That means that the cost of selecting pages increases. Off to pretty graphics!

Impressions

Note that the fetch time is accumulative.

  • Blue: The original implementation which does perform only one fetch of all data. In this case it is quite fast, but depending on the query and data you could wait a long time for the initial fetch, if it was possible at all.
  • Orange: The current implementation with quite a worst case scenario, it gradually fetches page after page with a row count of 50. As you can see the fetch time gradually increases, but as you can also see the initial fetches are fast.
  • Yellow: An optimization experiment which increases the fetched row count dynamically.

Let us look at this again in detail, to be exact the fetching of the first 1500 rows.

Impressions

What we see here is quite good news, actually, because with the new implementation with the limit clause, you can consecutively fetch 600 rows in the same time as the fetching of the 4400 rows with the old implementation. The big difference here is that the first set of ~113 rows returns close to immediately and consecutive fetches are equally fast. This is awesome because we can now display initial data faster, even few it is fewer data in the end and slows down the more data is fetched afterwards.

Improve all the things!

As you can see from the charts, we already did a short experiment to improve this further, and we are confident that we can implement such a solution which dynamically fetches more rows to reduce the overall fetch time while still preserving that the first rows are displayed fast, further improving GUI responsiveness.