This website uses cookies for visitor traffic analysis. By using the website, you agree with storing the cookies on your computer.More information

JVx Reference, Custom Components

Let's talk about custom components, and how to create them.

The GUI of JVx

We've previously covered how the GUI of JVx works, and now we will have a look on how we can add custom components to the GUI.

In the terminology of JVx there are two different kinds of custom components:

  1. UI based
  2. Technology based

We will look at both, of course.

Custom components at the UI layer

The simplest way to create custom components is to extend and use already existing UI classes, like UIPanel or UIComponent. These custom components will be Technology independent because they use Technology independent components, there is no need to know about the underlying Technology. You can think of those as a "remix" of already existing components.

The upside is that you never have to deal with the underlying Technology, the downside is that you can only use already existing components (custom drawing is not possible, for example).

Let's look at a very simple example, we will extend the UILabel to always display a certain postfix along with the set text:

public class PostfixedLabel extends UILabel
{
    private String postfix = null;

    // We must store the original text so that we can return
    // it if requested. Otherwise we could only return the text
    // with the appended postfix, which works unless the postfix
    // changes.
    private String text = null;

    public PostfixedLabel()
    {
        super();
    }

    public PostfixedLabel(String pText)
    {
        super(pText);
    }

    public PostfixedLabel(String pText, String pPostfix)
    {
        super(pText);

        setPostfix(pPostfix);
    }

    @Override
    public String getText()
    {
        return text;
    }

    @Override
    public void setText(String pText)
    {
        text = pText;

        if (!StringUtil.isEmpty(postfix) && !StringUtil.isEmpty(pText))
        {
            // We translate the text and the postfix now separately,
            // the underlying label will obviously try to translate
            // the concatenated version.
            super.setText(translate(pText) + translate(postfix));
        }
        else
        {
            super.setText(pText);
        }
    }

    public String getPostfix()
    {
        return postfix;
    }

    public void setPostfix(String pPostfix)
    {
        postfix = pPostfix;

        // If the postfix changed, we must update the text.
        setText(text);
    }
}

It will be treated just like another label, but every time a text is set, the postfix is appended to it.

Another example, we want a special type of component, one that always does the same but will be used in many different areas of the application, it should contain a label and two buttons. The best approach for a custom component which should not inherit any specific behavior is to extend UIComponent:

public class BeepComponent extends UIComponent
{
   public BeepComponent()
   {
       super(new UIPanel());
       
       UIButton highBeepButton = new UIButton("High Beep");
       highBeepButton.eventAction().addListener(Beeper::playHighBeep);
       
       UIButton lowBeepButton = new UIButton("Low Beep");
       highBeepButton.eventAction().addListener(Beeper::playLowBeep);
       
       UIFormLayout layout = new UIFormLayout();        

       uiResource.setLayout(layout);
       uiResource.add(new UILabel("Press for beeping..."), layout.getConstraints(0, 0, -1, 0));
       uiResource.add(highBeepButton, layout.getConstraints(0, 1));
       uiResource.add(lowBeepButton, layout.getConstraints(1, 1));
   }
}

So we extend UIComponent and set a new UIPanel as UIResource on it, which we can use later and which is the base for our new component. After that we added a label and two buttons which will play beep sounds if pressed. This component does not expose any specific behavior as it extends UIComponent, it only inherits the most basic properties, like background color and font settings, yet it can easily be placed anywhere in the application and will perform its duty.

Custom controls at the Technology layer

The more complex option is to create a custom component at the Technology layer. That means that we have to go through a multiple steps process to create and use the component:

  1. Create an interface for the functionality you'd like to expose
  2. Extend the Technology component (if needed)
  3. Implement the necessary interfaces for JVx
  4. Extend the factory to return the new component
  5. Create a UIComponent for the new component
  6. Use the new factory

I will walk you through this process, step by step.

The upside is that we can use any component which is available to us in the Technology, the downside is that it is quite some work to build the correct chain, ideally for every technology.

Creating an interface

The first step is to think about what functionality the component should expose, we will use a progress bar as example. We don't want anything fancy for now, a simple progress bar on which we set a percent value should be more than enough:

/**
 * The platform and technology independent definition for a progress bar.
 */

public interface IProgressBar extends IComponent
{
    /**
     * Gets the current value, in percent.
     *
     * @return the current value. Should be between {@code 0} and {@code 100}.
     */

    public int getValue();
   
    /**
     * Sets the current value, in percent.
     *
     * @param pValue the value. Should be between {@code 0} and {@code 100}.
     */

    public void setValue(int pValue);
}

Might not be the most sophisticated example (especially in regards to documentation) but it will do for now. This interface will be the foundation for our custom component.

Extending the component, if needed

We will be using Swing and the JProgressBar for this example, so the next step is to check if we must add additional functionality to the Technology component. In our case we don't, as we do not demand any behavior that is not provided by JProgressBar, but for the sake of the tutorial we will still create an extension on top of JProgressBar anyway.

public class ExtendedProgressBar extends JProgressBar
{
    public ExtendedProgressBar(int pMin, int pMax)
    {
        super(pMin, pMax);
    }
}

Within this class we could now implement additional behavior independent of JVx. For example, we provide many extended components for Swing, JavaFX and Vaadin with additional features but without depending on JVx. The extension layer is the perfect place to extend already existing components with functionality which will be used by, but is not depending on, JVx.

Creating the Implementation

The next step is to create an Implementation class which allows us to bind our newly extended JProgressBar to the JVx interfaces. Luckily there is the complete Swing Implementation infrastructure which we can use:

public class SwingProgressBar<ExtendedProgressBar> extends SwingComponent
                              implements IProgressBar
{
    public SwingProgressBar()
    {
        // We can hardcode the min and max values here, because
        // we do not support anything else.
        super(new ExtendedProgressBar(0, 100));
    }
   
    @Override
    public int getValue()
    {
        return resource.getValue();
    }
   
    @Override
    public void setValue(int pValue)
    {
        resource.setValue(pValue);
    }
}

That's it already. Again, in this case it is quite simple because we do not expect a lot of behavior. The implementation layer is the place to "glue" the component to the JVx interface, implementing missing functionality which is depending on JVx and "translating" and forwarding values and properties.

Extending the factory

Now we must extend the Factory to be aware of our new custom component, that is equally simple as our previous steps. First we extend the interface:

public interface IProgressBarFactory extends IFactory
{
    public IProgressBar createProgressBar();
}

And afterwards we extend the SwingFactory:

public class ProgressBarSwingFactory extends SwingFactory
                                     implements IProgressBarFactory
{
    @Override
    public IProgressBar createProgressBar()
    {
        SwingProgressBar progressBar = new SwingProgressBar();
        progressBar.setFactory(this);
        return progressBar;
    }
}

Again, it is that easy.

Creating the UIComponent

So that we can use our new and shiny progress bar easily, and without having to call the factory directly, we wrap it one last time in a new UIComponent:

public class UIProgressBar<IProgressBar> extends UIComponent
                           implements IProgressBar
{
    public UIProgressBar()
    {
        // We'll assume that, whoever uses this component,
        // is also using the correct factory.
        super(((IProgressBarFactory)UIFactoryManager.getFactory()).createProgressBar());
    }
   
    @Override
    public int getValue()
    {
        return uiResource.getValue();
    }
   
    @Override
    public void setValue(int pValue)
    {
        uiResource.setValue(pValue);
    }
}

Nearly done, we can nearly use our new and shiny component in our project.

Using thecustom factory

Of course we have to tell JVx that we want to use our factory, and not the default one. Depending on the technology which is used, this has to be done at different places:

Swing and JavaFX

Add the factory setting to the application.xml of the application:

<Launcher.uifactory>your.package.with.custom.components.SwingProgressBarFactory</Launcher.uifactory>
Vaadin

Add the following setting to the web.xml under the WebUI Servlet configuration:

<init-param>
    <param-name>Launcher.uifactory</param-name>
    <param-value>your.package.with.custom.components.VaadinProgressBarFactory</param-value>
</init-param>

Using our new component

And now we are done, from here we can use our custom component like any other.

UIProgressBar progressBar = new UIProgressBar();
progressBar.setValue(65);

// Skip

add(progressBar, constraints);

Wrapping custom components with UICustomComponent

There is a third way to have Technology dependent custom components in JVx, you can wrap them within a UICustomComponent:

JProgressBar progressBar = new JProgressBar(0, 100);
progressBar.setValue(100);

UICustomComponent customProgressBar = new UICustomComponent(progressBar);

// Skip

add(customProgressBar, constraints);

This has the upside of being fast and easy, but the downside is that your code has to know about the currently used Technology and is not easily portable anymore.

Conclusion

As you can see, there are multiple ways of extending the default set of components which are provided by JVx, depending on the use case and what custom components are required. It is very easy to extend JVx with all the components one does require.

EPlug 1.2.6

We're happy to announce the release of EPlug 1.2.6. Again this small version bump does not only yield important bug fixes, but also new features which will make your life a lot easier.

Fixes

This release includes bug fixes along with new features. One of the most notable problems fixed was that compile time checks might not be run if the communication with VisionX was active.

Cleaner context menu with more actions

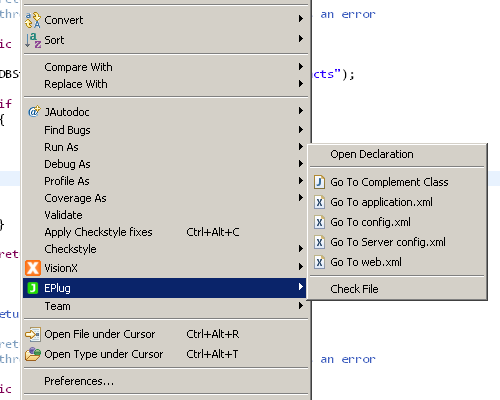
We have restructured our approach to the context menu entries and introduced a new menu item which holds all EPlug related actions:

New context menu

As you can see we've also added new actions to jump to the configuration files.

Resources outside of source folders

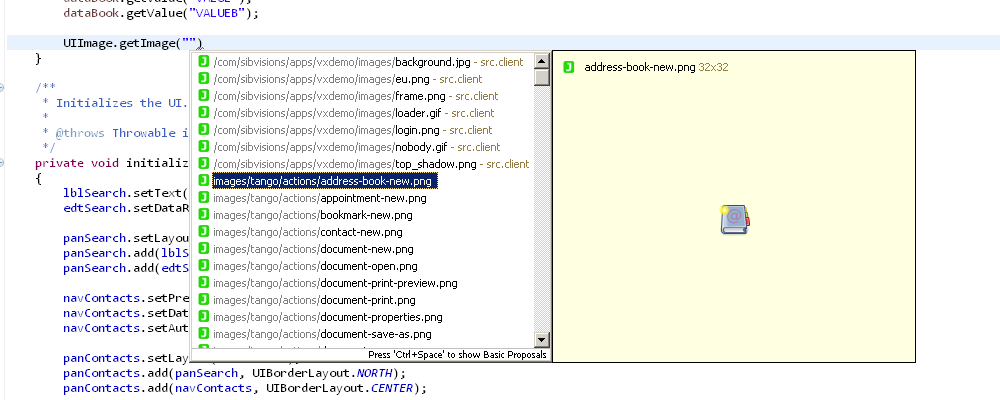
We do support autocompletion and compile time checks for resources, like images. But we only supported resources inside of source folders, with this version we do now also support resources anywhere in the project.

Resources

Improved DataBook handling

DataBook handling has been improved once more. There are now additional checks which make sure that a RemoteDataBook receives the correct DataSource and there for if the MetaData can reliably be determined.

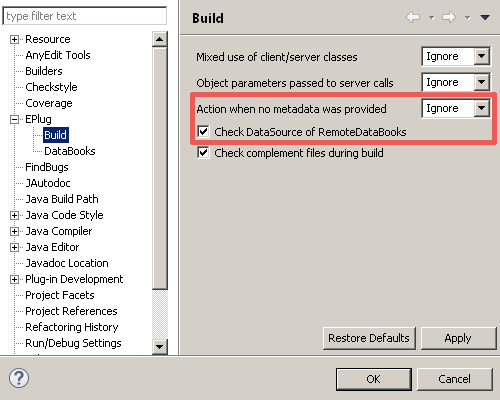
Additionally, the type of flag issued if no MetaData could be determined is now a configurable build option on the project.

New context menu

An example:

private void changeSomeValues(RemoteDataBook pDataBook)
{
    pDataBook.setValue("COLUMN_A", "A");
    pDataBook.setValue("COLUMN_B", "B");
    pDataBook.setValue("COLUMN_C", "C");
}

This would have been flagged as warning, because no MetaData could be determined for pDataBook. Now the check determines that determining MetaData for this DataBook is impossible and flags it accordingly. You can configure whether you want to see this flag or not in the project settings.

EPlug does also recognize if a "foreign" datasource has been set:

RemoteDataBook dataBookA = new RemoteDataBook();
dataBookA.setDataSource(getDataSource());
dataBookA.setName("a");
dataBookA.open();

RemoteDataBook dataBookB = new RemoteDataBook();
dataBookB.setDataSource(dataSourceFromSomewhereElse);
dataBookB.setName("a");
dataBookB.open();

// This will be flagged as error.
dataBookA.setValue("NON_EXISTING", BigDecimal.ZERO);

// This will be flagged according to the settings.
dataBookB.setValue("NON_EXISTING", BigDecimal.ZERO);

Usernames for sessions

Last but not least, there is now a project setting which allows to set the username which is used by EPlug for the session it creates.

A little background, to acquire the MetaData (and some other information about the application) EPlug creates a session of the application and executes the server side code. It could be that projects do have checks and manipulations on the username somewhere in their code on the server. Previously EPlug would set null as username, but now it does either use the configured autologin username or the username configured in the project settings. That allows server side code which does operate on the username of the session to run without a problem, which means that there are no checks necessary if the session was initialized by EPlug or not.

How to get it?

Simply update EPlug via Eclipse!

Jasperreports integration

Jasperreports is a wonderful Reporting library/product. It's OpenSource and great for commercial products. There are several products like JasperReports Server and Jaspersoft Studio. Especially the Jaspersoft Studio is very useful for creating reports with a WYSIWYG editor. Simply use the tool and create your reports.

The most insteresting part is the integration of Jasperreports in a JVx application. It's super easy to start Jasperreports programmatically:

//database connection
DBAccess dba = DBAccess.getDBAccess("jdbc:hsqldb:hsql://localhost/personsdb", "sa", "");
dba.open();

HashMap<String, Object> hmpParams = new HashMap<String, Object>();
hmpParams.put("ID" , Integer.valueOf(1));
//external connection as parameter
hmpParams.put("REPORT_CONNECTION", dba.getConnection()); // String

// compile report
JasperReport jasperReport = JasperCompileManager.compileReport(ResourceUtil.getResourceAsStream("Leaf_Grey.jrxml"));
 
// fill report (connection as parameter)
JasperPrint jasperPrint = JasperFillManager.fillReport(jasperReport, hmpParams);
// fill report (hardcoded connection)
//JasperPrint jasperPrint = JasperFillManager.fillReport(jasperReport, hmpParams, dba.getConnection());
 
File fiPdf = File.createTempFile("report", ".pdf");

// export report to PDF
JasperExportManager.exportReportToPdfFile(jasperPrint, fiPdf.getAbsolutePath());

// JVx usage
RemoteFileHandle rfh = new RemoteFileHandle(fiPdf);

// open with PDF viewer
//FileViewer.open(fiPdf);

Our example was created with Jasperreports 6.3.1. The library has some dependencies:

  • Apache Commons Logging
  • Apache Commons Digester 2
  • Apache Commons Collections
  • Apache Commons BeanUtils
  • iText 2.1.7 (unpatched) or iText 2.1.7.js5 (jaspersoft patched)

A complete Eclipse example project can be found here. It connects to a HSQLDB with following tables:

CREATE CACHED TABLE POSTLEITZAHLEN
(
 ID INTEGER IDENTITY,
 PLZ VARCHAR(5) NOT NULL,
 ORT VARCHAR(100) NOT NULL,
 CONSTRAINT UK_POST_PLZ_ORT UNIQUE(PLZ, ORT)
)

CREATE CACHED TABLE STRASSEN
(
 ID INTEGER IDENTITY,
 NAME VARCHAR(200) NOT NULL,
 CONSTRAINT UK_STRA_NAME UNIQUE(NAME)
)

CREATE CACHED TABLE ADRESSEN
(
 ID INTEGER IDENTITY,
 POST_ID INTEGER NOT NULL,
 STRA_ID INTEGER NOT NULL,
 HAUSNUMMER INTEGER NOT NULL,
 STIEGE INTEGER,
 TUERNUMMER INTEGER,
 CONSTRAINT FK_ADRE_POST_ID FOREIGN KEY (POST_ID) REFERENCES POSTLEITZAHLEN (ID),
 CONSTRAINT FK_ADRE_STRA_ID FOREIGN KEY (STRA_ID) REFERENCES STRASSEN (ID)
)

CREATE CACHED TABLE ANREDEN
(
 ID INTEGER IDENTITY,
 BEZEICHNUNG VARCHAR(20) NOT NULL,
 CONSTRAINT UK_ANRE_BEZEICHNUNG UNIQUE(BEZEICHNUNG)
)

CREATE CACHED TABLE TITEL
(
 ID INTEGER IDENTITY,
 BEZEICHNUNG VARCHAR(20) NOT NULL,
 CONSTRAINT UK_TITE_BEZEICHNUNG UNIQUE(BEZEICHNUNG)
)

CREATE CACHED TABLE PERSONEN
(
 ID INTEGER IDENTITY,
 PERS_ID INTEGER,
 ANRE_ID INTEGER NOT NULL,
 TITE_ID INTEGER,
 ADRE_ID INTEGER,
 VORNAME VARCHAR(100) NOT NULL,
 NACHNAME VARCHAR(100) NOT NULL,
 GEBDAT DATE NOT NULL,
 CONSTRAINT FK_PERS_ANRE_ID FOREIGN KEY (ANRE_ID) REFERENCES ANREDEN (ID),
 CONSTRAINT FK_PERS_TITE_ID FOREIGN KEY (TITE_ID) REFERENCES TITEL (ID),
 CONSTRAINT FK_PERS_PERS_ID FOREIGN KEY (PERS_ID) REFERENCES PERSONEN (ID),
 CONSTRAINT FK_PERS_ADRE_ID FOREIGN KEY (ADRE_ID) REFERENCES ADRESSEN (ID)
)

The final step for the integration into a JVx application is the integration in a life-cycle object, e.g.

public IFileHandle createReport() throws Exception
{
    JasperReport jasperReport = JasperCompileManager.compileReport(
                                   ResourceUtil.getResourceAsStream("person.jrxml"));
     
    JasperPrint jasperPrint = JasperFillManager.fillReport(jasperReport,
                                                           null,
                                                           getDBAccess().getConnection());
     
    File fiPdf = File.createTempFile("report", ".pdf");
   
    // export report to PDF
    JasperExportManager.exportReportToPdfFile(jasperPrint, fiPdf.getAbsolutePath());
   
    return new RemoteFileHandle(fiPdf);
}

JVx 2.6 is available

We're happy to announce that JVx 2.6 is available.

What's new?

  • Configuration via ServiceLoader

    It's now possible to use the ServiceLoader to configure an application (IApplicationSetup). It's enough to add a library to the classpath. It's not needed to extend anything.

  • Save bounds

    The Swing launcher now restores last frame bounds. The size and position of your application will be automatically saved and restored after an application restart. This feature takes care of multi monitor environments.

  • Better XmlNode API
    public XmlNode get(int pIndex)
    public XmlNode getFirstTextNode() // Getting the root node in xml file
    public void addAll(Collection<XmlNode> pNodes)
    public void insertAll(int pIndex, Collection<XmlNode> pNodes)
    public void setNodes(List<XmlNode> pNodes) // replaces setSubNodes
    public List<XmlNode> getNodes() // gets sub nodes never null and readonly
    public List<XmlNode> getNodes(short pType) // Gets sub nodes of given type
    public XmlNode remove(int pIndex)
  • Session states

    It's now possible to detect whether a session is initializing or destroying/expiring.

  • Message class improvements

    Simple support for Yes, No, Cancel messages.

  • preAuthentication support

    It's now possible to configure your sessions before authenticating without custom security managers.

  • BFILE and lazy loading

    New support for BFILE database columns and improved lazy loading mechanism.

  • Many Bugfixes

The full changelog is available here.