Let's talk about Resources and UIResources, and why they sound similar but are not the same.
The Basics
We've previously covered how the JVx GUI layer works, now we are going to have a better look at the Resources and UIResources. With "Resource" we do not mean images or similar, we mean the implementation at the technology layer which is encapsulated by a wrapper class (Bridge Pattern). An "UIResource" on the other hand is an encapsulated concrete implementation of one of the interfaces on the UI layer.
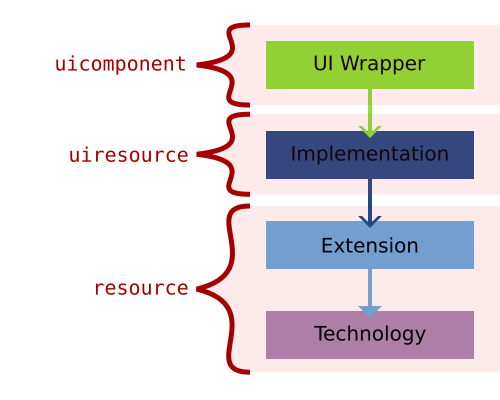
Let's do a short brush-up on how the JVx architecture looks like in regards to the GUI stack:

The UI Wrappers are the main UI classes which are used to create the GUI (f.e. UIButton). These are wrapping the Implementations (f.e. a SwingButton) which themselves are wrapping the Extension/Technology (f.e. a JVxButton/JButton). Only the UI and Implementation classes are implementing the interface required for the component (f.e. IButton). That also means that the Implementation is dependent on the Extension/Technology component, but the UI can use any object which implements the interface.
Now, with that knowledge we can start defining what is what:

The resource itself, accessed by calling <uiwrapper>.getResource(), is the Extension/Technology component. The uiresource can be accessed by calling <uiwrapper>.getUIResource(). The uicomponent can be accessed by calling <uiwrapper>.getUIComponent() and is usually the UI Wrapper itself. If we use our previous Swing example, the resource would be a JVxButton/JButton, the uiresource would be the SwingPanel and the uicomponent would be the UIButton.
As one can see, access to all objects which are comprising the GUI is at all times possible. We, of course, have the UI component, we can access the Implementation component and we can access the Extension/Technology component. Theoretically we could also swap them at runtime, but in JVx this is limited to the construction of the object to greatly reduce the error potential.
Creating custom components
Equipped with that knowledge, we can revisit the previous guide on how to create custom components, the part about the BeepComponent to be exact:
-
public class BeepComponent extends UIComponent<IPanel>
-
{
-
public BeepComponent()
-
{
-
super(new UIPanel());
-
-
UIButton highBeepButton = new UIButton("High Beep");
-
highBeepButton.eventAction().addListener(Beeper::playHighBeep);
-
-
UIButton lowBeepButton = new UIButton("Low Beep");
-
highBeepButton.eventAction().addListener(Beeper::playLowBeep);
-
-
UIFormLayout layout = new UIFormLayout();
-
-
uiResource.setLayout(layout);
-
uiResource.add(new UILabel("Beep"), layout.getConstraints(0, 0, -1, 0));
-
uiResource.add(highBeepButton, layout.getConstraints(0, 1));
-
uiResource.add(lowBeepButton, layout.getConstraints(1, 1));
-
}
-
}
We are setting a new UIResource (an UIPanel) in the constructor (at line #5) which is to be used by the UIComponent. In this case it is not an Implementation, but another UI component, but that doesn't matter because the UIResource only must implement the expected interface. At line #15 we start using that custom UIResource.
Because UIComponent is an abstract component designed for exactly this usage, the example might not be the most exciting one, but it clearly illustrates the mechanic.
Bolting on functionality
Also from the previous guide on how to create custom components we can reuse the PostfixedLabel as example.
-
private UILabel testLabel = new UILabel()
-
{
-
public UILabel()
-
{
-
super(new PostfixedLabel("", "-trial"));
-
}
-
};
Now testLabel will be using the PostfixedLabel internally, but with no indication to the user of the object that this is the case. This allows to extend the functionality of a component completely transparently, especially in combination with functions which do return an UIComponent and similar.
An important note about the component hierarchy
If we create a simple component extensions, like the BeepComponent above, it is important to note that there is one other layer of indirection in regards to the hierarchy on the technology layer. If we create a simple frame with the BeepComponent in it, one might expect the following hierarchy:
         UI                   Technology
---------------------    ----------------------
 UIFrame                  Frame
   \-UIPanel                \-Panel
       \-BeepComponent          \-BeepComponent
                                    \-Panel
                                        |-Label
                                        |-Button
                                        \-Button
With the BeepComponent added and its sub-components as its children. However, the actual hierarchy looks like this:
         UI                   Technology
---------------------    ----------------------
 UIFrame                  Frame
   \-UIPanel                \-Panel
       \-BeepComponent          \-Panel
                                    |-Label
                                    |-Button
                                    \-Button
That is because such extended components are not "passed" to the Technology, they do only exist on the UI layer because they do not have a Technology component which could be used. That is done by adding the UIComponent to the UI parent, but for adding the actual Technology component the set UIResource is used.
The special case of containers
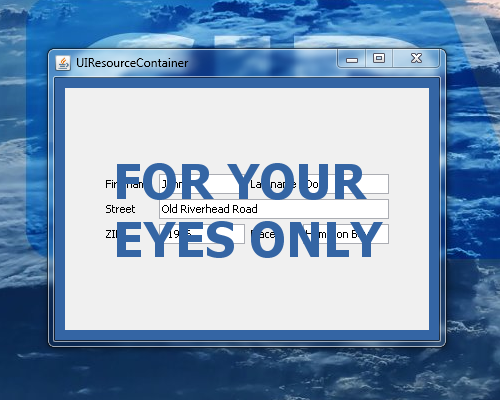
Another special case are containers. For example we could create a panel which does display an overlay in certain situations and we will need to use that throughout the whole application.

That means we do not want to build it every time anew, so one option would be to use a factory method to "wrap" the content, something like this:
-
UIFormLayout panelLayout = new UIFormLayout();
-
panelLayout.setHorizontalAlignment(UIFormLayout.ALIGN_CENTER);
-
panelLayout.setVerticalAlignment(UIFormLayout.ALIGN_CENTER);
-
-
UIPanel panel = new UIPanel();
-
panel.setLayout(panelLayout);
-
panel.add(new UILabel("Firstname"), panelLayout.getConstraints(0, 0));
-
panel.add(new UITextField("John"), panelLayout.getConstraints(1, 0));
-
panel.add(new UILabel("Lastname"), panelLayout.getConstraints(2, 0));
-
panel.add(new UITextField("Doe"), panelLayout.getConstraints(3, 0));
-
panel.add(new UILabel("Street"), panelLayout.getConstraints(0, 1));
-
panel.add(new UITextField("Old R. Road"), panelLayout.getConstraints(1, 1, 3, 1));
-
panel.add(new UILabel("ZIP"), panelLayout.getConstraints(0, 2));
-
panel.add(new UITextField("11946"), panelLayout.getConstraints(1, 2));
-
panel.add(new UILabel("Place"), panelLayout.getConstraints(2, 2));
-
panel.add(new UITextField("Hampton Bays"), panelLayout.getConstraints(3, 2));
-
-
parentContainer.add(OverlayPanelFactory.wrap(panel), UIBorderLayout.CENTER);
And the wrap method itself:
-
public static final UIPanel wrap(IComponent pContent)
-
{
-
UILabel overlayLabel = new UILabel("FOR YOUR<br>EYES ONLY");
-
overlayLabel.setBackground(null);
-
overlayLabel.setFont(UIFont.getDefaultFont().deriveFont(UIFont.BOLD, 48));
-
overlayLabel.setForeground(UIColor.createColor("#3465a4"));
-
overlayLabel.setHorizontalAlignment(UILabel.ALIGN_CENTER);
-
-
UIFormLayout layout = new UIFormLayout();
-
-
UIPanel panel = new UIPanel();
-
-
panel.setLayout(layout);
-
panel.setBackground(UIColor.createColor("#3465a4"));
-
panel.add(overlayLabel, layout.getConstraints(0, 0, -1, -1));
-
panel.add(pContent, layout.getConstraints(0, 0, -1, -1));
-
-
return panel;
-
}
Which is easy enough, but let's say we'd like to add logic to that wrapper, at that point it becomes more complicated. We can't use the same technique as for custom component from above, because in that case the "overlaying panel" would simply not be displayed. However, there is a similar mechanism for containers, setting the UIResourceContainer.
The UIResourceContainer is another special mechanism which works similar to setting the UIResource, but it works exactly the other way round. While setting the UIResource does "hide" components from the Technology which are there in UI layer, setting the UIResourceContainer does hide components from the UI layer while there are added in the Technology. A little bit complicated, here is our example again using this technique:
-
public static class OverlayedPanel extends UIPanel
-
{
-
public OverlayedPanel()
-
{
-
super();
-
-
UILabel overlayLabel = new UILabel("FOR YOUR<br>EYES ONLY");
-
overlayLabel.setBackground(null);
-
overlayLabel.setFont(UIFont.getDefaultFont().deriveFont(UIFont.BOLD, 48));
-
overlayLabel.setForeground(UIColor.createColor("#3465a4"));
-
overlayLabel.setHorizontalAlignment(UILabel.ALIGN_CENTER);
-
-
UIPanel innerPanel = new UIPanel();
-
-
UIFormLayout layout = new UIFormLayout();
-
-
setLayout(layout);
-
setBackground(UIColor.createColor("#3465a4"));
-
add(overlayLabel, layout.getConstraints(0, 0, -1, -1));
-
add(innerPanel, layout.getConstraints(0, 0, -1, -1));
-
-
setUIResourceContainer(innerPanel);
-
}
-
}
What we've done is extend an UIPanel (line #1), setting it up and adding children and then we've declared one of its children as the UIResourceContainer (line #22). So all methods which are specific to IContainer (adding children, setting a layout, etc.) are now forwarding to the innerPanel and manipulating the contents of the OverlayedPanel directly is not directly available.
And here is how it is used:
-
UIFormLayout panelLayout = new UIFormLayout();
-
panelLayout.setHorizontalAlignment(UIFormLayout.ALIGN_CENTER);
-
panelLayout.setVerticalAlignment(UIFormLayout.ALIGN_CENTER);
-
-
UIPanel panel = new OverlayedPanel();
-
panel.setLayout(panelLayout);
-
panel.add(new UILabel("Firstname"), panelLayout.getConstraints(0, 0));
-
panel.add(new UITextField("John"), panelLayout.getConstraints(1, 0));
-
panel.add(new UILabel("Lastname"), panelLayout.getConstraints(2, 0));
-
panel.add(new UITextField("Doe"), panelLayout.getConstraints(3, 0));
-
panel.add(new UILabel("Street"), panelLayout.getConstraints(0, 1));
-
panel.add(new UITextField("Old R. Road"), panelLayout.getConstraints(1, 1, 3, 1));
-
panel.add(new UILabel("ZIP"), panelLayout.getConstraints(0, 2));
-
panel.add(new UITextField("11946"), panelLayout.getConstraints(1, 2));
-
panel.add(new UILabel("Place"), panelLayout.getConstraints(2, 2));
-
panel.add(new UITextField("Hampton Bays"), panelLayout.getConstraints(3, 2));
-
-
parentContainer.add(panel, UIBorderLayout.CENTER);
Notice that we can use it is any other panel (line #5) and simply add it to the parent (line #18). For a user of the API it is transparent as to whether there are more components or not, this is also visible in the created component hierarchy:
         UI                   Technology
---------------------    ----------------------
 UIPanel                  Panel
   \-OverlayedPanel         \-Panel
       |-UILabel                |-Label
       |-UITextField                \-Panel
       |-UILabel                    |-Label
       |-UITextField                |-TextField
       |-UILabel                    |-Label
       |-UITextField                |-TextField
       |-UILabel                    |-Label
       |-UITextField                |-TextField
       |-UILabel                    |-Label
       \-UITextField                |-TextField
                                    |-Label
                                    \-TextField
This makes it very easy to have containers which add additional components without the actual GUI noticing or caring.
Conclusion
Because of the way the JVx framework is designed, it is easy to access all layers of the GUI framework and also facilitate the usage of these layers to create custom components and allow easy access to the wrapped components, no matter on what layer or of what kind they are.


 RSS-Feed