This website uses cookies for visitor traffic analysis. By using the website, you agree with storing the cookies on your computer.More information

Four years SIB Visions, a look back and ahead

My fourth year at SIB Visions has ended, once more it is time to take a deep breath, sit down and have a look at everything that has happened so far.

Demos

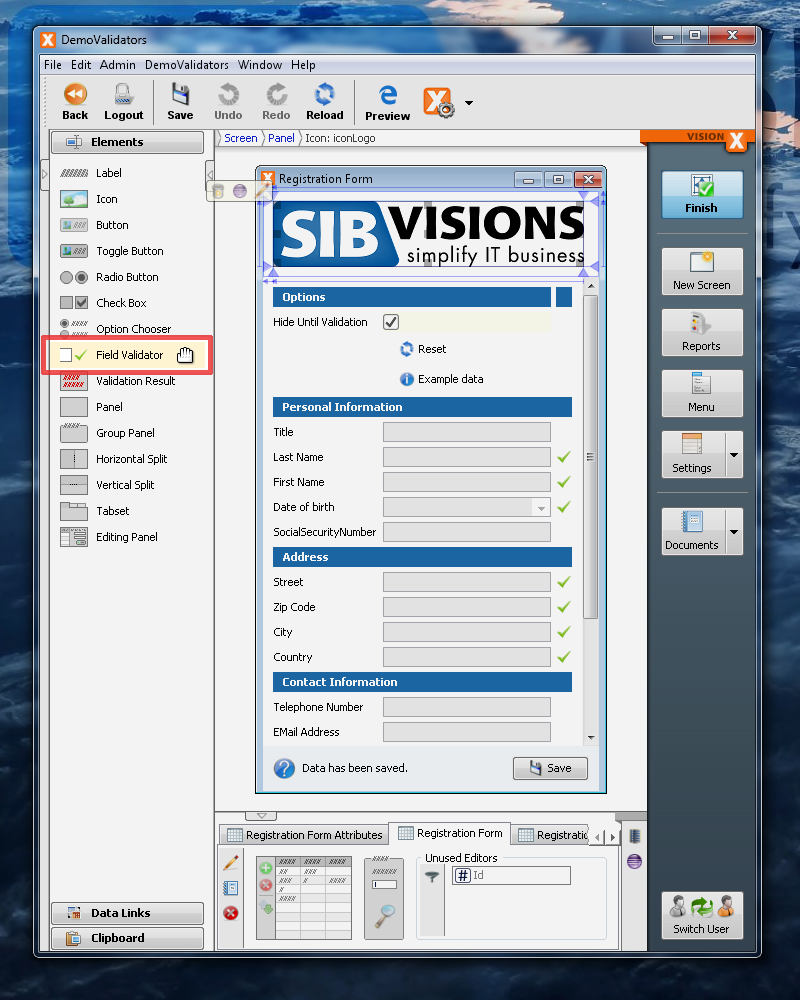
As mentioned in my last years post, there are several new demo applications available in the VisionX application store. These range from member portals to ERP applications and demonstrate not only the capabilities of JVx but also those of VisionX.

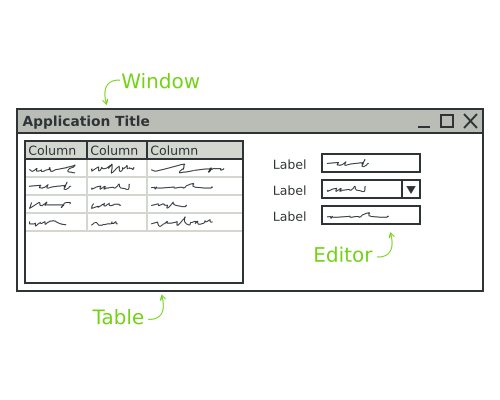
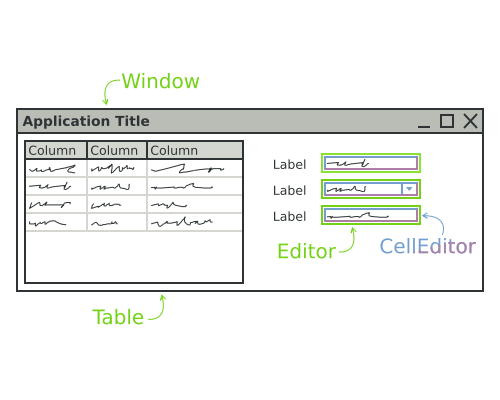
The layout of a simple screen with a table and a few editors.

The blog posting already outlines quite well what the demo applications encompass, so there is no need here to reiterate that. However, working in these was quite interesting because it is such a vast spectrum of applications, they have quite different requirements and as I've said before (at some point), one should always use the product one does create.

JVx Reference series

The JVx Reference series, a collection of blog posts which is supposed to give an overview over the most important aspects of the JVx Application Framework, has also grown considerably:

The series now covers all of the most important topics of the JVx framework. The new articles are outlining the remaining core concepts of JVx and give a good overview over these. If you feel like something is still missing and should be added to this list, feel free to drop us a message so that we can include it. We're also considering pressing these into an easier to digest format, to make the entrance of newcomers to JVx as easy as possible.

Kitchensink

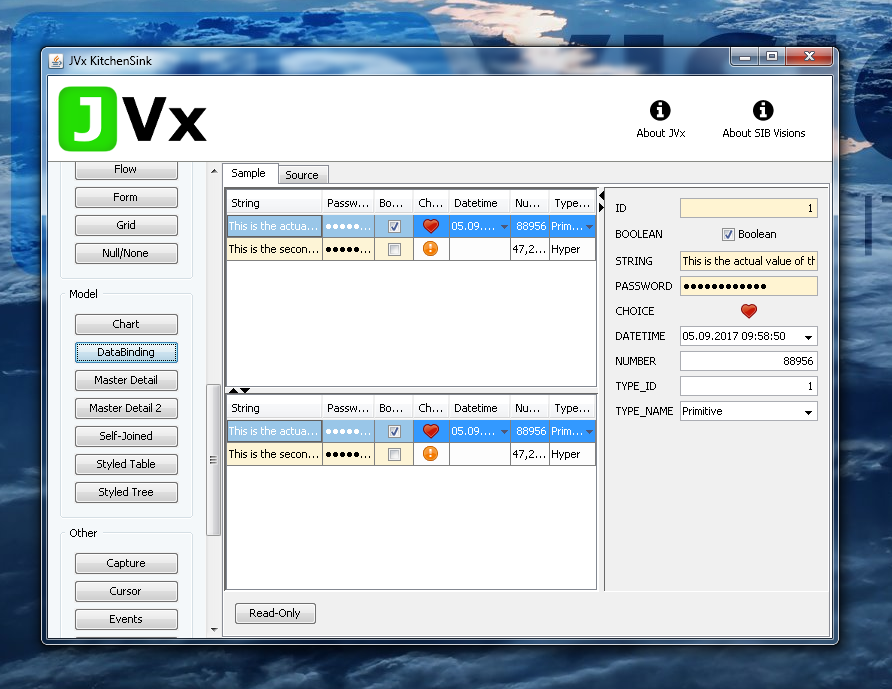
After having it around for so many years, I've finally managed to properly introduce the JVx Kitchensink last year. It is a simple demo application which is supposed to give a good overview over all the components and controls of JVx.

JVx Kitchensink - Databinding

It is also my go-to application when it comes to debugging problems with JVx or testing the same functionality in different implementations. With this introduction it also received a much needed upgrade in aesthetics and functionality, for example it is now easy to see the source of each sample.

JVx and Lua

I'm quite a fan of LuaJ, a Lua JITC for Java. It allows you to quickly and easily deploy a complete Lua integration and adding scripting support to your application. I've worked with LuaJ on a private project of mine and have been very fascinated with how easy it is to create a scripting interface with it, so of course I could not withstand the temptation to create a proof-of-concept JVx bindings library with it.

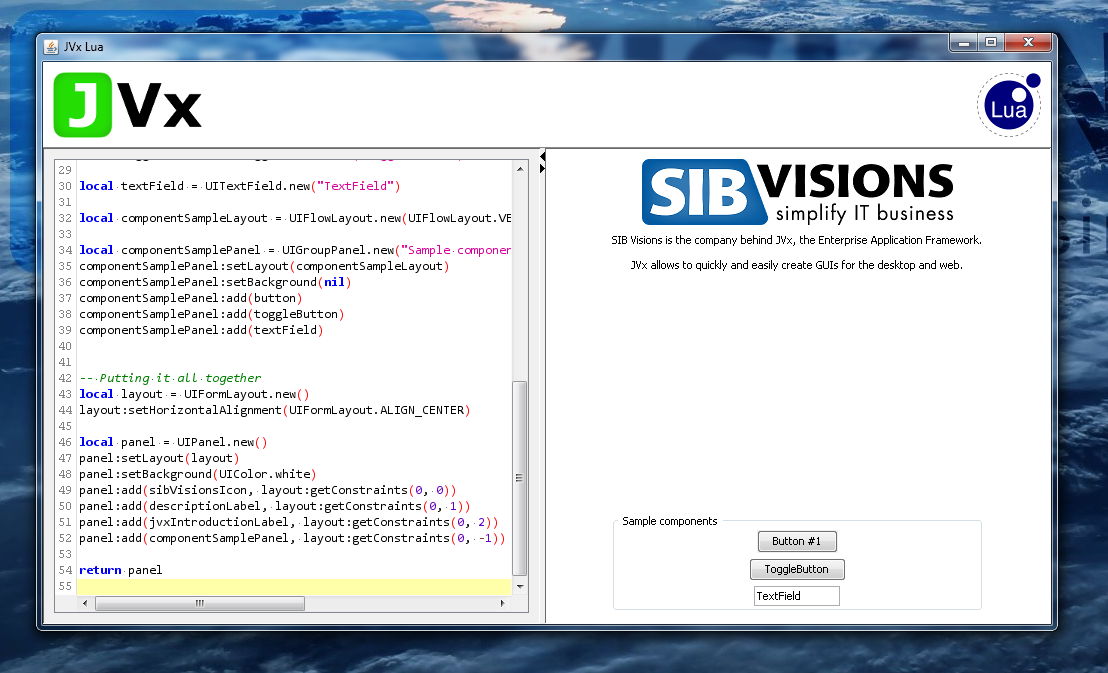
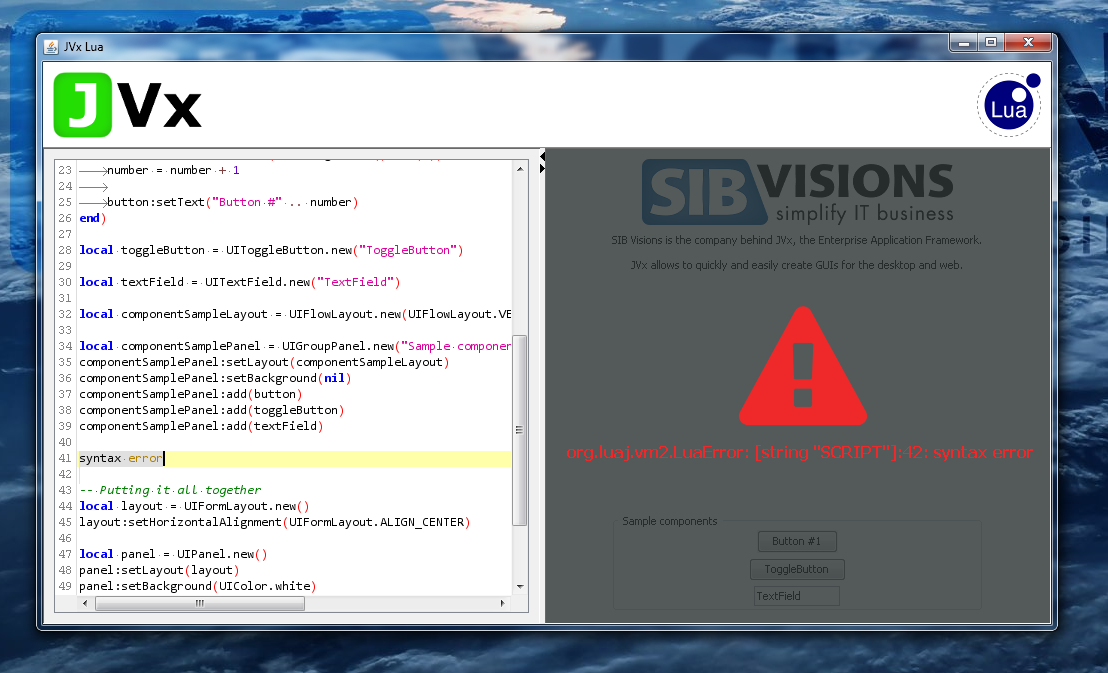
These bindings give you access to the complete GUI layer of JVx, directly from Lua scripts. There is also a demo application for these bindings available.

JVx Lua Demo Application

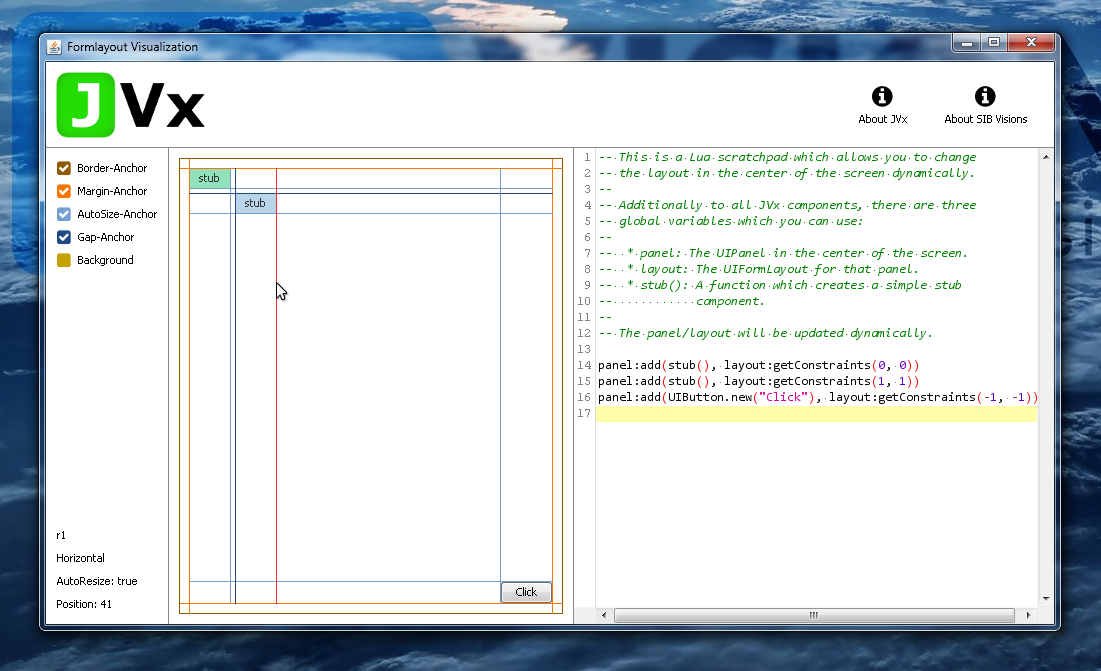
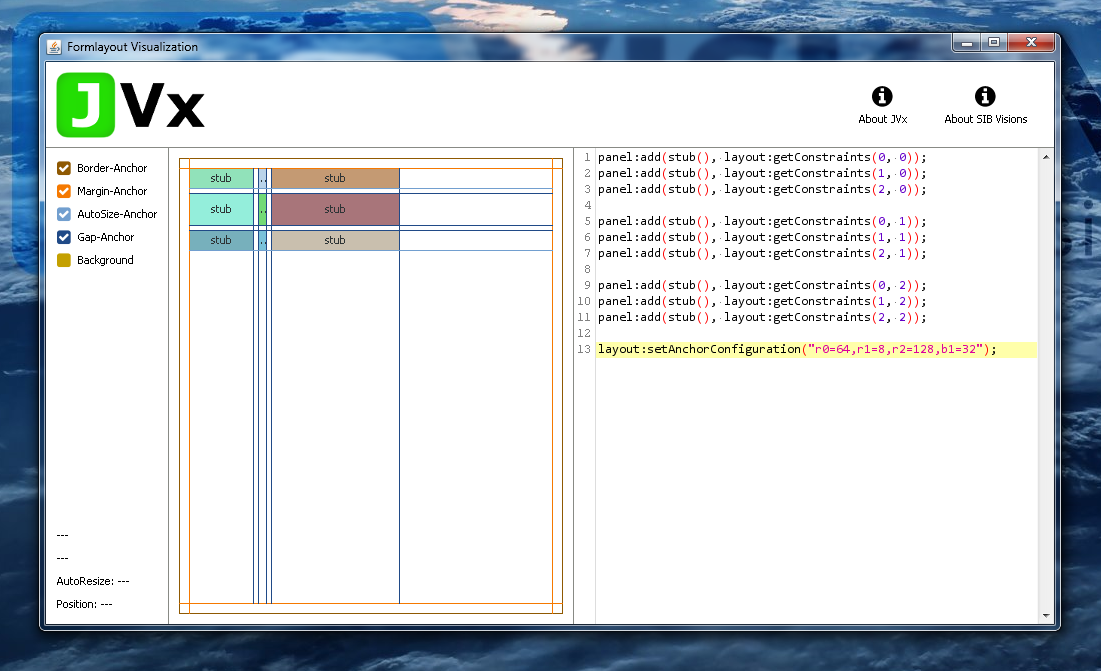
Additionally, these bindings are used in the JVx FormLayout Visualization application, which makes it easy to inspect certain configurations of the FormLayout and see how it behaves with each change.

JVx FormLayout Visualization Application

Vaadin 8

In the late summer of 2017 we've started working on migrating from Vaadin 7 to Vaadin 8. That was not a small task, but was eased by the availability of the Vaadin 7 compatibility layer, which allowed us to gradually and deliberately upgrade parts and single components to the new version. All in all, the migration went rather smooth even though it was quite time consuming. On a similar note, we took the opportunity and enabled the new client-side layouts by default. These new layouts provide a much more sophisticated layouting mechanism and allow the applications to utilize layouts as it was previously only possible in desktop applications.

I already wrote briefly about these new layouts in my last years posting, and I will do so again. The main motivation behind these new layouts is to be able to use sophisticated layouts on the client side which are driven dynamically by the size of each component. There is no such support in Vaadin by default, so we had to create our own layouts for this. The main idea behind these layouts is to have the layouting mechanism completely on the client side and that it only operates with hints (constraints) given by the server side, if they are required at all. What is happening on the client side is that each component which is added to the panel is measured and then absolutely positioned inside the panel according to the layout. So technically it works exactly the same as the layouts in the Swing or JavaFX implementation, with the sole difference that the a layer of indirection is between the component management and the layout itself (namely the client/server connection).

While further work was done on these layouts, the need to actually being able to measure the time spent in each panels layout method was also required. Unfortunately, there wasn't a ready made solution at hand so I dug around the Vaadin internals and found that it has a profiler built-in. Nice, or so I thought, as it turned out, getting it to spit out the needed information was a little bit more work than anticipated, however, in the end I was able to gather quite valuable information from it.

The remaining time was filled with making sure that Vaadin 8 worked the same way as Vaadin 7 did, and replacing all the deprecated Vaadin 7 components wherever possible.

Documentation pipeline

As part of our efforts to unify our documentation and provide a better documentation experience (for us, our users and our customers) we've built a custom documentation pipeline. This pipeline allows us to feed it Markdown documents and spits out HTML, PDF and DokuWiki files. The main component which enables us to do that is Pandoc, the swiss-army knife when it comes to converting documents, and wkhtmltopdf, which allows to convert HTML documents into PDFs.

The requirements for this pipeline were simple enough:

  1. Documentation must be easy to write.
  2. Documentation must have a unified look, always.
  3. Conversion into multiple formats are required (HTML, PDF and DokuWiki).

That lead us to the decision to use Markdown with Pandoc. Markdown is easy to write and easy to read and does not dictate any sort of styling for the finished document (though it is possible with embedded HTML). Pandoc can convert the Markdown documents to HTML and DokuWiki and additionally allows us to manipulate these documents on the fly by using Lua filters. With these filters one is capable of manipulating the internal document representation and add or remove additional parts or modify already existing ones. In short, there is not much the Lua filters cannot do.

Conversion to PDF was a quite different matter, the logical choice was to convert the HTML to PDF, as this was already quite well laid out. wkhtmltopdf is a tool which uses the Qt Webkit engine to render a HTML document into a PDF, there are quite a few gotchas on the way, but overall it does that very well. Additionally, with the modern CSS variants, one can write rules for different devices, which make it easy to change the style of a document as soon as it is send to a printer.

Last but not least, we needed a way to easily start this pipeline on different machines. We've opted to use Apache Ant as launcher environment for the pipeline for a few simple reasons:

  • We are already familiar with it.
  • It allows to write complex logic using the ant-contrib tasks.
  • As it is a Java solution, we can write the script once and run it everywhere. So we don't need to duplicate logic over multiple files for different systems.

So the only thing that needed to be system dependent were the launcher scripts. We've put all the necessary logic into the Apache Ant build file (which is mostly copying files and executing different programs like Pandoc) which in turn is invoked through the systems specific launchers.

I'm not sure in what detail I can go here, but the most work here was obviously to create the HTML template and figuring out which options make the most sense to use. I can give you two pieces of advice, though. First, when working with Pandoc and Lua filters, the native (or JSON) output format of Pandoc is your best friend when it comes to debugging the document structure. Second, when trying to create print material with wkhtmltopdf, disable the automatic scaling of content, it will save you a lot of headache.

We're still looking into how we can make this pipeline available to the general public, whether it will be as a product or as (partial) FLOSS has not been decided by now.

EPlug

With the start of the new year we've found the time to squeeze some much needed bug fixes into EPlug and publish the 1.2.7 bug fix release. It brings various bug fixes, improved performance and a better DataBookView to the table.

Diving into database specific behavior

There were some problems surrounding our PostgreSQL JDBC implementation. As it turned out, when an exception occurs during a transaction, PostgreSQL is awaiting a user interaction on how to proceed. I've outlined everything related to it in another blog post, and as it turned out, PostgreSQL wasn't even the odd one during my tests.

The look ahead

That was a quite slow year, actually. The Vaadin 8 migration took a lot of time, but a few interesting projects sneaked in none the less. I'm currently working on another quite interesting project which I hope will be finished within the next time. Stay tuned for it.

Thanks to everyone at SIB Visions, it's been an awesome year and I'm looking forward to another one with all of you!

JVx and PostgreSQL, supporting Savepoints

Transactions are an integral mechanism of databases, without them we could hardly ensure data consistency. Well, we could of course, but it would be a lot more work. JDBC has of course support for transactions, but it also supports so called "Savepoints", which we will have a look at today.

What are transactions?

Normally, I'd assume that everyone of you knows what transactions are and what they are used for, but today I will quickly rehash it to make sure. Transactions enable us to define groups of statements to be executed on a database with all either succeeding or all failing. Imagine the following statements which might be executed on a database as one action:

1: Insert record into A
2: Update record of B
3: Update another record of B
4: Insert record into C

This might happen in the background if you click a button or do something similar. This example is straightforward but if we start thinking about possible problems we will soon realize that there is a lot of potential for things going wrong. For example if statement #3 would fail we would miss records in the tables B and C. Overall, our data would be in an inconsistent state after that. To make sure that it does not happen, we can define these statements as a single transaction.

Transaction
  |-Insert record into A
  |-Update record of B
  |-Update another record of B
  |-Insert record into C
  \-Commit

If one of these statements fail, all changes done by previous statements can be undone and the database will return to the state before we started manipulating it. That is great, because we can now guarantee that even though an error has happened, the data will remain in a consistent state.

We could even extend that with additional application logic, for example we insert three records and then we check if the values of all records add up to a certain threshold, if yes, we simply undo the changes. Or if we notice that a constraint has been violated (though, pretty much all databases support constraint definitions in one way or the other). Additionally, transactions are completely isolated from all other connected clients. That means that if we start a transaction and insert a record into table A, all other clients will not see this record until we commit our changes. So the data is never in an inconsistent state, not even temporarily or transiently.

What are Savepoints?

Savepoints are sub-transactions within another transaction. It allows to undo parts of an ongoing transaction.

Another example:

Transaction
  |-Insert record into A
  |-Insert child record into B
  |-Insert child record into B
  |-Insert another record into A
  |-Insert child record into B
  |-Insert child record into B
  |-Insert another record into A
  |-Insert child record into B
  |-Insert child record into B
  \-Commit

This is a little bit more fabricated and complicated, assume we want to insert three master records with two detail records each. The following conditions apply:

  • If a master record fails to insert, nothing should be inserted.
  • If a detail record fails to insert, the corresponding master record should also not be inserted.

This is hard to do with a simple transaction, but is quite easy when it comes to using savepoints:

Transaction
  |-Savepoint 1
  |   |-Insert record into A
  |   |-Insert child record into B
  |   \-Insert child record into B
  |-Savepoint 2
  |   |-Insert another record into A
  |   |-Insert child record into B
  |   \-Insert child record into B
  |-Savepoint 3
  |   |-Insert another record into A
  |   |-Insert child record into B
  |   \-Insert child record into B
  \-Commit

We create a savepoint before the insert of the master record, if the insert of the master record fails we rollback the transaction, if the insert of a detail record fails we rollback to the savepoint we created earlier. This allows quite complicated and nested transactions, especially because there is no defined limit to how deep savepoints can be nested.

Error behavior

Of course it can always happen that a statement fails for one reason or another, so it is important to know how the database behaves once an error occurred. We built ourselves another simple example:

Transaction
  |-Insert record into A
  |-Insert record into B (this fails)
  |-Insert record into C
  \-Commit

We insert three records, and the second one fails to insert. How should the database behave in such a situation? Turns out that this differs between different database systems.

Silent/Automatic restore to a previous state

Many databases perform a simple "silent/automatic restore to a previous state", all changes done (if any) of the current statement are undone and the transaction can be treated like the failing statement never happened. With the example above, and assuming that we do not cancel the transaction on an error, the records would be inserted into A and C.

In our tests Oracle, MySQL/MariaDB, H2 and SQLite were all behaving this way.

Requiring manual recovery

PostgresSQL requires to perform a "manual recovery" from a failed statement. So that once an error occurred during a transaction, the user has to revert to a (manually) set savepoint or rollback the complete transaction. We will go into details on that later.

Reverting everything and happily continuing

MS SQL on the other hand has a quite different approach. When an error occurs during a transaction, all changes are (automatically) rolled back but the transaction can still be used. So in our example, only the record in C would be inserted.

PostgreSQL JDBC and Savepoints

Back to PostgresSQL and how it requires manual recovery. When a statement fails within a transaction in PostgreSQL, the transaction enters the aborted state and one can then see an error like the one below if further statements are issued:

Current transaction is aborted, commands ignored until end of transaction block.

What that means is simple that the connection/server is still waiting on input on what to do with the transaction. There are three possible ways to recover from there:

  1. Rollback the complete transaction
  2. Commit, which will be transformed into a rollback at this point
  3. Rollback to a savepoint

But these actions must be initiated by the user before the transaction can be further used (or not, if it is being rolled back completely). If one wants to emulate the behavior of other databases in PostgreSQL, every statement that is executed within a transaction has to be "wrapped" with a savepoint, in pseudo-code:

begin transaction
    savepoint
    try
        execute statement
        release savepoint
    catch
        rollback to savepoint
   
    ...
commit

Even though that seems tedious, that is not the case. If you have such a requirement you already have central point through which all statements pass before being executed, so this can be implemented easily.

JVx and Savepoints

In our case it is DBAccess, our main datasource. Because every database interaction has to pass through DBAccess (in one way or the other), we could easily implement such emulation at a low-level and it is automatically available to all users. To be exact, DBAccess has received internal support to wrap all statements in savepoints when configured to do so. This configuration possibility is protected and is currently only used by the PostgresSQL DBAccess extension. It does exactly what it says on the tin and is only active when enabled and automatic commits have been turned off. So this change does have no effect on any other database but PostgreSQL.

We already have plans to extend this basic savepoint support with a public API which allows users of JVx to utilize this new functionality. One of the ideas that we are currently discussing is to provide the ability to create named savepoints. A simple mockup of that idea:

  1. // Switch off auto commit to use transactions.
  2. dbAccess.setAutoCommit(false);
  3.  
  4. // Insert some data.
  5. dbStorage.insert(aRecord);
  6. dbStorage.insert(anotherRecord);
  7.  
  8. // This part is optional.
  9. try
  10. {
  11.     dbAccess.setSavepoint("NAME");
  12.    
  13.     dbStorage.insert(yetAnotherRecord);
  14.     dbStorage.update(someOtherRecord);
  15. }
  16. catch (DataSourceException dse)
  17. {
  18.     log.error(dse);
  19.     dbAccess.rollbackTo("NAME");
  20. }
  21.  
  22. dbAccess.commit();

As said, we are currently in the process of discussing such possibilities but definitely want to provide such an API at one point.

Conclusion

As it turns out, the "special" behavior of PostgreSQL isn't as special as it seems to be. It is a design decision that was taken and that is understandable. Changing this behavior now, 20+ years in, is out of the question as it would require a substantial effort to make sure that this behavior is backwards compatible. The gains from such a change on the other hand would be very little, as it is a quite specialized case in which this behavior matters and the "fix" is rather easy.

EPlug 1.2.7

We're happy to announce the release of EPlug 1.2.7. This minor update comes with a big performance improvement!

Major performance improvement

The most notable and important feature of this release is the major speed improvement when checking files. We've revisited how the build pipeline works and could determine quite a few bottlenecks which did not only encumber the build process, but also the live checks of databooks. After fixing these bottlenecks the databook live checks are blazing fast and one does not notice any more that these are active.

While reviewing the code, we also saw the possibility for a few more tweaks which we will incorporate into the next major release, to squeeze even more performance out of this.

Improved DataBook View

The DataBook view has also received some much needed attention. There is now a toolbar button which allows to sort the columns by their name (instead of their order as returned by the datasource). Additionally the view does no longer flicker when refreshing and will also clear itself when the last editor closes.

Other fixes

  1. There is no longer a sleeping EPlug job in the Progress View.
  2. The EPlug preferences are now only available on Java projects.
  3. If there is no screen lifecycle object, the session object is now used.
  4. Removed raw HTML in tooltips.

How to get it?

Simply update EPlug via Eclipse!

JVx Reference, CellEditors

Let's talk about CellEditors, and how they are decoupled from the surrounding GUI.

What are they?

While we've already covered large parts of how the GUI layer and the model of JVx works, the CellEditors have been left completely untouched and unmentioned. One might believe that they can be easily explained together with the Editors, however, they are a topic on their own, and a complex one from time to time that is.

The difference between Editors (the UIEditor for the most part) and CellEditors is that the Editors only provide the high-level GUI control, while the CellEditors provide the actual functionality. Let's take a look at a quite simple screen.

The layout of a simple screen with a table and a few editors.

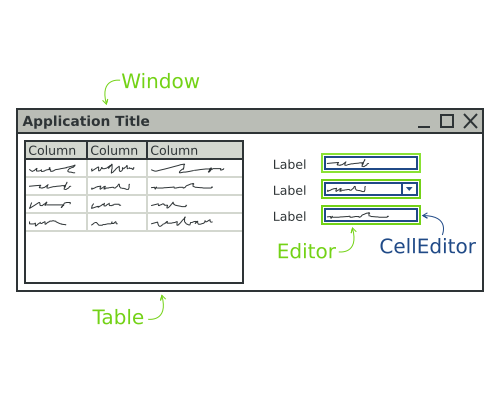
We see a window with a table on the left and some editors on the right, simple enough. Now these components we are seeing are UIEditors, not CellEditors. The CellEditors themselves are only added as child components to the Editors, so the Editors are basically just panels which contain the actual CellEditor.

The same scree but with the CellEditors differentiated from the UIEditors which contain them.

So technically every UIEditor is just another panel which gets the CellEditor added. The CellEditors themselves follow the same pattern as all GUI components in JVx, there is the base interface, an eventual extension of technology components, the implementation and finally the UI object. They are, however, rarely directly used in building the GUI, but mostly only referenced when building the model.

Why are they?

If you want to make GUI editor components, I know of two possible ways from the top of my head to achieve that: You create dedicated editor components for the datatypes that are available, for example a NumberEditor, TextEditor and so forth. Or you create one editor component which acts as a mere container and allows to plug in any wanted behavior for the type you're editing.

We've opted for the second option, because it means that the GUI is actually decoupled from the datatypes (and in extension the data) of the model. If we'd have separate components for each datatype, changing the datatype of a single column would mean that you'd have to touch all editors associated with that column and change that code, maybe with rippling effects on the rest of the GUI. With the CellEditors, one can change the datatype of a column and not worry about the GUI that is associated with that column. The CellEditor is changed on the model once and that change is automatically picked up by all Editors. Which also means that one can define and change defaults very easily and globally.

Of course one can also set the preferred or wanted CellEditor directly on the Editor, instead of using the one defined in the model, should the need arise.

And the table?

The same applies to the Table. Theoretically, every cell of the Table can be viewed as a single Editor, for this context at least. So a single cell behaves the same as an Editor when it comes to how the CellEditors are handled.

How many are there?

JVx comes with a variety of CellEditors out of the box:

  • Boolean
  • Choice
  • Date/Time
  • List
  • Number
  • Text
    • HTML
    • Multiline
    • Password
    • Standard

With these nearly all needs can be covered. If there is need for a new one, it can be created and added like any other UI component.

Using CellEditors

As said previously, which CellEditor is used is defined primarily with the model, for example:

  1. private void initiliazeModel() throws ModelException
  2. {
  3.     dataBook = new MemDataBook();
  4.    
  5.     ICellEditor cellEditor = new UITextCellEditor();
  6.     IDataType dataType = new StringDataType(cellEditor);
  7.     ColumnDefinition column = new ColumnDefinition("COLUMN", dataType);
  8.  
  9.     RowDefinition rowDefinition = dataBook.getRowDefinition();
  10.     rowDefinition.addColumnDefinition(column);
  11.    
  12.     dataBook.open();
  13. }
  14.  
  15. private void initializeUI() throws ModelException
  16. {
  17.     editor = new UIEditor(dataBook, "COLUMN");
  18.    
  19.     add(editor);
  20. }

We can see that every column has a datatype and every datatype has a CellEditor. That allows the model to provide the actual editing functionality without changing the GUI code. The Editor, when notifyRepaint() is called, will fetch the CellEditor from the datatype and use it. Additionally, there is a technology dependent default mechanism which allows this system to work even when the UI classes are not used.

Let's do a step by step explanation of what happens:

  1. The model is created.
  2. The GUI is created.
  3. The model invokes notifyRepaint() on all bound controls.
  4. The Editor gets the CellEditor from the model and adds it to itself.

One moment, instance sharing?

If we revisit at the example code from above, we will notice that the CellEditor instance is set on the model and must then be used by the Editor. That means that a single CellEditor instance is used for all bound Editors. We all know that sharing instances in such a way can be fun, but in this case it is not a problem because CellEditors are only "factories" for the actual editing components.

The ICellEditor interface does actually only specify two methods, whether it is a direct cell editor, and the factory method for creating an ICellEditorHandler. The CellEditorHandler is the manager of the instance of the component that is going to be embedded into the Editor.

  1. notifyRepaint() is called on the editor.
  2. The Editor gets the CellEditorHandler from the CellEditor.
  3. The Editor gets the component from the CellEditorHandler and embeds it.

This mechanism makes sure that no component instances end up shared between different GUI components.

A closer look at the CellEditorHandler

If we take a good look at the CellEditorHandler interface, we see that it contains everything that is required for setting up a component to be able to edit data coming from a DataRow. One method is especially important, the getCellEditorComponent() function. It returns the actual technology component that is to be embedded into the Editor. That means that even though there are implementations for the CellEditors on the UI layer, the actual components which will provide the functionality for editing the data are implemented on the technology layer. A short refresher:

The different layers of JVx.

Revisiting our simple screen from above, we'd actually need to represent it as something like this:

FormLayout with one added component.

Because the embedded components in the Editor are actually on the technology layer.

CellRenderers

There is another small topic we need to discuss, CellRenderers. They follow nearly the same schematics as CellEditors but are used to display values directly, for example values in a table cell. The Table is also the primary component which uses them to display the cell values until the editing is started. For simplicity reasons, most CellEditors implement ICellRenderer directly and provide management of the created component. That is because the reuse of components for barely displaying values is easier does not contain as much error potential.

Conclusion

CellEditors provide an easy mechanic to allow to edit data, and more important, they are decoupled from the GUI code in which they are used in a way which allows the model to change, even dynamically. That enables programmers to create and edit screens and models quickly without the need to check if the GUI and the model fit together, they always do.

Let's experiment, reducing code in screens and lifecycle objects.

Let's do a small experiment, and see if we can reduce the code required in screens and lifecycle objects to a minimum.

But be advised, this blog post is meant as a food for thoughts and less as a practical manual on doing things. So we will explore different possibilities which might not be practical.

Starting point

We will start with a small screen which has been automatically generated by VisionX, but has (manually) been stripped of all comments, documentation, imports and has some formatting modifications to make it easier readable in this post.

  1. public class PeopleWorkScreen extends DataSourceWorkScreen
  2. {
  3.     private UIEditor editPeopleFirstName = new UIEditor();
  4.     private UIEditor editPeopleLastName = new UIEditor();
  5.     private UIEditor editPeopleDateOfBirth = new UIEditor();
  6.     private UIEditor editPeopleOccupation = new UIEditor();
  7.     private UILabel labelFirstName = new UILabel();
  8.     private UILabel labelLastName = new UILabel();
  9.     private UILabel labelDateofBirth = new UILabel();
  10.     private UILabel labelOccupation = new UILabel();
  11.     private UIFormLayout formLayout1 = new UIFormLayout();
  12.     private UIGroupPanel groupPanelPeople = new UIGroupPanel();
  13.     private NavigationTable tablePeople = new NavigationTable();
  14.     private UIPanel splitPanelMainFirst = new UIPanel();
  15.     private UIPanel splitPanelMainSecond = new UIPanel();
  16.     private UISplitPanel splitPanelMain = new UISplitPanel();
  17.     private UIBorderLayout borderLayout1 = new UIBorderLayout();
  18.     private UIBorderLayout borderLayout2 = new UIBorderLayout();
  19.     private UIBorderLayout borderLayout3 = new UIBorderLayout();
  20.     private RemoteDataBook rdbPeople = new RemoteDataBook();
  21.    
  22.     public PeopleWorkScreen(
  23.             IWorkScreenApplication pApplication,
  24.             AbstractConnection pConnection,
  25.             Map pParameter) throws Throwable
  26.     {
  27.         super(pApplication, pConnection, pParameter);
  28.        
  29.         initializeModel();
  30.         initializeUI();
  31.     }
  32.    
  33.     private void initializeModel() throws Throwable
  34.     {
  35.         rdbPeople.setName("people");
  36.         rdbPeople.setDataSource(getDataSource());
  37.         rdbPeople.open();
  38.     }
  39.    
  40.     private void initializeUI() throws Throwable
  41.     {
  42.         tablePeople.setMaximumSize(new UIDimension(450, 350));
  43.         tablePeople.setDataBook(rdbPeople);
  44.         tablePeople.setAutoResize(false);
  45.        
  46.         labelFirstName.setText("First Name");
  47.        
  48.         labelLastName.setText("Last Name");
  49.        
  50.         labelDateofBirth.setText("Date of Birth");
  51.        
  52.         labelOccupation.setText("Occupation");
  53.        
  54.         editPeopleFirstName.setDataRow(rdbPeople);
  55.         editPeopleFirstName.setColumnName("FIRST_NAME");
  56.        
  57.         editPeopleLastName.setDataRow(rdbPeople);
  58.         editPeopleLastName.setColumnName("LAST_NAME");
  59.        
  60.         editPeopleDateOfBirth.setDataRow(rdbPeople);
  61.         editPeopleDateOfBirth.setColumnName("DATE_OF_BIRTH");
  62.        
  63.         editPeopleOccupation.setDataRow(rdbPeople);
  64.         editPeopleOccupation.setColumnName("OCCUPATION");
  65.        
  66.         splitPanelMainFirst.setLayout(borderLayout2);
  67.         splitPanelMainFirst.add(tablePeople, UIBorderLayout.CENTER);
  68.        
  69.         groupPanelPeople.setText("People");
  70.         groupPanelPeople.setLayout(formLayout1);
  71.         groupPanelPeople.add(labelFirstName, formLayout1.getConstraints(0, 0));
  72.         groupPanelPeople.add(editPeopleFirstName, formLayout1.getConstraints(1, 0));
  73.         groupPanelPeople.add(labelLastName, formLayout1.getConstraints(2, 0));
  74.         groupPanelPeople.add(editPeopleLastName, formLayout1.getConstraints(3, 0));
  75.         groupPanelPeople.add(labelDateofBirth, formLayout1.getConstraints(0, 1));
  76.         groupPanelPeople.add(editPeopleDateOfBirth, formLayout1.getConstraints(1, 1));
  77.         groupPanelPeople.add(labelOccupation, formLayout1.getConstraints(2, 1));
  78.         groupPanelPeople.add(editPeopleOccupation, formLayout1.getConstraints(3, 1));
  79.        
  80.         splitPanelMainSecond.setLayout(borderLayout3);
  81.         splitPanelMainSecond.add(groupPanelPeople, UIBorderLayout.CENTER);
  82.        
  83.         splitPanelMain.add(splitPanelMainFirst, UISplitPanel.FIRST_COMPONENT);
  84.         splitPanelMain.add(splitPanelMainSecond, UISplitPanel.SECOND_COMPONENT);
  85.        
  86.         setLayout(borderLayout1);
  87.         add(splitPanelMain, UIBorderLayout.CENTER);
  88.     }
  89. }

This is the PeopleWorkScreen class. It really doesn't do much except containing a Split panel, having on the left a table and on the right a few editors. That does look quite manageable, also it does look as one would expect in the GUI.
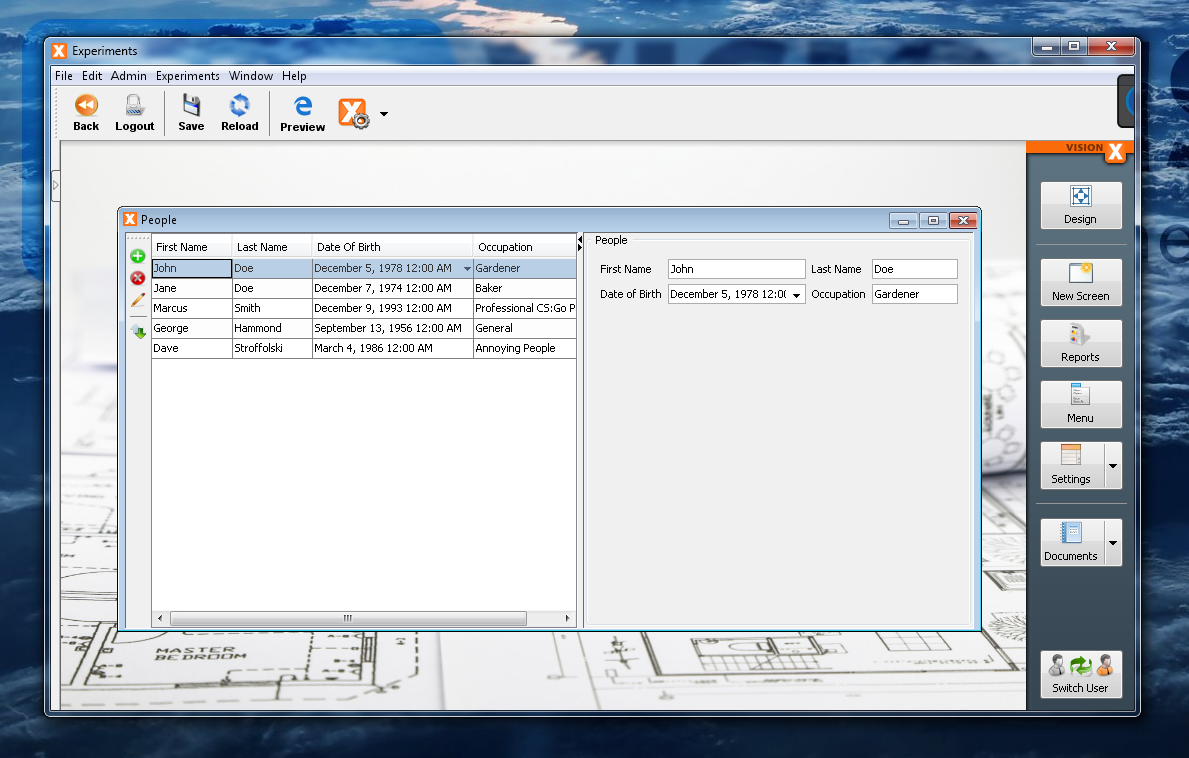
The screen we are going to use as demonstration.

But it is a very good starting point for our experiments. As an additional note, we will lose VisionX support with all the changes we will make, unfortunately, that can't be circumvented I'm afraid.

Annotations for editors

The first thought one has when it comes to reducing code is to use Annotations to deliver important information. We can do this here, too, to remove some setup from the editors and instead add it to a more central place. So we will create a new Annotation which is holding the required information for the editors, which are the name of the databook and the name of the column.

  1. @Retention(RUNTIME)
  2. @Target(FIELD)
  3. public @interface DataBound
  4. {
  5.     public String dataBookName();
  6.     public String columnName();
  7. }
  1. public class PeopleWorkScreen extends DataSourceWorkScreen
  2. {
  3.     @DataBound(dataBookName = "people", columnName = "FIRST_NAME")
  4.     private UIEditor editPeopleFirstName = new UIEditor();
  5.     @DataBound(dataBookName = "people", columnName = "LAST_NAME")
  6.     private UIEditor editPeopleLastName = new UIEditor();
  7.     @DataBound(dataBookName = "people", columnName = "DATE_OF_BIRTH")
  8.     private UIEditor editPeopleDateOfBirth = new UIEditor();
  9.     @DataBound(dataBookName = "people", columnName = "OCCUPATION")
  10.     private UIEditor editPeopleOccupation = new UIEditor();
  11.     private UILabel labelFirstName = new UILabel();
  12.     private UILabel labelLastName = new UILabel();
  13.     private UILabel labelDateofBirth = new UILabel();
  14.     private UILabel labelOccupation = new UILabel();
  15.     private UIFormLayout formLayout1 = new UIFormLayout();
  16.     private UIGroupPanel groupPanelPeople = new UIGroupPanel();
  17.     private NavigationTable tablePeople = new NavigationTable();
  18.     private UIPanel splitPanelMainFirst = new UIPanel();
  19.     private UIPanel splitPanelMainSecond = new UIPanel();
  20.     private UISplitPanel splitPanelMain = new UISplitPanel();
  21.     private UIBorderLayout borderLayout1 = new UIBorderLayout();
  22.     private UIBorderLayout borderLayout2 = new UIBorderLayout();
  23.     private UIBorderLayout borderLayout3 = new UIBorderLayout();
  24.     private RemoteDataBook rdbPeople = new RemoteDataBook();
  25.    
  26.     public PeopleWorkScreen(
  27.             IWorkScreenApplication pApplication,
  28.             AbstractConnection pConnection,
  29.             Map pParameter) throws Throwable
  30.     {
  31.         super(pApplication, pConnection, pParameter);
  32.        
  33.         initializeModel();
  34.         initializeUI();
  35.     }
  36.    
  37.     private void initializeModel() throws Throwable
  38.     {
  39.         rdbPeople.setName("people");
  40.         rdbPeople.setDataSource(getDataSource());
  41.         rdbPeople.open();
  42.     }
  43.    
  44.     private void initializeUI() throws Throwable
  45.     {
  46.         tablePeople.setMaximumSize(new UIDimension(450, 350));
  47.         tablePeople.setDataBook(rdbPeople);
  48.         tablePeople.setAutoResize(false);
  49.        
  50.         labelFirstName.setText("First Name");
  51.        
  52.         labelLastName.setText("Last Name");
  53.        
  54.         labelDateofBirth.setText("Date of Birth");
  55.        
  56.         labelOccupation.setText("Occupation");
  57.        
  58.         splitPanelMainFirst.setLayout(borderLayout2);
  59.         splitPanelMainFirst.add(tablePeople, UIBorderLayout.CENTER);
  60.        
  61.         groupPanelPeople.setText("People");
  62.         groupPanelPeople.setLayout(formLayout1);
  63.         groupPanelPeople.add(labelFirstName, formLayout1.getConstraints(0, 0));
  64.         groupPanelPeople.add(editPeopleFirstName, formLayout1.getConstraints(1, 0));
  65.         groupPanelPeople.add(labelLastName, formLayout1.getConstraints(2, 0));
  66.         groupPanelPeople.add(editPeopleLastName, formLayout1.getConstraints(3, 0));
  67.         groupPanelPeople.add(labelDateofBirth, formLayout1.getConstraints(0, 1));
  68.         groupPanelPeople.add(editPeopleDateOfBirth, formLayout1.getConstraints(1, 1));
  69.         groupPanelPeople.add(labelOccupation, formLayout1.getConstraints(2, 1));
  70.         groupPanelPeople.add(editPeopleOccupation, formLayout1.getConstraints(3, 1));
  71.        
  72.         splitPanelMainSecond.setLayout(borderLayout3);
  73.         splitPanelMainSecond.add(groupPanelPeople, UIBorderLayout.CENTER);
  74.        
  75.         splitPanelMain.add(splitPanelMainFirst, UISplitPanel.FIRST_COMPONENT);
  76.         splitPanelMain.add(splitPanelMainSecond, UISplitPanel.SECOND_COMPONENT);
  77.        
  78.         setLayout(borderLayout1);
  79.         add(splitPanelMain, UIBorderLayout.CENTER);
  80.     }
  81. }

As one can see, we've annotated the fields with our new Annotation and removed the setup lines from the initializeUI() function. Of course, that alone does nothing, we must add the processing of the annotations somewhere. The best place would be in the application when the workscreen is opened.

  1. public class AnnotationAwareApplication extends ProjX
  2. {
  3.     public AnnotationAwareApplication(UILauncher pLauncher) throws Throwable
  4.     {
  5.         super(pLauncher);
  6.     }
  7.    
  8.     @Override
  9.     public synchronized IWorkScreen openWorkScreen(
  10.             String pClassName,
  11.             Modality pModality,
  12.             AbstractConnection pConnection,
  13.             Map pParameters,
  14.             boolean pSingleInstance) throws Throwable
  15.     {
  16.         DataSourceWorkScreen workScreen = (DataSourceWorkScreen)super.openWorkScreen(
  17.                 pClassName,
  18.                 pModality,
  19.                 pConnection,
  20.                 pParameters,
  21.                 pSingleInstance);
  22.        
  23.         for (Field field : workScreen.getClass().getDeclaredFields())
  24.         {
  25.             DataBound dataBound = field.getAnnotation(DataBound.class);
  26.            
  27.             if (dataBound != null && IEditor.class.isAssignableFrom(field.getType()))
  28.             {
  29.                 IDataBook dataBook = workScreen.getDataSource().
  30.                                         getDataBook(dataBound.dataBookName());
  31.                 String columnName = dataBound.columnName();
  32.                
  33.                 field.setAccessible(true);
  34.                
  35.                 IEditor editor = (IEditor)field.get(workScreen);
  36.                
  37.                 editor.setDataRow(dataBook);
  38.                 editor.setColumnName(columnName);
  39.             }
  40.         }
  41.        
  42.         return workScreen;
  43.     }
  44.    
  45. }

Easy enough, it removes some lines from the screen and the logic added inside the application is straightforward.

The upside is that we now have the information of the data binding right there in the field declaration, the downside is that it doesn't save us that much. In theory the gain is only 1 line per editor. We could do better than that.

Automatic editors

Annotations are interesting, but don't fit well here. We could do better when we extend the UIEditor itself and fit it with the necessary logic to be able to find its data binding on its own. That means that it would need to go upward at some point and find its parent workscreen to retrieve the datasource (which holds all the databooks). Walking upwards in the hierarchy is straightforward, the question is when we should do that? The best point in time would be when addNotify() is being called, because at that point the GUI is being created, so we are very, very likely inside the initializeUI() function of the workscreen or at a later point.

  1. public class AutomaticEditor extends UIEditor
  2. {
  3.     private String dataBookName = null;
  4.     private String columnName = null;
  5.    
  6.     public AutomaticEditor(String pDataBookName, String pColumnName)
  7.     {
  8.         super();
  9.        
  10.         dataBookName = pDataBookName;
  11.         columnName = pColumnName;
  12.     }
  13.  
  14.     @Override
  15.     public void addNotify()
  16.     {
  17.         DataSourceWorkScreen workScreen = getParentWorkScreen();
  18.        
  19.         try
  20.         {
  21.             setDataRow(workScreen.getDataSource().getDataBook(dataBookName));
  22.             setColumnName(columnName);
  23.         }
  24.         catch (ModelException e)
  25.         {
  26.             ExceptionHandler.raise(e);
  27.         }
  28.        
  29.         super.addNotify();
  30.     }
  31.    
  32.     private DataSourceWorkScreen getParentWorkScreen()
  33.     {
  34.         IContainer parent = getParent();
  35.        
  36.         while (parent != null && !(parent instanceof DataSourceWorkScreen))
  37.         {
  38.             parent = parent.getParent();
  39.         }
  40.        
  41.         return (DataSourceWorkScreen)parent;
  42.     }
  43. }
  1. public class PeopleWorkScreen extends DataSourceWorkScreen
  2. {
  3.     private UIEditor editPeopleFirstName=new AutomaticEditor("people","FIRST_NAME");
  4.     private UIEditor editPeopleLastName = new AutomaticEditor("people", "LAST_NAME");
  5.     private UIEditor editPeopleDoB = new AutomaticEditor("people", "DATE_OF_BIRTH");
  6.     private UIEditor editPeopleOccupation=new AutomaticEditor("people","OCCUPATION");
  7.     private UILabel labelFirstName = new UILabel();
  8.     private UILabel labelLastName = new UILabel();
  9.     private UILabel labelDateofBirth = new UILabel();
  10.     private UILabel labelOccupation = new UILabel();
  11.     private UIFormLayout formLayout1 = new UIFormLayout();
  12.     private UIGroupPanel groupPanelPeople = new UIGroupPanel();
  13.     private NavigationTable tablePeople = new NavigationTable();
  14.     private UIPanel splitPanelMainFirst = new UIPanel();
  15.     private UIPanel splitPanelMainSecond = new UIPanel();
  16.     private UISplitPanel splitPanelMain = new UISplitPanel();
  17.     private UIBorderLayout borderLayout1 = new UIBorderLayout();
  18.     private UIBorderLayout borderLayout2 = new UIBorderLayout();
  19.     private UIBorderLayout borderLayout3 = new UIBorderLayout();
  20.     private RemoteDataBook rdbPeople = new RemoteDataBook();
  21.    
  22.     public PeopleWorkScreen(
  23.             IWorkScreenApplication pApplication,
  24.             AbstractConnection pConnection,
  25.             Map pParameter) throws Throwable
  26.     {
  27.         super(pApplication, pConnection, pParameter);
  28.        
  29.         initializeModel();
  30.         initializeUI();
  31.     }
  32.    
  33.     private void initializeModel() throws Throwable
  34.     {
  35.         rdbPeople.setName("people");
  36.         rdbPeople.setDataSource(getDataSource());
  37.         rdbPeople.open();
  38.     }
  39.    
  40.     private void initializeUI() throws Throwable
  41.     {
  42.         tablePeople.setMaximumSize(new UIDimension(450, 350));
  43.         tablePeople.setDataBook(rdbPeople);
  44.         tablePeople.setAutoResize(false);
  45.        
  46.         labelFirstName.setText("First Name");
  47.        
  48.         labelLastName.setText("Last Name");
  49.        
  50.         labelDateofBirth.setText("Date of Birth");
  51.        
  52.         labelOccupation.setText("Occupation");
  53.        
  54.         splitPanelMainFirst.setLayout(borderLayout2);
  55.         splitPanelMainFirst.add(tablePeople, UIBorderLayout.CENTER);
  56.        
  57.         groupPanelPeople.setText("People");
  58.         groupPanelPeople.setLayout(formLayout1);
  59.         groupPanelPeople.add(labelFirstName, formLayout1.getConstraints(0, 0));
  60.         groupPanelPeople.add(editPeopleFirstName, formLayout1.getConstraints(1, 0));
  61.         groupPanelPeople.add(labelLastName, formLayout1.getConstraints(2, 0));
  62.         groupPanelPeople.add(editPeopleLastName, formLayout1.getConstraints(3, 0));
  63.         groupPanelPeople.add(labelDateofBirth, formLayout1.getConstraints(0, 1));
  64.         groupPanelPeople.add(editPeopleDoB, formLayout1.getConstraints(1, 1));
  65.         groupPanelPeople.add(labelOccupation, formLayout1.getConstraints(2, 1));
  66.         groupPanelPeople.add(editPeopleOccupation, formLayout1.getConstraints(3, 1));
  67.        
  68.         splitPanelMainSecond.setLayout(borderLayout3);
  69.         splitPanelMainSecond.add(groupPanelPeople, UIBorderLayout.CENTER);
  70.        
  71.         splitPanelMain.add(splitPanelMainFirst, UISplitPanel.FIRST_COMPONENT);
  72.         splitPanelMain.add(splitPanelMainSecond, UISplitPanel.SECOND_COMPONENT);
  73.        
  74.         setLayout(borderLayout1);
  75.         add(splitPanelMain, UIBorderLayout.CENTER);
  76.     }
  77. }

That removes the complete setup of the editor from the code, with the exception of the constructor, and instead the editor itself manages its own setup, neat. So I think we can't lose any more of the editor associated code at this point, the only further possibility would be to associate a "default" databook with the workscreen so that we can scrap the databook name from the constructor. Or, we could scan the fields of the screen and build the editors based on their name, but that is a rather fragile approach.

Inline fields

While we are at it and we will lose VisionX support anyway, we can inline the fields directly into the initializeUI() function to shed more lines.

  1. public class PeopleWorkScreen extends DataSourceWorkScreen
  2. {
  3.     private RemoteDataBook rdbPeople = new RemoteDataBook();
  4.    
  5.     public PeopleWorkScreen(
  6.             IWorkScreenApplication pApplication,
  7.             AbstractConnection pConnection,
  8.             Map pParameter) throws Throwable
  9.     {
  10.         super(pApplication, pConnection, pParameter);
  11.        
  12.         initializeModel();
  13.         initializeUI();
  14.     }
  15.    
  16.     private void initializeModel() throws Throwable
  17.     {
  18.         rdbPeople.setName("people");
  19.         rdbPeople.setDataSource(getDataSource());
  20.         rdbPeople.open();
  21.     }
  22.    
  23.     private void initializeUI() throws Throwable
  24.     {
  25.         NavigationTable tablePeople = new NavigationTable();
  26.         tablePeople.setMaximumSize(new UIDimension(450, 350));
  27.         tablePeople.setDataBook(rdbPeople);
  28.         tablePeople.setAutoResize(false);
  29.        
  30.         UIPanel splitPanelMainFirst = new UIPanel();
  31.         splitPanelMainFirst.setLayout(new UIBorderLayout());
  32.         splitPanelMainFirst.add(tablePeople, UIBorderLayout.CENTER);
  33.        
  34.         UIFormLayout formLayout1 = new UIFormLayout();
  35.        
  36.         UIGroupPanel groupPanelPeople = new UIGroupPanel();
  37.         groupPanelPeople.setText("People");
  38.         groupPanelPeople.setLayout(formLayout1);
  39.         groupPanelPeople.add(new UILabel("First Name"),
  40.                              formLayout1.getConstraints(0, 0));
  41.         groupPanelPeople.add(new AutomaticEditor("people", "FIRST_NAME"),
  42.                              formLayout1.getConstraints(1, 0));
  43.         groupPanelPeople.add(new UILabel("Last Name"),
  44.                              formLayout1.getConstraints(2, 0));
  45.         groupPanelPeople.add(new AutomaticEditor("people", "LAST_NAME"),
  46.                              formLayout1.getConstraints(3, 0));
  47.         groupPanelPeople.add(new UILabel("Date of Birth"),
  48.                              formLayout1.getConstraints(0, 1));
  49.         groupPanelPeople.add(new AutomaticEditor("people", "DATE_OF_BIRTH"),
  50.                              formLayout1.getConstraints(1, 1));
  51.         groupPanelPeople.add(new UILabel("Occupation"),
  52.                              formLayout1.getConstraints(2, 1));
  53.         groupPanelPeople.add(new AutomaticEditor("people", "OCCUPATION"),
  54.                              formLayout1.getConstraints(3, 1));
  55.        
  56.         UIPanel splitPanelMainSecond = new UIPanel();
  57.         splitPanelMainSecond.setLayout(new UIBorderLayout());
  58.         splitPanelMainSecond.add(groupPanelPeople, UIBorderLayout.CENTER);
  59.        
  60.         UISplitPanel splitPanelMain = new UISplitPanel();
  61.         splitPanelMain.add(splitPanelMainFirst, UISplitPanel.FIRST_COMPONENT);
  62.         splitPanelMain.add(splitPanelMainSecond, UISplitPanel.SECOND_COMPONENT);
  63.        
  64.         setLayout(new UIBorderLayout());
  65.         add(splitPanelMain, UIBorderLayout.CENTER);
  66.     }
  67. }

That makes the code harder to read but in the end it saves a lot of lines.

Automatic databooks

Now the only part of the screen which we can now reduce is the model part. This is a little more complicated, though. First, if we create a databook on the fly it's a little bit more complicated to get it customized, so we have to assume that we can use the databooks "as they are", with all the necessary setup being done on the server side (which is ideal anyway). Second, ideally we could let the connection create the databooks as they are needed, that is a little bit more complicated and for this example we will add that logic to the screen instead. So the PeopleWorkScreen gains the method getDataBook(String) which gets or creates a databook for the given name and returns it.

  1. public class PeopleWorkScreen extends DataSourceWorkScreen
  2. {
  3.     public PeopleWorkScreen(
  4.             IWorkScreenApplication pApplication,
  5.             AbstractConnection pConnection,
  6.             Map pParameter) throws Throwable
  7.     {
  8.         super(pApplication, pConnection, pParameter);
  9.        
  10.         initializeUI();
  11.     }
  12.    
  13.     private void initializeUI() throws Throwable
  14.     {
  15.         NavigationTable tablePeople = new NavigationTable();
  16.         tablePeople.setMaximumSize(new UIDimension(450, 350));
  17.         tablePeople.setDataBook(getDataBook("people"));
  18.         tablePeople.setAutoResize(false);
  19.        
  20.         UIPanel splitPanelMainFirst = new UIPanel();
  21.         splitPanelMainFirst.setLayout(new UIBorderLayout());
  22.         splitPanelMainFirst.add(tablePeople, UIBorderLayout.CENTER);
  23.        
  24.         UIFormLayout formLayout1 = new UIFormLayout();
  25.        
  26.         UIGroupPanel groupPanelPeople = new UIGroupPanel();
  27.         groupPanelPeople.setText("People");
  28.         groupPanelPeople.setLayout(formLayout1);
  29.         groupPanelPeople.add(new UILabel("First Name"),
  30.                              formLayout1.getConstraints(0, 0));
  31.         groupPanelPeople.add(new AutomaticEditor("people", "FIRST_NAME"),
  32.                              formLayout1.getConstraints(1, 0));
  33.         groupPanelPeople.add(new UILabel("Last Name"),
  34.                              formLayout1.getConstraints(2, 0));
  35.         groupPanelPeople.add(new AutomaticEditor("people", "LAST_NAME"),
  36.                              formLayout1.getConstraints(3, 0));
  37.         groupPanelPeople.add(new UILabel("Date of Birth"),
  38.                              formLayout1.getConstraints(0, 1));
  39.         groupPanelPeople.add(new AutomaticEditor("people", "DATE_OF_BIRTH"),
  40.                              formLayout1.getConstraints(1, 1));
  41.         groupPanelPeople.add(new UILabel("Occupation"),
  42.                              formLayout1.getConstraints(2, 1));
  43.         groupPanelPeople.add(new AutomaticEditor("people", "OCCUPATION"),
  44.                              formLayout1.getConstraints(3, 1));
  45.        
  46.         UIPanel splitPanelMainSecond = new UIPanel();
  47.         splitPanelMainSecond.setLayout(new UIBorderLayout());
  48.         splitPanelMainSecond.add(groupPanelPeople, UIBorderLayout.CENTER);
  49.        
  50.         UISplitPanel splitPanelMain = new UISplitPanel();
  51.         splitPanelMain.add(splitPanelMainFirst, UISplitPanel.FIRST_COMPONENT);
  52.         splitPanelMain.add(splitPanelMainSecond, UISplitPanel.SECOND_COMPONENT);
  53.        
  54.         setLayout(new UIBorderLayout());
  55.         add(splitPanelMain, UIBorderLayout.CENTER);
  56.     }
  57.    
  58.     public IDataBook getDataBook(String pDataBookName) throws ModelException
  59.     {
  60.         IDataBook dataBook = getDataSource().getDataBook(pDataBookName);
  61.        
  62.         if (dataBook == null)
  63.         {
  64.             dataBook = new RemoteDataBook();
  65.             dataBook.setName(pDataBookName);
  66.             dataBook.setDataSource(getDataSource());
  67.             dataBook.open();
  68.         }
  69.        
  70.         return dataBook;
  71.     }
  72. }

and the changed editor

  1. public class AutomaticEditor extends UIEditor
  2. {
  3.     private String dataBookName = null;
  4.     private String columnName = null;
  5.    
  6.     public AutomaticEditor(String pDataBookName, String pColumnName)
  7.     {
  8.         super();
  9.        
  10.         dataBookName = pDataBookName;
  11.         columnName = pColumnName;
  12.     }
  13.  
  14.     @Override
  15.     public void addNotify()
  16.     {
  17.         PeopleWorkScreen workScreen = getParentWorkScreen();
  18.        
  19.         try
  20.         {
  21.             setDataRow(workScreen.getDataBook(dataBookName));
  22.             setColumnName(columnName);
  23.         }
  24.         catch (ModelException e)
  25.         {
  26.             ExceptionHandler.raise(e);
  27.         }
  28.        
  29.         super.addNotify();
  30.     }
  31.    
  32.     private PeopleWorkScreen getParentWorkScreen()
  33.     {
  34.         IContainer parent = getParent();
  35.        
  36.         while (parent != null && !(parent instanceof PeopleWorkScreen))
  37.         {
  38.             parent = parent.getParent();
  39.         }
  40.        
  41.         return (PeopleWorkScreen)parent;
  42.     }
  43. }

This introduces a quite unhealthy coupling between the PeopleWorkScreen and the AutomaticEditor, we can live with that for this example, but in a real application we'd have to correctly structure these objects. For example by introducing a workscreen base class, or by actually extending the datasource to provide this functionality.

If we ingore the method we just introduced in the PeopleWorkScreen, we actually managed to reduce the screen class a great deal and removed code which can be automated. That means that, at least theoretically, the likelihood of errors as we write the code has been lowered and it has become easier to write error free code. We can also now see that the screen class has become quite minimal, there really isn't anything left that we could restructure or remove.

Lifecycle objects

Now let us jump to the server and have a look at the associated lifecycle object.

  1. public class People extends Session
  2. {
  3.     public DBStorage getPeople() throws Exception
  4.     {
  5.         DBStorage dbsPeople = (DBStorage)get("people");
  6.         if (dbsPeople == null)
  7.         {
  8.             dbsPeople = new DBStorage();
  9.             dbsPeople.setWritebackTable("PEOPLE");
  10.             dbsPeople.setDBAccess(getDBAccess());
  11.             dbsPeople.open();
  12.  
  13.             put("people", dbsPeople);
  14.         }
  15.         return dbsPeople;
  16.     }  
  17. }

There isn't much here that we can do, but a few small things might make it easier to write in the future. Again, we will be losing VisionX support if we edit this "too much", but we are far beyond that point anyway.

Reducing error potential

What can happen easily with managing storages is that one does copy and paste code and misses to edit the key, under which the storage is stored, correctly. That can happen quickly especially if there is a complex object hierarchy in place. So what we can do is separating the storing logic from the creation logic.

  1. public class People extends Session
  2. {
  3.     public DBStorage getPeople() throws Exception
  4.     {
  5.         return getOrCreateStorage("people", (storage) ->
  6.         {
  7.             storage.setWritebackTable("PEOPLE");
  8.         });
  9.     }
  10.    
  11.     protected DBStorage getOrCreateStorage(String pName, Consumer pStorageConfigurer)
  12.                                           throws Exception
  13.     {
  14.         DBStorage storage = (DBStorage)get(pName);
  15.         if (storage == null)
  16.         {
  17.             storage = new DBStorage();
  18.             storage.setDBAccess(getDBAccess());
  19.            
  20.             pStorageConfigurer.accept(storage);
  21.            
  22.             if (!storage.isOpen())
  23.             {
  24.                 storage.open();
  25.             }
  26.  
  27.             put(pName, storage);
  28.         }
  29.        
  30.         return storage;
  31.     }
  32. }

This has the upside that it would reduce the error potential greatly, especially with a lot of storages, and it would allow us to add additional safety checks, for example if a storage with that name is already existing and would be overridden. But it has the downside that with each access a new lambda function is created, that might or might not be important for your use case.

If we try to mitigate this side effect we will quickly reach certain limits, for example if we change the process to a registry based approach we will find that we've again introduced the very thing we wanted to remove. The storage configurer must be registered at the registry with a name and the storage must be received with a name, so we'd be back at square one, actually.

A more dynamic approach

To get rid of this duplication of the name we could create a registry with the configurers and use a generic approach to retrieving it. The problem here is that that is not possible at compile time, so what we need would actually be a system that catches non-matched calls for storages in the client/server connection and redirects it to our generic method. That is unfortunately not trivial and I will only outline this approach here now.

  1. public class People extends Session
  2. {
  3.     private Map<String, Consumer> registeredStorages = new HashMap();
  4.    
  5.     public People()
  6.     {
  7.         super();
  8.        
  9.         registerStorage("people", (storage) ->
  10.         {
  11.             storage.setWritebackTable("PEOPLE");
  12.         });
  13.     }
  14.    
  15.     protected DBStorage getOrCreateStorage(String pName) throws Exception
  16.     {
  17.         DBStorage storage = (DBStorage)get(pName);
  18.         if (storage == null)
  19.         {
  20.             storage = new DBStorage();
  21.             storage.setDBAccess(getDBAccess());
  22.            
  23.             registeredStorages.get(pName).accept(storage);
  24.            
  25.             if (!storage.isOpen())
  26.             {
  27.                 storage.open();
  28.             }
  29.            
  30.             put(pName, storage);
  31.         }
  32.        
  33.         return storage;
  34.     }
  35.    
  36.     protected void registerStorage(String pName, Consumer pStorageConfigurer)
  37.     {
  38.         registeredStorages.put(pName, pStorageConfigurer);
  39.     }
  40. }

Now all that is missing would be that the connection is calling our getOrCreateStorage(String) method with the name of the requested object. Of course there is also a lot of error checking missing here, but that is not relevant for our example.

And again, if we remove the additional code we added, because it should be contained inside a base class, we have managed to reduce the code on the server side significantly. From here going any further becomes complicated, for example, again, one might to work with Annotations but that won't save us anything here anymore.

Conclusion

From time to time it is necessary to let the thoughts drift and think about different things, for example how to reduce the code inside of classes which are automatically generated and managed. Once I had a nice discussion with someone online on how to do things differently in their library. We had a little back and forth on what could be done and in the end we agreed that it should stay the way it was because none of the approaches we came up with had a significant advantage over the current state. In the end they said that, even though nothing came of it, it was an important discussion to have because from time to time one had to engage in such stimulated, technical and theoretical discussions, and I agree completely with that. It is important to be open to new ideas and consider different approaches even when they don't end up taken.

JVx Reference, the FormLayout

Let's talk about the FormLayout, and why the anchor system makes it much more flexible than just a simple grid.

Basics

JVx comes with 5 layouts by default:

  • null/none/manual
  • BorderLayout
  • FlowLayout
  • GridLayout
  • FormLayout

From these five the first four are easily explained, only the FormLayout needs some more information because it might not be as easy to grasp in the first moment than the others.

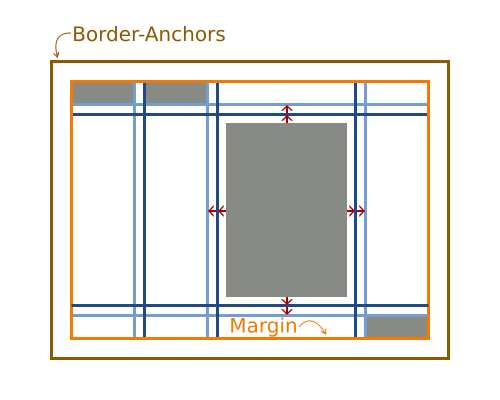
The FormLayout uses a dependent anchor system. An Anchor in this context is a position inside the layout which is calculated from parent anchors and either the size of the component or a fixed value. So we can say there are two different types of Anchors inside the FormLayout which we are concerned about:

  • AutoSize-Anchors, its position is calculated from the component assigned to it.
  • Fixed-Anchors, its position is fixed.

Additionally, there are three special cases of Fixed-Anchors:

  • Border-Anchors, which surround the FormLayout at its border.
  • Margin-Anchors, which are inset from the border by the defined value.
  • Gap-Anchors, which are added to create a gap between components.

When it comes to calculating the position of an anchor, the position of the parent anchor is determined and then the value of the current anchor is added (which is either the size of a component or a fixed value). Simplified and in pseudo-code it can expressed like this:

  1. public int getPosition(Anchor pAnchor)
  2. {
  3.     int parentPosition = 0;
  4.    
  5.     if (pAnchor.getParent() != null)
  6.     {
  7.         parentPosition = getPosition(pAnchor.getParent());
  8.     }
  9.  
  10.     if (pAnchor.isAutoSize())
  11.     {
  12.         return parentPosition + pAnchor.getComponent().getWidth();
  13.     }
  14.     else
  15.     {
  16.         return parentPosition + pAnchor.getValue();
  17.     }
  18. }

With this knowledge, we are nearly done with completely understanding the FormLayout.

Creating constraints

Now, the second important part after the basics is knowing how the constraints are created. For example this:

  1. panel.add(component, layout.getConstraints(0, 0));

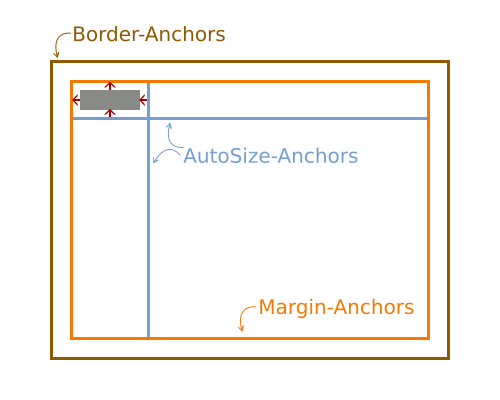
FormLayout with one added component.

With the coordinates of 0,0, no new anchors are created but instead the component is attached to the top and left margin anchor. Two new AutoSize-Anchors (horizontally and vertically) are created and attached to the component.

If we now add a second component in the same row:

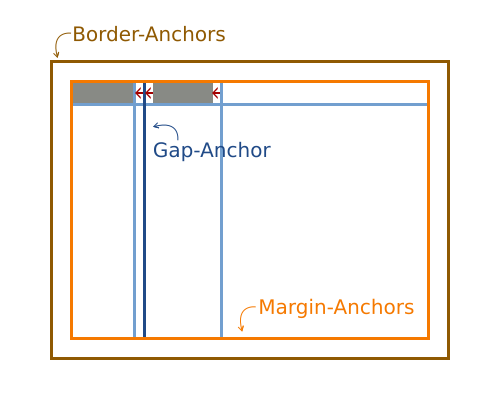
  1. panel.add(component, layout.getConstraints(0, 0));
  2. panel.add(component, layout.getConstraints(1, 0));

FormLayout with two added components.

Because we are still on row 0 the component is attached to the top margin anchor and the previous AutoSize-Anchor for this row. Then, a new Gap-Anchor will be created which is attached to the trailing AutoSize-Anchor of the previous component.

We can of course also add items to the right and bottom:

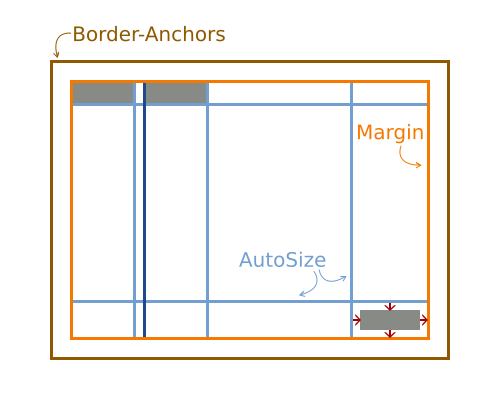
  1. panel.add(component, layout.getConstraints(0, 0));
  2. panel.add(component, layout.getConstraints(1, 0));
  3. panel.add(component, layout.getConstraints(-1, -1));

FormLayout with three added components, one in the bottom right corner.

What happens is the same as when adding a component at the coordinates 0,0, except that the reference is the lower right corner. The component is attached to the bottom and right margin anchors, with trialing AutoSize-Anchors.

Last but not least, we can add components which span between anchors:

  1. panel.add(component, layout.getConstraints(0, 0));
  2. panel.add(component, layout.getConstraints(1, 0));
  3. panel.add(component, layout.getConstraints(-1, -1));
  4. panel.add(component, layout.getConstraints(2, 1, -2, -2));

FormLayout with four added components, one stretched.

Again, the same logic applies as previously, with the notable exception that new Gap-Anchors are created for all four sides. That includes variants which span over anchors:

  1. panel.add(component, layout.getConstraints(0, 0));
  2. panel.add(component, layout.getConstraints(1, 0));
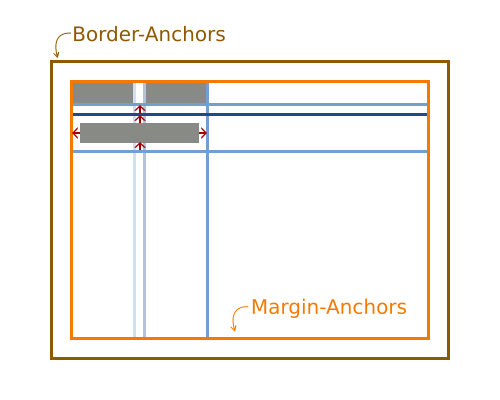
  3. panel.add(component, layout.getConstraints(0, 1, 2, 1));

FormLayout with three added components, one of them spans multiple anchors.

The component is horizontally attached to the left Margin-Anchor and additionally to the AutoSize-Anchor of the second column. The AutoSize- and Gap-Anchor of the first column are not ignored, they are not relevant to this case.

At this point it is important to note that spanning and stretched components are disregarded for the preferred size calculation of the layout. So whenever you span or stretch a component, it is not taken into account when the preferred size of the layout is calculated, which can lead to unexpected results.

Interactive demo

Sometimes, however, it might not be obvious what anchors are created and how they are used. For this we have created a simple interactive demonstration application which allows to inspect the created anchors of a layout, the JVx FormLayout Visualization.

FormLayout Visualization Demo

On the left is the possibility to show and hide anchors together with the information about the currently highlighted anchor. On the right is a Lua scripting area which allows you to quickly and easily rebuild and test layouts. It utilizes the JVx-Lua bridge from a previous blog post and so any changes to the code are directly applied.

The most simple usage: Flow-like

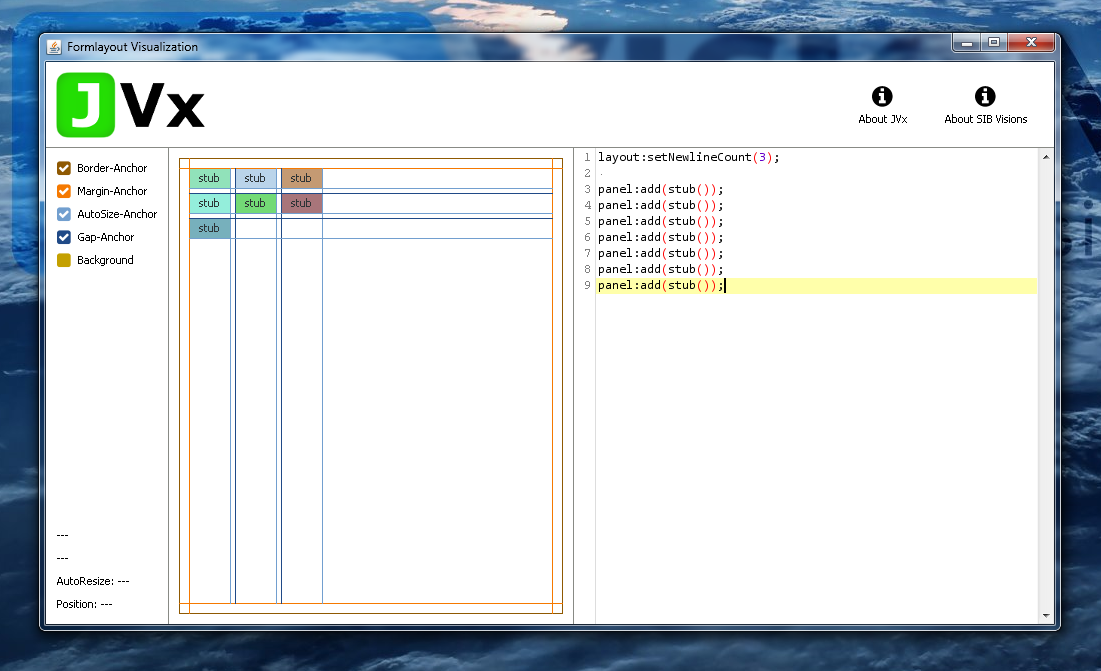
Enough of the internals, let's talk use-cases. The most simple use-case for the FormLayout can be a container which flows its contents in a line until a certain number of items is reach, at which it breaks into a new line:

  1. layout.setNewlineCount(3);
  2.  
  3. panel.add(component);
  4. panel.add(component);
  5. panel.add(component);
  6. panel.add(component);
  7. panel.add(component);
  8. panel.add(component);
  9. panel.add(component);

FormLayout with a flow layout

It does not require any interaction from us except adding components. In this case, when three components have been added, the next one will be added to the next line and so on. This is quite useful when all you want to do is display components in a fixed horizontal grid.

The obvious usage: Grid-like

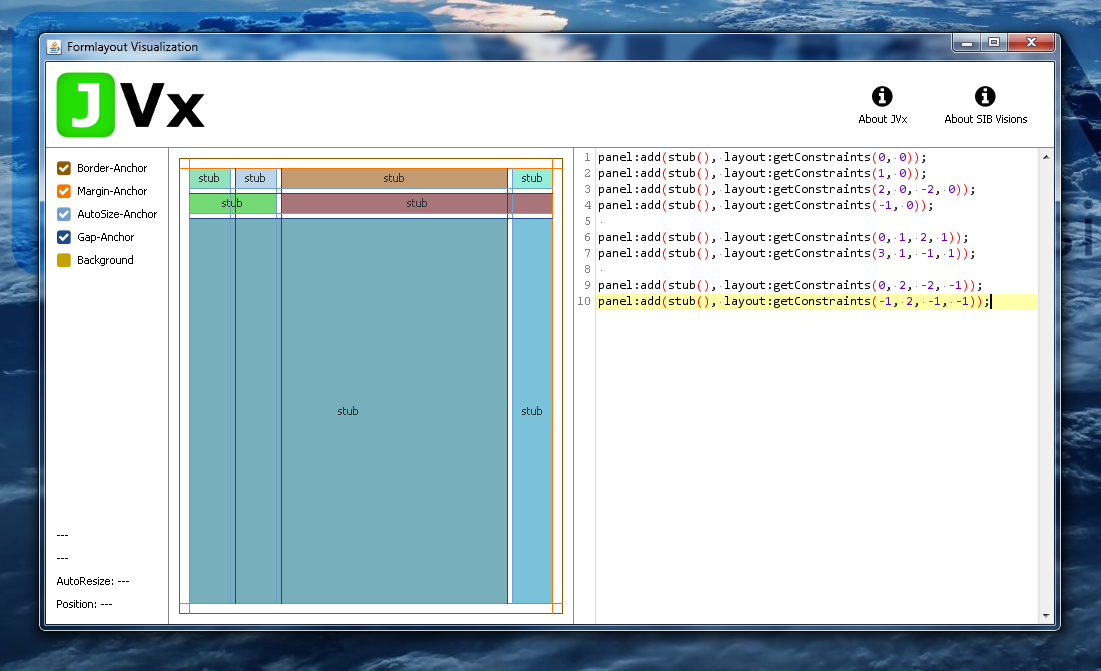
The FormLayout can also be used to align components in a grid, and actually layout them in a grid-like fashion:

  1. panel.add(component, layout.getConstraints(0, 0));
  2. panel.add(component, layout.getConstraints(1, 0));
  3. panel.add(component, layout.getConstraints(2, 0, -2, 0));
  4. panel.add(component, layout.getConstraints(-1, 0));
  5.  
  6. panel.add(component, layout.getConstraints(0, 1, 2, 1));
  7. panel.add(component, layout.getConstraints(3, 1, -1, 1));
  8.  
  9. panel.add(component, layout.getConstraints(0, 2, -2, -1));
  10. panel.add(component, layout.getConstraints(-1, 2, -1, -1));

FormLayout with a grid layout

With the main difference being that the columns and rows are sized according to the components in it and not given a fixed slice of the width of the panel.

The advanced usage: Anchor Configuration

Additionally, the FormLayout offers the possibility to manually set the anchor positions, for example when it is necessary to give the first elements a certain size:

  1. panel.add(component, layout.getConstraints(0, 0));
  2. panel.add(component, layout.getConstraints(1, 0));
  3. panel.add(component, layout.getConstraints(2, 0));
  4.  
  5. panel.add(component, layout.getConstraints(0, 1));
  6. panel.add(component, layout.getConstraints(1, 1));
  7. panel.add(component, layout.getConstraints(2, 1));
  8.  
  9. panel.add(component, layout.getConstraints(0, 2));
  10. panel.add(component, layout.getConstraints(1, 2));
  11. panel.add(component, layout.getConstraints(2, 2));
  12.  
  13. layout.setAnchorConfiguration("r0=64,r1=8,r2=128,b1=32");

Together with the ability to span components, this allows to create complex and rich layouts.

FormLayout with a set anchor configuration

Conclusion

The JVx FormLayout allows to quickly and easily create complex, good looking and working layouts which are still flexible enough for the cases when a component is swapped, removed or added. It can be used in many different circumstances and is still easy enough to use to make sure that even beginners are able to create a basic layout within seconds.

JVx Reference, Launchers and Applications

Let's talk about Launchers, and how they are used to start JVx applications.

Starting an application

We've previously outlined a simple way to start a JVx application, and now we're going to look at how to do it with a launcher to benefit from everything JVx has to offer. From a technical point of view, there are two prerequisites which must be fulfilled before a JVx application can run:

  1. the JVM must have started.
  2. the technology specific system must have started.

Then, and only then, the JVx application can run. Depending on the implementation that is used, that can be as easily as instancing the factory (Swing, JavaFX), but can also mean that a servlet server has to start (Vaadin). Because we do not wish to encumber our applications with technology specific code, we have to entrust all this to an encapsulated entity, meaning the implementations of ILauncher and IApplication.

Following the chain

The steps for getting an application to start are as follows:

  1. The first thing that must run is obviously the JVM, without it we won't have much luck starting anything.
  2. The launcher must be created and it must start the Technology.
  3. The launcher than creates the application which the user is seeing.

Launcher chain

So we need two classes, the ILauncher implementation which knows how to start the Technology and the IApplication implementation. That we already knew, so let's try to put this into code. For simplicity reasons (and because I don't want to write a complete factory from scratch for this example) we will reuse the Swing implementation and write a new launcher and application for it.

Entry point

The Main class that we will use as example is very straightforward:

  1. public class Main
  2. {
  3.     public static void main(String[] pArgs)
  4.     {
  5.         // All we have to do here is kickoff the creation of the launcher.
  6.         // The launcher will do everything that is required to start for us.
  7.         //
  8.         // In a real world scenario and/or application there might be more
  9.         // setup or groundwork required, for example processing the arguments,
  10.         // but we don't need any of that here.
  11.         new SwingLauncher();
  12.     }
  13. }

All we have to do there is start the launcher itself. As the comment suggests, there might be work required for a "real" application startup. For this example, it is all we need to do. Of course we could also directly embed this little function into the launcher implementation itself, to save us one class.

The launcher

The ILauncher implementation on the other hand contains quite some logic, but nothing not manageable:

  1. public class SwingLauncher extends SwingFrame
  2.                            implements ILauncher
  3. {
  4.     // We have to extend from SwingFrame because there is no factory
  5.     // instantiated at that point, so we can't use UI components.
  6.    
  7.     private IApplication application;
  8.    
  9.     public SwingLauncher()
  10.     {
  11.         super();
  12.        
  13.         try
  14.         {
  15.             SwingUtilities.invokeAndWait(this::startup);
  16.         }
  17.         catch (InvocationTargetException | InterruptedException e)
  18.         {
  19.             e.printStackTrace();
  20.         }
  21.     }
  22.  
  23.     @Override
  24.     public void dispose()
  25.     {
  26.         try
  27.         {
  28.             // We must notify the application that we are being disposed.
  29.             application.notifyDestroy();
  30.         }
  31.         catch (SecurityException e)
  32.         {
  33.             e.printStackTrace();
  34.         }
  35.        
  36.         super.dispose();
  37.        
  38.         // We have to make sure that the application is exiting when
  39.         // the frame is disposed of.
  40.         System.exit(0);
  41.     }
  42.  
  43.     private void startup()
  44.     {
  45.         // We create a new SwingFactory and it is directly registered as global
  46.         // instance, that means it will be used by all components which are
  47.         // created from now on.
  48.         UIFactoryManager.getFactoryInstance(SwingFactory.class);
  49.        
  50.         // Also we set it as our factory instance.
  51.         setFactory(UIFactoryManager.getFactory());
  52.        
  53.         // Because the IApplication implementation we use is based upon
  54.         // UI components (which is advisable) we have to wrap this launcher
  55.         // in an UILauncher.
  56.         UILauncher uiLauncher = new UILauncher(this);
  57.        
  58.         // Now we create the main application.
  59.         // Note that the ExampleApplication is already based upon
  60.         // UI components.
  61.         application = new ExampleApplication(uiLauncher);
  62.        
  63.         // Then we add the application as content to the launcher.
  64.         uiLauncher.add(application);
  65.        
  66.         // Perform some setup work and start everything.
  67.         uiLauncher.pack();
  68.         uiLauncher.setVisible(true);
  69.        
  70.         // We also have to notify the application itself.
  71.         application.notifyVisible();
  72.     }
  73.    
  74.     // SNIP
  75. }

In short, the launcher is kicking off the Swing thread by invoking the startup method on the main Swing thread. This startup method will instantiate the factory and then create the application. From there we only need to set it visible and then our application has started.

The launcher extends from SwingFrame, that is required because there hasn't been a factory created yet which could be used by UI components to create themselves. If we'd try to use an UI component before creating/setting a factory, we would obviously see the constructor of the component fail with a NullPointerException.

The method startup() is invoked on the main Swing thread, which also happens to be the main UI thread for JVx in this application. Once we are on the main UI thread we can create the application, add it and then set everything to visible.

The application

The IApplication implementation is quite short, because we extend com.sibvisions.rad.application.Application, an IApplication implementation created with UI components.

  1. public class ExampleApplication extends Application
  2. {
  3.     public ExampleApplication(UILauncher pParamUILauncher)
  4.     {
  5.         super(pParamUILauncher);
  6.     }
  7.    
  8.     @Override
  9.     protected IConnection createConnection() throws Exception
  10.     {
  11.         // Not required for this example.
  12.         return null;
  13.     }
  14.    
  15.     @Override
  16.     protected String getApplicationName()
  17.     {
  18.         return "Example Application";
  19.     }
  20. }

Because the launcher has previously started the technology and created the factory we can from here on now use UI components, which means we are already independent of the underlying technology. So the IApplication implementation can already be used with different technologies and is completely independent.

Notes on the launcher

As you might have noticed, in our example the launcher is a (window) frame, that makes sense for nearly every desktop GUI toolkit as they all depend upon a window as main method to display their applications. But the launcher could also be simpler, for example just a call to start the GUI thread. Or it could be something completely different, for example an incoming HTTP request.

Also don't forget that the launcher is providing additional functionality to the application, like saving file handles, reading and writing the configuration and similar platform and toolkit dependent operations, see the launcher for Swing for further details.

Conclusion

This example demonstrates how a simple launcher is implemented and why it is necessary to have a launcher in the first place. Compared with the "just set the factory" method this seems like a lot of work, but the launchers used by JVx are of course a lot more complex than these examples, that is because they implement all the required functionality and also take care of a lot of boiler plate operations. It is taking care of all technology specific code and allows to keep your application free from knowing about the platform it runs on.

JVx and Lua, a proof of concept

We've found the time to look at something that was floating around the office for quite some time. A few of us had previous experiences with Lua, a simple scripting language, but nothing too concrete and while doing a prototype a question popped up: Would it be easy to create a JVx GUI in Lua? As it turns out, the answer is "yes".

Lua, a short tour

Lua is a lightweight, multi-paradigm programming language designed primarily for embedded systems and clients.

Lua was originally designed in 1993 as a language for extending software applications to meet the increasing demand for customization at the time. It provided the basic facilities of most procedural programming languages, but more complicated or domain-specific features were not included; rather, it included mechanisms for extending the language, allowing programmers to implement such features. As Lua was intended to be a general embeddable extension language, the designers of Lua focused on improving its speed, portability, extensibility, and ease-of-use in development.

That is what Wikipedia has to say about Lua, but personally I like to think about it as "Basic done right", no insults intended. Lua is easy to write, easy to read and allows to quickly write and edit scripts. There are quite a few implementations for different languages and systems available which makes it very versatile and usable from in nearly every environment.

The most simple Lua script is one that prints "Hello World":

  1. print("Hello World")

Because it is a prototype based language, functions are first-class citizens, which can be easily created, passed around and invoked:

  1. local call = function()
  2.     print("Hello World")
  3. end
  4.  
  5. call()

Additionally, we can use tables to store state. They work like a simple key/value store:

  1. local operation = {
  2.     method = function(string)
  3.         print(string)
  4.     end,
  5.     value = "Hello World"
  6. }
  7.  
  8. operation.method(operation.value)
  1. local operation = {}
  2. operation.method = function(string)
  3.     print(string)
  4. end
  5. operation.value = "Hello World"
  6.  
  7. operation.method(operation.value)

Additionally, with some syntactic sugar, we can even emulate "real" objects. This is done by using a colon for invoking functions, which means that the table on which the function is invoked from will be provided as first parameter:

  1. local operation = {
  2.     method = function(valueContainer, string)
  3.         print(valueContainer.value .. " " .. string)
  4.     end,
  5.     value = "Hello World"
  6. }
  7.  
  8. operation:method("and others")

Last but not least, the rules about "new lines" and "end of statements" are very relaxed in Lua, we can either write everything on one line or use semicolons as statement end:

  1. local call = function(value) return value + 5 end print(call(10))
  2.  
  3. local call = function(value)
  4.     return value + 5;
  5. end
  6.  
  7. print(call(10));

But enough of the simple things, let's jump right to the case.

World, meet JVx.Lua

JVx.Lua is a proof of concept Java/Lua bridge, which allows to use the JVx classes in Lua scripts. Additionally, we've created a short demo application, JVx.Lua Live, which allows to directly write Lua code and see the output live in the application.

JVx/Lua live demo

The example code should be self-explanatory and the API is as close to the Java one as is possible. If an exception is thrown by the Lua environment it will be displayed in the live preview.

JVx/Lua live demo

This allows to quickly test out the Lua bindings and create a simple GUI in no time. But note that this simple demo application does not store what you've created, when you close it, it will be gone.

How does it work?

Glad you asked! The demo application is, of course, a simple GUI build with JVx, there are two core components which make it possible:

  1. RSyntaxTextArea, a Swing component for displaying and editing code.
  2. LuaJ, a Lua interpreter and compiler which allows to compile Lua directly to Java bytecode.

RSyntaxTextArea does not need to be further explained, it just works, and working very well it does. So does LuaJ, but that one has to be explained.

To create a new "Lua environment" one has to instance a new set of Globals and install the Lua-to-Lua-Bytecode and Lua-Bytecode-to-Java-Bytecode compilers into it.

  1. Globals globals = new Globals();
  2. LuaC.install(globals);
  3. LuaJC.install(globals);
  4.  
  5. globals.load("print(\"Hello World\")");

And that's it! With this we can already execute Lua code directly in Java, and most importantly, at runtime.

By default, LuaJ does provide nothing for the Lua environment, which means that it is sandboxed by default. If we want to add functionality and libraries, we'll have to load it into the Globals as so called "libs". For example if we want to provide all functions which can be found inside the string table, we'll have to load the StringLib:

  1. Globals globals = new Globals();
  2. LuaC.install(globals);
  3. LuaJC.install(globals);
  4.  
  5. globals.load(new StringLib());
  6.  
  7. globals.load("print(string.sub(\"Hello World\", 7))");

There are multiple libs provided with LuaJ which contain the standard library functions of Lua or provide access directly into the Java environment. For example we can coerce Java objects directly into Lua ones:

  1. BigDecimal value = new BigDecimal("-5.1234");
  2.  
  3. globals.set("value", CoerceJavaToLua.coerce(value));
  1. local absoluteValue = value:abs()
  2. local squaredValue = absoluteValue:pow(2)
  3.  
  4. print(squaredValue:toString())

Which gives us all the power of Java at our fingertips in Lua.

JVx bindings for Lua

Armed with that knowledge, we can have a look at the bindings which make it possible to use the JVx classes. JVxLib and LuaUtil are the main classes which coerce a single class to be used by Lua, the procedure looks as follows:

  1. Create a LuaTable to hold the class and register it globally.
  2. Add all public static fields (constants) to it.
  3. Add all static methods to it.
  4. Add a single constructor with a vararg argument to it.

The most interesting point is the constructor call, we simply register a method called "new" on the table and give it a vararg argument, which means that it can be called with any number of arguments. When this function is invoked the arguments are processed and a fitting constructor for the object is chosen. The found constructor is invoked and the created object is coerced to a Lua object, that created Lua object is returned.

This allows us to use a clean syntax when it comes to accessing the static or instance state of the objects. Static methods and constants, including constructors, are always accessed using the "dot" notation, while everything related to the instance is accessed using the "colon" notation.

Downside, binding events

For events and event handlers we had to dig a little deeper into LuaJ. The main problem with our EventHandler is that it has two methods: addListener(L) and addListener(IRunnable), at runtime the first one is reduced to addListener(Object). Let's assume the following code:

  1. button:eventAction():addListener(listener)

With such a construct LuaJ had a hard time finding the correct overload to use even when listener was a coerced IRunnable. This turned out to be undefined behavior, because the order of methods returned by a class object during runtime is undefined, sometimes LuaJ would choose the correct method and all other times it would use the addListener(Object) method. Which had "interesting" side effects, obviously, because an IRunnable object ended up in a list which should only hold objects of type L.

We've added a workaround so that functions with no parameters can be easily used, but for "full blown listener" support we'd have to invest quite some time. Which we might do at some point, but currently this is alright for a proof of concept.

Conclusion

Using Lua from Java is easy thanks to LuaJ, another possible option is Rembulan, which can not go unmentioned when one talks about Java and Lua. It does not only allow to quickly and easily write logic, but with the right bindings one can even create complete GUIs and applications in it and thanks to the ability to compile it directly to Java bytecode it is nearly as fast as the Java code. But, with the big upside that it can be easily changed at runtime, even by users.

Vaadin, let's hack the Profiler

Vaadin comes with a builtin Profiler which is only available during debug mode, which might not be available or reasonable. So, let us see if we can use it without the debug mode enabled.

It has a profiler?

Yes, there is one right builtin on the client side. You can activate it easily enough by adding the following to the widgetset:

  1. <set-property name="vaadin.profiler" value="true" />

But to see the results, you also have to switch the application into debug mode by changing the web.xml to the following:

  1. <context-param>
  2.     <description>Vaadin production mode</description>
  3.     <param-name>productionMode</param-name>
  4.     <param-value>false</param-value>
  5. </context-param>

This allows you to enter the debug mode of an application, though, that requires to restart the application (or in the worst case, a redeploy). One upside of testing new Widgetsets can be that one can apply them to any running application without modifications, because that is purely client-side. So changing the configuration of the application might not be possible or desirable.

There are some forum posts out there which talk about that it is enough to enable the profiler and see the the output of it being logged to the debug console of the browser, but that is not the case anymore.

Let's have a deeper look

The Profiler can be found in the class com.vaain.vaadin.client.Profiler and is comletely client-side. It will store all gathered information until the function logTimings() is called, which then will hand the gathered information to a consumer which can do with it whatever it wants. Now comes the interesting part, there is no public default implementation for the consumer provided. If you want to log what was profiled to the debug console you'll have to write your own. Even if there were, the function setProfilerResultConsumer(ProfilerResultConsumer) is commented with a warning that it might change in future versions without notice and should not be used - interesting. Also interesting is the fact that it can only be set once. Once set, it can not be changed.

Hm, looks a little bare bone. Of course there is an "internal" class that is utilizing it to send its output to the debug window, but we can't use any of that code, unfortunately. So let's see what we can do with it.

Send everything to the debug console

The easiest thing is to simply send all the output to the debug console of the browser, we can do this easily enough:

  1. import java.util.LinkedHashMap;
  2. import java.util.List;
  3.  
  4. import com.vaadin.client.Profiler.Node;
  5. import com.vaadin.client.Profiler.ProfilerResultConsumer;
  6.  
  7. /**
  8.  * A simple {@link ProfilerResultConsumer} which is outputting everything to the
  9.  * debug console of the browser.
  10.  *
  11.  * @author Robert Zenz
  12.  */
  13. public class DebugConsoleProfilerResultConsumer implements ProfilerResultConsumer
  14. {
  15.     //~~~~~~~~~~~~~~~~~~~~~~~~~~~~~~~~~~~~~~~~~~~~~~~~~~~~~~~~~~~~~~~~
  16.     // Initialization
  17.     //~~~~~~~~~~~~~~~~~~~~~~~~~~~~~~~~~~~~~~~~~~~~~~~~~~~~~~~~~~~~~~~~
  18.    
  19.     /**
  20.      * Creates a new instance of {@link DebugConsoleProfilerResultConsumer}.
  21.      */
  22.     public DebugConsoleProfilerResultConsumer()
  23.     {
  24.         super();
  25.     }
  26.    
  27.     //~~~~~~~~~~~~~~~~~~~~~~~~~~~~~~~~~~~~~~~~~~~~~~~~~~~~~~~~~~~~~~~~
  28.     // Interface implementation
  29.     //~~~~~~~~~~~~~~~~~~~~~~~~~~~~~~~~~~~~~~~~~~~~~~~~~~~~~~~~~~~~~~~~
  30.    
  31.     /**
  32.      * {@inheritDoc}
  33.      */
  34.     @Override
  35.     public void addProfilerData(Node pRootNode, List pTotals)
  36.     {
  37.         debug(pRootNode);
  38.        
  39.         for (Node node : pTotals)
  40.         {
  41.             debug(node);
  42.         }
  43.     }
  44.    
  45.     /**
  46.      * {@inheritDoc}
  47.      */
  48.     @Override
  49.     public void addBootstrapData(LinkedHashMap pTimings)
  50.     {
  51.         // TODO We'll ingore this for now.
  52.     }
  53.    
  54.     //~~~~~~~~~~~~~~~~~~~~~~~~~~~~~~~~~~~~~~~~~~~~~~~~~~~~~~~~~~~~~~~~
  55.     // User-defined methods
  56.     //~~~~~~~~~~~~~~~~~~~~~~~~~~~~~~~~~~~~~~~~~~~~~~~~~~~~~~~~~~~~~~~~
  57.    
  58.     /**
  59.      * Sends the given {@link Node} to the debug console if it is
  60.      * {@link #isValid(Node) valid}.
  61.      *
  62.      * @param pNode the {@link Node} to log.
  63.      * @see #isValid(Node)
  64.      */
  65.     private void debug(Node pNode)
  66.     {
  67.         if (isValid(pNode))
  68.         {
  69.             debug(pNode.getStringRepresentation(""));
  70.         }
  71.     }
  72.    
  73.     /**
  74.      * Tests if the given {@link Node} is valid, meaning not {@code null}, has a
  75.      * {@link Node#getName() name} and was {@link Node#getCount() invoked at
  76.      * all}.
  77.      *
  78.      * @param pNode the {@link Node} to test}.
  79.      * @return {@code true} if the given {@link Node} is considered valid.
  80.      */
  81.     private boolean isValid(Node pNode)
  82.     {
  83.         return pNode != null && pNode.getName() != null && pNode.getCount() > 0;
  84.     }
  85.    
  86.     //~~~~~~~~~~~~~~~~~~~~~~~~~~~~~~~~~~~~~~~~~~~~~~~~~~~~~~~~~~~~~~~~
  87.     // Native methods
  88.     //~~~~~~~~~~~~~~~~~~~~~~~~~~~~~~~~~~~~~~~~~~~~~~~~~~~~~~~~~~~~~~~~
  89.    
  90.     /**
  91.      * Logs the given message to the debug console.
  92.      *
  93.      * @param pMessage the message to log.
  94.      */
  95.     private native void debug(String pMessage)
  96.     /*-{
  97.         console.debug(pMessage);
  98.     }-*/;
  99.    
  100. }    // DebugConsoleProfilerResultConsumer

And we can attach it rather easily, too:

  1. Profiler.setProfilerResultConsumer(new DebugConsoleProfilerResultConsumer());

Make sure to do this only once, otherwise an Exception will be thrown, stating that it can only be done once. Also the application should not be in debug mode, otherwise the Vaadin consumer will be attached. Now that we've attached a consumer we can recompile the Widgetset and actually try it, and low and behold, we see output in the debug window of the browser. Quite a lot, actually, seems like the Profiler is used often, which is good.

Filter the results

Skimming through the results is tedious, luckily most browsers come with the possibility to filter the results, but that possibility is quite limited. If we are interested in multiple results, the easiest way will be to filter them on the server side, obviously we can do that just as easily:

  1. import java.util.HashSet;
  2. import java.util.LinkedHashMap;
  3. import java.util.List;
  4. import java.util.Set;
  5.  
  6. import com.vaadin.client.Profiler.Node;
  7. import com.vaadin.client.Profiler.ProfilerResultConsumer;
  8.  
  9. /**
  10.  * A simple {@link ProfilerResultConsumer} which is outputting everything to the
  11.  * debug console of the browser.
  12.  *
  13.  * @author Robert Zenz
  14.  */
  15. public class DebugConsoleProfilerResultConsumer implements ProfilerResultConsumer
  16. {
  17.     //~~~~~~~~~~~~~~~~~~~~~~~~~~~~~~~~~~~~~~~~~~~~~~~~~~~~~~~~~~~~~~~~
  18.     // Class members
  19.     //~~~~~~~~~~~~~~~~~~~~~~~~~~~~~~~~~~~~~~~~~~~~~~~~~~~~~~~~~~~~~~~~
  20.    
  21.     /** The names of nodes we want to output. */
  22.     private Set wantedNames = new HashSet();
  23.    
  24.     //~~~~~~~~~~~~~~~~~~~~~~~~~~~~~~~~~~~~~~~~~~~~~~~~~~~~~~~~~~~~~~~~
  25.     // Initialization
  26.     //~~~~~~~~~~~~~~~~~~~~~~~~~~~~~~~~~~~~~~~~~~~~~~~~~~~~~~~~~~~~~~~~
  27.    
  28.     /**
  29.      * Creates a new instance of {@link DebugConsoleProfilerResultConsumer}.
  30.      *
  31.      * @param pWantedNames the names of the profiler data which should be
  32.      *            displayed.
  33.      */
  34.     public DebugConsoleProfilerResultConsumer(String... pWantedNames)
  35.     {
  36.         super();
  37.        
  38.         if (pWantedNames != null && pWantedNames.length > 0)
  39.         {
  40.             for (String wantedName : pWantedNames)
  41.             {
  42.                 wantedNames.add(wantedName);
  43.             }
  44.         }
  45.     }
  46.    
  47.     //~~~~~~~~~~~~~~~~~~~~~~~~~~~~~~~~~~~~~~~~~~~~~~~~~~~~~~~~~~~~~~~~
  48.     // Interface implementation
  49.     //~~~~~~~~~~~~~~~~~~~~~~~~~~~~~~~~~~~~~~~~~~~~~~~~~~~~~~~~~~~~~~~~
  50.    
  51.     /**
  52.      * {@inheritDoc}
  53.      */
  54.     @Override
  55.     public void addProfilerData(Node pRootNode, List pTotals)
  56.     {
  57.         debug(pRootNode);
  58.        
  59.         for (Node node : pTotals)
  60.         {
  61.             debug(node);
  62.         }
  63.     }
  64.    
  65.     /**
  66.      * {@inheritDoc}
  67.      */
  68.     @Override
  69.     public void addBootstrapData(LinkedHashMap pTimings)
  70.     {
  71.         // TODO We'll ingore this for now.
  72.     }
  73.    
  74.     //~~~~~~~~~~~~~~~~~~~~~~~~~~~~~~~~~~~~~~~~~~~~~~~~~~~~~~~~~~~~~~~~
  75.     // User-defined methods
  76.     //~~~~~~~~~~~~~~~~~~~~~~~~~~~~~~~~~~~~~~~~~~~~~~~~~~~~~~~~~~~~~~~~
  77.    
  78.     /**
  79.      * Sends the given {@link Node} to the debug console if it is
  80.      * {@link #isValid(Node) valid}.
  81.      *
  82.      * @param pNode the {@link Node} to log.
  83.      * @see #isValid(Node)
  84.      */
  85.     private void debug(Node pNode)
  86.     {
  87.         if (isValid(pNode))
  88.         {
  89.             debug(pNode.getStringRepresentation(""));
  90.         }
  91.     }
  92.    
  93.     /**
  94.      * Tests if the given {@link Node} is valid, meaning not {@code null}, has a
  95.      * {@link Node#getName() name} and was {@link Node#getCount() invoked at
  96.      * all}.
  97.      *
  98.      * @param pNode the {@link Node} to test}.
  99.      * @return {@code true} if the given {@link Node} is considered valid.
  100.      */
  101.     private boolean isValid(Node pNode)
  102.     {
  103.         return pNode != null
  104.                 && pNode.getName() != null
  105.                 && pNode.getCount() > 0
  106.                 && (wantedNames.isEmpty() || wantedNames.contains(pNode.getName()));
  107.     }
  108.    
  109.     //~~~~~~~~~~~~~~~~~~~~~~~~~~~~~~~~~~~~~~~~~~~~~~~~~~~~~~~~~~~~~~~~
  110.     // Native methods
  111.     //~~~~~~~~~~~~~~~~~~~~~~~~~~~~~~~~~~~~~~~~~~~~~~~~~~~~~~~~~~~~~~~~
  112.    
  113.     /**
  114.      * Logs the given message to the debug console.
  115.      *
  116.      * @param pMessage the message to log.
  117.      */
  118.     private native void debug(String pMessage)
  119.     /*-{
  120.         console.debug(pMessage);
  121.     }-*/;
  122.    
  123. }    // DebugConsoleProfilerResultConsumer

Now we can simply pass the list of "interesting" event names to the consumer and see only these.

JavaScript hacking

But there is more, instead of setting a consumer we can attach ourselves to the JavaScript function and instead process each profiled section individually. So in the debug console we can simply run something like this:

  1. window.__gwtStatsEvent = function(event)
  2. {
  3.     console.debug(event);
  4. };

This will output every single profiler event into the console. Now, if we want to process these events, we must first understand there is always a "begin" and an "end" event, which respectively are marking the begin and end of an event.

We can now listen for a certain event and simply output how long it took, like this:

  1. window.__profiler = {};
  2.  
  3. window.__gwtStatsEvent = function(event)
  4. {
  5.     if (event.subSystem === "Layout pass")
  6.     {
  7.         if (event.type === "begin")
  8.         {
  9.             window.__profiler[event.subSystem] = event.millis;
  10.         }
  11.         else
  12.         {
  13.             console.log(
  14.                     event.subSystem
  15.                     + ": "
  16.                     + (event.millis - window.__profiler[event.subSystem]).toFixed(0)
  17.                     + "ms");
  18.         }
  19.     }
  20. };

Or, to go over the top, we could create a generic listener which informs us about everything:

  1. window.__wantedEvents = [
  2.     "Layout pass",
  3.     "Layout measure connectors",
  4.     "layout PostLayoutListener"
  5. ];
  6.  
  7. window.__profiler = {};
  8.  
  9. window.__gwtStatsEvent = function(event)
  10. {
  11.     if (window.__wantedEvents.indexOf(event.subSystem) >= 0)
  12.     {
  13.         if (typeof window.__profiler[event.subSystem] === "undefined")
  14.         {
  15.             window.__profiler[event.subSystem] = {
  16.                 averageRuntime : 0,
  17.                 count : 0,
  18.                 lastBegin : 0,
  19.                 lastEnd : 0,
  20.                 lastRuntime: 0,
  21.                 lastRuntimes : new Array(),
  22.                 minRuntime : 999999999,
  23.                 maxRuntime : -999999999,
  24.                 totalRuntime : 0
  25.             }
  26.         }
  27.        
  28.         var info = window.__profiler[event.subSystem];
  29.        
  30.         if (event.type === "begin")
  31.         {
  32.             info.count = info.count + 1;
  33.             info.lastBegin = event.millis;
  34.         }
  35.         else
  36.         {
  37.             info.lastEnd = event.millis;
  38.            
  39.             info.lastRuntime = info.lastEnd - info.lastBegin;
  40.             info.lastRuntimes.push(info.lastRuntime);
  41.             info.minRuntime = Math.min(info.lastRuntime, info.minRuntime);
  42.             info.maxRuntime = Math.max(info.lastRuntime, info.maxRuntime);
  43.             info.totalRuntime = info.totalRuntime + info.lastRuntime;
  44.            
  45.             info.averageRuntime = 0;
  46.             for (var index = 0; index < info.lastRuntimes.length; index++)
  47.             {
  48.                 info.averageRuntime = info.averageRuntime + info.lastRuntimes[index];
  49.             }
  50.             info.averageRuntime = info.averageRuntime / info.lastRuntimes.length;
  51.            
  52.             console.log(
  53.                     event.subSystem
  54.                     + ": "
  55.                     + info.count.toFixed(0)
  56.                     + " times at "
  57.                     + info.averageRuntime.toFixed(3)
  58.                     + " totaling "
  59.                     + info.totalRuntime.toFixed(0)
  60.                     + "ms with current at "
  61.                     + info.lastRuntime.toFixed(0)
  62.                     + "ms ("
  63.                     + info.minRuntime.toFixed(0)
  64.                     + "ms/"
  65.                     + info.maxRuntime.toFixed(0)
  66.                     + "ms)");
  67.         }
  68.     }
  69. };

And we now have a neat little system in place which displays everything we'd like to know, and it is easily extendable and modifiable, too.

Conclusion

As we see, we have quite a few ways to get the information from the profiler even without the application running in debug mode, some might not be as obvious as others, though. The interesting part is that many things are easily accessible on the JavaScript side of Vaadin, directly from the debug console of the browser, one only has to look for it.

VisionX, a short look at Validators

It is time to have a short look at Validators, what they are, how they work and how they can be used.

Okay, what are they?

A Validator is a component which is available to our customers who have purchased VisionX, it allows to quickly and easily add field validation to a form or any screen with records.

Validators in VisionX

Validators are readily available in VisionX as components which can be added to the screen.

VisionX Validators - Toolbox

It can be added to the screen by simply dragging it like any other component, but must be configured afterwards to know which field required validation.

VisionX Validators - Properties

There are three important properties to the Validator:

  • Binding: The field to which the Validator should be bound to. This works analog to selecting to a field for an Editor.
  • Automatic validate: If the validation process should be automatically performed on value changes.
    If this is checked, the Validator will listen for value changes on the specified field and will automatically run the validation action on every change. If not checked, the validation process must be run manually by calling Validator.validate() as needed.
  • Hide until first validate: If the Validator should stay hidden until at least one validation was performed.
    If this is checked, the Validator will not be visible until at least its validation has been called once, afterwards it will always be visible.

Validating values

To actually validate something, we have to attach an action to the Validator which will perform the validation. This can be readily done through the VisionX action designer, which provides everything needed to create such an action and we will not go into detail on how to do this.

We will, however, have a short look at the code of a simple action.

  1. public void doValidateNonEmpty(Validator pValidator) throws Throwable
  2. {
  3.     if (Logical.equals(rdbData.getValue("COLUMN"), ""))
  4.     {
  5.         throw new Exception("A value for the COLUMN must be entered.");
  6.     }
  7. }

It is a very simple action, the current value of the DataBook is checked and if it is empty, an Exception is. This is the most simple validation action one can create.

Validators in action

Once we have everything setup, we can put the Validators to good use. When the validation is performed, may it be automatically or manually, the validation actions will be invoked and if all of them return without throwing an Exception, the Validator will display a green check mark. However, if the actions should throw an Exception, the Validator will display a red "X".

VisionX Validators - Failed

Manual validation

Manually invoking the validation process as needed is quite simple by calling Validator.isValid(), which will return either true or false.

  1. public void doSaveButtonPressed(UIActionEvent pEvent) throws Throwable
  2. {
  3.     if (validator.isValid())
  4.     {
  5.         rdbData.saveSelectedRow();
  6.     }
  7.     else
  8.     {
  9.         labelError.setVisible(true);
  10.     }
  11. }

Above you see a sample action which manually performs the validation process and either saves the data or sets an error label to visible.

The ValidationResult

One can quickly end up with many Validators in a single screen, which might make it difficult for the user to directly see why a field is not correctly validated. So it suggest itself that there should be a short summary close to the save button to make sure that the user is readily provided with the information why the action could not be performed. For this scenario there is the ValidationResult, which is another component which can be added to the screen from the toolbox.

It will automatically find all Validators in the screen and will perform their validation as needed. Afterwards it will gather all error messages and display them in a list.

VisionX Validators - ValidationResult

The ValidationResult can be used similar to the Validator in an action.

  1. public void doSaveButtonPressed(UIActionEvent pEvent) throws Throwable
  2. {
  3.     if (validationResult.isValid())
  4.     {
  5.         rdbData.saveSelectedRow();
  6.     }
  7.     else
  8.     {
  9.         labelError.setVisible(true);
  10.     }
  11. }

Additionally, there is the clearMessage() method which allows to clear the list of errors.

Conclusion

The Validator and ValidationResult provide quick and easy means to add data validation to forms and screens with records and can be added and configured completely through the VisionX designer. Additionally, it provides a rich API which allows it to be easily used when writing the code manually or extending it with additional functionality.