This website uses cookies for visitor traffic analysis. By using the website, you agree with storing the cookies on your computer.More information

Category: Development

Vert.x + JVx

Do you know vert.x?

It's like node.js but written in Java and without JavaScript limitations. It's very powerful and easy to use. I don't describe features of vert.x or tell you how it works. If you want to know more about it, you'll find everything you need on the official site.

How and why do we use vert.x?

We simply tried it out to find out how it works and if an integration with JVx makes sense. We started a simple Research project with some goals:

  • Create a simple http server that will run without an application server, e.g. on a Raspberry Pi
  • Create a simple net/socket server, also for Raspberry Pi
  • Deploy an existing JVx application (e.g. FirstApp) and connect to the new server
  • Integrate the EventBus in an existing JVx application
  • Create a simple JavaScript app (show data in a grid) with jQuery, jQueryUI and vert.x EventBus
  • Use EventBus in Cluster mode (Java IPC)

The documentation of vert.x is great and there are a lot of examples, not what we needed but good for a quick start.

It was easy to create a http and socket server. The only problem was that everything was asynchronous and JVx expected synchronous calls. The HttpConnection of JVx worked without modifications because the JDK solved everything. We didn't use the vert.x http client.

It was a little bit tricky to implement an IConnection for socket communication because the server has to know when a command ends. It only reads a stream and does not know the protocol! We didn't introduce a new protocol, instead we wrote a delimiter after each command. This worked like a charm.

After we had http and socket support, the usage of an existing JVx application was easy. We copied existing files and it worked out-of-the-box. That was as expected ;-)

What about the event bus?

With JVx we have a super fast and simple client/server communication and it's possible to send messages from the client to the server, but the client polls. It's not live!

The event bus offers more power and flexibility. We thought it would be a great benefit for JVx applications or applications written in technologies that are supported from vert.x e.g. JavaScript.

It's already possible to use JVx' REST interface from non Java applications but if you use vert.x it would be cool to use the event bus.

The EventBus support was soo easy because the API is very nice and simple. It's enough to register a handler (like a listener) for a specific address (= string). After the registration you'll receive events from the bus :)

We had some problems with clustering vert.x because we didn't read the (whole) documentation and the information was in a different place as expected. If you use vert.x embedded and start multiple applications with different Vertx instances, be sure to use free cluster (communication) ports (see manual):

-cluster-port If the cluster option has also been specified then this determines which port will be used for cluster communication with other vert.x instances. Default is 25500. If you are running more than one vert.x instance on the same host and want to cluster them, then you'll need to make sure each instance has its own cluster port to avoid port conflicts.

We had to create Vertx instances with a specific port, e.g. 25501, 25502 (for the second and third application):

Vertx vertx = Vertx.newVertx(25501, "10.0.0.11");

Without port and host, the instance is not clustered!

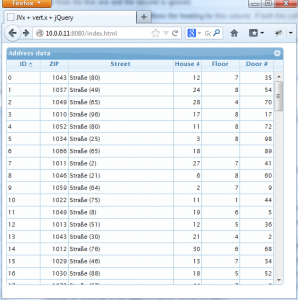
The last goal was a simple JavaScript application. Here is a screenshot:

JVx with Vert.x and JQuery

JVx with Vert.x and JQuery

The application connects with username and password and retrieves data from a database via business logic (standard JVx). We used an existing JVx application and wrote one html page for our JavaScript application. Here is the source code:

<!DOCTYPE html PUBLIC "-//W3C//DTD XHTML 1.0 Strict//EN" "http://www.w3.org/TR/xhtml1/DTD/xhtml1-strict.dtd">
<html xmlns="http://www.w3.org/1999/xhtml" xml:lang="en" lang="en">
<head>
<meta http-equiv="Content-Type" content="text/html; charset=utf-8" />
<title>JVx + vert.x + jQuery</title>
 
<link rel="stylesheet" type="text/css" media="screen" href="css/jquery-ui.custom.css" />
<link rel="stylesheet" type="text/css" media="screen" href="css/ui.jqgrid.css" />

<script src="js/jquery-1.7.2.min.js" type="text/javascript"></script>
<script src="js/i18n/grid.locale-en.js" type="text/javascript"></script>
<script src="js/jquery.jqGrid.min.js" type="text/javascript"></script>
<script src="http://cdn.sockjs.org/sockjs-0.2.1.min.js"></script>
<script src="js/vertxbus.js"></script>
<script type="text/javascript">
  $.jgrid.no_legacy_api = true;
  $.jgrid.useJSON = true;
</script>
<script type="text/javascript">
jQuery(document).ready(function(){
  $.jgrid.defaults = $.extend($.jgrid.defaults,{loadui:"enable"});

  jQuery("#grid").jqGrid(
  {
    datatype: "local",
    height: 400,

    colNames:['ID','PLZ-ID', 'ZIP', 'STRA-ID', 'Street', 'House #', 'Floor', 'Door #'],
    colModel:[
                {name:'ID', width:60, sorttype:"int"},
                {name:'POST_ID', hidden:true},
                {name:'POST_PLZ', width:50, align:"right", sorttype:"text"},
                {name:'STRA_ID', hidden:true},
                {name:'STRA_NAME', width:200, sorttype:"text"},        
                {name:'HAUSNUMMER', width:50, align:"right", sorttype:"int"},          
                {name:'STIEGE', width:70, align:"right", sorttype:"int"},              
                {name:'TUERNUMMER', width:60, align:"right", sorttype:"int"}
                ],
   
    multiselect: false,
    rowNum: 200,
    forceFit: true,
    loadonce: true,
    caption: "Address data"
});

eb = new vertx.EventBus("http://10.0.0.11:8080/eventbus");

eb.onopen = function()
{
    eb.send('jvx.createSession',
            {application: 'demo', username: 'rene', password: 'rene'},
            function (reply)
    {  
      eb.send('jvx.fetch',
              {sessionId: reply.sessionId, object: 'adrData'},
              function (reply2)
      {
        gdata = reply2.data;

        for(var i = 0; i <= gdata.length; i++)
       {
         jQuery("#grid").jqGrid('addRowData', i + 1, gdata[i]);
       }
     });
   });    
};

});
</script>
</head>
<body>
  <div id="GridPane">
    <table id="grid"></table>
  </div>
</body>
</html>

The authentication is hardcoded, of course. It's not a problem to show a login page, but not necessary for our project.

Summary

We have a great integration of JVx for vert.x and it's now possible to use JVx on remote hosts without application server. Simply use Vert.x as http or socket server. It's very cool to use a Raspberry Pi with JVx without Tomcat, Jetty or JBoss - it saves system resources and is cool :)

It's now possible to use JavaScript, Python, Ruby or Groovy as client technology together with vert.x and JVx. Use the power of JVx for your preferred client technology.

The EventBus is a powerful feature to enrich your rich applications :)

Our integration project is open source and free for everyone!

New project: embedded NFC

The source code for NFC reading/writing (mifare cards, chip PN532) is available.

See http://sourceforge.net/projects/enfc.

If you use Eclipse, simply check out and open the included project. It should work without problems. A build.xml for ant is included and creates an enfc.jar under <project>/build/install/.

How to use the library?

First, test if your hardware works. Start the JUnit test cases:

<TestNFC>.testDiagnose
<TestNFC>.testCommunication

Both should be green.

If you have problems, check if your authentication Key is 0xFF_FF_FF_FF_FF_FF and change the port for the serial interface (default: COM6). Add the system property "-Dserialport=xxx" to your launch configuration or change AbstractNFCTest.

The library has one very important class and one important class :)

  • The very important class is NFC. It handles the communication with your hardware (supports read and write operations).
  • The important class is NFCReader

The NFCReader reads two sectors (á 3 Blocks á 16bytes). The first sector contains a name (usually your first and last name). The second sector contains an authentication key (whatever). If you manage different data or want save read operations, check the source of NFCReader and create your own reader - it's easy.

Before you can read data, you have to write data to your card. Use following test case to write data:

<TestNFC>.testWrite

but don't forget to change the username and auth key. The defaults are René Jahn and 010203 ;-)

A simple test application:

public static void main(String[] pArgs)
{
  nfcr = new NFCReader();
  nfcr.setPort(System.getProperty("serialport"));
  nfcr.setAuthenticationKey(new byte[] {(byte)0xFF, (byte)0xFF, (byte)0xFF, (byte)0xFF, (byte)0xFF, (byte)0xFF});
  nfcr.addListener(new INFCListener()
  {
    public void nearFieldCommunication(final NFCEvent pEvent)
    {
      switch (pEvent.getType())
      {
        case BlockRead:
                byte[] byData = new byte[48];
                                                       
                List<?> liBytes = (List<?>)pEvent.getObject();
                                                       
                for (int i = 0; i < 3; i++)
                {
                  System.arraycopy((byte[])liBytes.get(i), 0, byData, i * 16, 16);     
                }
                                                       
                String sName = NFC.toString(byData);

                byData = new byte[48];

                for (int i = 3, j = 0; i < 6; i++, j++)
                {
                  System.arraycopy((byte[])liBytes.get(i), 0, byData, j * 16, 16);     
                }
                                                       
                String sKey = NFC.toString(byData);
                                                       
                System.out.println("Welcome: " + sName + " [" + sKey + "]");
                break;
        case Error:
                ((Exception)pEvent.getObject()).printStackTrace();
                break;
      }
    }
  });
       
  nfcr.searchCards(false);
}

JVx, NTLMv2, Samba4 AD - authentication rocks!

Samba4 - what a great product!

My first samba PDC was version 3, and it took many nights until my old NT machines joined the samba domain... that was long time ago. As I heard of samba 4 and the big ideas (2005), I thought c'mon how would you do this? But Microsoft released important documentation about the protocol internas. And this helped!

... and some years later, we have a final release of Samba4.
Respect!

Yesterday, I read about a prebuilt samba image from SerNet (EnterpriseSamba) and thought I should try it out, because the installation was so easy! 20 minutes later, my Samba4 VM was up and running.

My first test with Windows XP as client was successful and today I added Vista, Win7 and Win8 to my new domain.
It was too easy :(

Of course, I had a problem with name resolving. The client machines should use the Samba4 server as primary DNS. I didn't change my DNS server but set the primary DNS on every machine/VM.

After my virtual domain environment was setup, I made tests with JVx' NTLM authentication. We added NTLMv1 support in 2008 or earlier - not sure when. We used jCIFS - what else.

We support authentication with signed, unsigned Applets (YES - Applets) and Desktop applications. It is one of the most important features for our business customers: Single Sign-On.

Our problems with the implementation were the difference between OS versions and Java versions. In Windows XP, NTLMv1 was default. Since Vista, NTLMv2 is default. Java 1.5 and newer support NTLM authentication via http automatically. Since 1.6 update ?? the authentication implementation is not so nice as it was before...

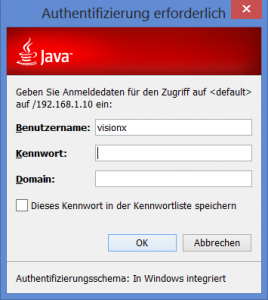
My tests with 1.5 and 1.6 <= 20 on WinXP, Vista, Win7, Win8 were successful. With 1.6 u38 and 1.7 u10 we have to use a new authentication dialog (be careful - German):

Authentication dialog

Authentication dialog

I'm not sure if this dialog is good or not, because NTLM authentication worked with e.g. 1.6 u20 without this thing. I didn't find a property to bypass this dialog. But if you check "save", the dialog does not pop up again (not perfect but our business users can handle it).

At the end of the day, we have a working solution for automatic NTLMv1 + NTLMv2 authentication for JVx with support for WinXP, Vista, Win7, Win8 and jre 1.5 up to 1.7. Thanks to samba4, an ActiveDirectory costs nothing.

It's a nice present :)

Welcome RaspberryPi

I ordered a Raspberry Pi model B two month ago from RS-Components... it arrived today. It was not a problem because I had a Beagleboard for tests and JavaFX for Pi is available since yesterday.

One of my friends received a (more expensive) Pi some weeks ago and we made some tests with JBossAS 7.1 and JavaSE 7 (without JavaFX). It worked like a charm and it's cool to have a JBossAS on a Pi. But without JavaFX it was not too funny.

So, back to my Pi.

The installation was very easy: Simply read the short version of Stephen Chin or the long version.

I had some smaller problems:

  • Win32DiskImager did not work with my Laptop and the builtin card-reader, and I had no external reader
  • I didn't know the username and password for login

I solved the first problem with flashnul:

flashnul 2 -L 2012-12-16-wheezy-raspbian.img

My first attempt didn't work - Raspberry Pi didn't boot (no flashing lights on my Pi - only PWR, screen was black) .... Wrote the image once again and removed the device cleanly from my Laptop - worked.

The second problem was not really a problem, but I had no idea. Used pi as username and raspberry as password (see here)

First actions after boot and setup:

apt-get update
apt-get install librxtx-java mc locate

Pi is up and running, but the image is not comparable with my Angstrom image. Some modules/drivers are missing... but that's not too important now.

My Time tracking software works on my Pi without problems. Startup time is a little bit longer as on my Beagleboard.

The next steps are some performance tests...

But Pi is definitely a MUST have.
Order your own one asap and enter the world of embedded systems with JavaFX.

Time tracking in Action

If you read previous articles about my experiments with JavaFX and embedded hardware you might be interested in the result.

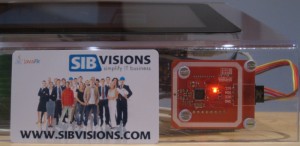
SIB Visions card

SIB Visions card

  This is the NFC card reader and one of our user cards.

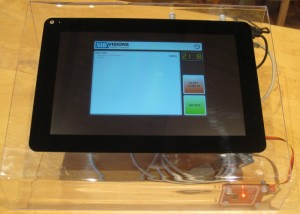
Hardware and case

Hardware and case

  This is the whole system with a nice looking case. This case is hand-made and you can't buy it in a store :)

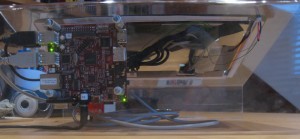
Beagleboard-xm

Beagleboard-xm

  The back shows the Beagleboard.

Finally, a short video because the solution needs sound to be cool:


Time tracking in action


There are 3 different sounds: OK, OK + completed (whistle) and ERROR. If you hear OK, it means "come in", OK + completed means "Go out". An ERROR means "unknown card".

Have fun.

Pre-built Angstrom image for Beagleboard-xm

Angstrom kernel version: 3.2.28

The archive is available here and contains

  • MLO
  • u-boot.img
  • systemd-GNOME-image
  • modules

The archive contains fresh files but includes the mac address patch.

Check installation instructions.

Source Code modification with Eclipse AST

We heavily use Eclipse AST and JDT. The problem with both APIs is that you don't find a lot of documentation or examples. The best documentation was and is the source code. It shows all secrets.

Last friday at Eclipse DemoCamp Vienna, I discussed with CodeCop about AST and JDT and the missing documentation :)

I wrote a simple class for class/superclass/package/javadoc manipulation some months ago. It is included in VisionX and is not free, but no matter. Here is the source code:

/*
(c) SIB Visions 2012

http://www.sibvisions.com
*/
public class SimpleSourceFile {
    //~~~~~~~~~~~~~~~~~~~~~~~~~~~~~~~~~~~~~
    // Class members
    //~~~~~~~~~~~~~~~~~~~~~~~~~~~~~~~~~~~~~

    /** the source parser. */
    private ASTParser parser;

    /** the parsed tokens of the source file. */
    private CompilationUnit cuSource;

    /** the original document. */
    private Document docOrig;

    /** the class type info. */
    private TypeDeclaration tdClass;

    /** the javadoc of the class. */
    private JavadocInfo jdoc;

    /** the full qualified name of the class. */
    private String sClassName;

    /** the full qualified name of the super class after loading. */
    private String sLoadedSuperClass;

    /** the full qualified name of the parent class. */
    private String sSuperClass;

    /** whether the source is changed. */
    private boolean bChanged = false;

    //~~~~~~~~~~~~~~~~~~~~~~~~~~~~~~~~~~~~~
    // Initialization
    //~~~~~~~~~~~~~~~~~~~~~~~~~~~~~~~~~~~~~

    /**
     * Creates a new instance of <code>SimpleSourceFile</code> without source
     * information.
     */

    public SimpleSourceFile() {
        load("");
    }

    /**
     * Creates a new instance of <code>SimpleSourceFile</code> with a given
     * source file.
     *  
     * @param pFile the java source file
     * @throws IOException if an error occurs during reading the file
     */

    public SimpleSourceFile(File pFile) throws IOException {
        if (pFile.exists()) {
            JavaSource source = JavaSource.get(pFile.getAbsolutePath());

            if (source != null) {
                synchronized(source) {
                    load(new String(FileUtil.getContent(pFile)));
                }
            } else {
                load(new String(FileUtil.getContent(pFile)));
            }
        } else {
            load("");
        }
    }

    /**
     * Creates a new instance of <code>SimpleSourceFile</code> with a given
     * source stream. The stream is closed after reading
     *  
     * @param pStream the java source stream
     * @throws IOException if an error occurs during reading the stream
     */

    public SimpleSourceFile(InputStream pStream) throws IOException {
        this(pStream, true);
    }

    /**
     * Creates a new instance of <code>SimpleSourceFile</code> with a given
     * source stream.
     *  
     * @param pStream the java source stream
     * @param pAutoClose whether the stream should be closed after reading
     * @throws IOException if an error occurs during reading the stream
     */

    public SimpleSourceFile(InputStream pStream, boolean pAutoClose) throws IOException {
        load(new String(FileUtil.getContent(pStream, pAutoClose)));
    }

    //~~~~~~~~~~~~~~~~~~~~~~~~~~~~~~~~~~~~~
    // User-defined methods
    //~~~~~~~~~~~~~~~~~~~~~~~~~~~~~~~~~~~~~

    /**
     * Loads the properties from the source file.
     *
     * @param pSource the java source
     */
@SuppressWarnings({
        "unchecked", "rawtypes"
    })
    private void load(String pSource) {
        jdoc = new JavadocInfo();

        if (parser == null) {
            parser = ASTUtil.createParser();
        }

        parser.setSource(pSource.toCharArray());

        cuSource = (CompilationUnit) parser.createAST(null);

        if (docOrig != null) {
            docOrig.set(pSource);
        } else {
            docOrig = new Document(pSource);
        }

        //we support only one class per file
        List types = cuSource.types();

        if (types.size() > 0 && types.get(0) instanceof TypeDeclaration) {
            tdClass = (TypeDeclaration) types.get(0);

            String sPackage;

            //we have to use the current package, if set
            if (cuSource.getPackage() != null) {
                sPackage = cuSource.getPackage().getName().getFullyQualifiedName() + ".";
            } else {
                sPackage = "";
            }

            sClassName = sPackage + tdClass.getName().getFullyQualifiedName();

            if (tdClass.getSuperclassType() != null) {
                String sSuperName = ((SimpleType)(tdClass.getSuperclassType())).getName().getFullyQualifiedName();

                if (sSuperName.indexOf('.') > 0) {
                    sSuperClass = sSuperName;
                } else {
                    //try to detect the full qualified name of the super class through the imports

                    List < ImportDeclaration > liImports = cuSource.imports();

                    boolean bFound = false;

                    if (liImports != null) {
                        String sTempName = "." + sSuperName;
                        String sImport;

                        for (int i = 0, anz = liImports.size(); !bFound && i < anz; i++) {
                            sImport = liImports.get(i).getName().getFullyQualifiedName();
                            if (sImport.endsWith(sTempName)) {
                                bFound = true;

                                sSuperClass = liImports.get(i).getName().getFullyQualifiedName();
                            }
                        }
                    }

                    if (!bFound) {
                        //we use the current package
                       sSuperClass = sPackage + sSuperName;
                    }
                }

                //cache for optimizing imports in apply
                sLoadedSuperClass = sSuperClass;
            }

            jdoc = new JavadocInfo(tdClass.getJavadoc(), pSource);
        } else {
            tdClass = null;
        }

        //currently loaded file can not be changed!
        bChanged = false;
    }

    /**
     * Sets the comment for the class.
     *
     * @param pText the comment
     */

    public void setClassComment(String pText) {
        bChanged |= !CommonUtil.equals(pText, jdoc.getDescription());

        jdoc.setDescription(pText);
    }

    /**
     * Gets the comment for the class.
     *
     * @return the comment
     */

    public String getClassComment() {
        return jdoc.getDescription();
    }

    /**
     * Sets the full qualified name of the class.
     *
     * @param pName the class name
     */

    public void setClassName(String pName) {
        if (pName == null) {
            throw new IllegalArgumentException("It is not allowed to remove the class definition (class name = null)!");
        }

        bChanged |= !CommonUtil.equals(pName, sClassName);

        sClassName = pName;
    }

    /**
     * Gets the full qualified name of the class.
     *
     * @return the class name
     */

    public String getClassName() {
        return sClassName;
    }

    /**
     * Sets the full qualified class name of the parent class.
     *
     * @param pSuperClass the full qualified class name of the parent class
     */

    public void setSuperClass(String pSuperClass) {
        bChanged |= !CommonUtil.equals(pSuperClass, sSuperClass);

        sSuperClass = pSuperClass;
    }

    /**
     * Gets the full qualified class name of the parent class.
     *
     * @return the class name
     */

    public String getSuperClass() {
        return sSuperClass;
    }

    /**
     * Replaces the relevant information with the specific values
     * and saves the source file.
     *
     * @throws Exception if the source modification fails
     */
@SuppressWarnings("unchecked")
    protected void apply() throws Exception {
        if (!bChanged) {
            return;
        }

        AST ast = cuSource.getAST();

        ASTRewrite arw = ASTRewrite.create(ast);

        //----------------------------------------------------
        // Change Package, Classname and Constructor
        //----------------------------------------------------

        String sCurrentPackage;

        //set package
        String[] sClassInfo = ClassUtil.splitName(sClassName);

        if (sClassInfo[0] != null) {
            if (cuSource.getPackage() != null) {
                arw.set(cuSource.getPackage(), PackageDeclaration.NAME_PROPERTY, ast.newName(sClassInfo[0]), null);

                sCurrentPackage = sClassInfo[0];
            } else {
                PackageDeclaration pdcl = ast.newPackageDeclaration();
                pdcl.setName(ast.newName(sClassInfo[0]));

                arw.set(cuSource, CompilationUnit.PACKAGE_PROPERTY, pdcl, null);

                sCurrentPackage = sClassInfo[0];
            }
        } else {
            arw.set(cuSource, CompilationUnit.PACKAGE_PROPERTY, null, null);

            sCurrentPackage = null;
        }

        if (tdClass == null) {
            //new class
            tdClass = ast.newTypeDeclaration();
            tdClass.setName(ast.newSimpleName(sClassInfo[1]));

            ListRewrite lrwImp = arw.getListRewrite(cuSource, CompilationUnit.TYPES_PROPERTY);
            lrwImp.insertFirst(tdClass, null);
        } else {
            //change class name
            SimpleName snClass = ast.newSimpleName(sClassInfo[1]);

            arw.set(tdClass, TypeDeclaration.NAME_PROPERTY, snClass, null);

            //chage constructors

            MethodDeclaration[] methods = tdClass.getMethods();

            if (methods != null) {
                for (MethodDeclaration method: methods) {
                    if (method.isConstructor()) {
                        arw.set(method, MethodDeclaration.NAME_PROPERTY, snClass, null);
                    }
                }
            }
        }

        //change Superclass

        List < ImportDeclaration > liImports = cuSource.imports();

        //remove "old" import
       if (sLoadedSuperClass != null) {
            if (liImports != null) {
                boolean bFound = false;

                for (int i = liImports.size() - 1; !bFound && i >= 0; i--) {
                    if (sLoadedSuperClass.equals(liImports.get(i).getName().getFullyQualifiedName())) {
                        bFound = true;

                        arw.remove(liImports.get(i), null);

                        liImports.remove(i);
                    }
                }
            }
        }

        if (sSuperClass == null) {
            arw.set(tdClass, TypeDeclaration.SUPERCLASS_TYPE_PROPERTY, null, null);
        } else {
            //check new super class import
            String[] sSuperClassInfo = ClassUtil.splitName(sSuperClass);

            if (sSuperClassInfo[0] != null) {
                boolean bFound = false;

                if (sCurrentPackage != null) {
                    bFound = sSuperClassInfo[0].equals(sCurrentPackage);
                }

                if (!bFound) {
                    if (liImports != null) {
                        for (int i = 0, anz = liImports.size(); !bFound && i < anz; i++) {
                            bFound = sSuperClass.equals(liImports.get(i).getName().getFullyQualifiedName());
                        }
                    }
                }

                //class not already importet -> add import
               if (!bFound) {
                    ImportDeclaration idSuper = ast.newImportDeclaration();
                    idSuper.setName(ast.newName(sSuperClass));

                    ListRewrite lrwImp = arw.getListRewrite(cuSource, CompilationUnit.IMPORTS_PROPERTY);
                    lrwImp.insertLast(idSuper, null);
                }
            }

            arw.set(tdClass, TypeDeclaration.SUPERCLASS_TYPE_PROPERTY, ast.newSimpleType(ast.newName(sSuperClassInfo[1])), null);
        }

        //----------------------------------------------------
        // Change Javadoc of the class
        //----------------------------------------------------

        if ("".equals(jdoc.toString())) {
            //no javadoc
            arw.set(tdClass, TypeDeclaration.JAVADOC_PROPERTY, null, null);
        } else {
            arw.set(tdClass, TypeDeclaration.JAVADOC_PROPERTY, jdoc.createJavadoc(tdClass.getAST()), null);
        }

        //----------------------------------------------------
        // Modify AST
        //----------------------------------------------------

        TextEdit edit = arw.rewriteAST(docOrig, null);
        edit.apply(docOrig);

        ASTUtil.applyFormat(docOrig);

        //simple reparse (important for the comments)
        parser.setSource(docOrig.get().toCharArray());

        cuSource = (CompilationUnit) parser.createAST(null);

        //----------------------------------------------------
        // Modify comments
        //----------------------------------------------------

        //Class comment after the last bracket

        int iCorr = 0;

        List < Comment > liComments = cuSource.getCommentList();

        if (liComments != null) {
            String sOldName = tdClass.getName().getFullyQualifiedName();
            String sText;

            for (Comment com: liComments) {
                sText = docOrig.get(com.getStartPosition() - iCorr, com.getLength());

                int iPos = 0;
                int iClassLen = sClassInfo[1].length();
                int iLenDiff = sOldName.length() - iClassLen;

                int iNextPos;

                CharacterType ctypePrev;
                CharacterType ctypeNext;

                while ((iPos = sText.indexOf(sOldName, iPos)) >= 0) {
                    if (iPos > 0) {
                        ctypePrev = StringUtil.getCharacterType("" + sText.charAt(iPos - 1));
                    } else {
                        ctypePrev = CharacterType.OnlySpecial;
                    }

                    iNextPos = iPos + sOldName.length();

                    if (iNextPos <= sText.length() - 1) {
                        ctypeNext = StringUtil.getCharacterType("" + sText.charAt(iNextPos));
                    } else {
                        ctypeNext = CharacterType.OnlySpecial;
                    }

                    //don't replace word parts e.g. ContactsWorkScreen should not be replaced with Contacts
                    if ((ctypePrev == CharacterType.OnlySpecial || ctypePrev == CharacterType.OnlyWhitespace) && (ctypeNext == CharacterType.OnlySpecial || ctypeNext == CharacterType.OnlyWhitespace)) {
                        docOrig.replace(com.getStartPosition() + iPos - iCorr, sOldName.length(), sClassInfo[1]);

                        iCorr += iLenDiff;
                        iPos += iClassLen;
                    } else {
                        iPos = iNextPos;
                    }
                }
            }
        }

        //----------------------------------------------------
        // Update
        //----------------------------------------------------

        load(docOrig.get());

        bChanged = false;
    }

    /**
     * Stores the changed source into the given file.
     *
     * @param pFile the target file for the source
     * @throws Exception if an error occurs during saving
     */

    public void saveAs(File pFile) throws Exception {
        apply();

        JavaSource source = JavaSource.get(pFile.getAbsolutePath());

        if (source != null) {
            synchronized(source) {
                FileUtil.save(pFile, docOrig.get().getBytes());

                source.reload();
            }
        } else {
            FileUtil.save(pFile, docOrig.get().getBytes());
        }
    }

    /**
     * Stores the changed source into the given stream.
     *
     * @param pStream the target stream for the source
     * @throws Exception if an error occurs during saving
     */

    public void saveAs(OutputStream pStream) throws Exception {
        apply();

        pStream.write(docOrig.get().getBytes());
        pStream.flush();
    }

    /**
     * Returns the modified source code.
     *  
     * @return the modified source code
     * @throws Exception if the source modification fails
     */

    protected String getSource() throws Exception {
        apply();

        return docOrig.get();
    }

} // SimpleSourceFile

Important imports:

import org.eclipse.jdt.core.dom.AST;
import org.eclipse.jdt.core.dom.ASTParser;
import org.eclipse.jdt.core.dom.Comment;
import org.eclipse.jdt.core.dom.CompilationUnit;
import org.eclipse.jdt.core.dom.ImportDeclaration;
import org.eclipse.jdt.core.dom.MethodDeclaration;
import org.eclipse.jdt.core.dom.PackageDeclaration;
import org.eclipse.jdt.core.dom.SimpleName;
import org.eclipse.jdt.core.dom.SimpleType;
import org.eclipse.jdt.core.dom.TypeDeclaration;
import org.eclipse.jdt.core.dom.rewrite.ASTRewrite;
import org.eclipse.jdt.core.dom.rewrite.ListRewrite;
import org.eclipse.jface.text.Document;
import org.eclipse.text.edits.TextEdit;

The class contains references to other classes like CommonUtil, FileUtil, StringUtil. These classes are included in JVx. There are two classes (JavaSource, ClassUtil) that are not free, but you should find out how it works without these classes.

If you'll set a new superclass, the superclass and its import, if available, will be updated. If you'll set a new classname, all constructors will be updated.

And once again: The best documentation is the source code :)

JavaFX TimeTracking with Beagleboard-xm

My first JavaFX "embedded" application is ready.

The application is a time tracking tool. It uses RFID cards for user authentication and sends time entries to a remote Redmine project management tool. It works great.... now.

Before I continue, a screenshot of the current application taken via VNC from my Beagleboard:

Time tracking

Time tracking

... I'm not a UI designer ;-)

My first design was a little bit different because I began to develop on my Windows Laptop and used some nice transitions and effects. The first layout was this:

Time tracking (Laptop)

Time tracking (Laptop)

Some problems with this design - on my Beagleboard - were bad peformance of TableView updates, slow transitions, problems with innershadow effect:

Time tracking (1:1)

Time tracking (1:1)

I don't know why the shadow effect worked for the table border, but the UI was not usable. It was too slow and the clock was not shown because of other problems described from Gerrit Grunwald.

After short frustration, I began to tweak:

  • Replaced TableView with ListView
  • Replaced Clock from JFXtras with a styled Label
  • Smaller buttons for better performance
  • Specific stylesheets for embedded environment

It was not a lot of work to change the application, but I thought the performance would be better. It's very important to reduce effects and transitions for applications that should run on an embedded device like Beagleboard-xm. It's a little bit like developing mobile applications (touch instead of mouse, screen size, performance, ...).

The current JavaFX embedded runtime is not perfect and the performance could be better, but if you are careful, you can create very useful applications.

And finally a picture of my hardware:

Hardware

Hardware

NFC/RFID for Beagleboard xm with Java

NFC reader   Based on my experience with JavaFX, Beagleboard xm, RxTx and GSM devices, I started my new research project: A simple and cheap time tracking solution.

There are hundreds of tools and hardware solutions available for time tracking, but hardware solutions are expensive and tools without hardware are not practically.

The ideal solution would use a Raspberry Pi and a RFID reader together with a simple JavaFX application. Total costs are about EUR 50,- for the hardware and software should be free :) If you need a case for your hardware and a lcd display, it would be more expensive but EUR 150,- should be the limit for a brilliant system.

I ordered my Raspberry Pi some weeks ago but it is still not available and hopefully it will arrive before Xmas? My fallback board is the Beagleboard xm.

The big question was the RFID reader/writer. Wich devices were supported, and were there any Java APIs for the communication? After a short google search I found a lot of recommendations for RFID breakout board, but it was not too cheap and I don't have an Arduino board and don't want one. I found some other boards but I decided to use PN532 NFC RFID module kit. It is still expensive but seems to be fair.

Why this RFID board?

Firstly, because of a mistake. I saw a screenshot of an example application and the frame icon was a Java icon... So I thought the application was written with Java and there must be a Java API. Not really!
The whole kit was available as developer version with a lot of accessoires like two cards, one dongle, additional cables, ....

After reading the documentation and provided information it was clear that the board was perfect for Arduino boards and the software was written in C/C++, but it was still not too expensive.

But no risk, no fun - ordered.

The delivery time was ok and after unpacking I thought it would be easy to test the included RFID cards - Plug and Play? The truth: No way.

First problem

Included cables were built for Arduino board. I kew that the connection could be a problem and ordered an USB TTL module together with the RFID baord.

The USB module has a connector with 4 pins (GND, VCC, RX, TX) and the RFID board has 4 pins (GND, VDD, RX/SDA, TX/SDL). It was not a big problem to connect the right pins after it was clear that the included standard cable will not work.

Solved.

Second problem

The RFID reader supports 3 different modes (HSU, I2C, SPI). The default mode was I2C because of the Arduino support. But in order to support my Beagleboard, HSU was needed. The board has no jumpers and you must solder a little bit to, but with the right tools it's easy.

Solved.

Third problem

No Arduino board, no chance to test the RFID board? Not really.
There is a great open source project with the name libnfc. It has read/write and diagnostic tools and runs on Linux and should run on Windows too. I compiled libnfc on my Ubuntu VM and had the problem that the nfc-list tool reported a timeout after connecting - but the RFID board was found.
Hm...

It was easy to compile libnfc on Ubuntu - after installing some dependencies - so I thought it should be easy to compile it on my Beagleboard xm? It was a bad idea and I spent some extra hours... but it worked.

How? I can't remember every single step, but try following:

Dependencies:

opkg install cc
opkg install gcc-dev
opkg install task-native-sdk
opkg install libusb-1.0-0 libusb-1.0-dev
opkg install libusb-0.1-4 libusb-0.1-dev
opkg install udev-dev
opkg install autoconf

You need following source packages:

pcsc-lite.1.7.0
libnfc-1.5.1

(Newer versions or different version combinations did not work because libraries were not available for my distribution. But this versions are good enough for tests.)

Start with pcsclite:

./bootstrap
./configure --disable-libhal
make install

Copy /usr/local/include/PCSC directory to /usr/include and /usr/local/lib/pkgconfig/libpcsclite.pc to /usr/lib/pkconfig/

Next, compile libnfc:

./configure --with-drivers=pn532_uart,pn53x_usb --enable-serial-autoprobe --enable-debug
make install

If you get the exception similar to ln: symbol not found -lusb, create a symbolic link:

cd /lib
ln -s libusb-0.1.so.4.4.4 libusb.so

Test, in your libnfc directory:

cd utils
./nfc-list
cd ../examples
# hold a card over the RFID board
./nfc-poll

My output:

# ./nfc-list
Connected to NFC device: PN532 (/dev/ttyUSB0) - PN532 v1.6 (0x07)

# ./nfc-poll
NFC device will poll during 30000 ms (20 pollings of 300 ms for 5 modulations)
ISO/IEC 14443A (106 kbps) target:
    ATQA (SENS_RES): 00  04
       UID (NFCID1): 1b  21  4b  e0
      SAK (SEL_RES): 08

Now you know that your hardware is supported and works with CPP libraries. But what about Java?

I found NFC Tools but the online demo did not work with my reader. Another solution was Open-NFC.

Both solutions were feature rich but horrible because the first one did not compile and maven could not resolve all dependencies. The other solution was too complex for my use case. Why the hell are most libraries so complex. Nobody can handle big libraries.

My use-case was simple: I need a small Java library that can be bundled with my application and it should work on Linux, Windows and optionally on MacOS. It should connect to my Reader via RS232. I stopped evaluating libraries and decided to create my own "simple" library for my use-case.

The topic (NFC, RFID, smart cards) is really complex but I had a PDF that described how read/write basically should work. And I had a reference implementation in cpp. After some problems and night hacking, the problem was solved and I had my library that simply worked (only 2 source files and ~ 1000 LoC).

My first application only reads content from cards that are over the reader. Here is the output:

SAM = true
LOOP PAUSE
UUID length: 4
UUID: 1b 21 4b e0
Authentication receive: 00 FF 03 FD D5 41 00 EA
Authentication successful
Read block successfully:
00 00 00 00 00 00 00 00 00 00 00 00 00 00 00 00

Read block successfully:
00 00 00 00 00 00 00 00 00 00 00 00 00 00 00 00

Read block successfully:
00 00 00 00 00 00 00 00 00 00 00 00 00 00 00 00

Read block successfully:
00 00 00 00 00 00 FF 07 80 69 FF FF FF FF FF FF

And it supports writing to the card, but don't overwrite the 4th block because it contains security settings. If you overwrite the 4th block with wrong values, the whole sector is unusable.

What'll come next? A JavaFX UI for in/out tracking.
The library itself is free but the source is not yet available because it needs some refactoring and beautifying.

Have fun ;-)

JavaFX development for Beagleboard xm

TableView

TableView

  This is my first application for the board.
It's not rocket science but was already developed :)

This screenshot was captured via VNC. The installation of VNC was very easy:

opkg install angstrom-x11vnc-xinit
killall Xorg

Wait until X was restarted and use a VNC Viewer (e.g. TightVNC) to create a connection to port 5900. More details are available here.

The application was developed with JavaFX 2.2.2, but on the beagleboard (with the current preview version) it is version 8.0.0-ea-b55. If you develop custom controls be careful because SkinBase was moved to javafx.scene.control. If you want develop with an 8.x version, you must download a JDK8 EA version. It works for me but some methods are different in 8.x as in 2.x and of course they removed some deprecated "impl_" methods :)

Another problem with my test application is that I have no scrollbars (see screenshot) and scrolling with my mouse does not work. Sort on header and resize columns is not possible.

Don't expect too much from the current JavaFX support for ARM. It's in a very early phase, but if you create your own "controls" you get a powerful toy.