This website uses cookies for visitor traffic analysis. By using the website, you agree with storing the cookies on your computer.More information

Dynamically set css' with Vaadin 7

Have you ever tried to add/remove/change style sheets of Vaadin components dynamically, without css file modification? We didn't find suitable methods in Vaadin' standard components.

We miss methods like

setStyle("margins: 2px;");
addStyle("padding-left: 5px;");
removeStyle("padding-left: 5px;");

in Vaadin. It's very easy to change style sheets with css files that are included in your project(s), but if you need a little bit more control... or must create dynamic applications - it's not possible out-of-the-box.

I'm not sure why there are no such methods, because GWT has all of them?

But no worries, with Vaadin 7 it's easy to add support for CSS manipulation. Simply use UI Extensions.

You'll find our CssExtension in our Vaadin UI project.

JVx with Maven

We're pleased to announce that JVx is available in the public maven repositories.

Use following dependency in your pom.xml:

<dependency>  
   <groupId>com.sibvisions.jvx</groupId>  
   <artifactId>jvxall</artifactId>  
   <version>1.1</version>  
</dependency>

for your server project and following dependency:

<dependency>  
   <groupId>com.sibvisions.jvx</groupId>  
   <artifactId>jvxclient</artifactId>  
   <version>1.1</version>  
</dependency>

for your client project.
The differences between jvxclient and jvxall are: The client does not contain server classes and is about 200Kb smaller.

JVx EE 1.0.1 is out

What is JVx EE?

It is a small library that allows you to create backend applications for your frontends. Simply re-use your existing domain model and create a JVx application that uses a domain model instead of direct database connections.

It's licensed under Apache 2.0 and is available here.

What's new?

We reviewed the code and fixed some smaller bugs. We added an example application that shows how it works.

A short example

Session.java

public EntityManager getEntityManager() throws Exception
{
    EntityManager em = (EntityManager)get("entityManager");
       
    if (em == null)
    {
        EntityManagerFactory emf = Persistence.createEntityManagerFactory("jvxee");  
        em = emf.createEntityManager();
           
        put("entityManager", em);
    }
       
    return em;
}

Screen.java

public IStorage getCustomer() throws Exception
{
    JPAStorage jpaCustomer = (JPAStorage)get("customer");

    if (jpaCustomer == null)
    {
        EntityManager em = getEntityManager();
               
        jpaCustomer = new JPAStorage(Customer.class);
        jpaCustomer.setEntityManager(em);
               
        CustomerEAO customerEAO = new CustomerEAO();
        customerEAO.setEntityManager(em);
               
        jpaCustomer.getJPAAccess().setExternalEAO(customerEAO);
        jpaCustomer.open();
               
        put("customer", jpaCustomer);
    }
       
    return jpaCustomer;
}

public IStorage getCustomerEducation() throws Exception
{
    JPAStorage jpaCustomerEducation = (JPAStorage)get("customerEducation");
       
    if (jpaCustomerEducation == null)
    {
        jpaCustomerEducation = new JPAStorage(Customer.class);
        jpaCustomerEducation.setDetailEntity(Education.class);
        jpaCustomerEducation.setEntityManager(getEntityManager());
        jpaCustomerEducation.open();
               
        put("customerEducation", jpaCustomerEducation);
    }
       
    return jpaCustomerEducation;
}

JVx 1.1 is available

Yesterday, we released a brand new version of JVx. The version number is now 1.1. We had some delays between 1.0 and 1.1 because we decided to do more researching as we originally planned. The 1.0 release was too stable and full featured because we only got positive feedback and some feature requests. Our product VisionX also uses JVx 1.0 and our customers had absolutely no problems.

Last year, we decided to open our nightly builds for everyone and because of our high quality standards, we had a new release every day. Some versions were broken but most versions were ready for production use. Of course, a nightly build is not an official release.

But now you are able to use the latest version of JVx as an official release and of course we offer full support.

We have a bunch of new features and smaller bugfixes. Many changes are related to other open source frameworks because we researched a lot of interesting libraries and frameworks. The famous ones are Javeleon and Vert.x.

So, what happened with JVx since 1.0?

  • Improved REST support for all server-side life-cycle objects. It's possible to call actions and to access data (CRUD and metadata). The REST interface is using the same APIs and the same security settings as your web or desktop application. If you're using JVx, it's a task of 1 minute to bind external html5 clients.
    It's very easy to provide custom data for your customers, e.g. create a view in your database, use existing DAOs or dynamically create reports. You'll need about 5 minutes to provide new functionality.

  • Full support for Vert.x

    We successfully used Vert.x http and socket server instead of Tomcat or JBoss. Simply use your existing applications and integrate them in your Vert.x environment. Don't change your application, simply use another technology.
    Simply use Vert.x event bus for asynchronous and live messages.

  • Execute database procedures and functions like Java functions. Don't write many LoC for database access. We now offer input and output parameters as known from direct JDBC calls. We didn't reinvent the wheel but made JDBC a little bit easier to use.

    Standard JDBC procedure call:

    // Standard IN-OUT Parameter Test with plain JDBC
    Connection con = dba.getConnection();

    CallableStatement cstmt = con.prepareCall("{ call EXECPROCEDURE(?, ?, ?) }");
    cstmt.registerOutParameter(1, Types.DECIMAL);
    cstmt.registerOutParameter(3, Types.VARCHAR);

    cstmt.setObject(1, BigDecimal.valueOf(1), Types.DECIMAL);
    cstmt.setObject(2, "ABC", Types.VARCHAR);
    cstmt.execute();

    Same procedure call with JVx:

    OutParam ouTextParam = new OutParam(InOutParam.SQLTYPE_VARCHAR);
    InOutParam ioNumberParam = new InOutParam(InOutParam.SQLTYPE_DECIMAL,
                                              BigDecimal.valueOf(1));
    dba.executeProcedure("execProcedure", ioNumberParam, "ABC", ouTextParam);

    The Oracle procedure:

    CREATE OR REPLACE PROCEDURE execProcedure(pNumber IN OUT NUMBER,
                                              pInText IN VARCHAR2,
                                              pOutText OUT VARCHAR2) IS
      nr NUMBER := pNumber;
    BEGIN
      pOutText := 'Out: '|| pOutText ||' In: '|| pInText;

      pNumber := pNumber + pNumber;
    END execProcedure;

  • Custom UI factories

    It's now fully supportet that you create your own UI factories or extend existing factories. A JVx application will use your custom factory. This allows replacement of single standard components with your own components or simply integrate new components in your application.

  • Oracle Forms integration

    The whole framework was successfully integrated in Oracle Forms applications. A JVx application or a single screen interacts with Forms like standard Forms screens. It's now possible to use modern UI elements in your Forms application without changing or migrating the whole application. We use both technologies and that boosts development time.

  • Full NTLMv2 authentication support

    We had support for NTLMv1 in JVx 1.0 and earlier, but with modern Windows OS' you had to set a registry key to force NTLMv1 because the OS' used NTLMv2. We now support modern Windows versions (Vista, Win7, Win8) out-of-the-box.

  • JVx is ready for Embedded devices

    We made some experiments with embedded Hardware like RaspberryPi or Beagleboard. We always used JVx for our applications and JVx 1.1 works without problems. If you're interested in our experiments, check our Videos on YouTube.

  • Pimped standard Save file dialog to ask for override existing files
  • Prepared JVx for JVx.mobile

The complete changelog is available here.

Control your window shutters with JavaFX

If you have remote controlled, electronical, window shutters, continue reading. If you don't have them, this article might not be interesting for you?
I have such window shutters and a lot of windows. I don't own a control center that allows me to automatically open and close my shutters every morning and evening. I do it every day manually. Sometimes sooner and sometimes later - depends on the day of the week.

Why I don't own a control center?
Such control centers are expensive and do not offer expected features. Some of my features are controlling via SMS, controlling via Internet, move shutters to a specific position (not only up and down).

I didn't really search for a solution of my "problem" because it was not a problem, it was an everyday task and it was habitual. Since I own a RaspberryPi, I tried to find useful solutions, not only Hello worlds. That's the reason why I tried to control my window shutters via Raspberry Pi.

The first big problem was, that it was not possible to find a sender for my shutters. The frequency was 433,42 MHz, but there were no ready-to-use solutions. It was not my intention to solder my own sender and record and decrypt the signal. So, I decided for the easy way: Connect an existing remote control with my Pi. It makes no difference for the remote control, if you press buttons manually or a Pi does the job.

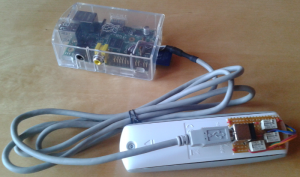
It was not a big problem to find some cheap 3V relais. The soldering was fun and not rocket science. Here is the result:

Remote control

Remote control

My remote control got a new brain. It works with and without connected Pi. I didn't damage it :)
The only thing I had to do, was programming every receiver with one (or more) channel of my remote control. Because one button should control all window shutters. But that was a task of 5 minutes.

The hardware was ready and the next step was a fancy client application for controlling my Pi. The plan was a simple application that shows one of my windows. The shutter should move like the original. The application should connect to my Pi via my LAN.
I used JVx and vert.x on server-side for the GPIO control, wrote a nice Deskotp application with JavaFX, some transitions and JVx for the communication to my server. And here is the result:


JavaFX application

The application moves the shutter like its big brother. One feature is transparency on mouse over, because you wanna know the position if you stop it.

And if you are interested how software and hardware acts together:


JavaFX Shutter control

The project was really cool because the source code for the whole thing was minimal, the costs were not comparable to a control center from the manufacturer and I have all features I ever wanted.

Interested in the source code?

Server-side, JVx style:

//----------------------------------------------------
// Application.java
//----------------------------------------------------

public GpioController getController()
{
    GpioController gpio = (GpioController)get("controller");
       
    if (gpio == null)
    {
        gpio = GpioFactory.getInstance();
               
        put("controller", gpio);
    }
       
    return gpio;
}

public GpioPinDigitalOutput getDownPin()
{
    GpioPinDigitalOutput pin = (GpioPinDigitalOutput)get("downPin");
       
    if (pin == null)
    {
        pin = getController().provisionDigitalOutputPin(RaspiPin.GPIO_01, "Down",
                                                        PinState.LOW);
               
        put("downPin", pin);
    }
       
    return pin;
}

//---------------------------------------------
// Session.java
//---------------------------------------------

public void moveDown() throws Exception
{
    GpioPinDigitalOutput pin = getDownPin();
       
    pin.high();
    Thread.sleep(2000);
    pin.low();
}

And my client simply calls:

NetSocketConnection con = new NetSocketConnection("10.0.0.39");
                       
macon = new MasterConnection(con);
macon.setApplicationName("shutter");
macon.setUserName("user");
macon.setPassword("pwd");
macon.setAliveInterval(-1);
macon.open();

macon.callAction("moveDown");

RaspberryPi JavaFX + Sound

Media support is not included in the current JDK8 preview. If you want to play audio files, it's maybe a problem if you think that it's not possible :)

Don't use JavaFX for the job. Simply use Java Sound API. We successfully used it for our tests with Beagleboard-xm and RaspberryPi (jdk7, jdk8 javafx preview).

Here's the source code of our, old but still good, implementation:

/*
 * Copyright 2012 SIB Visions GmbH
 *
 * Licensed under the Apache License, Version 2.0 (the "License"); you may not
 * use this file except in compliance with the License. You may obtain a copy of
 * the License at
 *
 * http://www.apache.org/licenses/LICENSE-2.0
 *
 * Unless required by applicable law or agreed to in writing, software
 * distributed under the License is distributed on an "AS IS" BASIS, WITHOUT
 * WARRANTIES OR CONDITIONS OF ANY KIND, either express or implied. See the
 * License for the specific language governing permissions and limitations under
 * the License.
 *
 *
 * History
 *
 * 15.12.2005 - [JR] - creation
 */

package com.sibvisions.apps.util;

import java.io.ByteArrayInputStream;
import java.io.ByteArrayOutputStream;
import java.io.File;
import java.io.FileInputStream;
import java.io.IOException;
import java.io.InputStream;
import java.util.Hashtable;
import java.util.Vector;

import javax.sound.sampled.AudioFormat;
import javax.sound.sampled.AudioInputStream;
import javax.sound.sampled.AudioSystem;
import javax.sound.sampled.DataLine;
import javax.sound.sampled.LineUnavailableException;
import javax.sound.sampled.SourceDataLine;

import com.sibvisions.util.type.FileUtil;

/**
 * The <code>AudioPlayer</code> plays audio files. Currently only wav, au and midi files are supported.
 *
 * @author René Jahn
 */

public final class AudioPlayer
{
    //~~~~~~~~~~~~~~~~~~~~~~~~~~~~~~~~~~~~~~~~~~~~~~~~~~~~~~~~~~~~~~~~
    // Class members
    //~~~~~~~~~~~~~~~~~~~~~~~~~~~~~~~~~~~~~~~~~~~~~~~~~~~~~~~~~~~~~~~~

  /** thread list for background playback. */
  private static Vector<Thread> vThreads = null;
 
  /** list of dataline connections for playback. */
  private static Vector<SourceDataLine> vSdl = new Vector<SourceDataLine>();
 
  /** Cached audio files. Reduces resource usage during repatedly playback. */
  private static Hashtable<String, byte[]> htAudioCache = new Hashtable<String, byte[]>();
 
  /** sync object. */
  private static final Object SYNC = new Object();
 
  //~~~~~~~~~~~~~~~~~~~~~~~~~~~~~~~~~~~~~~~~~~~~~~~~~~~~~~~~~~~~~~~~
  // Initialization
  //~~~~~~~~~~~~~~~~~~~~~~~~~~~~~~~~~~~~~~~~~~~~~~~~~~~~~~~~~~~~~~~~

  /**
   * Invisible constructor because <code>AudioPlayer</code> is a utility
   * class.
   */

  private AudioPlayer()
  {
  }
 
    //~~~~~~~~~~~~~~~~~~~~~~~~~~~~~~~~~~~~~~~~~~~~~~~~~~~~~~~~~~~~~~~~
    // User-defined methods
    //~~~~~~~~~~~~~~~~~~~~~~~~~~~~~~~~~~~~~~~~~~~~~~~~~~~~~~~~~~~~~~~~

  /**
   * Gets the current player thread count.
   *
   * @return the number of player threads
   */

  public static int getPlayerThreads()
  {
    if (vThreads != null)
    {
      return vThreads.size();
    }
    else
    {
      return 0;
    }
  }
 
  /**
   * Playback an audio file.
   *
   * @param pFileName the filename
   * @param pBackground <code>true</code> to start playback as background process. The method call returns
   *                    immediately.
   */

  public static synchronized void play(final String pFileName, boolean pBackground)
  {
    AudioPlayer.play(new String[] {pFileName}, 0, pBackground);
  }

  /**
   * Playback multiple audio files.
   *
   * @param pFileName list of file names
   * @param pDelay delay between playback
   * @param pBackground <code>true</code> to start playback as background process. The method call returns
   *                    immediately.
   */

  public static synchronized void play(final String[] pFileName, final long pDelay, boolean pBackground)
  {
    Thread thPlay;
    Thread th;

   
    if (pBackground)
    {
      thPlay = new Thread()
      {
        public void run()
        {
          if (Thread.currentThread() == this)
          {
            if (pFileName != null)
            {
              for (int i = 0, anz = pFileName.length; i < anz; i++)
              {
                AudioPlayer.play(pFileName[i]);
               
                //Use defined delay between playback, but ignore delay after the last track
                if (pDelay > 0 && i + 1 < anz)
                {
                  try
                  {
                    Thread.sleep(pDelay);
                  }
                  catch (InterruptedException ie)
                  {
                    //nothing to be done
                  }
                }
              }
            }
          }
         
          vThreads.remove(this);
        }
      };
     
      if (vThreads == null)
      {
        vThreads = new Vector<Thread>();
      }
     
      //Clear zombies
      for (int i = 0; i < vThreads.size();)
      {
        th = (Thread)vThreads.get(i);
       
        if (!th.isAlive())
        {
          th.interrupt();
          vThreads.remove(i);
         
          th = null;
        }
        else
        {
          i++;
        }
      }
     
      vThreads.add(thPlay);
     
      thPlay.setPriority(Thread.MAX_PRIORITY);
      thPlay.start();
    }
    else
    {
      if (pFileName != null)
      {
        for (int i = 0, anz = pFileName.length; i < anz; i++)
        {
          AudioPlayer.play(pFileName[i]);
         
          //Use defined delay between playback, but ignore delay after the last track
          if (pDelay > 0 && i + 1 < anz)
          {
            try
            {
              Thread.sleep(pDelay);
            }
            catch (InterruptedException ie)
            {
              //nothing to be done
            }
          }
        }
      }
    }
  }
 
    /**
     * Playback a sound file.
     *
     * @param pFileName the filename
     */

    public static void play(String pFileName)
    {
    AudioInputStream ais = null;
 
    AudioFormat adf;
   
    DataLine.Info dli;
   
    SourceDataLine sdl;
   
    byte[] byData = new byte[128000];

    int iData;
   
   
    try
    {
      byte[] byCache = (byte[])htAudioCache.get(pFileName);
     
      if (byCache != null)
      {
        ais = AudioSystem.getAudioInputStream(new ByteArrayInputStream(byCache));
      }
      else
      {
        File fiDirect = new File(pFileName);
       
        //use byte array because most InputStreams do not support "seek"
        //we avoid Exceptions
        if (fiDirect.exists())
        {
          byCache = FileUtil.getContent(new FileInputStream(fiDirect));
        }
        else
        {
          byCache = FileUtil.getContent(AudioPlayer.class.getResourceAsStream(pFileName));
        }

        if (byCache != null)
        {
          cacheFile(pFileName, byCache);

          ais = AudioSystem.getAudioInputStream(new ByteArrayInputStream(byCache));
        }
        else
        {
          throw new IllegalArgumentException("No content found for : " + pFileName);
        }
      }
     
      byCache = null;
    }
    catch (Exception e)
    {
      e.printStackTrace();
      return;
    }

    adf = ais.getFormat();
    dli = new DataLine.Info(SourceDataLine.class, adf);

    try
    {
      sdl = (SourceDataLine) AudioSystem.getLine(dli);
      sdl.open(adf);
     
      synchronized (SYNC)
      {
        vSdl.add(sdl);
      }
    }
    catch (Exception e)
    {
      e.printStackTrace();
      return;
    }

    sdl.start();

    try
    {
      while ((iData = ais.read(byData, 0, byData.length)) != -1)
      {
        sdl.write(byData, 0, iData);
      }
    }
    catch (IOException ioe)
    {
      ioe.printStackTrace();
    }

    sdl.drain();

    synchronized (SYNC)
    {
      sdl.flush();
      sdl.stop();
     
      sdl.close();
     
      vSdl.remove(sdl);
    }

    try
    {
      ais.close();
      ais = null;
    }
    catch (IOException ioe)
    {
      //nothing to be done
    }
   
    sdl = null;
    adf = null;
    }
 
    /**
     * Stop playback of all audio files.
     */

    public static void stopSound()
    {
      synchronized (SYNC)
      {
        if (vSdl != null)
        {
        //stop all playbacks
        for (SourceDataLine sdl : vSdl)
        {
          try
          {
            sdl.flush();
            sdl.stop();
         
            //Don't call this because it crashes the VM and results in a core dump
            //sdl.close();
          }
          catch (Exception e)
          {
            //nothing to be done
          }
        }
       
        vSdl.clear();
        }
      }
    }
   
    /**
     * Caches audio data for later use. If the file is already cached the cache won't
     * be overwritten.
     *
     * @param pFileName the filename
     * @param pData audio data
     */

    public static void cacheFile(String pFileName, byte[] pData)
    {
      cacheFile(pFileName, pData, false);
    }

    /**
     * Caches audio data for later use.
     *
     * @param pFileName the filename
     * @param pData audio data
     * @param bIgnoreCache <code>true</code> to overwrite already cached data, <code>false</code>
     *                     doesn't overwrite cached data
     */

    public static void cacheFile(String pFileName, byte[] pData, boolean bIgnoreCache)
    {
      if (!bIgnoreCache && htAudioCache.containsKey(pFileName))
      {
        return;
      }
     
      if (pFileName != null && pData != null)
      {
        htAudioCache.put(pFileName, pData);
      }
    }
   
    /**
     * Caches an audio file for later use. The file content will be read automatically.
     * If the file is already cached the cache won't be overwritten.
     *
     * @param pFileName the filename
     */

    public static void cacheFile(String pFileName)
    {
      cacheFile(pFileName, false);
    }

    /**
     * Caches an audio file for later use. The file content will be read automatically.
     *
     * @param sFileName Dateiname
     * @param bIgnoreCache true um bereits gecachte Daten zu überschreiben
     */

    public static void cacheFile(String sFileName, boolean bIgnoreCache)
    {
      //don't overwrite cache, if not specified
      if (!bIgnoreCache && htAudioCache.containsKey(sFileName))
      {
        return;
      }
     
      InputStream is = AudioPlayer.class.getResourceAsStream(sFileName);
     
      ByteArrayOutputStream bos = new ByteArrayOutputStream();

    byte[] byData = new byte[128000];
     
      int iData;
     
     
      try
      {
      while ((iData = is.read(byData, 0, byData.length)) != -1)
      {
        bos.write(byData, 0, iData);
      }
   
      htAudioCache.put(sFileName, bos.toByteArray());
     
      bos.close();
      is.close();
      }
      catch (IOException ioe)
      {
        //nothing to be done
      }
    }
   
} //AudioPlayer

Example wav file.

OUYA

Sounds like "Oh Ja" in German ;-)

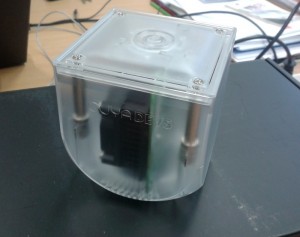
Our developer console arrived today! What a great day.

First impressions:

OUYA unboxing

OUYA unboxing

 
OUYA Console

OUYA Console

Stay tuned.

NFC Reader with RaspberryPi GPIO

If you read my postings about NFC Reader, you know that I use an USB TTL module for the communication with my NFC Reader (UART mode). If you don't own such a module, it's not a big problem to connect the reader with GPIO pins of your RaspberryPi.

How?

Change /boot/cmdline.txt, from:

dwc_otg.lpm_enable=0 console=ttyAMA0,115200 kgdboc=ttyAMA0,115200 console=tty1

to

dwc_otg.lpm_enable=0 console=tty1

Change /etc/inittab, from:

#Spawn a getty on Raspberry Pi serial line
T0:23:respawn:/sbin/getty -L ttyAMA0 115200 vt100

to

#Spawn a getty on Raspberry Pi serial line
#T0:23:respawn:/sbin/getty -L ttyAMA0 115200 vt100

Reboot your Pi.

Connect the Reader with following PINs:

GND -> PIN 6
TxD -> PIN 10 (= GPIO 15)
RxD -> PIN 8 (= GPIO 14)
VCC -> PIN 1 (3,3V) or PIN2 (5,5V)

(GPIO PIN overview)

Use serial port with the name /dev/ttyAMA0 for RxTx and configure RxTx e.g. -Dgnu.io.rxtx.SerialPorts=/dev/ttyAMA0.

Successfully tested with eNFC.

Vaadin 7 beta11 javadoc

Vaadin 7 is still in beta phase. Thats not really a problem, but you don't find a source and/or javadoc archive? Maybe the archives are available, but I couldn't find them!

The source code is available here and in README.TXT you'll find a link to Git of v7.

The heads section contains a link to beta11. Download a snapshot from there and you'll get most source files.

To generate your own javadoc, you'll need some library (jar) files. Simply download complete Vaadin 7.0.0 beta11 archive. This archive contains a lib directory.

Let's create the javadoc

Extract your downloaded source snapshot (e.g. D:\Temp\vaadin-7.0.0.beta11) and create a libs sub-directory. Extract all libraries from beta archive into this directory. Download additional libraries: Portlet API, Servlet API and GWT. (you'll need gwt-servlet.jar and gwt-user.jar). Copy all jar files into the libs directory.

I used following ant task to generate my javadoc:

<target name="vaadin.javadoc">
  <property name="vaadin" location="D:/temp/vaadin-7.0.0.beta11"/>
  <property name="doc" location="${vaadin}/javadoc"/>
  <property name="doc.src" location="${vaadin}/allsrc"/>
  <delete dir="${doc}" />
  <delete dir="${doc.src}" />
  <copy todir="${doc.src}">
    <fileset dir="${vaadin}/client/src/" />
    <fileset dir="${vaadin}/server/src" />
    <fileset dir="${vaadin}/shared/src" />
  </copy>
  <javadoc packagenames="*"
            sourcepath="${doc.src}"
            destdir="${doc}"
            author="false"
            version="false"
            use="true"
            windowtitle="Vaadin 7.0.0 beta 11 (temporary)"
            source="1.6"
            encoding="UTF-8">
    <classpath>
      <fileset dir="${vaadin}/libs">
        <include name="**/*.jar" />
      </fileset>
    </classpath>
    <doctitle>
      <![CDATA[<h1>Vaadin 7.0.0 beta 11 (temporary)</h1>]]>
    </doctitle>
    <bottom>
      <![CDATA[Manually built]]>
    </bottom>
      <link href="http://docs.oracle.com/javase/6/docs/api/" />
      <link href="http://java.sun.com/j2ee/1.4/docs/api/" />
      <link href="http://google-web-toolkit.googlecode.com/svn/javadoc/latest/" />
    </javadoc>
    <jar destfile="${vaadin}/vaadin-7.0.0-beta11-javadoc.jar">
      <zipfileset dir="${doc}" />
    </jar>

Customize the "location" parameter of the properties and use jdk6 or jdk7 to execute the task.

Source code is available in allsrc directory and javadoc is available in javadoc directory or as zip archive.

Good luck and have fun ;-)

Power control with RaspberryPi, JVx and Vert.x

My idea was to create a programmable timer for some lamps at home. I wanted to control the timer via mobile phone (not only smartphone). I decided to use simple SMS'.

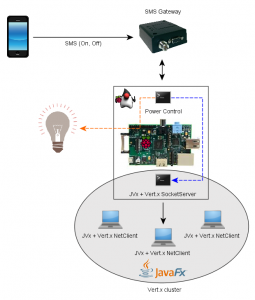
The timer app was not really a challenge and the SMS interface was also very straight forward, so I added a little bit network communication and complexity. The result:

Power control

Power control

My Hardware:

  • Raspberry Pi Model B
  • Cinterion TC65i
  • Standard table lamp
  • Solid State Relay (found here)
  • Laptop as cluster client
  • Mobile Phone :)

My software:

My first question was - Which application server should I use for my Pi? I thought that JBoss or Tomcat would be overhead and I would save resources. I decided for Vert.x and a simple socket server. I wanted to show the integration of Vert.x with JVx and so my server got a JVx application with some business logic for publishing messages.

The server "thing" was clear and for reading SMS' I wrote a simple polling app. The app reads SMS from my hardware via RS232 and forwards received SMS via JVx APIs to my server (with Vert.x' NetClient).
I didn't use the EventBus for sending messages becasue I wanted to show the seamless integration of JVx and Vert.x.

The code for forwarding messages:

MasterConnection macon = new MasterConnection(new NetSocketConnection("10.0.0.39"));
macon.setApplicationName("demo");
macon.setUserName("user");
macon.setPassword("password");
macon.setAliveInterval(-1);
macon.open();

macon.callAction("publishMessage", msg.getOriginator(), msg.getText());

The server application is a standard JVx application (only server-side). It uses a standard XmlSecurityManager without the need for a database. The "business logic" is very simple:

public Vertx getVertx()
{
    return (Vertx)get("vertx");
}

public void publishMessage(String pNr, String pMessage)
{
    System.out.println("publishMessage (" + pMessage + ")");
       
    String sNumber = pNr;

    sNumber = sNumber.substring(0, 5);

    //hide last characters
    for (int i = 5; i < pNr.length(); i++)
    {
        sNumber += "*";
    }
       
    JsonObject jsobj = new JsonObject();
    jsobj.putString("number", sNumber);
    jsobj.putString("message", pMessage);
       
    getVertx().eventBus().publish("sms.received", jsobj);
}

I made some tests with vert.x clustering and decided to implement a (very) simple JavaFX application that shows published SMS'. The application contains following code:

vertx = Vertx.newVertx(25502, "10.0.0.11");

EventBus ebus = vertx.eventBus();
ebus.registerHandler("sms.received", new Handler<Message<JsonObject>>()
{
    public void handle(final Message<JsonObject> pMessage)
    {
        Platform.runLater(new Runnable()
        {
            public void run()
            {
                try
                {
                    mdb.insert(false);
                    mdb.setValues(new String[] {"NUMBER", "MESSAGE"},
                                  new String[] {pMessage.body.getString("number"),
                                                pMessage.body.getString("message")});
                    mdb.saveSelectedRow();
                }
                catch (ModelException me)
                {
                    throw new RuntimeException(me);
                }
            }
        });
    }
});

Finally, I created a short video that shows all in action. It shows three applications on the same laptop. The first is the JavaFX application that shows published SMS. The second is the Power control (includes SMS check), started via PuTTY. The third application is the server instance, started via PuTTY. You can see a table lamp that will be turned on and off with SMS, sent from a smartphone.

Enjoy it :)


Power Control with RaspberryPi