This website uses cookies for visitor traffic analysis. By using the website, you agree with storing the cookies on your computer.More information

DokuWiki XMLRPC with Java

DokuWiki

is a simple to use and highly versatile Open Source wiki software that doesn't require a database.

It's a really nice software for your documentation. The default theme isn't super modern, but it works. There are many custom themes available and styling is simple.

The really cool thing is the remote API of DokuWiki. It has a XML based RPC interface. Here are some details.

The documentation looks promise. There's a Java example :)
But the last update of the Java client was 2016 :(

After downloading and testing the client, it was clear that it doesn't work. It had a problem with cookie management. I tried to fix the problem in the base lib - aXMLRPC but it was tricky. The problem was the standard Http URL connection. After replacing it with Apache HttpClient, the dokujclient was working without problems.
I didn't try to find the root cause of the problem because it wasn't worth the time. It was faster to replace the communication part.

Here's a link to our patch and all required libraries (pre-built).

Here's a short snippet

DokuJClient client = new DokuJClient(url);
client.login(username, password);

client.putPage(pNamespace + ":" + pPageName, sText);

FileSearch fs = new FileSearch();
fs.search(dirImages, true);

for (String file : fs.getFoundFiles())
{
    client.putAttachment(pNamespace + ":" + pPageName + ":" + FileUtil.getName(file),
                         file, true);
}

client.logoff();

We use the remote interface for automatic article updates. It works great!

EPlug 1.2.7

We're happy to announce the release of EPlug 1.2.7. This minor update comes with a big performance improvement!

Major performance improvement

The most notable and important feature of this release is the major speed improvement when checking files. We've revisited how the build pipeline works and could determine quite a few bottlenecks which did not only encumber the build process, but also the live checks of databooks. After fixing these bottlenecks the databook live checks are blazing fast and one does not notice any more that these are active.

While reviewing the code, we also saw the possibility for a few more tweaks which we will incorporate into the next major release, to squeeze even more performance out of this.

Improved DataBook View

The DataBook view has also received some much needed attention. There is now a toolbar button which allows to sort the columns by their name (instead of their order as returned by the datasource). Additionally the view does no longer flicker when refreshing and will also clear itself when the last editor closes.

Other fixes

  1. There is no longer a sleeping EPlug job in the Progress View.
  2. The EPlug preferences are now only available on Java projects.
  3. If there is no screen lifecycle object, the session object is now used.
  4. Removed raw HTML in tooltips.

How to get it?

Simply update EPlug via Eclipse!

JVx 2.7 is available

We're happy to announce that JVx 2.7 is available. It's a bigger bugfix release with a small number of new features.

What's new?

  • Tibero Database Support
  • boolean support

    Our DBAccess implementation now supports boolean as parameter.

  • SimpleJavaSource

    It's now possible to create java objects from java source code, see our REST interface

  • Struct support

    Struct support for Oracle DB in procedures and functions.

  • Session timeouts

    We fixed the problem of session timeouts with long up/downloads.

  • WorkScreen

    It's now possible to open a work-screen with additional parameters. A new (optional) Parameter class is available.

  • Mac OS

    We fixed the problems with internal frame borders.

  • Many improvements

The full changelog is available here.

Start with JVx

VisionX, JVx and native Vaadin

If you create an application with VisionX, it's always a JVx based application. You get all advantages of JVx and its GUI independency, but sometimes the GUI indepency is not important and you want to use native GUI controls in your JVx application because JVx doesn't contain the GUI control or you need a commercial control. This is a very simple use-case and it's not a problem to mix JVx components with native components. We have different examples, with different GUI technologies, for this use-case.

Here are some links:

But we don't have a link for our Vaadin implementation. But no problem, here it is!

Simply create a new application with VisionX and a dummy screen like this one:

Simple screen

Simple screen

The screen contains a simple table and two editors. Nothing special. Now we want to add a custom Vaadin component in the empty space. It doesn't matter which component you use. Every vaadin component or AddOn component can be used. JVx doesn't do specific things, it's only an UI abstraction layer.

So, lets add an Accordion to the screen:

Integrated Accordion

Integrated Accordion

The Accordion component is a standard Vaadin component, simply added to the screen. But more... Do you see the "Show Vaadin Notification" Button? This is a standard JVx component. So we mix native vaadin components with standard JVx components and get the full power of both. One advantage of the JVx components is that the automatic translation works without additional hacks, or what about JVx' layouts, event handling, ...

Interested in the source code?

No worries, it's super simple to understand :)

Lets have a look at the custom code:

UIButton butNotification = new UIButton("Show Vaadin Notification");
butNotification.eventAction().addListener(new IActionListener()
{
        public void action(UIActionEvent arg0) throws Throwable
        {
                Notification noti = new Notification("Message",
                                                     "Description", Type.WARNING_MESSAGE);
                noti.setDelayMsec(2000);
                noti.show(Page.getCurrent());
        }
});

UIFormLayout flJVxPanel = new UIFormLayout();

UIPanel panJVxPanel = new UIPanel();
panJVxPanel.setLayout(flJVxPanel);

panJVxPanel.add(butNotification);

if (getApplication().getLauncher().isWebEnvironment())
{
        Accordion acc = new Accordion();
        acc.setHeight(100.0f, Unit.PERCENTAGE);

        for (int i = 1; i < 8; i++)
        {

                if (i >= 2)
                {
                        final Label label = new Label("Welcome sheet!", ContentMode.HTML);
                        label.setWidth(100.0f, Unit.PERCENTAGE);

                        final VerticalLayout layout = new VerticalLayout(label);
                        layout.setMargin(true);

                        acc.addTab(layout, "Tab " + i);
                }
                else
                {
                        groupPanelOverview.add(panJVxPanel);

                        acc.addTab(((Component)panJVxPanel.getResource()), "Tab " + i);
                }
        }

        groupPanelOverview.add(new UICustomComponent(acc), formLayout1.getConstraints(0, 2, -1, -1));
}

The Accordion source code was copied from Vaadin Sampler:

sample = new Accordion();
sample.setHeight(100.0f, Unit.PERCENTAGE);
 
for (int i = 1; i < 8; i++) {
    final Label label = new Label(TabSheetSample.getLoremContent(), ContentMode.HTML);
    label.setWidth(100.0f, Unit.PERCENTAGE);
 
    final VerticalLayout layout = new VerticalLayout(label);
    layout.setMargin(true);
 
    sample.addTab(layout, "Tab " + i);
}

So, what are the most interesting parts in our code?

First, we add the JVx panel to another JVx panel. This is important to get support for translation. If it's not important for your, simply ignore the line:

groupPanelOverview.add(panJVxPanel);

The groupPanelOverview is a simple UIGroupPanel with UIFormLayout:

UIFormLayout formLayout1 = new UIFormLayout();

UIGroupPanel groupPanelOverview = new UIGroupPanel();

groupPanelOverview.setText("Overview");
groupPanelOverview.setLayout(formLayout1);

groupPanelOverview.add(labelName, formLayout1.getConstraints(0, 0));
groupPanelOverview.add(editOverviewName, formLayout1.getConstraints(1, 0));
groupPanelOverview.add(labelDescription, formLayout1.getConstraints(0, 1));
groupPanelOverview.add(editOverviewDescription, formLayout1.getConstraints(1, 1, -1, 1));

Our JVx button will be added to the native vaadin Accordion with following code:

acc.addTab(((Component)panJVxPanel.getResource()), "Tab " + i);

We don't add the JVx component itself, we use the wrapped resource. This is a simple vaadin component: com.vaadin.ui.Button

And finally, we add the Accordion as custom component to our JVx group panel:

groupPanelOverview.add(new UICustomComponent(acc), formLayout1.getConstraints(0, 2, -1, -1));

This code:

if (getApplication().getLauncher().isWebEnvironment())

is important for VisionX because the vaadin components aren't available in Swing, so we use this check for the supported environment.

So far, we mixed native vaadin components with JVx components. It's super easy to use, isn't it?

But it's also possible to use CSS for JVx components:

Css style for Button

Css style for Button

The button got the friendly style, which is defined in Vaadin CSS. Check some examples.

To add the friendly style class to the JVx button, simple add:

Style.addStyleNames(butNotification, "friendly");

This example is using predefined CSS from vaadin. It's also possible to set custom styles in your own css file. Simple follow this instructions.

This article covered the integration of native vaadin components into an existing JVx application with all advantages of vaadin.

JVx Reference, CellEditors

Let's talk about CellEditors, and how they are decoupled from the surrounding GUI.

What are they?

While we've already covered large parts of how the GUI layer and the model of JVx works, the CellEditors have been left completely untouched and unmentioned. One might believe that they can be easily explained together with the Editors, however, they are a topic on their own, and a complex one from time to time that is.

The difference between Editors (the UIEditor for the most part) and CellEditors is that the Editors only provide the high-level GUI control, while the CellEditors provide the actual functionality. Let's take a look at a quite simple screen.

The layout of a simple screen with a table and a few editors.

We see a window with a table on the left and some editors on the right, simple enough. Now these components we are seeing are UIEditors, not CellEditors. The CellEditors themselves are only added as child components to the Editors, so the Editors are basically just panels which contain the actual CellEditor.

The same scree but with the CellEditors differentiated from the UIEditors which contain them.

So technically every UIEditor is just another panel which gets the CellEditor added. The CellEditors themselves follow the same pattern as all GUI components in JVx, there is the base interface, an eventual extension of technology components, the implementation and finally the UI object. They are, however, rarely directly used in building the GUI, but mostly only referenced when building the model.

Why are they?

If you want to make GUI editor components, I know of two possible ways from the top of my head to achieve that: You create dedicated editor components for the datatypes that are available, for example a NumberEditor, TextEditor and so forth. Or you create one editor component which acts as a mere container and allows to plug in any wanted behavior for the type you're editing.

We've opted for the second option, because it means that the GUI is actually decoupled from the datatypes (and in extension the data) of the model. If we'd have separate components for each datatype, changing the datatype of a single column would mean that you'd have to touch all editors associated with that column and change that code, maybe with rippling effects on the rest of the GUI. With the CellEditors, one can change the datatype of a column and not worry about the GUI that is associated with that column. The CellEditor is changed on the model once and that change is automatically picked up by all Editors. Which also means that one can define and change defaults very easily and globally.

Of course one can also set the preferred or wanted CellEditor directly on the Editor, instead of using the one defined in the model, should the need arise.

And the table?

The same applies to the Table. Theoretically, every cell of the Table can be viewed as a single Editor, for this context at least. So a single cell behaves the same as an Editor when it comes to how the CellEditors are handled.

How many are there?

JVx comes with a variety of CellEditors out of the box:

  • Boolean
  • Choice
  • Date/Time
  • List
  • Number
  • Text
    • HTML
    • Multiline
    • Password
    • Standard

With these nearly all needs can be covered. If there is need for a new one, it can be created and added like any other UI component.

Using CellEditors

As said previously, which CellEditor is used is defined primarily with the model, for example:

  1. private void initiliazeModel() throws ModelException
  2. {
  3.     dataBook = new MemDataBook();
  4.    
  5.     ICellEditor cellEditor = new UITextCellEditor();
  6.     IDataType dataType = new StringDataType(cellEditor);
  7.     ColumnDefinition column = new ColumnDefinition("COLUMN", dataType);
  8.  
  9.     RowDefinition rowDefinition = dataBook.getRowDefinition();
  10.     rowDefinition.addColumnDefinition(column);
  11.    
  12.     dataBook.open();
  13. }
  14.  
  15. private void initializeUI() throws ModelException
  16. {
  17.     editor = new UIEditor(dataBook, "COLUMN");
  18.    
  19.     add(editor);
  20. }

We can see that every column has a datatype and every datatype has a CellEditor. That allows the model to provide the actual editing functionality without changing the GUI code. The Editor, when notifyRepaint() is called, will fetch the CellEditor from the datatype and use it. Additionally, there is a technology dependent default mechanism which allows this system to work even when the UI classes are not used.

Let's do a step by step explanation of what happens:

  1. The model is created.
  2. The GUI is created.
  3. The model invokes notifyRepaint() on all bound controls.
  4. The Editor gets the CellEditor from the model and adds it to itself.

One moment, instance sharing?

If we revisit at the example code from above, we will notice that the CellEditor instance is set on the model and must then be used by the Editor. That means that a single CellEditor instance is used for all bound Editors. We all know that sharing instances in such a way can be fun, but in this case it is not a problem because CellEditors are only "factories" for the actual editing components.

The ICellEditor interface does actually only specify two methods, whether it is a direct cell editor, and the factory method for creating an ICellEditorHandler. The CellEditorHandler is the manager of the instance of the component that is going to be embedded into the Editor.

  1. notifyRepaint() is called on the editor.
  2. The Editor gets the CellEditorHandler from the CellEditor.
  3. The Editor gets the component from the CellEditorHandler and embeds it.

This mechanism makes sure that no component instances end up shared between different GUI components.

A closer look at the CellEditorHandler

If we take a good look at the CellEditorHandler interface, we see that it contains everything that is required for setting up a component to be able to edit data coming from a DataRow. One method is especially important, the getCellEditorComponent() function. It returns the actual technology component that is to be embedded into the Editor. That means that even though there are implementations for the CellEditors on the UI layer, the actual components which will provide the functionality for editing the data are implemented on the technology layer. A short refresher:

The different layers of JVx.

Revisiting our simple screen from above, we'd actually need to represent it as something like this:

FormLayout with one added component.

Because the embedded components in the Editor are actually on the technology layer.

CellRenderers

There is another small topic we need to discuss, CellRenderers. They follow nearly the same schematics as CellEditors but are used to display values directly, for example values in a table cell. The Table is also the primary component which uses them to display the cell values until the editing is started. For simplicity reasons, most CellEditors implement ICellRenderer directly and provide management of the created component. That is because the reuse of components for barely displaying values is easier does not contain as much error potential.

Conclusion

CellEditors provide an easy mechanic to allow to edit data, and more important, they are decoupled from the GUI code in which they are used in a way which allows the model to change, even dynamically. That enables programmers to create and edit screens and models quickly without the need to check if the GUI and the model fit together, they always do.

Let's experiment, reducing code in screens and lifecycle objects.

Let's do a small experiment, and see if we can reduce the code required in screens and lifecycle objects to a minimum.

But be advised, this blog post is meant as a food for thoughts and less as a practical manual on doing things. So we will explore different possibilities which might not be practical.

Starting point

We will start with a small screen which has been automatically generated by VisionX, but has (manually) been stripped of all comments, documentation, imports and has some formatting modifications to make it easier readable in this post.

  1. public class PeopleWorkScreen extends DataSourceWorkScreen
  2. {
  3.     private UIEditor editPeopleFirstName = new UIEditor();
  4.     private UIEditor editPeopleLastName = new UIEditor();
  5.     private UIEditor editPeopleDateOfBirth = new UIEditor();
  6.     private UIEditor editPeopleOccupation = new UIEditor();
  7.     private UILabel labelFirstName = new UILabel();
  8.     private UILabel labelLastName = new UILabel();
  9.     private UILabel labelDateofBirth = new UILabel();
  10.     private UILabel labelOccupation = new UILabel();
  11.     private UIFormLayout formLayout1 = new UIFormLayout();
  12.     private UIGroupPanel groupPanelPeople = new UIGroupPanel();
  13.     private NavigationTable tablePeople = new NavigationTable();
  14.     private UIPanel splitPanelMainFirst = new UIPanel();
  15.     private UIPanel splitPanelMainSecond = new UIPanel();
  16.     private UISplitPanel splitPanelMain = new UISplitPanel();
  17.     private UIBorderLayout borderLayout1 = new UIBorderLayout();
  18.     private UIBorderLayout borderLayout2 = new UIBorderLayout();
  19.     private UIBorderLayout borderLayout3 = new UIBorderLayout();
  20.     private RemoteDataBook rdbPeople = new RemoteDataBook();
  21.    
  22.     public PeopleWorkScreen(
  23.             IWorkScreenApplication pApplication,
  24.             AbstractConnection pConnection,
  25.             Map pParameter) throws Throwable
  26.     {
  27.         super(pApplication, pConnection, pParameter);
  28.        
  29.         initializeModel();
  30.         initializeUI();
  31.     }
  32.    
  33.     private void initializeModel() throws Throwable
  34.     {
  35.         rdbPeople.setName("people");
  36.         rdbPeople.setDataSource(getDataSource());
  37.         rdbPeople.open();
  38.     }
  39.    
  40.     private void initializeUI() throws Throwable
  41.     {
  42.         tablePeople.setMaximumSize(new UIDimension(450, 350));
  43.         tablePeople.setDataBook(rdbPeople);
  44.         tablePeople.setAutoResize(false);
  45.        
  46.         labelFirstName.setText("First Name");
  47.        
  48.         labelLastName.setText("Last Name");
  49.        
  50.         labelDateofBirth.setText("Date of Birth");
  51.        
  52.         labelOccupation.setText("Occupation");
  53.        
  54.         editPeopleFirstName.setDataRow(rdbPeople);
  55.         editPeopleFirstName.setColumnName("FIRST_NAME");
  56.        
  57.         editPeopleLastName.setDataRow(rdbPeople);
  58.         editPeopleLastName.setColumnName("LAST_NAME");
  59.        
  60.         editPeopleDateOfBirth.setDataRow(rdbPeople);
  61.         editPeopleDateOfBirth.setColumnName("DATE_OF_BIRTH");
  62.        
  63.         editPeopleOccupation.setDataRow(rdbPeople);
  64.         editPeopleOccupation.setColumnName("OCCUPATION");
  65.        
  66.         splitPanelMainFirst.setLayout(borderLayout2);
  67.         splitPanelMainFirst.add(tablePeople, UIBorderLayout.CENTER);
  68.        
  69.         groupPanelPeople.setText("People");
  70.         groupPanelPeople.setLayout(formLayout1);
  71.         groupPanelPeople.add(labelFirstName, formLayout1.getConstraints(0, 0));
  72.         groupPanelPeople.add(editPeopleFirstName, formLayout1.getConstraints(1, 0));
  73.         groupPanelPeople.add(labelLastName, formLayout1.getConstraints(2, 0));
  74.         groupPanelPeople.add(editPeopleLastName, formLayout1.getConstraints(3, 0));
  75.         groupPanelPeople.add(labelDateofBirth, formLayout1.getConstraints(0, 1));
  76.         groupPanelPeople.add(editPeopleDateOfBirth, formLayout1.getConstraints(1, 1));
  77.         groupPanelPeople.add(labelOccupation, formLayout1.getConstraints(2, 1));
  78.         groupPanelPeople.add(editPeopleOccupation, formLayout1.getConstraints(3, 1));
  79.        
  80.         splitPanelMainSecond.setLayout(borderLayout3);
  81.         splitPanelMainSecond.add(groupPanelPeople, UIBorderLayout.CENTER);
  82.        
  83.         splitPanelMain.add(splitPanelMainFirst, UISplitPanel.FIRST_COMPONENT);
  84.         splitPanelMain.add(splitPanelMainSecond, UISplitPanel.SECOND_COMPONENT);
  85.        
  86.         setLayout(borderLayout1);
  87.         add(splitPanelMain, UIBorderLayout.CENTER);
  88.     }
  89. }

This is the PeopleWorkScreen class. It really doesn't do much except containing a Split panel, having on the left a table and on the right a few editors. That does look quite manageable, also it does look as one would expect in the GUI.

The screen we are going to use as demonstration.

But it is a very good starting point for our experiments. As an additional note, we will lose VisionX support with all the changes we will make, unfortunately, that can't be circumvented I'm afraid.

Annotations for editors

The first thought one has when it comes to reducing code is to use Annotations to deliver important information. We can do this here, too, to remove some setup from the editors and instead add it to a more central place. So we will create a new Annotation which is holding the required information for the editors, which are the name of the databook and the name of the column.

  1. @Retention(RUNTIME)
  2. @Target(FIELD)
  3. public @interface DataBound
  4. {
  5.     public String dataBookName();
  6.     public String columnName();
  7. }
  1. public class PeopleWorkScreen extends DataSourceWorkScreen
  2. {
  3.     @DataBound(dataBookName = "people", columnName = "FIRST_NAME")
  4.     private UIEditor editPeopleFirstName = new UIEditor();
  5.     @DataBound(dataBookName = "people", columnName = "LAST_NAME")
  6.     private UIEditor editPeopleLastName = new UIEditor();
  7.     @DataBound(dataBookName = "people", columnName = "DATE_OF_BIRTH")
  8.     private UIEditor editPeopleDateOfBirth = new UIEditor();
  9.     @DataBound(dataBookName = "people", columnName = "OCCUPATION")
  10.     private UIEditor editPeopleOccupation = new UIEditor();
  11.     private UILabel labelFirstName = new UILabel();
  12.     private UILabel labelLastName = new UILabel();
  13.     private UILabel labelDateofBirth = new UILabel();
  14.     private UILabel labelOccupation = new UILabel();
  15.     private UIFormLayout formLayout1 = new UIFormLayout();
  16.     private UIGroupPanel groupPanelPeople = new UIGroupPanel();
  17.     private NavigationTable tablePeople = new NavigationTable();
  18.     private UIPanel splitPanelMainFirst = new UIPanel();
  19.     private UIPanel splitPanelMainSecond = new UIPanel();
  20.     private UISplitPanel splitPanelMain = new UISplitPanel();
  21.     private UIBorderLayout borderLayout1 = new UIBorderLayout();
  22.     private UIBorderLayout borderLayout2 = new UIBorderLayout();
  23.     private UIBorderLayout borderLayout3 = new UIBorderLayout();
  24.     private RemoteDataBook rdbPeople = new RemoteDataBook();
  25.    
  26.     public PeopleWorkScreen(
  27.             IWorkScreenApplication pApplication,
  28.             AbstractConnection pConnection,
  29.             Map pParameter) throws Throwable
  30.     {
  31.         super(pApplication, pConnection, pParameter);
  32.        
  33.         initializeModel();
  34.         initializeUI();
  35.     }
  36.    
  37.     private void initializeModel() throws Throwable
  38.     {
  39.         rdbPeople.setName("people");
  40.         rdbPeople.setDataSource(getDataSource());
  41.         rdbPeople.open();
  42.     }
  43.    
  44.     private void initializeUI() throws Throwable
  45.     {
  46.         tablePeople.setMaximumSize(new UIDimension(450, 350));
  47.         tablePeople.setDataBook(rdbPeople);
  48.         tablePeople.setAutoResize(false);
  49.        
  50.         labelFirstName.setText("First Name");
  51.        
  52.         labelLastName.setText("Last Name");
  53.        
  54.         labelDateofBirth.setText("Date of Birth");
  55.        
  56.         labelOccupation.setText("Occupation");
  57.        
  58.         splitPanelMainFirst.setLayout(borderLayout2);
  59.         splitPanelMainFirst.add(tablePeople, UIBorderLayout.CENTER);
  60.        
  61.         groupPanelPeople.setText("People");
  62.         groupPanelPeople.setLayout(formLayout1);
  63.         groupPanelPeople.add(labelFirstName, formLayout1.getConstraints(0, 0));
  64.         groupPanelPeople.add(editPeopleFirstName, formLayout1.getConstraints(1, 0));
  65.         groupPanelPeople.add(labelLastName, formLayout1.getConstraints(2, 0));
  66.         groupPanelPeople.add(editPeopleLastName, formLayout1.getConstraints(3, 0));
  67.         groupPanelPeople.add(labelDateofBirth, formLayout1.getConstraints(0, 1));
  68.         groupPanelPeople.add(editPeopleDateOfBirth, formLayout1.getConstraints(1, 1));
  69.         groupPanelPeople.add(labelOccupation, formLayout1.getConstraints(2, 1));
  70.         groupPanelPeople.add(editPeopleOccupation, formLayout1.getConstraints(3, 1));
  71.        
  72.         splitPanelMainSecond.setLayout(borderLayout3);
  73.         splitPanelMainSecond.add(groupPanelPeople, UIBorderLayout.CENTER);
  74.        
  75.         splitPanelMain.add(splitPanelMainFirst, UISplitPanel.FIRST_COMPONENT);
  76.         splitPanelMain.add(splitPanelMainSecond, UISplitPanel.SECOND_COMPONENT);
  77.        
  78.         setLayout(borderLayout1);
  79.         add(splitPanelMain, UIBorderLayout.CENTER);
  80.     }
  81. }

As one can see, we've annotated the fields with our new Annotation and removed the setup lines from the initializeUI() function. Of course, that alone does nothing, we must add the processing of the annotations somewhere. The best place would be in the application when the workscreen is opened.

  1. public class AnnotationAwareApplication extends ProjX
  2. {
  3.     public AnnotationAwareApplication(UILauncher pLauncher) throws Throwable
  4.     {
  5.         super(pLauncher);
  6.     }
  7.    
  8.     @Override
  9.     public synchronized IWorkScreen openWorkScreen(
  10.             String pClassName,
  11.             Modality pModality,
  12.             AbstractConnection pConnection,
  13.             Map pParameters,
  14.             boolean pSingleInstance) throws Throwable
  15.     {
  16.         DataSourceWorkScreen workScreen = (DataSourceWorkScreen)super.openWorkScreen(
  17.                 pClassName,
  18.                 pModality,
  19.                 pConnection,
  20.                 pParameters,
  21.                 pSingleInstance);
  22.        
  23.         for (Field field : workScreen.getClass().getDeclaredFields())
  24.         {
  25.             DataBound dataBound = field.getAnnotation(DataBound.class);
  26.            
  27.             if (dataBound != null && IEditor.class.isAssignableFrom(field.getType()))
  28.             {
  29.                 IDataBook dataBook = workScreen.getDataSource().
  30.                                         getDataBook(dataBound.dataBookName());
  31.                 String columnName = dataBound.columnName();
  32.                
  33.                 field.setAccessible(true);
  34.                
  35.                 IEditor editor = (IEditor)field.get(workScreen);
  36.                
  37.                 editor.setDataRow(dataBook);
  38.                 editor.setColumnName(columnName);
  39.             }
  40.         }
  41.        
  42.         return workScreen;
  43.     }
  44.    
  45. }

Easy enough, it removes some lines from the screen and the logic added inside the application is straightforward.

The upside is that we now have the information of the data binding right there in the field declaration, the downside is that it doesn't save us that much. In theory the gain is only 1 line per editor. We could do better than that.

Automatic editors

Annotations are interesting, but don't fit well here. We could do better when we extend the UIEditor itself and fit it with the necessary logic to be able to find its data binding on its own. That means that it would need to go upward at some point and find its parent workscreen to retrieve the datasource (which holds all the databooks). Walking upwards in the hierarchy is straightforward, the question is when we should do that? The best point in time would be when addNotify() is being called, because at that point the GUI is being created, so we are very, very likely inside the initializeUI() function of the workscreen or at a later point.

  1. public class AutomaticEditor extends UIEditor
  2. {
  3.     private String dataBookName = null;
  4.     private String columnName = null;
  5.    
  6.     public AutomaticEditor(String pDataBookName, String pColumnName)
  7.     {
  8.         super();
  9.        
  10.         dataBookName = pDataBookName;
  11.         columnName = pColumnName;
  12.     }
  13.  
  14.     @Override
  15.     public void addNotify()
  16.     {
  17.         DataSourceWorkScreen workScreen = getParentWorkScreen();
  18.        
  19.         try
  20.         {
  21.             setDataRow(workScreen.getDataSource().getDataBook(dataBookName));
  22.             setColumnName(columnName);
  23.         }
  24.         catch (ModelException e)
  25.         {
  26.             ExceptionHandler.raise(e);
  27.         }
  28.        
  29.         super.addNotify();
  30.     }
  31.    
  32.     private DataSourceWorkScreen getParentWorkScreen()
  33.     {
  34.         IContainer parent = getParent();
  35.        
  36.         while (parent != null && !(parent instanceof DataSourceWorkScreen))
  37.         {
  38.             parent = parent.getParent();
  39.         }
  40.        
  41.         return (DataSourceWorkScreen)parent;
  42.     }
  43. }
  1. public class PeopleWorkScreen extends DataSourceWorkScreen
  2. {
  3.     private UIEditor editPeopleFirstName=new AutomaticEditor("people","FIRST_NAME");
  4.     private UIEditor editPeopleLastName = new AutomaticEditor("people", "LAST_NAME");
  5.     private UIEditor editPeopleDoB = new AutomaticEditor("people", "DATE_OF_BIRTH");
  6.     private UIEditor editPeopleOccupation=new AutomaticEditor("people","OCCUPATION");
  7.     private UILabel labelFirstName = new UILabel();
  8.     private UILabel labelLastName = new UILabel();
  9.     private UILabel labelDateofBirth = new UILabel();
  10.     private UILabel labelOccupation = new UILabel();
  11.     private UIFormLayout formLayout1 = new UIFormLayout();
  12.     private UIGroupPanel groupPanelPeople = new UIGroupPanel();
  13.     private NavigationTable tablePeople = new NavigationTable();
  14.     private UIPanel splitPanelMainFirst = new UIPanel();
  15.     private UIPanel splitPanelMainSecond = new UIPanel();
  16.     private UISplitPanel splitPanelMain = new UISplitPanel();
  17.     private UIBorderLayout borderLayout1 = new UIBorderLayout();
  18.     private UIBorderLayout borderLayout2 = new UIBorderLayout();
  19.     private UIBorderLayout borderLayout3 = new UIBorderLayout();
  20.     private RemoteDataBook rdbPeople = new RemoteDataBook();
  21.    
  22.     public PeopleWorkScreen(
  23.             IWorkScreenApplication pApplication,
  24.             AbstractConnection pConnection,
  25.             Map pParameter) throws Throwable
  26.     {
  27.         super(pApplication, pConnection, pParameter);
  28.        
  29.         initializeModel();
  30.         initializeUI();
  31.     }
  32.    
  33.     private void initializeModel() throws Throwable
  34.     {
  35.         rdbPeople.setName("people");
  36.         rdbPeople.setDataSource(getDataSource());
  37.         rdbPeople.open();
  38.     }
  39.    
  40.     private void initializeUI() throws Throwable
  41.     {
  42.         tablePeople.setMaximumSize(new UIDimension(450, 350));
  43.         tablePeople.setDataBook(rdbPeople);
  44.         tablePeople.setAutoResize(false);
  45.        
  46.         labelFirstName.setText("First Name");
  47.        
  48.         labelLastName.setText("Last Name");
  49.        
  50.         labelDateofBirth.setText("Date of Birth");
  51.        
  52.         labelOccupation.setText("Occupation");
  53.        
  54.         splitPanelMainFirst.setLayout(borderLayout2);
  55.         splitPanelMainFirst.add(tablePeople, UIBorderLayout.CENTER);
  56.        
  57.         groupPanelPeople.setText("People");
  58.         groupPanelPeople.setLayout(formLayout1);
  59.         groupPanelPeople.add(labelFirstName, formLayout1.getConstraints(0, 0));
  60.         groupPanelPeople.add(editPeopleFirstName, formLayout1.getConstraints(1, 0));
  61.         groupPanelPeople.add(labelLastName, formLayout1.getConstraints(2, 0));
  62.         groupPanelPeople.add(editPeopleLastName, formLayout1.getConstraints(3, 0));
  63.         groupPanelPeople.add(labelDateofBirth, formLayout1.getConstraints(0, 1));
  64.         groupPanelPeople.add(editPeopleDoB, formLayout1.getConstraints(1, 1));
  65.         groupPanelPeople.add(labelOccupation, formLayout1.getConstraints(2, 1));
  66.         groupPanelPeople.add(editPeopleOccupation, formLayout1.getConstraints(3, 1));
  67.        
  68.         splitPanelMainSecond.setLayout(borderLayout3);
  69.         splitPanelMainSecond.add(groupPanelPeople, UIBorderLayout.CENTER);
  70.        
  71.         splitPanelMain.add(splitPanelMainFirst, UISplitPanel.FIRST_COMPONENT);
  72.         splitPanelMain.add(splitPanelMainSecond, UISplitPanel.SECOND_COMPONENT);
  73.        
  74.         setLayout(borderLayout1);
  75.         add(splitPanelMain, UIBorderLayout.CENTER);
  76.     }
  77. }

That removes the complete setup of the editor from the code, with the exception of the constructor, and instead the editor itself manages its own setup, neat. So I think we can't lose any more of the editor associated code at this point, the only further possibility would be to associate a "default" databook with the workscreen so that we can scrap the databook name from the constructor. Or, we could scan the fields of the screen and build the editors based on their name, but that is a rather fragile approach.

Inline fields

While we are at it and we will lose VisionX support anyway, we can inline the fields directly into the initializeUI() function to shed more lines.

  1. public class PeopleWorkScreen extends DataSourceWorkScreen
  2. {
  3.     private RemoteDataBook rdbPeople = new RemoteDataBook();
  4.    
  5.     public PeopleWorkScreen(
  6.             IWorkScreenApplication pApplication,
  7.             AbstractConnection pConnection,
  8.             Map pParameter) throws Throwable
  9.     {
  10.         super(pApplication, pConnection, pParameter);
  11.        
  12.         initializeModel();
  13.         initializeUI();
  14.     }
  15.    
  16.     private void initializeModel() throws Throwable
  17.     {
  18.         rdbPeople.setName("people");
  19.         rdbPeople.setDataSource(getDataSource());
  20.         rdbPeople.open();
  21.     }
  22.    
  23.     private void initializeUI() throws Throwable
  24.     {
  25.         NavigationTable tablePeople = new NavigationTable();
  26.         tablePeople.setMaximumSize(new UIDimension(450, 350));
  27.         tablePeople.setDataBook(rdbPeople);
  28.         tablePeople.setAutoResize(false);
  29.        
  30.         UIPanel splitPanelMainFirst = new UIPanel();
  31.         splitPanelMainFirst.setLayout(new UIBorderLayout());
  32.         splitPanelMainFirst.add(tablePeople, UIBorderLayout.CENTER);
  33.        
  34.         UIFormLayout formLayout1 = new UIFormLayout();
  35.        
  36.         UIGroupPanel groupPanelPeople = new UIGroupPanel();
  37.         groupPanelPeople.setText("People");
  38.         groupPanelPeople.setLayout(formLayout1);
  39.         groupPanelPeople.add(new UILabel("First Name"),
  40.                              formLayout1.getConstraints(0, 0));
  41.         groupPanelPeople.add(new AutomaticEditor("people", "FIRST_NAME"),
  42.                              formLayout1.getConstraints(1, 0));
  43.         groupPanelPeople.add(new UILabel("Last Name"),
  44.                              formLayout1.getConstraints(2, 0));
  45.         groupPanelPeople.add(new AutomaticEditor("people", "LAST_NAME"),
  46.                              formLayout1.getConstraints(3, 0));
  47.         groupPanelPeople.add(new UILabel("Date of Birth"),
  48.                              formLayout1.getConstraints(0, 1));
  49.         groupPanelPeople.add(new AutomaticEditor("people", "DATE_OF_BIRTH"),
  50.                              formLayout1.getConstraints(1, 1));
  51.         groupPanelPeople.add(new UILabel("Occupation"),
  52.                              formLayout1.getConstraints(2, 1));
  53.         groupPanelPeople.add(new AutomaticEditor("people", "OCCUPATION"),
  54.                              formLayout1.getConstraints(3, 1));
  55.        
  56.         UIPanel splitPanelMainSecond = new UIPanel();
  57.         splitPanelMainSecond.setLayout(new UIBorderLayout());
  58.         splitPanelMainSecond.add(groupPanelPeople, UIBorderLayout.CENTER);
  59.        
  60.         UISplitPanel splitPanelMain = new UISplitPanel();
  61.         splitPanelMain.add(splitPanelMainFirst, UISplitPanel.FIRST_COMPONENT);
  62.         splitPanelMain.add(splitPanelMainSecond, UISplitPanel.SECOND_COMPONENT);
  63.        
  64.         setLayout(new UIBorderLayout());
  65.         add(splitPanelMain, UIBorderLayout.CENTER);
  66.     }
  67. }

That makes the code harder to read but in the end it saves a lot of lines.

Automatic databooks

Now the only part of the screen which we can now reduce is the model part. This is a little more complicated, though. First, if we create a databook on the fly it's a little bit more complicated to get it customized, so we have to assume that we can use the databooks "as they are", with all the necessary setup being done on the server side (which is ideal anyway). Second, ideally we could let the connection create the databooks as they are needed, that is a little bit more complicated and for this example we will add that logic to the screen instead. So the PeopleWorkScreen gains the method getDataBook(String) which gets or creates a databook for the given name and returns it.

  1. public class PeopleWorkScreen extends DataSourceWorkScreen
  2. {
  3.     public PeopleWorkScreen(
  4.             IWorkScreenApplication pApplication,
  5.             AbstractConnection pConnection,
  6.             Map pParameter) throws Throwable
  7.     {
  8.         super(pApplication, pConnection, pParameter);
  9.        
  10.         initializeUI();
  11.     }
  12.    
  13.     private void initializeUI() throws Throwable
  14.     {
  15.         NavigationTable tablePeople = new NavigationTable();
  16.         tablePeople.setMaximumSize(new UIDimension(450, 350));
  17.         tablePeople.setDataBook(getDataBook("people"));
  18.         tablePeople.setAutoResize(false);
  19.        
  20.         UIPanel splitPanelMainFirst = new UIPanel();
  21.         splitPanelMainFirst.setLayout(new UIBorderLayout());
  22.         splitPanelMainFirst.add(tablePeople, UIBorderLayout.CENTER);
  23.        
  24.         UIFormLayout formLayout1 = new UIFormLayout();
  25.        
  26.         UIGroupPanel groupPanelPeople = new UIGroupPanel();
  27.         groupPanelPeople.setText("People");
  28.         groupPanelPeople.setLayout(formLayout1);
  29.         groupPanelPeople.add(new UILabel("First Name"),
  30.                              formLayout1.getConstraints(0, 0));
  31.         groupPanelPeople.add(new AutomaticEditor("people", "FIRST_NAME"),
  32.                              formLayout1.getConstraints(1, 0));
  33.         groupPanelPeople.add(new UILabel("Last Name"),
  34.                              formLayout1.getConstraints(2, 0));
  35.         groupPanelPeople.add(new AutomaticEditor("people", "LAST_NAME"),
  36.                              formLayout1.getConstraints(3, 0));
  37.         groupPanelPeople.add(new UILabel("Date of Birth"),
  38.                              formLayout1.getConstraints(0, 1));
  39.         groupPanelPeople.add(new AutomaticEditor("people", "DATE_OF_BIRTH"),
  40.                              formLayout1.getConstraints(1, 1));
  41.         groupPanelPeople.add(new UILabel("Occupation"),
  42.                              formLayout1.getConstraints(2, 1));
  43.         groupPanelPeople.add(new AutomaticEditor("people", "OCCUPATION"),
  44.                              formLayout1.getConstraints(3, 1));
  45.        
  46.         UIPanel splitPanelMainSecond = new UIPanel();
  47.         splitPanelMainSecond.setLayout(new UIBorderLayout());
  48.         splitPanelMainSecond.add(groupPanelPeople, UIBorderLayout.CENTER);
  49.        
  50.         UISplitPanel splitPanelMain = new UISplitPanel();
  51.         splitPanelMain.add(splitPanelMainFirst, UISplitPanel.FIRST_COMPONENT);
  52.         splitPanelMain.add(splitPanelMainSecond, UISplitPanel.SECOND_COMPONENT);
  53.        
  54.         setLayout(new UIBorderLayout());
  55.         add(splitPanelMain, UIBorderLayout.CENTER);
  56.     }
  57.    
  58.     public IDataBook getDataBook(String pDataBookName) throws ModelException
  59.     {
  60.         IDataBook dataBook = getDataSource().getDataBook(pDataBookName);
  61.        
  62.         if (dataBook == null)
  63.         {
  64.             dataBook = new RemoteDataBook();
  65.             dataBook.setName(pDataBookName);
  66.             dataBook.setDataSource(getDataSource());
  67.             dataBook.open();
  68.         }
  69.        
  70.         return dataBook;
  71.     }
  72. }

and the changed editor

  1. public class AutomaticEditor extends UIEditor
  2. {
  3.     private String dataBookName = null;
  4.     private String columnName = null;
  5.    
  6.     public AutomaticEditor(String pDataBookName, String pColumnName)
  7.     {
  8.         super();
  9.        
  10.         dataBookName = pDataBookName;
  11.         columnName = pColumnName;
  12.     }
  13.  
  14.     @Override
  15.     public void addNotify()
  16.     {
  17.         PeopleWorkScreen workScreen = getParentWorkScreen();
  18.        
  19.         try
  20.         {
  21.             setDataRow(workScreen.getDataBook(dataBookName));
  22.             setColumnName(columnName);
  23.         }
  24.         catch (ModelException e)
  25.         {
  26.             ExceptionHandler.raise(e);
  27.         }
  28.        
  29.         super.addNotify();
  30.     }
  31.    
  32.     private PeopleWorkScreen getParentWorkScreen()
  33.     {
  34.         IContainer parent = getParent();
  35.        
  36.         while (parent != null && !(parent instanceof PeopleWorkScreen))
  37.         {
  38.             parent = parent.getParent();
  39.         }
  40.        
  41.         return (PeopleWorkScreen)parent;
  42.     }
  43. }

This introduces a quite unhealthy coupling between the PeopleWorkScreen and the AutomaticEditor, we can live with that for this example, but in a real application we'd have to correctly structure these objects. For example by introducing a workscreen base class, or by actually extending the datasource to provide this functionality.

If we ingore the method we just introduced in the PeopleWorkScreen, we actually managed to reduce the screen class a great deal and removed code which can be automated. That means that, at least theoretically, the likelihood of errors as we write the code has been lowered and it has become easier to write error free code. We can also now see that the screen class has become quite minimal, there really isn't anything left that we could restructure or remove.

Lifecycle objects

Now let us jump to the server and have a look at the associated lifecycle object.

  1. public class People extends Session
  2. {
  3.     public DBStorage getPeople() throws Exception
  4.     {
  5.         DBStorage dbsPeople = (DBStorage)get("people");
  6.         if (dbsPeople == null)
  7.         {
  8.             dbsPeople = new DBStorage();
  9.             dbsPeople.setWritebackTable("PEOPLE");
  10.             dbsPeople.setDBAccess(getDBAccess());
  11.             dbsPeople.open();
  12.  
  13.             put("people", dbsPeople);
  14.         }
  15.         return dbsPeople;
  16.     }  
  17. }

There isn't much here that we can do, but a few small things might make it easier to write in the future. Again, we will be losing VisionX support if we edit this "too much", but we are far beyond that point anyway.

Reducing error potential

What can happen easily with managing storages is that one does copy and paste code and misses to edit the key, under which the storage is stored, correctly. That can happen quickly especially if there is a complex object hierarchy in place. So what we can do is separating the storing logic from the creation logic.

  1. public class People extends Session
  2. {
  3.     public DBStorage getPeople() throws Exception
  4.     {
  5.         return getOrCreateStorage("people", (storage) ->
  6.         {
  7.             storage.setWritebackTable("PEOPLE");
  8.         });
  9.     }
  10.    
  11.     protected DBStorage getOrCreateStorage(String pName, Consumer pStorageConfigurer)
  12.                                           throws Exception
  13.     {
  14.         DBStorage storage = (DBStorage)get(pName);
  15.         if (storage == null)
  16.         {
  17.             storage = new DBStorage();
  18.             storage.setDBAccess(getDBAccess());
  19.            
  20.             pStorageConfigurer.accept(storage);
  21.            
  22.             if (!storage.isOpen())
  23.             {
  24.                 storage.open();
  25.             }
  26.  
  27.             put(pName, storage);
  28.         }
  29.        
  30.         return storage;
  31.     }
  32. }

This has the upside that it would reduce the error potential greatly, especially with a lot of storages, and it would allow us to add additional safety checks, for example if a storage with that name is already existing and would be overridden. But it has the downside that with each access a new lambda function is created, that might or might not be important for your use case.

If we try to mitigate this side effect we will quickly reach certain limits, for example if we change the process to a registry based approach we will find that we've again introduced the very thing we wanted to remove. The storage configurer must be registered at the registry with a name and the storage must be received with a name, so we'd be back at square one, actually.

A more dynamic approach

To get rid of this duplication of the name we could create a registry with the configurers and use a generic approach to retrieving it. The problem here is that that is not possible at compile time, so what we need would actually be a system that catches non-matched calls for storages in the client/server connection and redirects it to our generic method. That is unfortunately not trivial and I will only outline this approach here now.

  1. public class People extends Session
  2. {
  3.     private Map<String, Consumer> registeredStorages = new HashMap();
  4.    
  5.     public People()
  6.     {
  7.         super();
  8.        
  9.         registerStorage("people", (storage) ->
  10.         {
  11.             storage.setWritebackTable("PEOPLE");
  12.         });
  13.     }
  14.    
  15.     protected DBStorage getOrCreateStorage(String pName) throws Exception
  16.     {
  17.         DBStorage storage = (DBStorage)get(pName);
  18.         if (storage == null)
  19.         {
  20.             storage = new DBStorage();
  21.             storage.setDBAccess(getDBAccess());
  22.            
  23.             registeredStorages.get(pName).accept(storage);
  24.            
  25.             if (!storage.isOpen())
  26.             {
  27.                 storage.open();
  28.             }
  29.            
  30.             put(pName, storage);
  31.         }
  32.        
  33.         return storage;
  34.     }
  35.    
  36.     protected void registerStorage(String pName, Consumer pStorageConfigurer)
  37.     {
  38.         registeredStorages.put(pName, pStorageConfigurer);
  39.     }
  40. }

Now all that is missing would be that the connection is calling our getOrCreateStorage(String) method with the name of the requested object. Of course there is also a lot of error checking missing here, but that is not relevant for our example.

And again, if we remove the additional code we added, because it should be contained inside a base class, we have managed to reduce the code on the server side significantly. From here going any further becomes complicated, for example, again, one might to work with Annotations but that won't save us anything here anymore.

Conclusion

From time to time it is necessary to let the thoughts drift and think about different things, for example how to reduce the code inside of classes which are automatically generated and managed. Once I had a nice discussion with someone online on how to do things differently in their library. We had a little back and forth on what could be done and in the end we agreed that it should stay the way it was because none of the approaches we came up with had a significant advantage over the current state. In the end they said that, even though nothing came of it, it was an important discussion to have because from time to time one had to engage in such stimulated, technical and theoretical discussions, and I agree completely with that. It is important to be open to new ideas and consider different approaches even when they don't end up taken.

JVx Reference, the FormLayout

Let's talk about the FormLayout, and why the anchor system makes it much more flexible than just a simple grid.

Basics

JVx comes with 5 layouts by default:

  • null/none/manual
  • BorderLayout
  • FlowLayout
  • GridLayout
  • FormLayout

From these five the first four are easily explained, only the FormLayout needs some more information because it might not be as easy to grasp in the first moment than the others.

The FormLayout uses a dependent anchor system. An Anchor in this context is a position inside the layout which is calculated from parent anchors and either the size of the component or a fixed value. So we can say there are two different types of Anchors inside the FormLayout which we are concerned about:

  • AutoSize-Anchors, its position is calculated from the component assigned to it.
  • Fixed-Anchors, its position is fixed.

Additionally, there are three special cases of Fixed-Anchors:

  • Border-Anchors, which surround the FormLayout at its border.
  • Margin-Anchors, which are inset from the border by the defined value.
  • Gap-Anchors, which are added to create a gap between components.

When it comes to calculating the position of an anchor, the position of the parent anchor is determined and then the value of the current anchor is added (which is either the size of a component or a fixed value). Simplified and in pseudo-code it can expressed like this:

  1. public int getPosition(Anchor pAnchor)
  2. {
  3.     int parentPosition = 0;
  4.    
  5.     if (pAnchor.getParent() != null)
  6.     {
  7.         parentPosition = getPosition(pAnchor.getParent());
  8.     }
  9.  
  10.     if (pAnchor.isAutoSize())
  11.     {
  12.         return parentPosition + pAnchor.getComponent().getWidth();
  13.     }
  14.     else
  15.     {
  16.         return parentPosition + pAnchor.getValue();
  17.     }
  18. }

With this knowledge, we are nearly done with completely understanding the FormLayout.

Creating constraints

Now, the second important part after the basics is knowing how the constraints are created. For example this:

  1. panel.add(component, layout.getConstraints(0, 0));

FormLayout with one added component.

With the coordinates of 0,0, no new anchors are created but instead the component is attached to the top and left margin anchor. Two new AutoSize-Anchors (horizontally and vertically) are created and attached to the component.

If we now add a second component in the same row:

  1. panel.add(component, layout.getConstraints(0, 0));
  2. panel.add(component, layout.getConstraints(1, 0));

FormLayout with two added components.

Because we are still on row 0 the component is attached to the top margin anchor and the previous AutoSize-Anchor for this row. Then, a new Gap-Anchor will be created which is attached to the trailing AutoSize-Anchor of the previous component.

We can of course also add items to the right and bottom:

  1. panel.add(component, layout.getConstraints(0, 0));
  2. panel.add(component, layout.getConstraints(1, 0));
  3. panel.add(component, layout.getConstraints(-1, -1));

FormLayout with three added components, one in the bottom right corner.

What happens is the same as when adding a component at the coordinates 0,0, except that the reference is the lower right corner. The component is attached to the bottom and right margin anchors, with trialing AutoSize-Anchors.

Last but not least, we can add components which span between anchors:

  1. panel.add(component, layout.getConstraints(0, 0));
  2. panel.add(component, layout.getConstraints(1, 0));
  3. panel.add(component, layout.getConstraints(-1, -1));
  4. panel.add(component, layout.getConstraints(2, 1, -2, -2));

FormLayout with four added components, one stretched.

Again, the same logic applies as previously, with the notable exception that new Gap-Anchors are created for all four sides. That includes variants which span over anchors:

  1. panel.add(component, layout.getConstraints(0, 0));
  2. panel.add(component, layout.getConstraints(1, 0));
  3. panel.add(component, layout.getConstraints(0, 1, 2, 1));

FormLayout with three added components, one of them spans multiple anchors.

The component is horizontally attached to the left Margin-Anchor and additionally to the AutoSize-Anchor of the second column. The AutoSize- and Gap-Anchor of the first column are not ignored, they are not relevant to this case.

At this point it is important to note that spanning and stretched components are disregarded for the preferred size calculation of the layout. So whenever you span or stretch a component, it is not taken into account when the preferred size of the layout is calculated, which can lead to unexpected results.

Interactive demo

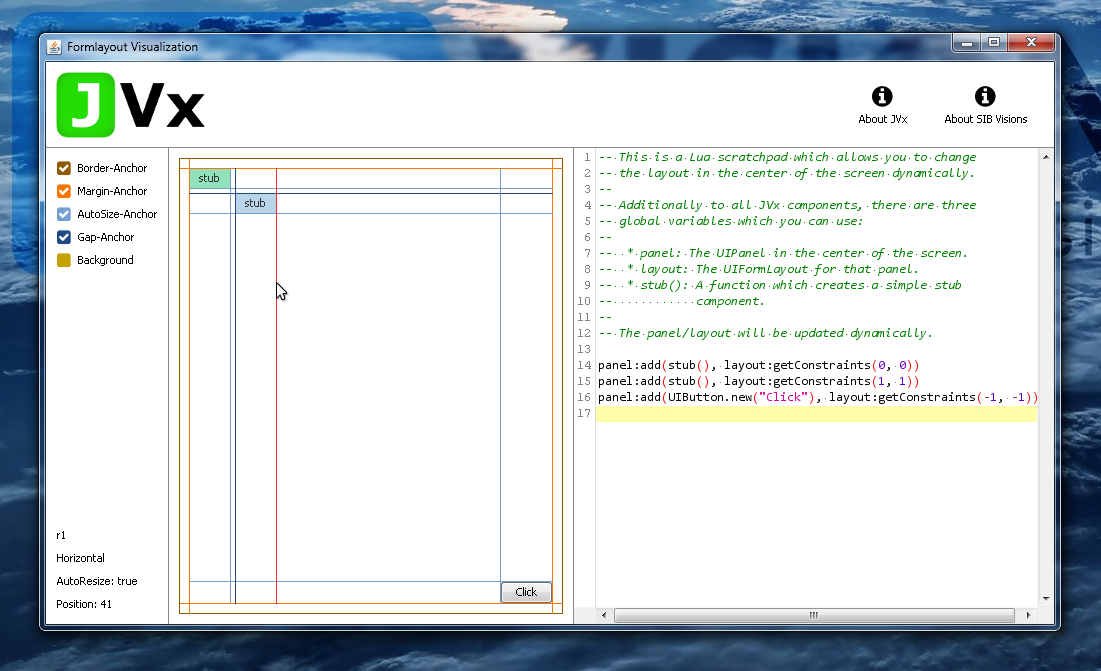
Sometimes, however, it might not be obvious what anchors are created and how they are used. For this we have created a simple interactive demonstration application which allows to inspect the created anchors of a layout, the JVx FormLayout Visualization.

FormLayout Visualization Demo

On the left is the possibility to show and hide anchors together with the information about the currently highlighted anchor. On the right is a Lua scripting area which allows you to quickly and easily rebuild and test layouts. It utilizes the JVx-Lua bridge from a previous blog post and so any changes to the code are directly applied.

The most simple usage: Flow-like

Enough of the internals, let's talk use-cases. The most simple use-case for the FormLayout can be a container which flows its contents in a line until a certain number of items is reach, at which it breaks into a new line:

  1. layout.setNewlineCount(3);
  2.  
  3. panel.add(component);
  4. panel.add(component);
  5. panel.add(component);
  6. panel.add(component);
  7. panel.add(component);
  8. panel.add(component);
  9. panel.add(component);

FormLayout with a flow layout

It does not require any interaction from us except adding components. In this case, when three components have been added, the next one will be added to the next line and so on. This is quite useful when all you want to do is display components in a fixed horizontal grid.

The obvious usage: Grid-like

The FormLayout can also be used to align components in a grid, and actually layout them in a grid-like fashion:

  1. panel.add(component, layout.getConstraints(0, 0));
  2. panel.add(component, layout.getConstraints(1, 0));
  3. panel.add(component, layout.getConstraints(2, 0, -2, 0));
  4. panel.add(component, layout.getConstraints(-1, 0));
  5.  
  6. panel.add(component, layout.getConstraints(0, 1, 2, 1));
  7. panel.add(component, layout.getConstraints(3, 1, -1, 1));
  8.  
  9. panel.add(component, layout.getConstraints(0, 2, -2, -1));
  10. panel.add(component, layout.getConstraints(-1, 2, -1, -1));

FormLayout with a grid layout

With the main difference being that the columns and rows are sized according to the components in it and not given a fixed slice of the width of the panel.

The advanced usage: Anchor Configuration

Additionally, the FormLayout offers the possibility to manually set the anchor positions, for example when it is necessary to give the first elements a certain size:

  1. panel.add(component, layout.getConstraints(0, 0));
  2. panel.add(component, layout.getConstraints(1, 0));
  3. panel.add(component, layout.getConstraints(2, 0));
  4.  
  5. panel.add(component, layout.getConstraints(0, 1));
  6. panel.add(component, layout.getConstraints(1, 1));
  7. panel.add(component, layout.getConstraints(2, 1));
  8.  
  9. panel.add(component, layout.getConstraints(0, 2));
  10. panel.add(component, layout.getConstraints(1, 2));
  11. panel.add(component, layout.getConstraints(2, 2));
  12.  
  13. layout.setAnchorConfiguration("r0=64,r1=8,r2=128,b1=32");

Together with the ability to span components, this allows to create complex and rich layouts.

FormLayout with a set anchor configuration

Conclusion

The JVx FormLayout allows to quickly and easily create complex, good looking and working layouts which are still flexible enough for the cases when a component is swapped, removed or added. It can be used in many different circumstances and is still easy enough to use to make sure that even beginners are able to create a basic layout within seconds.

JVx REST interface update

Our generic REST interface of JVx got an update.

The REST services are a powerful feature of JVx and built-in. Usually you would implement your own REST services, but JVx has the concept of lifecycle objects and the powerful action mechanism. It would be ugly to implement another layer on top of JVx just for REST services. This is a framework feature.

We had this powerful feature for a long time and it is still in use for different use-cases:

AngularJS 4 with VisionX and JVx REST services
AngularJS with JVx in action

Our REST interface just works and you are able to create microservices very fast and efficient.

But the interface has a problem with some kind of parameters because they are also generic. Suppose you have the following method:

public IFileHandle createReport(ICondition pFilter, SortDefinition pSort)

The result type (IFileHandle) isn't a problem because JVx will send the bytes in the REST response, but the parameters: pFilter and pSort are specific types and not base types like String, Array, int, float.

It wasn't possible to call such methods without wrapper methods like:

public IFileHandle createReport(String pFilter, String pSort)
{
   return createReport(createCondition(pFilter), createSort(pSort));
}

Still not hard to solve, but parsing the filter and sort definition weren't trivial tasks. In fact, it was annoying.

We now have support for such parameters and much more. It's not super modern but an awesome solution!

Assume you have following code in one of your lifecycle objects:

public DBStorage getAdrData() throws Throwable
{
        DBStorage dbs = (DBStorage)get("adrData");
       
        if (dbs == null)
        {
                dbs = new DBStorage();

                dbs.setDBAccess(getDataSource());
                dbs.setWritebackTable("ADDRESS");
                dbs.open();
               
                put("adrData", dbs);
        }
       
        return dbs;
}

The DBStorage class offers a public method:

public IFileHandle createCSV(String pFileName, String[] pColumnNames, String[] pLabels,
                             ICondition pFilter, SortDefinition pSort) throws Exception

This method creates a CSV report (address data in this example). It has some parameters for the expected filename, optional column names which should be used for the report, optional labels for the column names, the filter condition and sort definition.

To call this method as REST service, simply send a post request with following information:

e.g. URL:

http://localhost/jvx/services/rest/demo/Address/object/adrData/createCSV

(demo is the application name, Address is the lifecycle object name, adrData is the object name)

Body:

["test.rtf", null, null,
 "{j:new LessEquals('NR', 10)}",
 "{j:new SortDefinition(new String[] {'NR', 'STAIR'}, new boolean[] {true, false}}"]);

The body contains Java Code :) (in the JSON string).

W00t?

JVx got support for executing simple Java code. We introduced the new utility class SimpleJavaSource. It's a backport from our commercial product VisionX. The SimpleJavaSource is able to execute the given parameters and creates real Java objects. It doesn't support conditions or loops, so it's really simple - but powerful!

With our new SimpleJavaSource and the support for parameter Code, it'll be possible to call most methods without additional wrapper methods.

The SimpleJavaSource class is now included in JVx and ready to use. It's simple but powerful:

SimpleJavaSource ssj = new SimpleJavaSource();
ssj.addImport("javax.rad.model.condition.*");

String sEqualsCode = "new Equals('ID', 0).or(new Like('NAME', '%john%'))";

ICondition cond = (ICondition)ssj.execute(sEqualsCode);

The new features will be available with our next JVx release and are already available via nightly builds.

AngularJS 4 with VisionX and JVx REST services

Some time ago I wrote articles about my "web-technology" tests. The first article covered AngularJS with JVx in action. It was a simple list view for contacts, had an Edit form and was based on AngularJS 1.4. The second article was about Oracle JET with JVx. The result was another list view with contacts, without Edit form.

Both solutions were more or less a demonstration for the automatic REST interface of JVx but not a real technology PoC.

The second article about Oracle JET was written in Feb 2016 and the first, about AngularJS, was written in July 2015 - long time ago. Currently, Angular 4 is available and Angular 5 is coming. Big version jumps with big API changes and many new features.

Last week, I thought it might a good idea to start a new evaluation of AngularJS. One week later, I think different... but one step after another.

My plan was the creation of a very simple application with some enhanced features, like routing, CRUD, styling, custom components, REST with authentication, Deployment. This was the base idea because I read really cool marketing articles about Angular and thought it might be easy to create a simple application with expected features.

So, what did I do to start?

The Angular tutorial was great for a jump start. You'll build a smart heroes application with a small dashboard. Sure, it's not a real world application but has everything on board and hey, the Tutorial will show how to integrate REST services. I thought it might be an easy task and won't last more than 1 day!

The tutorial has 7 chapters and the last one integrates REST. The chapter 1 was easy, because it was the instruction :) The second chapter contains the setup process which should be trivial, because I manually tried to create an AngularJS 4 application from scratch and it was super simple. But the setup for the tutorial wasn't easy because the creation of a new project from scratch contained too many files and the expected project layout (shown in the tutorial) was reduced to a bare minimum. It wasn't possible to delete all additional files because the project preview in the browser didn't work afterwards. So I decided to download the example archive.

This was the right decission because everything was pre-configured :) First lesson learned: Project configuration is not easy and woha, many different config files.

It was super easy to follow the tutorial and chapters 3, 4 were relative short and fast to do. Starting with chapter 5, the whole thing was starting to get complex because Service integration, Routing and HTTP(REST) were complex things. The chapters 5, 6 and 7 are very long and boring because you have to do so many things (hey, it's a tutorial and it's good as it is!).
No worries because I'm an "expert" and so I jumped to Chapter 6 and downloaded the finished example archive. The example was working without problems in my test environment :) but it was without support for HTTP/REST calls because I thought it might be a good idea to integrate the features based on the tutorial on my own.

So the next step was the integration of my own REST service instead of the dummy service in the tutorial. But first... I needed a REST service.

The creation of a web service was super easy because of our Low Code Development Platform - VisionX. It creates JVx based applications with all gimmicks. I did create a simple Heroes application with VisionX. The application has one screen:

Heroes app created with VisionX

Heroes app created with VisionX

The application was ready to use in 1 minute and had one database table:

Heroes table

Heroes table

The heroes table contains the columns: ID and NAME. Thanks to JVx, the REST service was ready-to-use. The request: http://localhost/services/rest/Heroes/HeroesWorkScreen/data/heroes

returned the JSON string with my test data:

[
  {
    "ID": 1,
    "NAME": "Superman"
  },
  {
    "ID": 4,
    "NAME": "Rambo (John)"
  },
  {
    "ID": 6,
    "NAME": "Wolverine (X-Men)"
  },
  {
    "ID": 2,
    "NAME": "Batman"
  },
  {
    "ID": 5,
    "NAME": "Captain America"
  },
  {
    "ID": 3,
    "NAME": "ANT MAN"
  }
]

So, my backend was ready.

The Next step was the integration into my Angular frontend. It was easy to find the right source file for the integration, because the hero-service was encapsulated. The first problem was that my REST service required authentication and the service implementation didn't use authentication. I had the same problem with missing authentication support in Angular 1.4 but found some useful things on stackoverflow. With Angular 4 everything has changed because you code Typescript and the API is different to 1.4, so my old solution didn't work. I tried to find something in the Internet but had a lot of problems because most help was for Angular 2. And I found so many github issues for http authentication and most issues had tons of comments... frustrating and not effective.

I tried to search in the official Angular documentation and found some hints about HttpClient in the online guide. But I didn't know HttpClient because my example was created with HttpModule. Not helpful that the example from the tutorial is different to the official documentation.... or.... I didn't read the details.... or.... I'm a bad developer.... or (and this is a fact) my Javascript/Typescript know-how is not enough. But anyway, it was not a standard task to add authentication to my hero-service.

I'm not 100% sure how I solved the problem, but I guess I read the API doc about http and an information about the new Angular2 HttpModule (means that HttpModule is old and HttpClient is new?). I googled around for sime time and tried a lot of hints, but it was painful. So much documentation about such a simple problem and no concreate solution for the http authentication problem.

Here's my solution:

export class HeroService {
 
  private heroesUrl : string;
       
  private options : RequestOptions;
  private headers : Headers;
       
  constructor(private http: Http)
  {
    this.headers = new Headers();
    this.headers.append('Accept', 'application/json')
    this.headers.append('Content-Type', 'application/json');
    this.headers.append('Authorization', 'Basic ' + btoa("admin:admin"));
         
    this.options = new RequestOptions({ headers: this.headers, withCredentials: true });

    this.heroesUrl = 'http://localhost/services/rest/Heroes/HeroesWorkScreen/data/heroes';
  }

  getHeroes(): Promise<Hero[]> {
    return this.http.get(this.heroesUrl, this.options)
                    .toPromise()
                    .then(response => response.json() as Hero[])
                    .catch(this.handleError);
  }

}

I know that username and admin are hard-coded but it's a simple test application without login. It's not really a problem to add a login form if needed and to replace the hard-coded values with variables.

After I solved the authentication problem, and everything was working in my test environment, I tried to continue with tutorial chapter 7 and tried to add new features like Adding new heroes, Deleting heroes. This was really straight forward and worked without problems, even with authentication.

Yuhu. After two days I had a working Angular 4 application which reads data from a REST service and offers CRUD. A simple routing was available and I had custom components, styling and was happy. I thought the next step should be a test deployment. Sounds easy and I thought it couldn't be a problem... but... deployment hell.

Why is Angular deployment so complex?

The documentation has a lot of information about deployment. The simple deployment is really straight-forward because it's enough to copy/paste your development environment. But this is not recommended for production environments because of performance and many other things. So, i tried to deploy a production ready application and not my development environment... And the nightmare started.

I found a super simple deployment guide for Angular 4. First problem: didn't work for my example project because:

Unable to find @angular/cli in devDependencies

Please take the following steps to avoid issues:
"npm install --save-dev @angular/cli@latest"

After installing the missing module, the next problem:

Cannot read property 'config' of null
TypeError: Cannot read property 'config' of null

Also no problem because google found that my project needs an additional config file:

.angular-cli.json

I found this file in my demo Angular application, created from scratch. I tried to edit and adapt the file for my heroes application and the next problem came up:

ENOENT: no such file or directory, stat '...\angular-tour-of-heroes\src\tsconfig.app.json'

No problem, same solution as before (copy/paste/change).

Hurray, the command:

ng build -prod

was successful!

The dist folder contained my production ready application with 6 files! Great.

The deployment to my Tomcat application server was also super easy, because VisionX is able to create war files with a single mouse click. I changed the created war file and put the built Angular files in the root directory and deployed the war file.

No surprise, the application didn't work because some javascript files weren't found. The developer console of Chrome browser was a big help!

So, what should I do?

No... not Google. I read the development guide and found the solution in section Load npm package files from the web (SystemJS).

So, I changed my deployment and replaced node_modules in my index.html with https://unpkg.com/. This solved one problem but the developer console showed more 404 errors. I had to remove following:

<script>System.import('main.js').catch(function(err){ console.error(err); });</script>

and

<link rel="stylesheet" href="styles.css">

I also had to replace the node_modules path in systemjs.config.js with https://unpkg.com/. Oh, and the file was missing in dist folder. I decided to follow the deployment guide and created a file with the name systemjs.config.server.js. If you do this, the index.html needs a changed mapping.

I didn't replace the values by hand. Here's my ant build file:

<project name="AngularJS" default="start.complete">

  <!--
 *****************************************************************
 * information
 *****************************************************************
 -->

  <description>Angular JS deployment</description>

  <!--
 *****************************************************************
 * tasks
 *****************************************************************
 -->

  <target name="start.complete" description="Prepares production files">

    <property name="heroes" location="D:/dev/other/angularjs/angular-tour-of-heroes" />
    <property name="dist"   location="${heroes}/dist" />

    <replace file="${dist}/index.html" encoding="UTF-8">
      <replacetoken><![CDATA[<link rel="stylesheet" href="styles.css">]]></replacetoken>
      <replacevalue><![CDATA[]]></replacevalue>
    </replace>

    <replace file="${dist}/index.html" encoding="UTF-8">
      <replacetoken><![CDATA[<script>System.import('main.js').catch(function(err){ console.error(err); });</script>]]></replacetoken>
      <replacevalue><![CDATA[]]></replacevalue>
    </replace>

    <replace file="${dist}/index.html" encoding="UTF-8">
      <replacetoken><![CDATA[node_modules/]]></replacetoken>
      <replacevalue><![CDATA[https://unpkg.com/]]></replacevalue>
    </replace>
   
    <replace file="${dist}/index.html" encoding="UTF-8">
      <replacetoken><![CDATA[<script src="systemjs.config.js"></script>]]></replacetoken>
      <replacevalue><![CDATA[<script src="systemjs.config.server.js"></script>]]></replacevalue>
    </replace>
   
    <copy file="${heroes}/src/systemjs.config.server.js" tofile="${dist}/systemjs.config.server.js" />
       
  </target>

</project>

With above changes, it was possible to use my application with my tomcat application server. But I had two more problems!

First, my REST service URL was wrong because it was set for my dev environment.
Second, the browser reload of URLs didn't work because the application server returned 404 for e.g. https://cloud.sibvisions.com/heroes/heroes/3

Two more problems, omg.

But clear, the REST service URL can't be the same in the prod environment. I saw that Angular comes with support for environments and thought this would solve my first problem.... No way!
The problem was that the environment integration worked for build time, but not for development. It wasn't possible to import the environment constant in my Typescript files. It wasn't possible beause the file wasn't routed correctly and I didn't find a solution for this problem. The dev server returned 404 for the access to ../environments/environment.js. I tried to find a solution for more than one day, but gave up. I found out that the config files of an Angular application are evil. You have so many options and have absolutely no idea what's right. This is a common problem if you search the internet and it's a good idea to use a pre-created configuration. But the configuration of the heroes application was different to a newly created configuration. So I reverted all my environment changes and decided to follow the official documentation. This code is the clue:

if (!/localhost/.test(document.location.host)) {
  enableProdMode();
}

It doesn't read the value from the environment constant, as recommended here. Not sure if this was recommended in Angular 2 and not for Angular 4, but the support is still built-in. I found so many horrible solutions for the environment problem, but no simple and easy one.

I solved the problem with my heroes-service and static properties. Yep, static field properties. It's that easy!

Here's a snippet from my service:

export class HeroService {
 
  private static heroesUrl : string;
       
  public static initMode(prodMode: boolean): void {
    if (prodMode) {
      enableProdMode();

      HeroService.heroesUrl = 'https://cloud.sibvisions.com/heroes/services/rest/Heroes/HeroesWorkScreen/data/heroes';
    }
    else {
      HeroService.heroesUrl = 'http://localhost/services/rest/Heroes/HeroesWorkScreen/data/heroes';
    }
  }
...

I used the recommended environment detection in my main.ts:

HeroService.initMode(!/localhost/.test(document.location.host));

This solved my environment problem completely. I'm not sure what's the best solution and I would recommend the built-in environment solution, but there should be a working tutorial or example for development and deployment.

Second lesson learned: Deployment is not easy with Angular if you want to make it right. The documentation is not clear and it's complex!!!

Back to my second problem: browser reload!
This is documented here. Clear, isn't it?

So, no solution for my Apache Tomcat installation. Rewrite rules are supported but why so tricky? I won't configure routing in my application and in the application server. This should simply work.
I tried to find a simple solution and created a simple Filter, because too much configuration was not what I want!

My filter:

public void doFilter(ServletRequest pRequest, ServletResponse pResponse, FilterChain pChain) throws IOException, ServletException
    {
        String sURI = ((HttpServletRequest)pRequest).getRequestURI();
       
        if (StringUtil.isEmpty(FileUtil.getExtension(sURI)))
        {
            RequestDispatcher reqdis = pRequest.getRequestDispatcher(sIndex);
           
            reqdis.forward(pRequest, pResponse);
        }
        else
        {
            pChain.doFilter(pRequest, pResponse);
        }
    }

Configration (web.xml):

<filter>
   <filter-name>IndexHtmlFilter</filter-name>
   <filter-class>demo.angular.IndexHtmlFilter</filter-class>
   
   <init-param>
    <param-name>index</param-name>
    <param-value>/app/index.html</param-value>
   </init-param>
 </filter>
 
 <filter-mapping>
   <filter-name>IndexHtmlFilter</filter-name>
   <url-pattern>/app/*</url-pattern>
 </filter-mapping>

Not my best code, but works.... if you put the application in a seperate folder... e.g. The REST servic call:

//souldn't route to index.html
https://cloud.sibvisions.com/heroes/services/rest/Heroes/HeroesWorkScreen/data/heroes

//should route to index.html
https://cloud.sibvisions.com/heroes/heroes/2

So it was easier to move the application into a sub directory: /app
https://cloud.sibvisions.com/heroes/app/heroes/2

and everything starting with /app/* will be routed to /app/index.html if necessary.

This configuration and the filter solved my second problem and hurray, my application was working without any problems!

Oh, in order to serve my application from the /app directory, I had to set the base href in index.html:

ng build -prod --base-href /heroes/app/

Here's the application: https://cloud.sibvisions.com/heroes/app/
(Please don't delete my default heroes because there's no "restore defaults" implemented)

What's next?

I wasn't happy with default features of tutorial app because I missed an export feature. So I decided to add a Report which contains all my heroes. The REST service was ready in one minute because VisionX has Reporting support. But how to download/save the report?

I had no example and google returned too many answers for Angular 2 and one for Angular 4. I followed the instructions and had many problems because the saveAs method wasn't found... So I had the next big problem!

Every new feature was a big problem for me :)

This feature was horrible because I had absolutely no plan about angular modules. I found several save-file modules and tried to install one by one. No module was working as documented. Not sure if the problem was because of my configuration or because of Angular 4. Finally I found one solution but I had to change my system.config.js manually and add:

'file-saver': 'npm:file-saver'

to the system loader and

'file-saver': {
        format: 'global',
        main: 'FileSaver.js',
        defaultExtension: 'js'
      }

to the packages.

I don't know why the default module installation didn't work but it did not!

After everything worked in my dev environment, I tried the same application in my prod environment and... error.
The FileSaver.js was not found???

Absolutely unclear, but I solved the problem dirty (or not) in my index.html. Simply added

<script src="node_modules/file-saver/FileSaver.min.js"></script>

and it was find in dev and prod environment.

... I thought.

One more problem: Download worked but the content was damaged!

The problem was related to the content-type or maybe the encoding?

Recommended (Solution 1, Solution 2) solution:

this.http.post(HeroService.heroesUrlAction + 'createListReportHeroes', JSON.stringify([null, null]))
                                 .toPromise()
                                 .then(response => {
                                   var blob = new Blob([response._body], {type: 'application/vnd.openxmlformats-officedocument.spreadsheetml.sheet'});
                                   saveAs(blob, 'report.xlsx');
                                 })
                                 .catch(this.handleError);

This wasn't working because something was missing:

var optCopy = new RequestOptions({ headers: this.headers, withCredentials: true, responseType: ResponseContentType.Blob });+

      this.http.post(HeroService.heroesUrlAction + 'createListReportHeroes', JSON.stringify([null, null]), optCopy)
                                 .toPromise()
                                 .then(response => {
                                   var blob = new Blob([response.blob()], {type: 'application/vnd.openxmlformats-officedocument.spreadsheetml.sheet'});
                                   saveAs(blob, 'report.xlsx');
                                 })
                                 .catch(this.handleError);

Clear, the ResponseContentType.Blob has to be set!!!
And if you set this type, the response._body throws a warning? Use response.blob() instead!

It took me one hour to remove this warning!

Next?

I'm done!

The whole application development made me 1 year older because of frustration. I know that I'm not an Angular expert and I didn't read everything in the official documentation or guide/tutorial, but the whole development was a torture - sure, the result is great!

Too many different solutions for simple problems: deployment, downloading a file, configuration.

The documentation is awesome but too complex and contains no simple use cases. A simple deployment would be awesome and the problem with environments was horrible. Angular is powerful, no doubt! The configuration and deployment aren't straight forward. Also the mechanism behind the module system was not always working, at least not for me.

I love using custom components and the styling integration is great. The routing configuration is error-prone without an IDE or specific tools. My application didn't use all available features like testing, linting, ...

Finally

The application is available as JVx application with Vaadin UI here.
Login with admin as username and password.

The Angular 4 application.

JVx Reference series

We wrote a lot of useful articles about JVx in the past weeks. You can use them as reference:

Here's the search result and the direct links to the articles:

Technologies and Factories
Resource and UIResource
Launchers and Applications
Application Basics
Custom Components
Events
DataBooks
The FormLayout
CellEditors

And the link to our JVx documentation.