JVx Reference, DataBooks
Let's talk about DataBooks, which allow access to data without any effort.
What is it?
DataBooks are an active model, which allow you to directly query and manipulate the data. Contrary to many other systems JVx does not map the data into objects, but instead allows you to directly access it in a table like fashion, exposing columns, rows and values.
One could say that it is like a three dimensional array, with these dimensions:
- DataPages
- DataRows
- Columns/Values
With DataPages containing DataRows, which itself contain the values and everything is referencing the RowDefinition, which outlines how a row looks like.
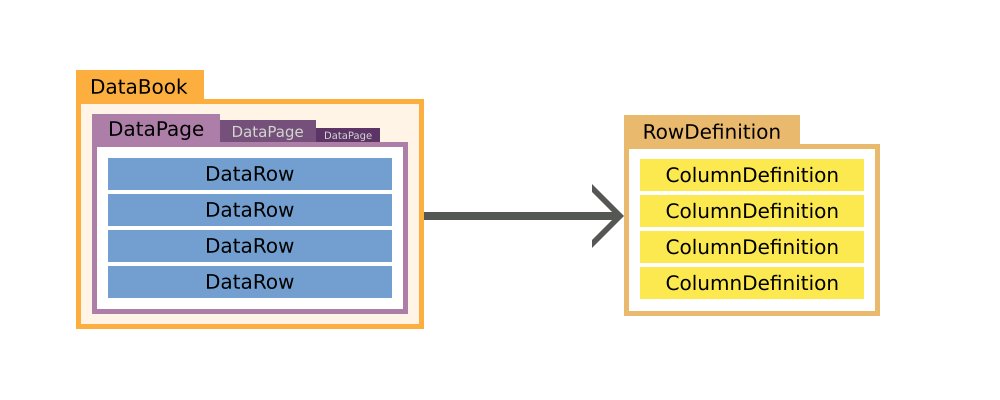
RowDefinition
The RowDefinition defines what columns are available in the row and stores some additional information about them, like the names of the primary key columns. You can think of the RowDefinition as the headers of a table.
Its creation and usage is rather simple, and if you're working with RemoteDataBooks there is no need to create one at all, as it is automatically created when the DataBook is opened. A RowDefinition holds and manages ColumnDefinitions, which define the columns.
rowDefinition.addColumnDefinition(columnDefinitionA);
rowDefinition.addColumnDefinition(columnDefinitionB);
rowDefinition.addColumnDefinition(columnDefinitionC);
dataBook.setRowDefinition(rowDefinition);
ColumnDefinition
The ColumnDefinition defines and provides all necessary information about the column, like its DataType, its size and if it is nullable or not. You can think of it as one column in a table.
columnDefinition.setNullable(false);
MetaData
Most of the ColumnDefinition is additional information about the column, like if it is nullable, the label of the column, default values, allowed values and similar information.
DataType
Of course we must define what type the value in the column has, this is done by setting a DataType on the ColumnDefinition. The DataType defines what kind of values the column holds, like if it is a String, or a Number or something else. We do provide the widest used DataTypes out of the box:
- BigDecimal
- BinaryData
- Boolean
- Long
- Object
- String
- Timestamp
It is possible to add new DataTypes by simply implementing IDataType.
DataRow
The DataRow repesents a single row of data, it holds/references its own RowDefinition and of course provides access to the values of the row. Accessing the DataRow can be done either by column index or column name, and the methods do either return or accept Objects. Let's look at a simple usage example:
String value = (String)dataRow.getValue("COLUMN_A");
dataRow.setValue("COLUMN_A", "New Value");
DataPage
The DataPage is basically a list of DataRows, it also holds its own RowDefinition which is shared with all the contained DataRows.
The main usage of DataPages is to allow paging in a master/detail relationship. If the master selects a different row, the detail databook does select the related DataPage.
DataBook
The DataBook is the main model of JVx, it provides direct access to its current DataPage and DataRow by extending from IDataRow and IDataPage.
By default, the DataBook holds one DataPage and only has multiple DataPages if it is the detail in a master/detail relationship.
Usage example
Here is a simple usage example of a MemDataBook, an IDataBook implementation which does only operate in memory:
dataBook.setName("test");
dataBook.getRowDefinition().addColumnDefinition(new ColumnDefinition("ID", new LongDataType()));
dataBook.getRowDefinition().addColumnDefinition(new ColumnDefinition("COLUMN_STRING", new StringDataType()));
dataBook.open();
dataBook.insert(false);
dataBook.setValue("ID", Long.valueof(0));
dataBook.setValue("COLUMN_STRING", "VALUE");
dataBook.insert(false);
dataBook.setValue("ID", Long.valueof(1));
dataBook.setValue("COLUMN_STRING", "VALUE_A");
dataBook.saveSelectedRow();
dataBook.setSelectedRow(0);
dataBook.setValue("COLUMN_STRING", "VALUE_NEW");
dataBook.saveSelectedRow();
dataBook.setSelectedRow(1);
dataBook.delete();
Accessing the data with Strings
One of the major advantages of the DataBook concept is that there is no need to create new classes to represent each table, view or query result. One can always use the DataBook, directly and easily and model changes don't necessitate changes on the client side. The downside to this approach is that we lose compile time checks because we access the data dynamically. However, This can be mitigated by using EPlug, an Eclipse plugin which provides compile time checks and many more features.
No primitives, Objects only
We do not provide overloads to fetch primitives, that is because there are mainly three types of data inside a database:
- Numbers
- Text
- Binary Data
Text and Binary Data are both objects (arrays of primitives are Objects after all) and Numbers are either primitives or Objects. Most of the time if we deal with numbers inside a database we want them to be of arbitrary precision, which means we must represent them as BigDecimal. Supporting double or float in these cases would be dangerously, because one might write a float into the database which might or might not end up with the correct value in the database. To completely eliminate such problems, we do only support Objects, which means that one is "limited" to the usage of Number extensions like BigLong and BigDecimal, which do not suffer from such problems.
Where are the DataPages?
What is not clear from this example is how and when DataPages are used. As a matter of fact, most of the time there is no need to think about DataPages because they are managed directly by the DataBook, and if used this like there is only one DataPage. Multiple DataPages will be used if there is a Master/Detail relationship defined in which case the DataBook does select the correct DataPage automatically.
Master/Detail
Master/Detail is something that occurs in nearly every data model. It means simply that there is one master dataset which is referenced by one or multiple detail datasets. Or to express it in SQL:
*
FROM
MASTER m
LEFT JOIN DETAIL d ON m.ID=d.MASTER_ID;
We can of course express a Master/Detail relationship when using DataBooks. For that we just create a ReferenceDefinition and assign it to the Detail DataBook:
masterDataBook.setName("master");
masterDataBook.getRowDefinition().addColumnDefinition(new ColumnDefinition("ID", new LongDataType()));
masterDataBook.open();
IDataBook detailDataBook = new MemDataBook();
detailDataBook.setName("detail");
detailDataBook.getRowDefinition().addColumnDefinition(new ColumnDefinition("ID", new LongDataType()));
detailDataBook.getRowDefinition().addColumnDefinition(new ColumnDefinition("MASTER_ID", new LongDataType()));
detailDataBook.setReferenceDefinition(new ReferenceDefinition(new Streing[] {"MASTER_ID"}, masterDataBook, new String[] {"ID"});
detailDataBook.open();
Let's assume the following data for illustration purposes:
====== =================
ID ID | MASTER_ID
------ ------|----------
1 1| 1
2 2| 1
3 3| 2
4| 2
5| 2
6| 3
7| 3
8| 3
Now if we select the second row in the masterDataBook, the detailDataBook will just contain the rows with the corresponding MASTER_ID, so 3, 4 and 5.
====== =================
ID ID | MASTER_ID
------ ------|----------
1 3| 2
S 2 4| 2
3 5| 2
The detailDataBook is automatically adjusted according to the selection in the masterDatabook. Of course this can have an arbitrary depth, too.
Conclusion
The DataBook is the backbone of JVx, it provides a clean and easy way to access and manipulate data. At the same time, it is flexible and can be customized to specific needs with ease.
![]() API, Development, Information | rzenz | 01/05/2017 |
API, Development, Information | rzenz | 01/05/2017 | ![]() Comments (0)
Comments (0)


")
")
")
")
 RSS-Feed