We're happy to announce the release of EPlug1.2.5. Even though the change in the version number is quite small, the changes which have gone into this version are very interesting.
Better hover information and improved DataBookView
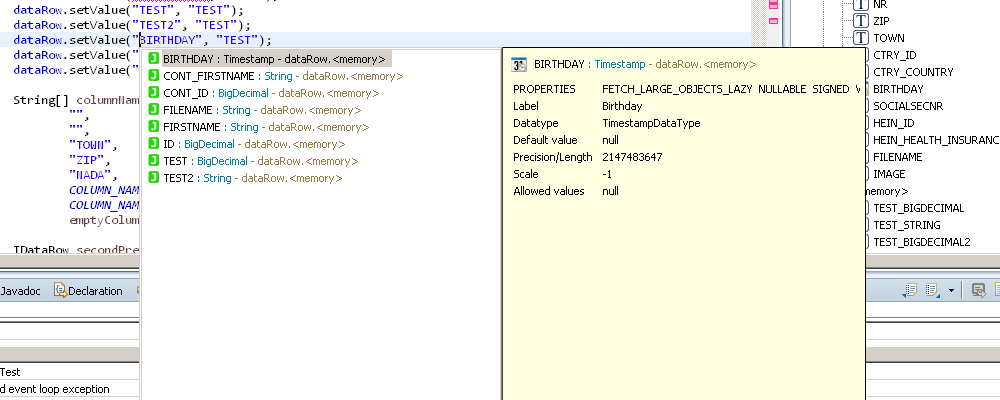
The biggest visual change in this new version is the new hover information for columns:
As you can see it has been vastly extended, with nearly all information about the column which you might want to know about, including its type, the label and all other properties.
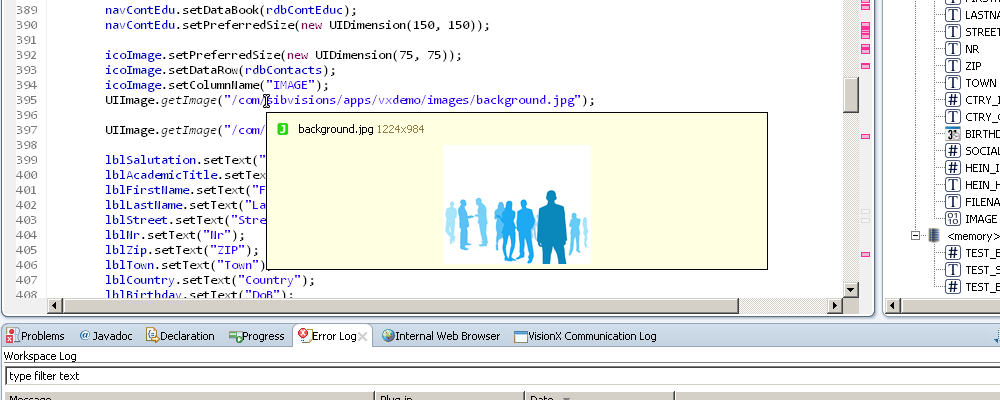
Also the image preview is now more useful and is displaying the complete image but scaled to fit the hover:
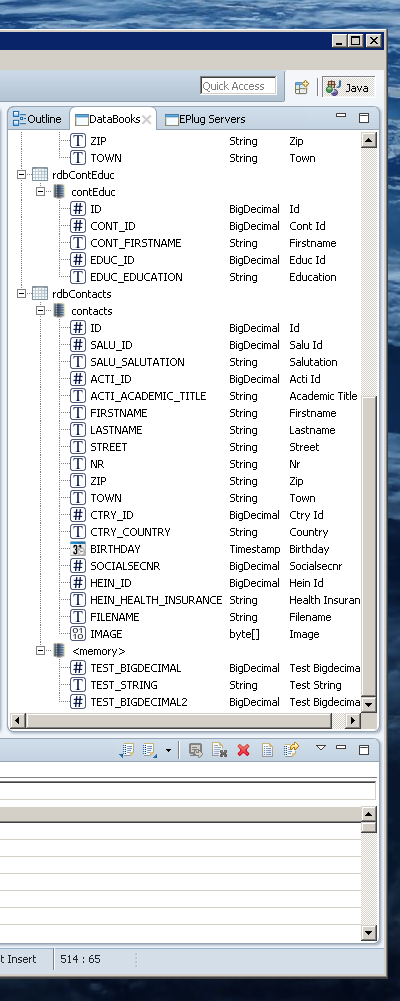
Additionally the DataBookView has been restructured to display the information in a more easily digestible way, structured by variable name and source of the columns:
Improved DataBook support
The support for DataBooks/DataRows has been greatly improved and the plugin does now support a lot more variations on how to achieve the metadata. For example cloning of ColumnDefinitions, assigning of RowDefinitions and even getDataRow(...) and similar methods are now processed to acquire the metadata and column information.
Objects in server calls
One of the build-time checks is the type-check of parameters in server calls. Let's look at a simple example:
// Server side publicvoid serverSideAction(ActionType pActionType, String pLogMessage, BigDecimal pId);
// Client side
getConnection().callAction( "serverSideAction",
ActionType.DO_IT_LATER, "Some message which will be logged",
dataBook.getValue("ID"));
While this compiles completely fine in pure Java (because callAction(...) does accept an Object vararg), EPlug would flag it with an error because getValue(...) returns an Object but the server-side expects a BigDecimal. With this update there is now a build option available in the Project/EPlug settings to ignore such errors, allowing to pass Objects to the server side without checks.
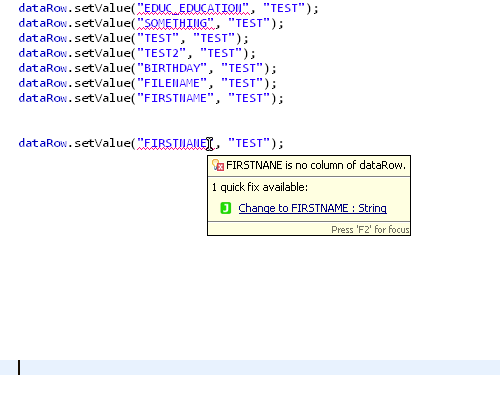
Misspelled a column name? No problem!
We do now offer QuickFixes for column names with typos:
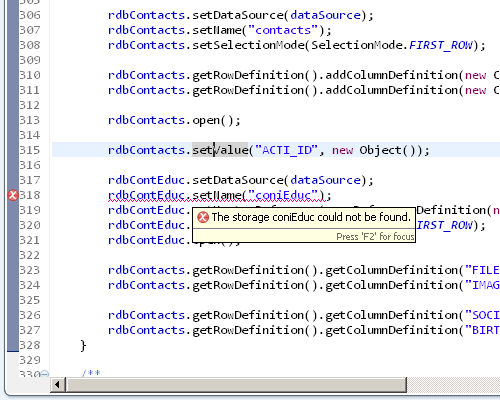
Automatic check of complement files
There is now a new build option in the Project/EPlug settings which allows to enable the automatic check of complement files. A "complement" file is simply the "other side", for example for the lifecycle-object the complement file is the workscreen, and vice versa. That means that now workscreens are automatically checked if the lifecycle object changes.
Preliminary String array support
There are various functions which do accept a String array of column names, for example getValues(...). Because of limitations coming up from the JDT infrastructure which we are using, we've been unable to provide autocompletion for column names in such circumstances:
dataBook.getValues(newString[]{"|
We are still unable to determine the exact databook in such circumstances, but we do now simply provide all columns as completion suggestions. What we can do is provide full hover and build support for these functions.
Improved VisionX/EPlug communication
VisionX is now a lot more talkative, it informs EPlug about file changes. If "Auto Reload" is enabled in EPlug, all files that have been changed by VisionX will now be reloaded and checked automatically. The same accounts for changed metadata.
Changes
Updated JVx version
Cached MetaData is now correctly invalidated and refreshed
DataBookView is now not constantly refreshed
Markers (Errors, Warnings) are now only placed on the names of the columns, instead of the whole statement
Inserted methods (from quick fixes) should now always be correctly formed
Fixed "phantom" markers which could pop up during build
Fixed that the DataBookView might not display all metadata
Fixed that folding nodes in the DataBookView made the child-nodes vanish
If you work with JDBC and MySQL, you will most likely be aware of one shortcoming: MySQL can not stream the results from a query (well, actually it can, but the feature is quite limited). That means that up until now JVx has always received and stored the full result set in memory which it received from MySQL. No paging was performed as it was done in the Oracle implementation.
Limit to the rescue!
MySQL does support the limit clause, which allows to limit the results to either a certain number of rows, or a certain range of rows. How does it look like?
SELECT
ID,
NAME FROM
TEST WHERE
NAME LIKE'Hans%' LIMIT 5,10;
This will fetch the data starting by the 5th row up to the 15th row, so it will skip the first five rows and then return the next ten. As this is a database builtin, no additional data is send over the wire except the actual requested rows. This is perfect if you want to limit your queries, for example, because you know that you don't need more than 5 rows even though there are 50,000 rows.
Fetch all the things!
With the old behavior, without limit clause, the JDBC MySQL driver would fetch the complete result of the query and only we would do some cutting on it (mainly dropping not needed rows at the start). That meant that the complete result set was always loaded into memory, which itself might have caused that you were unable to execute certain queries, especially if they contained bigger blob columns.
Limit all the things!
With the new behavior, the limit clause is appended to the query as needed, which means that the JDBC MySQL driver has to load a lot less data and a lot less data is send over the wire.
The MySQL giveth, the MySQL taketh away...
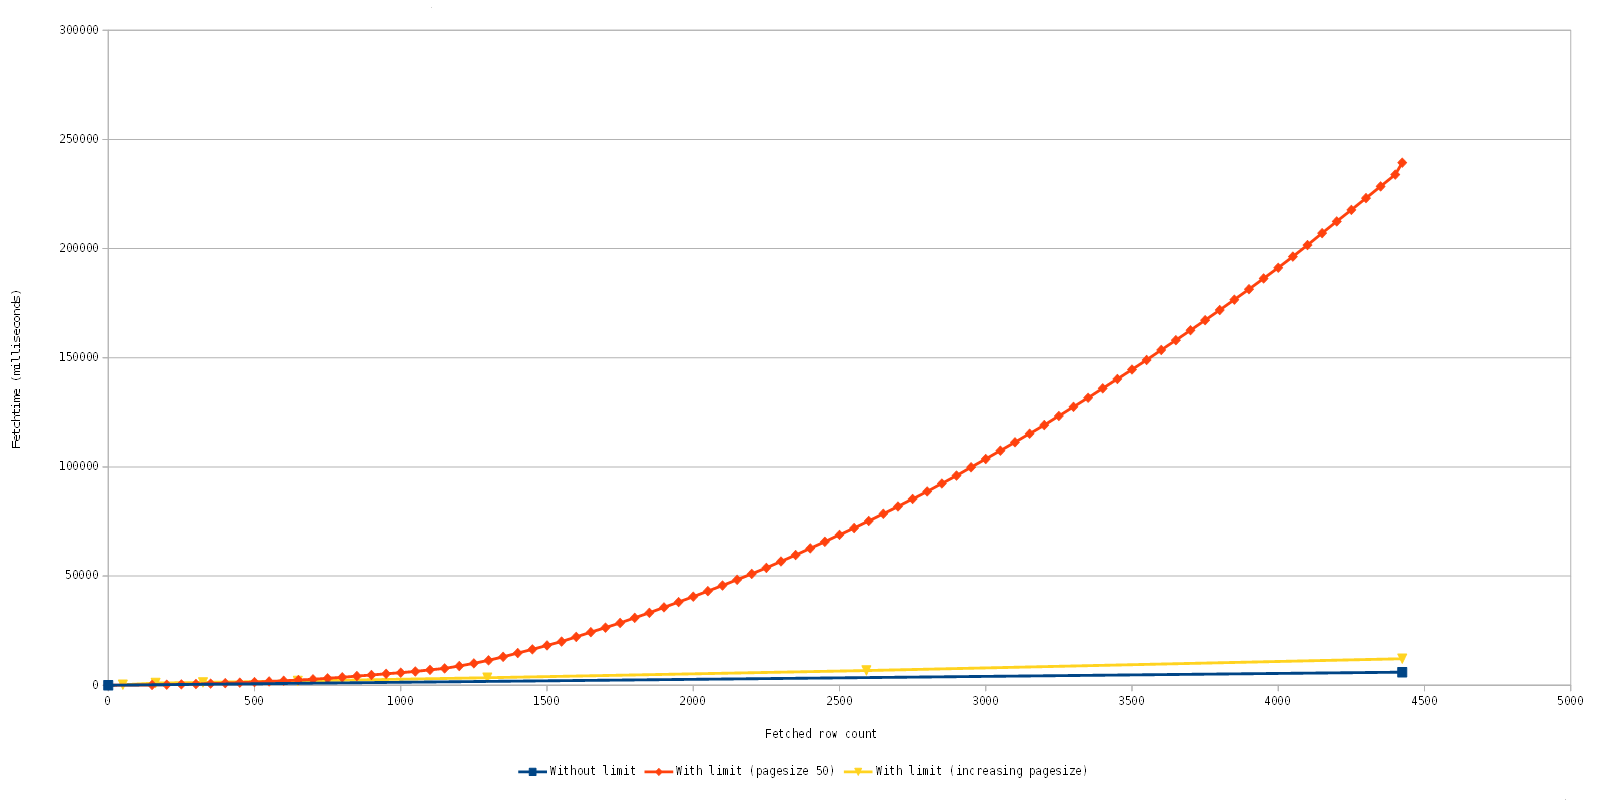
But there is an additional cost associated with the usage of the limit clause. Because the fetches are separate statements, all rows leading up to the beginning row have to be selected, too. Let us return to our first example, the query of the TEST table. We only want 10 rows starting from the 5th row, that means our result set only contains 10 rows. However, MySQL has (obviously) to query, select and discard the first five rows so that it can start sending us the rows that we actually want. That means that the cost of selecting pages increases. Off to pretty graphics!
Note that the fetch time is accumulative.
Blue: The original implementation which does perform only one fetch of all data. In this case it is quite fast, but depending on the query and data you could wait a long time for the initial fetch, if it was possible at all.
Orange: The current implementation with quite a worst case scenario, it gradually fetches page after page with a row count of 50. As you can see the fetch time gradually increases, but as you can also see the initial fetches are fast.
Yellow: An optimization experiment which increases the fetched row count dynamically.
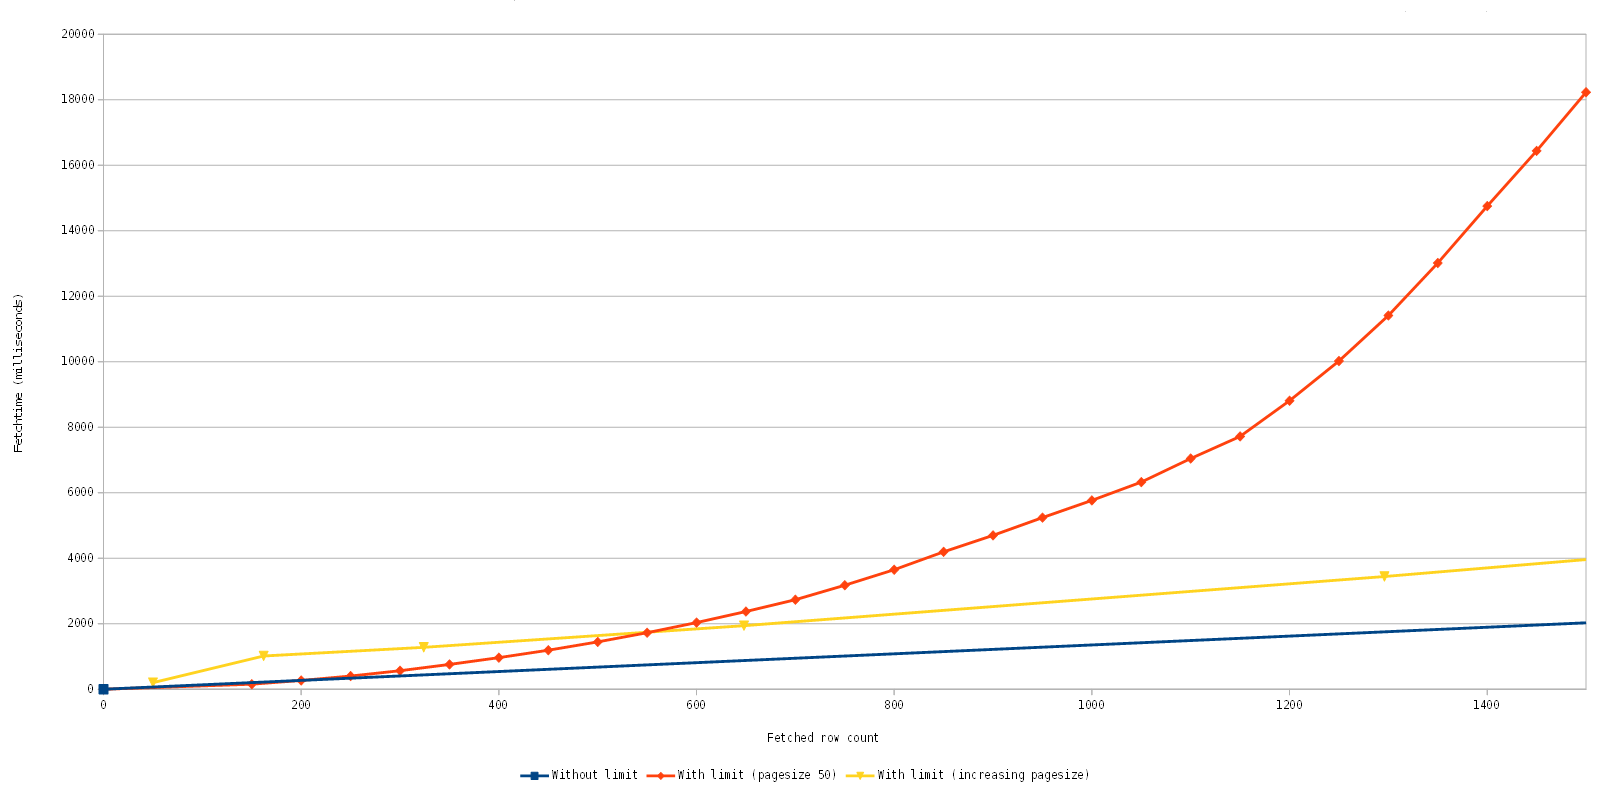
Let us look at this again in detail, to be exact the fetching of the first 1500 rows.
What we see here is quite good news, actually, because with the new implementation with the limit clause, you can consecutively fetch 600 rows in the same time as the fetching of the 4400 rows with the old implementation. The big difference here is that the first set of ~113 rows returns close to immediately and consecutive fetches are equally fast. This is awesome because we can now display initial data faster, even few it is fewer data in the end and slows down the more data is fetched afterwards.
Improve all the things!
As you can see from the charts, we already did a short experiment to improve this further, and we are confident that we can implement such a solution which dynamically fetches more rows to reduce the overall fetch time while still preserving that the first rows are displayed fast, further improving GUI responsiveness.
My last years post ended with a look at the work on our JavaFX implementation. That work was shortly after finished and we could release the version 1.0, which still has some rough edges but overall works quite well. There weren't many exciting things going on in the last cycle of development, only a lot of small bugs to be fixed.
In June the JavaFX project migrated from its own JIRA system to the OpenJDK bugtracker, something which sounds like a little and quite unimportant migration turned out to be quite a problem for people like us. The OpenJDK bugtracker is read-only for everyone who is not an OpenJDK author (I believe it is called "author"), tickets can only be created through the web interface for generic Java bugs. That means that we lost the possibility to contribute to the tickets which we created or tracked, we even lost the possibility to track tickets easily, and the forwarding from the old JIRA issues has been removed in the mean time, too. The only possibility to track the tickets which are of interest to us is now via RSS feeds...one feed for every single ticket. If you remember my last years post, that list had grown to over 50 tickets. Contributing to tickets and commenting is only possible through the mailing lists for us. Which is a quite sad state compared to the previous one, but I guess there isn't much one can do about.
Anyway, for our implementation we've already gathered a list of needed improvements which will come next, we just don't know when exactly that will happen, but it will.
The Kitchensink, plumbing not included
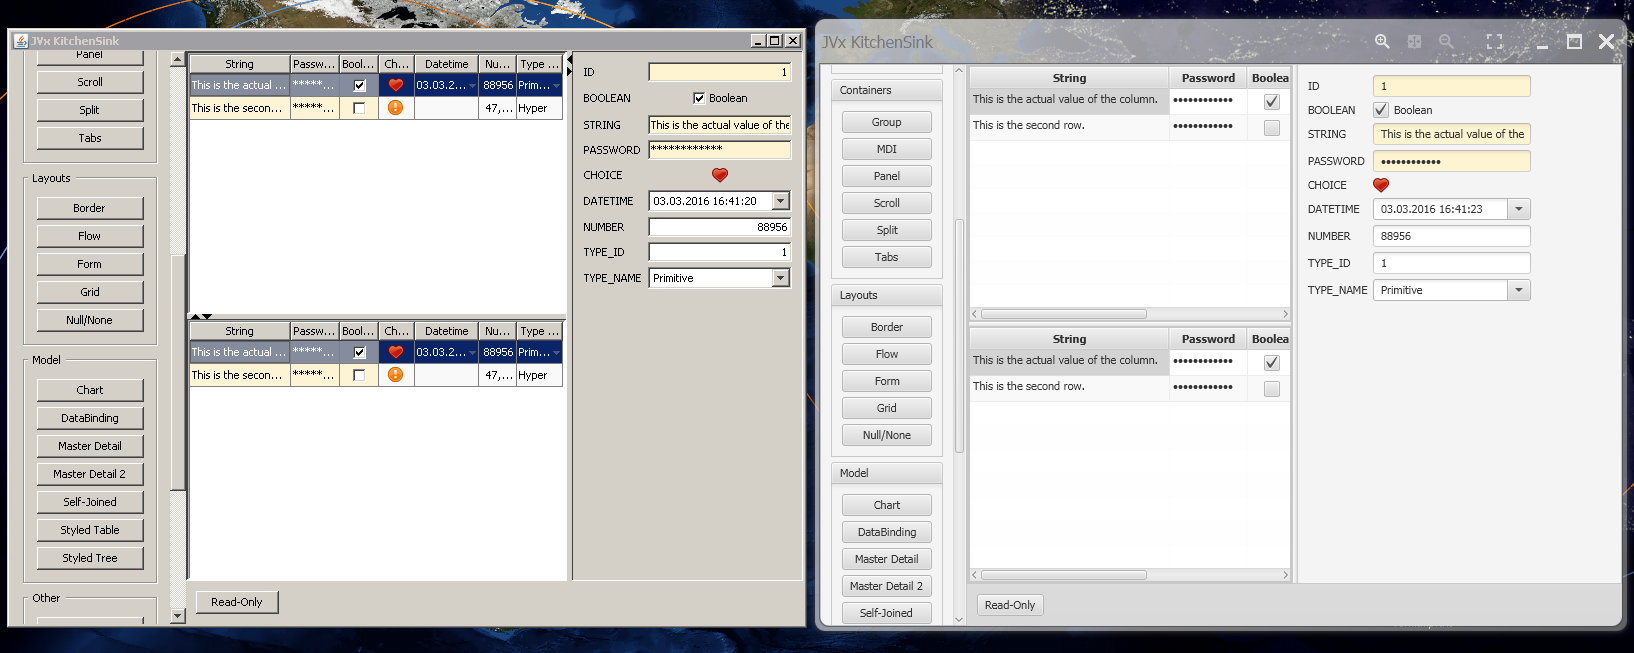
During the JavaFX implementation the necessity arose to quickly and easily test most features. The first test runs and verifications had been done using the FirstApp and the DemoERP, which are very good examples if you want to get it to work but lack the detail of most features for the most part. Out of this need the JVx Kitchensink was born.
The Kitchensink is a very, very simple application which doubles as a showcase and as a testbed for new implementations. It includes all controls and allows you to manipulate them on the fly, easily testing the features of every single one. Though, it does not use the Client/Server infrastructure and instead is a simple, stand-alone application which is launched directly using the factory.
This little application allowed us to rapidly test single features of controls and components in Swing and JavaFX without having to click through large applications or the need to change these applications to accommodate our tests. You can check it out, it runs completely standalone and allows you to see and test all of the controls which are offered by JVx.
One of the features that I personally found important is the DataBook View, it displays all databooks of the current file in a similar manner to the Outline. That means that you can now see which databooks and which columns are in use in the current file. I'm afraid that there isn't much more to say about working on these releases, implementing the new features worked like a charm and was uneventful.
During the summer my working assignments were widespread throughout all our projects. Bug fixes in JVx, maintenance in VisionX, new features in ProjX, you name it.
GUI Testing, an experiment
Back when we ran stress tests on our Vaadin implementation and server we had the idea that a generic GUI testing system for JVx should be possible. During the late summer we actually found the time to pursue this idea and started building a prototype. The goal was to provide an application which allows to record, replay, save/load and export GUI unit tests. Hooking into the toolkits, like Swing, proofed to be rather simple and with our naming scheme in place it was quite easy to gather events and ascribe them to components in a toolkit generic way. For example for Swing/AWT you can register a global event listener which will receive all events, ideal for such a usecase. For JavaFX you have to resort to register a filter for events on a scene level. Regarding Vaadin we opted to refer to the Selenium IDE which already allowed to record whole test cases in the browser. Additionally with our naming scheme we can record test cases in Swing/JavaFX and map them nearly one-to-one to Selenium test cases.
Processing the events which we received from the toolkit proofed to be more difficult than first thought, for example the window close button in Swing fires a single click event, unfortunately that button does not have any information associated with it which would allow us to figure out that it is the close button. Additionally that button might change from LaF to LaF. There were multiple such instances which made it quite hard for us to determine what event just fired and to which component it belonged to.
At the end we had a working prototype which could be launched with the application (basically wrapping the application to make it possible to hook into the event loops and similar), record events, replay these events and allowed us to save, load and export these as unit tests. Unfortunately we ran out of time before we could raise this prototype to a production ready software. But the long term goal is still to provide such a functionality to JVx users at some point.
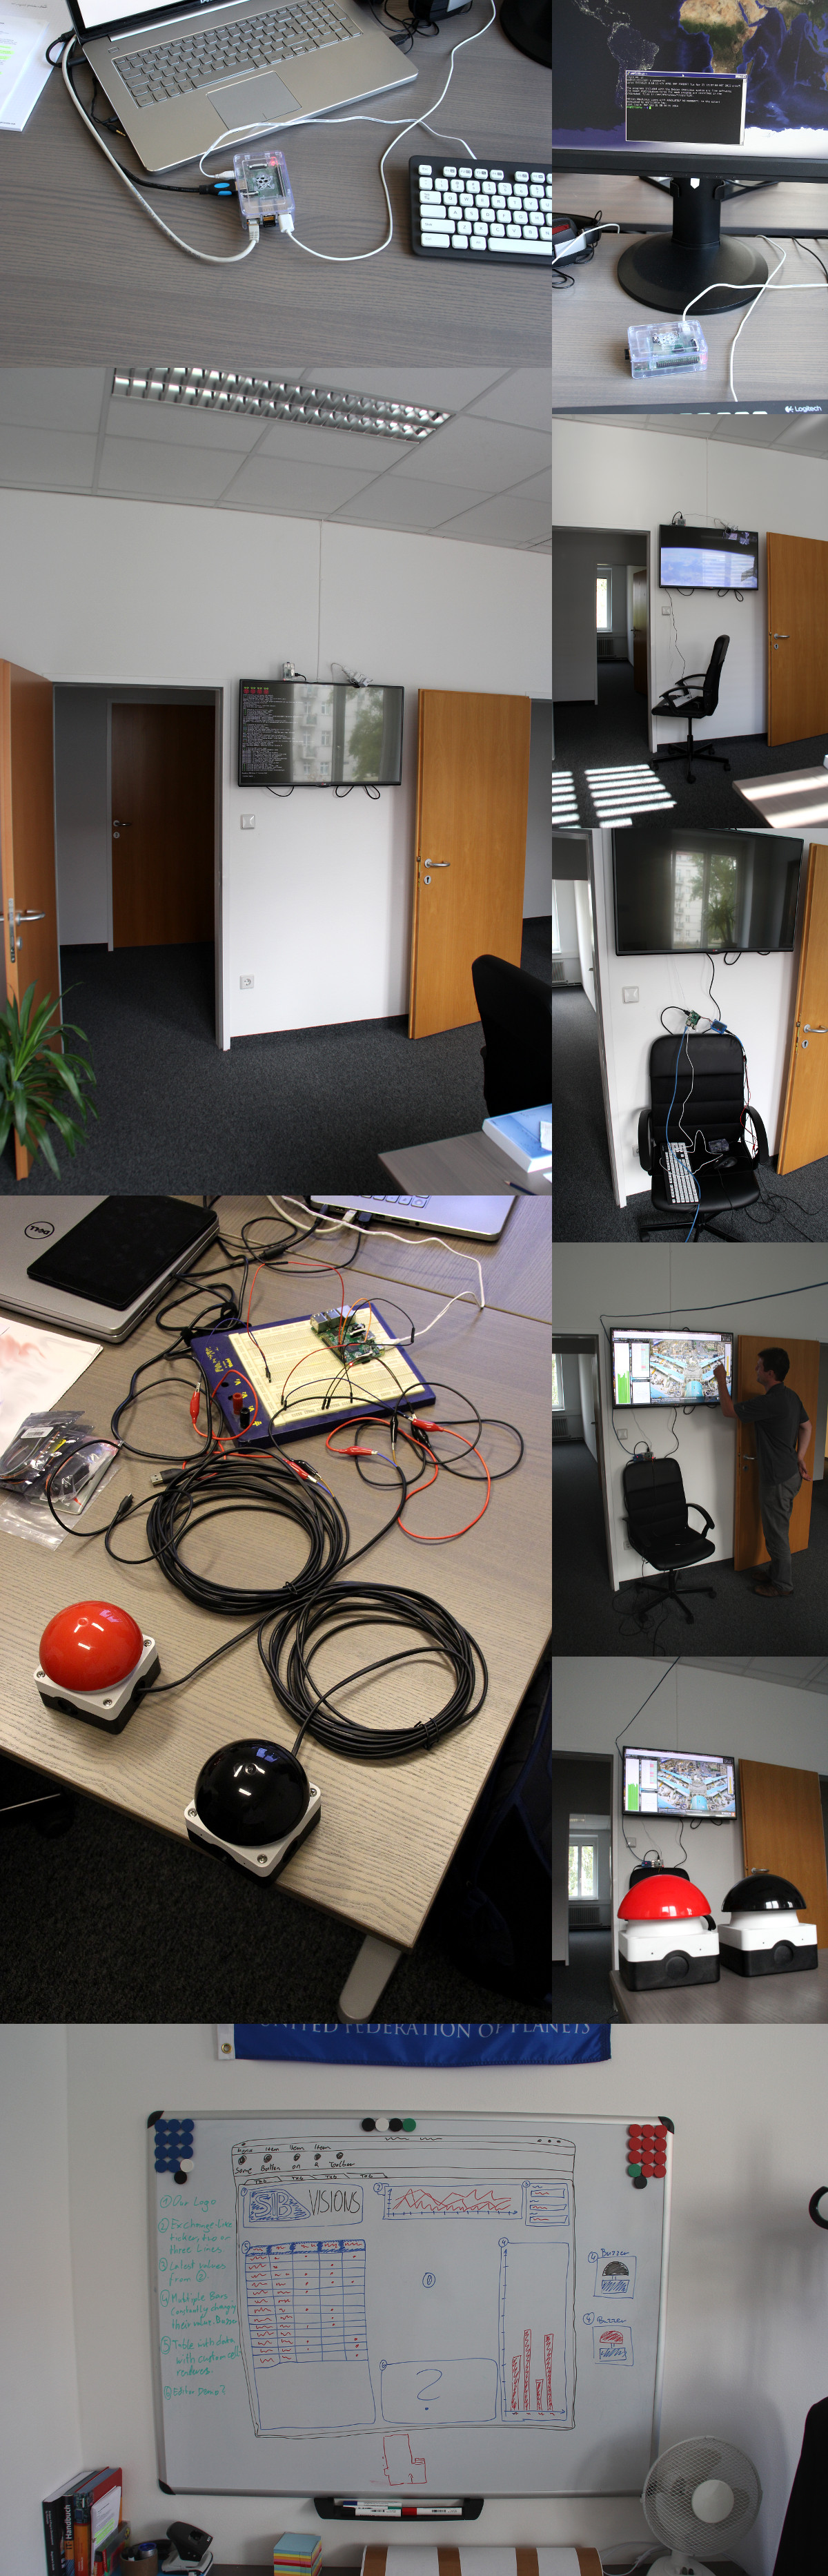
eTV, a small side project
As I will explain further down, I was not happy with the last empty wall in the office and the idea to have some sort of information display was born. Additionally we could use this setup in our conference room as needed and even bring it to events and conferences. Now, if you want to display information you need two things:
A display to display the information on
A system which can power the display
As it turned out later, you also need information to display, but that is a different story. So the first step was to figure out what would display the information and what would power that. We settled quickly on a simple 41" TV and a Raspberry Pi 2. That means we have a low-power setup which is easily portable (unplug it, move the TV over, plug it in). We installed Raspbian and our first tests were promising.
After some tests it turned out that the easiest way would be to create a custom setup which was powered by JVx and utilized all the power the Linux system provided us with. The final stack looks like this:
That will launch a user session everytime the system boots. From there it simply launches X11 and executes the initial setup of the user session (like starting the window manager, setting a wallpaper, starting the JVx server etc.).
We chose i3 because it allows to be controlled from the command line and provides extensive customization options. In the mean time we've looked into replacing it with Sawfish as it provides even more options and provides more control.
The custom JVx system is also not that impressive as it might seem. It is a simple and slim JVx server which one can connect to and execute commands, like to show the next window or launch an application. This also includes the "glue" shell scripts, which basically provide another layer of abstraction between the JVx server and the system, for example if the next window should be displayed the server invokes the "next-window.sh" script which then sends the command to the window manager. That allows to easily tune or swap technologies without having to edit, recompile and restart the server.
One of the first usecases was to show videos and streams on the TV, as it turns out, the options you have when it comes to display videos on a Raspberry Pi are quite limited. The initial idea to use VLC quickly died because it does not support hardware acceleration on the Raspberry Pi, which renders it useless for showing videos. Even though 2.2.0 promised support, we did not get it to work on our device. That left us with OMXPlayer, which comes with a completely different set of problems. The first surprise for me was that OMXPlayer did not use a window, it directly paints to the screen, which means that it can't be controlled with window commands. The second problem is that it behaves very badly if the connection is bad, of course that is to be expected, however OMXPlayer quits at the first sign of a bad connection. If you want to display a livestream, which does not end, it is quite confusing to have the player quit on you without an obvious reason. The workaround to that problem was to wrap it in a while loop inside the shell script which starts it, a quite ugly hack, but unfortunately necessary.
There were other problems to be solved, for example that the USB WLAN dongle would go to sleep after some time, that the network manager would consider it a good idea to assign a completely different IP address and that our WLAN is really unpredictable in some circumstances, but otherwise it was not that bad. After we've figured these things out it was a smooth sailing. As you can see in the other blog post about it, we even built a simple demonstration system of the capabilities of JVx complete with a little gamification. The whole setup can now be controlled over a web interface (which is a JVx Vaadin application deployed to a Jetty) and with an app on a tablet, it can display pictures, videos, streams and of course run applications, including different dashboards (created with JVx) which provide us with information (some vital, some not so much, but who does not want to see the latest Garfield comics at a glance) or some nice views, like the live streams from the ISS.
All in all, we are very happy with how this turned out and we will keep improving this setup in the future. There is also now the Raspberry Pi 3 and the ODROID-C2 which offer even better performance in the same form factor, so there is definitely space for upgrades. Here are a few impressions from the project:
JVx and lambdas, let's do it right
With the release of Java 8, Java gained support for lambdas and method references, this is great! It means that a lot of code can be written simpler and more readable. The new method references are also very close to our implementation of listeners and actions, which means that it is only natural to make sure that we support them to the best of our abilities.
To make sure that our events, listeners and actions can be used with lambdas and method references and to provide a clean migration path if wanted, we had to make sure that these could be translated as easily as possible. For that we introduced a new interface called IRunnable, which is the same as Runnable except that the run method can throw any Throwable. With this new interface under our belt, we can now provide 1:1 migration path for everyone who wants to use lambdas instead of our listener scheme.
Vaadin, the new grid
With Vaadin 7.4 a new component was included, the Grid. The Grid set out to fix the shortcomings of the Table and provide more and better features, so of course we wanted to see how it actually performs and works. Thanks to the architecture of JVx, having multiple implementations of the same component is easily possible, all you need is a switch in the factory so that it provides you with the implementation you want.
The new Grid provides a lot of possibilities and integrating it into our implementation was quite painless and straightforward. For us, one of the best things about the new Grid are the custom renderers, that means that we can finally fine tune the representation of every cell in every way, something that was previously only with some hacks possible, but is now painless with our custom renderer. The only downside to the Grid is the missing inline editing support, but that is already remedied in later versions, to which we will update in time.
Prototype, my first
First, you have to know that I was hired as a framework coder, even though JVx is a business application framework, the whole "business application" part does not concern me as long as it is does not directly influence the framework work I'm doing. But at the beginning of this year I was required to create a prototype for a real business application, which is a very exciting opportunity to actually look on the other side of the fence (and as we all know, the grass is always greener on the other side, though in Eden it might be acid). With the power of VisionX strapped to my back it actually was a quite easy task to get the first draft up and running. As usual, the most time went into fine tuning the user interface and the styling.
A few misjudgments on my end included which were later on fixed, it was quite an experience working on this prototype. Even though I do not consider it a requirement, it is always a good idea to use the software that you create, it helps seeing problems early on and also provides a very simple reality and sanity check. But for me personally, I was happy when I was allowed to go back to work on the framework, it is my domain, in job and mind.
Vaadin, the new FormLayout
Since the beginning of the Vaadin implementation the FormLayout was a problematic child, never behaving as it should. The original implementation is based upon the GridLayout of Vaadin, which is nice but comes with quite heavy limitations, for example that components can not overlap. So it was finally time to put all these problems behind us and rewrite the FormLayout to behave the same as in the other implementations.
Implementing something in Vaadin is more complicated than doing it in, for example, Swing. It means that you have a server-side class, a client-side class and a connector stringing the two together. Technically the only touching area is the connector between the server and client side and that is one way only. This is very limiting when it comes to something like our FormLayout, but we found a way to send everything necessary to the client.
Additional problems we faced were that the new FormLayout is required to resize itself whenever its parent changes, something that is not necessarily easily achieved in HTML/CSS, not in the way we needed it. You see, these panel must fulfill two properties: First, it must resize itself to the size of its parent or the size it is set to by the parent. Second, it must resize itself according to its own preferred size. These two sound contradictory, but are very simply explained when put them into proper context. The panel must resize itself whenever the parent changes, this is obviously necessary to make sure that the panel is always correctly layouted. Everyone who does know a little about HTML/CSS will now say "set the width and height to 100%", this is correct, however it also means that the panel inside a container which itself does not have a fixed size will collapse. That is not what we want, we want the panel to dictate a size if the parent does not have one, and everyone will say again "then don't set a width and height", this is also correct, but means that it won't resize itself anymore with the parent. To make the matter even more complicated, all children are positioned absolute, which means that the panel can not have a size of its own. So how can we eat our cake and have it?
The answer is, at least to me, some form of black magic (sacrificing a goat might also help, not sure, we only tried with sheep): You set the minimum width and height of the panel to 100% and you have a second element inside which has an actual size, like this:
Panel, minimum-height: 100%, minimum-width: 100%
Canvas, height: 500px, width: 500px
Child, absolute position
Child, absolute position
All children will be added to the canvas instead of the panel itself. This means that the panel will always be the size of the parent but still has its own size dictated by the size of the canvas. The size of the canvas is updated at every layout pass with the values calculated from the children. As this wasn't confusing enough, we had to make sure that certain children behave correctly, for example the TabSheet would only recalculate its size correctly if it was set to 100% on the server side. But Vaadin has some server side checks which make sure that you can't set the size of a component to 100% if the parent (or some parent in the chain) hasn't an absolute size. I have to say that this took some time until I figured that one out. The workaround for this last bit is quite ugly but works, simply set the size of the panel to Float.POSITIVE_INFINITY and PICAS, and then override beforeClientResponse(boolean) and set 100% hardcoded into the state. This disables the Vaadin server side check completely. Additionally we also included and provided a mechanism to allow the server side to set minimum, preferred and maximum sizes for each component, as most people will know from Swing.
The last bit was the positioning of the elements themselves, which was surprisingly easy to do after all these little obstacles had been overcome.
The latest nightlies of JVx are already containing this new FormLayout, which can be activated by setting a property on the factory.
Vaadin, the new Panel and Layouts
As an extension to the work on the FormLayout, we experimented with creating a panel which does accept a layout, just like in Swing. With most of the hard work already done during the rewrite of the FormLayout we could start quickly with a solid base. Implementing the panel itself which does accept a layout and does forward all layout operations to that layout was quickly done, this panel together with the layouts can be found in Vaadin package, as pure Vaadin classes.
The new LayoutedPanel does work very simply: It gets a layout set and all layout operations are forwarded to that layout. The layouts themselves only need to handle constraint creation and how the components are positioned on the client side. A very simple and nice solution.
However, integrating this new Panel into the Vaadin implementation for incorporation into JVx proofed to be difficult. The constraint that it is possible to switch between the old and new panel is necessary to guarantee that already existing applications are not broken, but exactly this became a difficulty. The Vaadin implementation assumes from the first moment that the layout implementations are Vaadin components, which they no longer were. Normally you'd do a big rewrite to change these underlying assumptions, but that was out of the question...a tough nut to crack. In the end we had to postpone any further work on this for a more important project.
On the upside, we've come very, very close to be able to implement the layouts independent of the UI implementation, which means that we will only have the logic ones, not duplicated anymore. Of course this needs some more thinking and work, but I'm very confident that this is actually going to happen.
Office customization
One of the things that I find important is that I feel comfortable in the office and at my workplace, I'm going to spend well over 8 hours a day there so I might as well enjoy the time. Luckily, here at SIB Visions quite relaxed rules are applied when it comes to what is allowed in the office and what is not. Giving me free reign over the decorations in the office made me wish that I would have more walls than just three to put things on.
That is also how our eTV came to be, it was hard to find something for the space between the doors, as most of the time half of the wall would be covered by the door. A TV which would display something seemed like a logical choice here.
And for those of you wondering what we're doing the whole day, here is a timelapse video of nearly a whole week:
A week @ SIB Visions
The look ahead
That was quite an eventful year, a lot of smaller but very interesting projects. What does the future hold? Well, it for sure ain't going any slower, that I can tell you.
Thanks to everyone at SIB Visions for this wonderful year, I'm looking forward to another awesome year with all of you!
Already at the beginning of this year we started to improve the support for Lambdas in JVx. Now with 2.4 only a few days away, I'm happy to announce that we managed to improve it dramatically! Our events are now supporting basically every method which you can imagine as handler.
But let's not get ahead of ourselves, shall we? As most of you know, our own event handler scheme had support for basically five different variations of listeners:
publicvoid doActionA() { // A simple method with no parameters. }
publicvoid doActionB()throwsException { // A simple method which can throw *any* exception. }
publicvoid doActionC(UIActionEvent pActionEvent) { // A method with the correct signature. }
publicvoid doActionD(UIActionEvent pActionEvent)throwsException { // A method with the correct signature which can throw *any* exception. }
This scheme allows us to wire up basically any method to the event, and even to wire the same method to different events. Behind the scenes there is some reflection magic going on which I won't describe here, but with Lambdas entering the stage this changes quite a bit. The good thing about Lambdas is that they are fitting neatly into the already existing interface structure, so you can replace any interface implementation which has only one method with a lambda.
privatevoid doActionA(UIActionEvent pActionEvent)throwsException { // The correct implementation. }
But if you wanted to use a method without parameters you were out of luck until now, because listener interfaces always expect a parameter. With 2.4 there will be a new interface, called IRunnable, which provides a method which does not accept any parameter and can throw any exception and the EventHandler will also accept listeners which implement this interface. That means that the scheme outlined above is now fully possible with lambdas.
privatevoid doActionA() { // A simple method with no parameters. }
privatevoid doActionB()throwsException { // A simple method which can throw *any* exception. }
privatevoid doActionC(UIActionEvent pActionEvent) { // A method with the correct signature. }
privatevoid doActionD(UIActionEvent pActionEvent)throwsException { // A method with the correct signature which can throw *any* exception. }
And more good news, did you notice that the visibility of these methods changed from public to private? With the new Lambda scheme these methods no longer need to be public, they can have any visibility and will still work as intended.
So JVx 2.4 is the release when it comes to Lambda support, and everyone who has the possibility to already use Java 8 can now enjoy full support for them.
The first of the two major changes are that we fixed possible exceptions that might be thrown by JPAStorage.getEstimatedRowCount(ICondition), it should now work under all situations.
The second change is the handling of foreign key columns. Previously, foreign key columns where named with the pattern "REFERENCEDTABLE_REFERENCEDCOLUMN", which can lead to collisions if there is more than one column referencing the same table and primary key. So it was possible that you would end up with two columns with the same name, which of course can't be handled by the storage and databook correctly. We devised a new naming scheme and from now on the foreign key columns are named with a combination of the referencing column and the referenced column.
An example:
@Entitypublicclass A {
@Id privateint id; private B source; private B target;
// Getters/Setters }
@Entitypublicclass B {
@Id privateint id; privateString name;
// Getters/Setters }
With 1.1 the generated columns would look like this, for entity "A":
ID BigDecimal
B_ID BigDecimal
B_NAME String
B_ID BigDecimal
B_NAME String
And with 1.2:
ID BigDecimal
SOURCE_ID BigDecimal
SOURCE_NAME String
TARGET_ID BigDecimal
TARGET_NAME BigDecimal
This is definitely an improvement!
The bad news
There is always a downside
The changes in the foreign key column naming scheme, to avoid collisions, also mean that most foreign key columns do now have a different name. You'll have to check your code for usages of the now differently named columns.
This is an extremely simplified model for airline flights.
There is an aircraft that can be used, airports that can be flown to and from and the flight itself. Flight is referencing both, the aircraft and the airport. Now we only need to tell JPA about these classes by placing a persistence.xml in the META-INF directory, like this one that we use for our unit tests:
Great news for everyone who uses, or plans to use our Eclipse plugin called EPlug, a new version is available! Version 1.2.0 brings a whole truckload of new features and bug fixes.
Changes (Pro and VisionX)
Completion for resources is now more reliable
Sped up the time it takes for VisionX to reload a file if a change was made in Eclipse
MetaData changes are now properly handled
When selecting from VisionX to Eclipse it will be made sure that the server and client class both show up
Added the "Checkl File (EPlug)" command, which allows to easily re-run all checks on the current file
The hyperlinks for server calls/actions are now "fuzzy", which means that if there is no function with that signature, the next best function will be the target
Improved the error messages if there was a problem when checking databooks
Added completion for generic resources, which means you now can get completion for any resource in your project
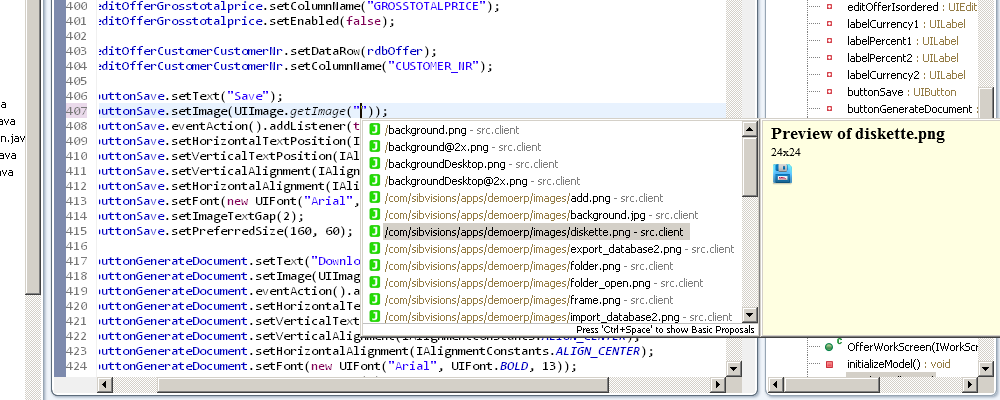
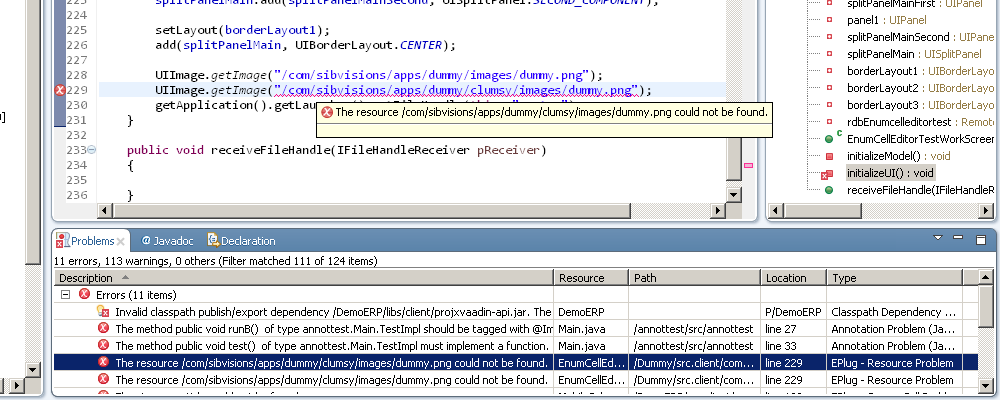
The call to UIImage.getImage(String) is now checked at compile time if the resource exists
By default, databooks are now checked while you're typing for instant feedback. This can be disabled in the project properties
Added a view that displays all databooks in the current file, including column name and type
Added support for the constructor of UIEditor
Dramatically increased the speed of compile time checks
Eclipse Mars
Also we have tested and developed EPlug with Eclipse Mars, which means that you can use it in the latest and greatest Eclipse release version. Of course we haven't dropped support for older versions, EPlug should continue to work even on Eclipse Juno.
Since last year we are offering an Eclipse Plugin that integrates the JVx workflow into Eclipse. Now that EPlug 1.2 has been released, we believe it's long overdue to give you a guided tour of the experience that EPlug is offering.
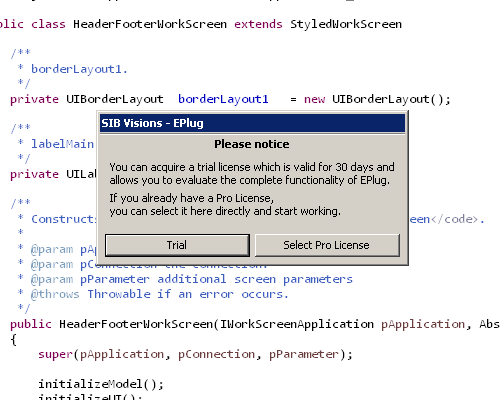
Trial
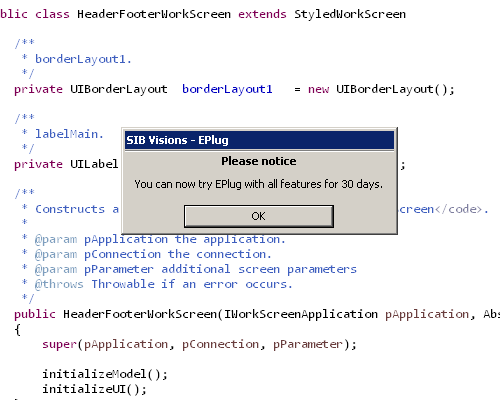
We offer a free trial period so that you can test EPlug without any problems. The first time you start Eclipse with EPlug you will be asked if you'd like to only test EPlug, or if you'd like to select an already purchased Pro license.
When clicking the Trial button, a new trial license will be issued and you'll be able to evaluate EPlug with all features for 30 days.
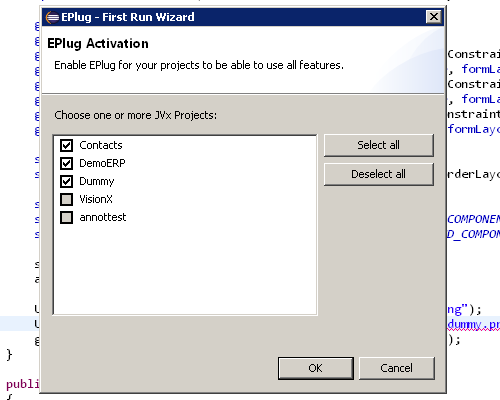
'First Run' Wizard
One of the biggest usability improvements compared to previous versions is discoverability of how to use and activate EPlug. With the new version we have added a "First Run Wizard" which allows to directly activate EPlug on selected projects.
Usage
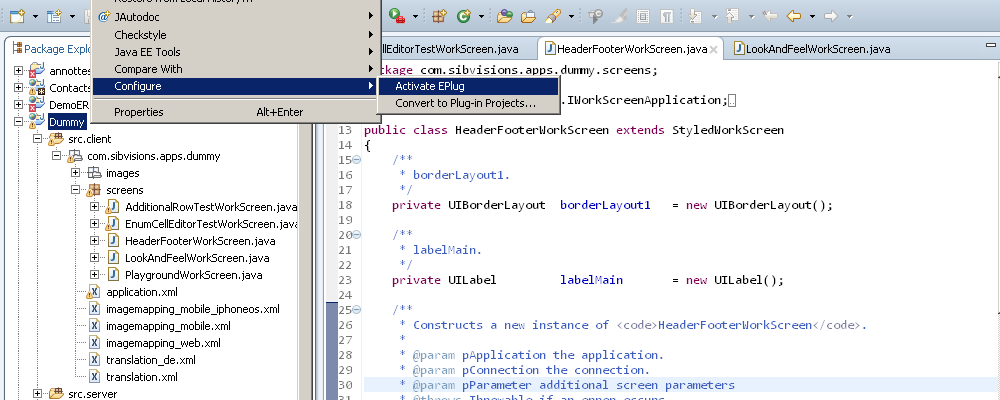
EPlug integrates seamlessly into Eclipse, but to use most of its features it has to be activated on each project you want to use it with. This can be done in the previously shown First Run Wizard, or by right-clicking a project and selecting "Activate EPlug" under "Configure".
From there on you will be able to use code completion, compile time checks and all the other features on this project.
Better and extended commands
A handful of commands are added by EPlug, which make it faster to navigate in JVx projects.
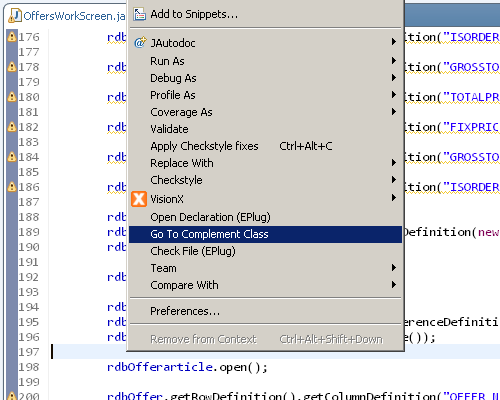
Go to complement class
It's often the case that you want to go from the server to the client class, or from the client to the server class. Most of the time in Eclipse this involves expanding trees and looking for the correct class in the Package Explorer. That is why we've implement the command "Go to complement class", which enables you to quickly jump from the server to client, or the other way round.
As you can see the command is available from the context menu, but you can also bind it to a key in the "Keys" preferences.
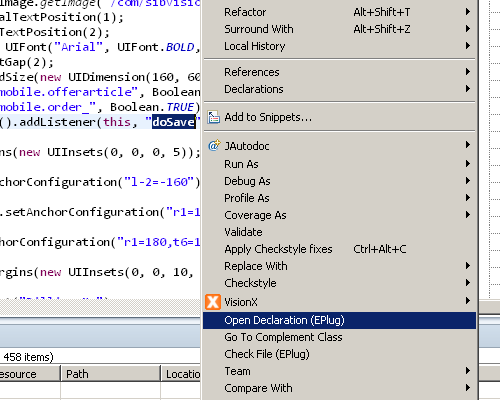
Open Declaration
The "Open Declaration" command, sometimes known by its key binding "F3", allows you to jump to the declaration of whatever is currently under the cursor. We've extended this command with the possibility to jump to the declaration of event handlers (actions), server methods and storage's. If the item underneath the cursor is not handled by our extension, the default "Open Declaration" command will be invoked.
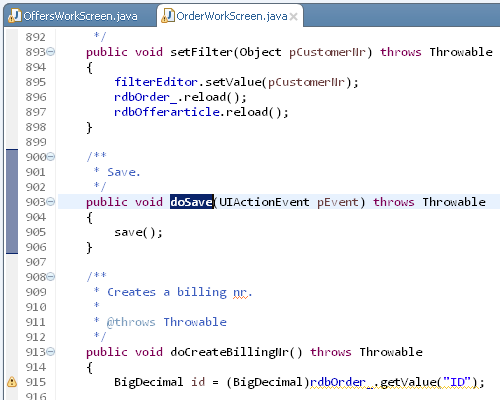
The declaration:
Because we've extended the "Open Declaration" command, you can bind the "Open Declaration (EPlug)" command also to "F3" and enjoy faster navigating in your JVx files without any downsides.
DataBooks
The biggest and most important feature of EPlug is its support for data books. EPlug offers code completion, compile time checks and more for column names on remote and local data books.
Code completion
Everytime you want to get or set a value, or wire up an editor you will receive code completion suggestions with all column names that are in the databook, it doesn't matter if those are remote or added locally.
Compile time checks
Of course we also added compile time checks, which means that you can never mistype a column name ever again.
With the newest version, these compile time checks are even active while you type!
Text hovers
When hovering above a column name, a simple text hover will inform you about the type of the column.
Storage support
RemoteDataBooks require to have the correct name set so that the server side storage is found, of course we do also offer code completion, compile time checks, text hovers and hyperlinks for this.
The DataBook View
And last but for sure not least, with the newest version a feature has been added which I've been looking forward to for quite some time: The DataBook View. A view similar to the Outline view, which displays all databooks in the current file and all of its columns.
Actions/Events and server calls
Support for actions, events and server calls is the second big EPlug feature. For events and actions we support a very Lambda-like system that uses reflection and strings. Obviously the compiler was never able to understand this system and provide feedback or support for it, but with EPlug this has changed.
Code Completion
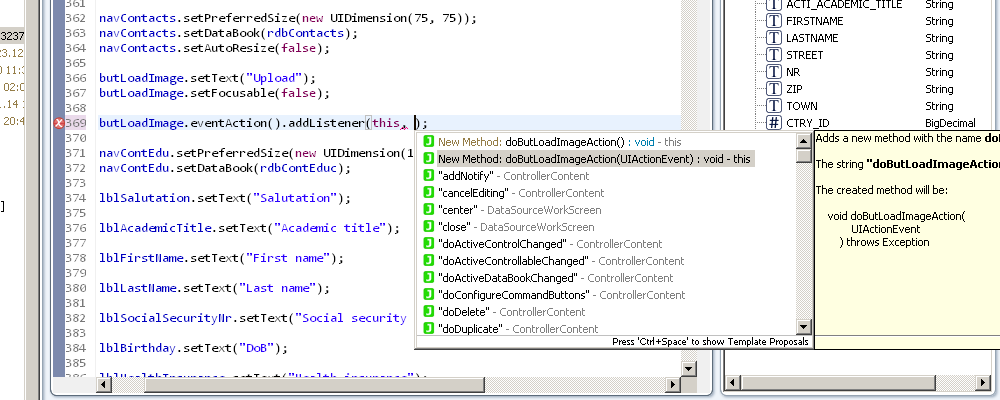
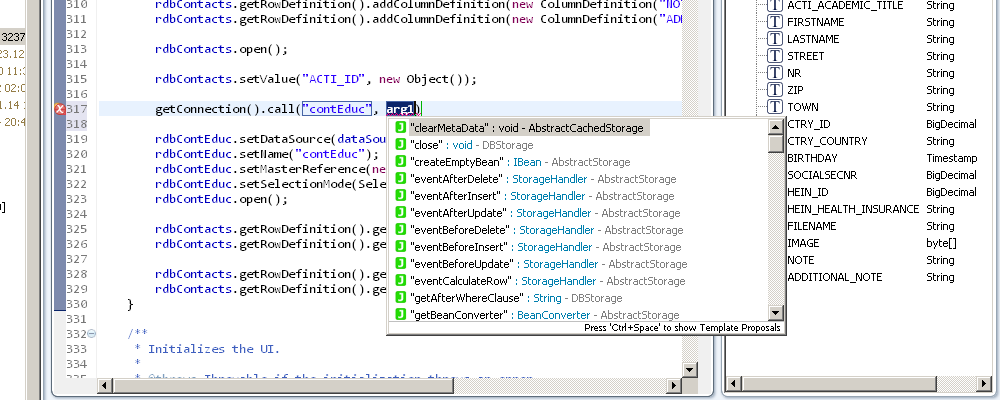
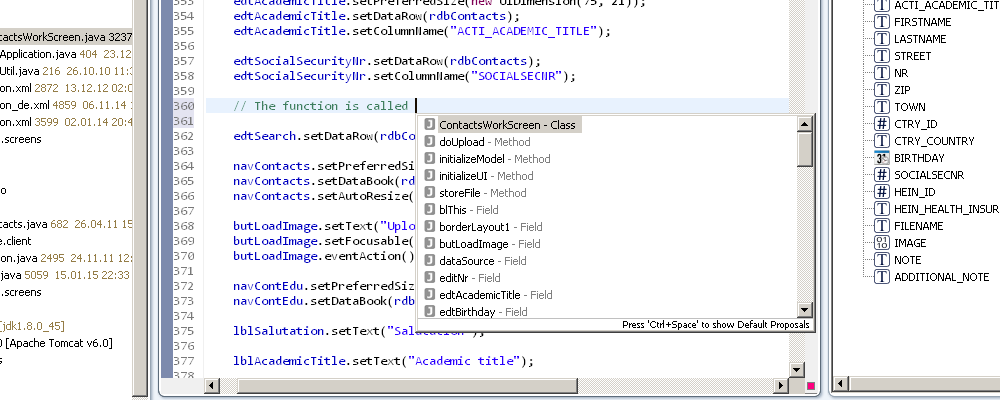
Whenever you want to wire up an event, you'll now receive code completion for all fitting methods in the used class.
Action methods:
Remote calls:
As you can see in upper image, we also provide a fast and convenient way to create methods if necessary.
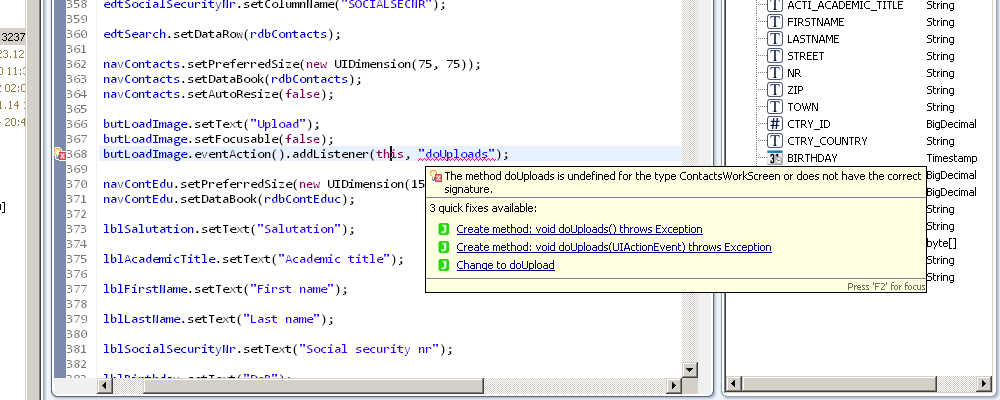
Compile time checks
During compilation the actions, events and server calls are checked for their correctness, and if there is a problem it'll be reported to you.
You can also see the quick fixes for this problem, which do not only offer to create the missing method, but also suggesting methods with similar names in case a typo happened.
Text hovers, hyperlinks and refactoring support
Additionally EPlug provides text hover and hyperlink support, that means that you can now jump to the methods by using your mouse (Ctrl+Left Click) or the "Open Declaration (EPlug)" command. Refactoring support has also been added, which means that you can now rename action/event handlers without having to manually search for all uses and change those.
Resources
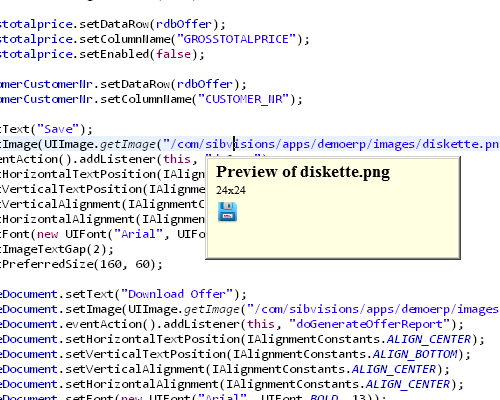
Dealing with resources can often be a pain in the neck, especially if you constantly have to look up the path and check if you're now using the correct image. Because we also felt these pains, we've added functionality to EPlug to make sure that working with resources becomes easy and painless.
Support for UIImage
Whenever you use UIImage methods, you can now enjoy code completion, previews of the images and compile time checks.
Preview:
Compile checks:
Generic resource completion
For all other resources, we do only offer a "generic" code completion system and no preview. Still, this is a huge help.
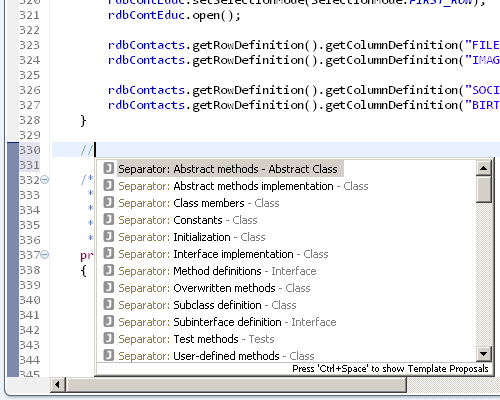
Comments
One of the more simple and not so obvious features of EPlug is that it allows to have code completion of the current class in comments, and also provides the JVx category separators.
Separator:
Action/call completion in comments:
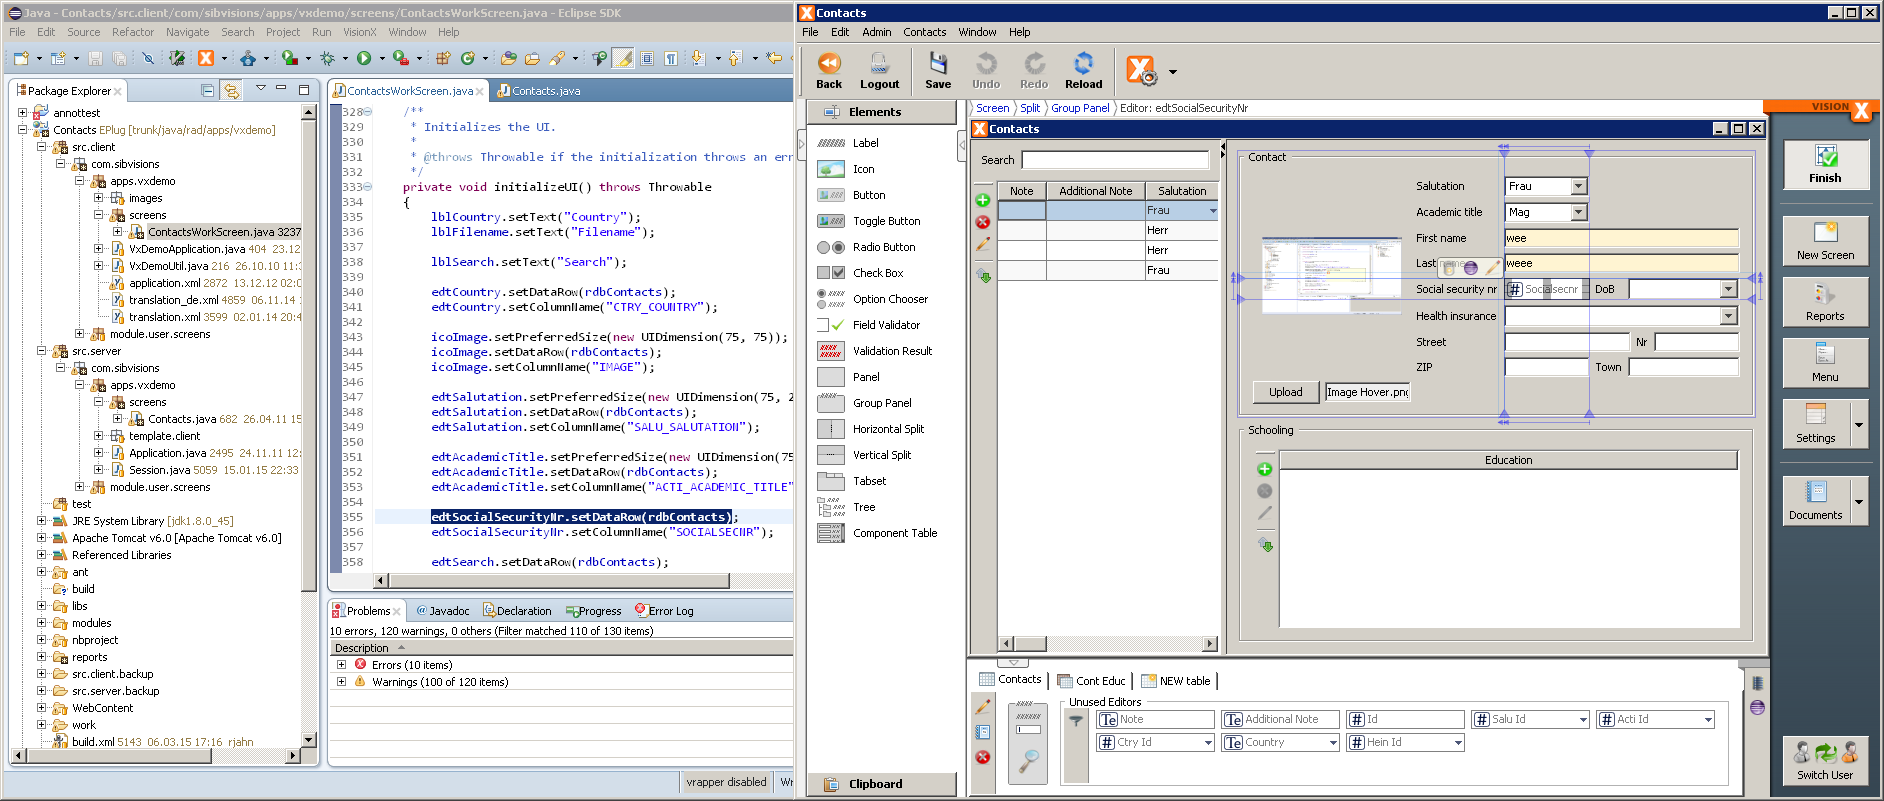
VisionX support
Now we've arrive at the big final, support for VisionX. For all of you who do not know VisionX, it is our product for rapidly building applications from scratch or migrating already existing systems. It allows to build GUIs and the respective database backend within a matter of minutes. Even though VisionX allows you to build whole applications, from time to time you'll want to do something by hand and this is the great thing about VisionX, all projects and applications are automatically and by design already Eclipse projects. So all you need to do is import the project into Eclipse and start working on it. To improve this workflow further EPlug does offer various features.
Selection synchronization
The selection in Eclipse and VisionX can be automatically synchronized, so that whatever you're working on in the one application is also visible and selected in the other
Automatic applying of changes
VisionX will also automatically refresh its current view if you change a sourcefile in Eclipse, allowing to rapidly and verify changes in a workscreen without the need to manually reload the workscreen.
How and where to get it?
EPlug comes in two flavors, EPlug for JVx and EPlug for VisionX, both are available from the Eclipse Marketplace and can be installed and used freely for 30 days. Afterwards a license is necessary to keep using all features.
The first day at SIB Visions was filled with getting familiar with the JVx application framework, including a crash course through the complete architecture of it. I have to be honest here and say that I have maybe understood half of what I was told, but it was an awesome and extremely useful overview over the framework.
Right after that I made myself roughly familiar with the framework by looking through the code, I got assigned my first tickets, simple feature requests and bugs, easy enough to do. The next weeks I read through quite many areas of the codebase and learned to navigate through it. Nothing too exciting.
FMB Importer - Oracle Forms to JVx
The first really big task I was assigned to was writing an FMB importer from scratch. In case you don't not know what FMB is, it is the file format used by Oracle Forms Builder to save the created forms. It basically comes in two flavors, binary and XML. The goal was to be able to import a form created with Oracle Forms Builder directly into VisionX, preserving as much information as possible and making the migration of the GUI as seamless as possible.
Reading the XML file is easy, processing its content not so much. The concepts of JVx UI and Oracle Forms UI are quite different. In JVx the controls are forming a tree structure/hierarchy, with the inheritance dictating the size and location of a control. Oracle Forms uses a coordinate approach, with each control knowing its exact coordinates and size on the form. This can be clearly seen in the following picture:
On the left is the JVx control tree (Swing), on the right the Summit example in Oracle Forms Builder, the XML format looks quite the same as the view in the designer. After some trial and error, I decided to take a two step approach to converting this structure:
Convert the XML nodes into custom objects and place them in a tree structure.
Convert the custom objects to JVx classes and perform the layouting in this step.
Step 1 starts rather easy, I encapsulated the XML nodes in a custom class to have a thin interface over them, that allowed me to be able to provide support methods and yet still have all the information of the XML node easily accessible. The tricky part becomes the creation of the tree structure and the conversion to the custom objects, because the controls of the form do not have any sort of structure and are split in two groups, graphical elements (lines, circles, etc.) and controls (text fields, radio button, etc.). The best working solution I found was to create a processor object that does know everything necessary to create the custom objects and also builds the tree structure. That processor starts with the window and finds all canvases that can be on that window, then it finds all controls and graphics that can be on these canvases. From there it recurses through all controls and graphical elements, always finding the children of the current one by checking their coordinates and size. Extremely simplified it looks like this:
function Container createContainer(Object parent)
current = new Container
foreach child on canvas if child is inside parent then if child is container then
current.add(createContainer(child)) else
current.add(child)
return current
"Extremely simplified" might be an understatement, because there are a lot of edge cases that need to be taken into account and you can't treat all elements the same, but basically that's the core principle of the processor. If you also go with naming your functions after what they are doing, don't be surprised if you end up with a function named transformItemNodesOnCanvasOnTabPageInBoundary. In the same step as the creation of the tree is the creation of a custom object hierarchy. I decided against converting them directly into JVx classes, because that would add a lot of logic to the processor and would mix two tasks, creating the tree structure and converting the objects.
Now that we have a nice tree of objects, converting them to JVx classes is easy. Ideally all custom objects that were created in the previous step would inherit from one base, and that base ideally would have a method like toJVxComponent(). With that in place converting the custom objects becomes only a matter of calling root.toJVxComponent() after the tree was generated. Again, the second part of this step is what gets you, the layouting. A lot of trial and error went into this one and while Oracle Forms does only support one layout, coordinates, JVx has multiple:
Pane
SplitPane
BorderPane
FormPane
So we need some form of heuristic approach to determine what layout we will be using for each container based on:
The number of children.
The position and size of these children.
Again, very simplified the approach might look like this:
function Layout determineLayout(Container container) if container.#children == 0 then returnnull elseif container.#children == 1 then return container.firstChildren elseif container.#children == 2 then return SplitPane else return FormPane
Again, this misses quite a few edge cases and optimizations. But now the really hard part is missing, how do we convert a coordinate base layout to a FormPane layout?
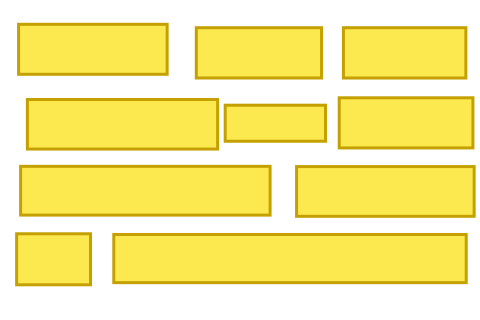
I tried many multiple methods but ended up using a Sweep line algorithm. The basic idea is to have a line sweep from left to right/top to bottom and creating anchors on the go as necessary. We'll sweep from left to right, for example, and create a new anchor everytime we encounter the start of a new element and and element has ended before. Assume the following layout:
We'll sweep from left to right, create anchors and stretch all components to their respective anchors:
Even though the layout looks quite nice already, there are two problems here. First, the second/third and fourth/fifth anchors are empty, they do not contain a component ("contain" as in a component that does start and end in that anchor). So we can eliminate all anchors that do not contain a component.
The second problem are the overlapping components in the middle. We can easily fix that by pushing the components around.
All that is missing now is to two a second pass from top to bottom. So we now have everything in place to import the UI. Of course there are still some parts missing, like data binding and wiring up events. But that wraps up the approach to importing FMB files.
EPlug - JVx Eclipse Plugin
I enjoyed working on the plugin very much. The Eclipse environment was a completely new system to work with and I had never before written a plugin for a development environment. After the basic functionality was determined, I set to work and made myself familiar with Eclipse. As it turns out, the Eclipse plugin system is quite huge, but once you know the basics it is very easy to use. Every plugin consists of a simple "core" of files:
plugin.xml
Manifest.mf
Activator
The plugin.xml contains all the needed information for the Eclipse runtime to load and run the plugin. Also this is where you register all the extensions you want either to use or provide. The Manifest.mf contains some additional information and the Activator is the main lifecycle class for the plugin. Registering extensions is as easy as implementing the interface required by the extension point and then adding your implementation to the list of the extension point. Your class will be automatically instantiated and used from the class it is registered at.
The first big obstacle was implementing auto completion for various code parts, for example our listeners. As it turned out JDT (Java Development Tools) does only have limited support for it. If you use their parser, you can only have complete lines, it was not possible to get incomplete statements. So we had to rely on internal classes provided by the "JavaCompletionProposalComputer" and the "JavaContentAssistInvocationContext" which also allowed us to get the information needed for incomplete statements.
The other big part of the plugin is launching an application in a container, that allows to extract information about it (like lifecycle objects, server metadata, etc.). That part is quite big and complicated, so let me shortly outline the approach for it:
Create a new Server.
Gather all necessary dependencies for the application.
Create a ClassLoader that contains all these dependencies and inject it into the ObjectProvider of the server.
Create yourself a new session.
Obviously this is only a rough outline, for example there's the security manager. We took the approach to change the configuration of the application on the fly and inject our own security manager that way, which obviously allowed us to do everything within the application. Also our session is a custom implementation that can never expire.
From there it is only a small step to receiving metadata and other information needed to provide auto completion and compile time errors. Speaking of compile time errors, implementing those was as easy as eating a cake. The only two things needed are to register a build watcher, which will be notified of every file that is touched by the build process, and to run the file you want through the parser to receive the AST. Walking the AST is thanks to the visitor pattern very easy and you can quickly select only those parts of the AST that you're interested in.
One of the biggest features we can offer is auto completion and compile time support of DataBook columns. From a technical point of view, the support for RemoteDataBooks is kinda boring, we simply query the server for the metadata. However the support for MemDataBooks was a challenge. Because of the very nature of MemDataBooks, there only were two options to receive the needed MetaData:
Run the code and extract the needed information.
Parse the code/AST.
The first possibility got axed extremely quickly, as it would be too hard, if not impossible to do it in a sane manner. So we ended up with parsing the code/AST directly for any information about the MemDataBook which we tried to provide support for. This is a tedious work, as you basically have to consider all the permutations of creating a MemDataBook and everything related with it, for example the following code:
If we now need to get the metadata for this MemDataBook, it would be roughly the following steps:
Find the variable that contains the MemDataBook.
Find the declaration or last assignment of that variable.
Find all usages of that variables.
Get all values from the .getRowDefinition().addColumnDefinition calls.
This is quite some work and that does not take into account that the row definition might be put into a variable, or might be provided by a different variable altogether. In the end, it comes down to implementing all the edge cases that you run across, and I think we did that very well.
Also we had to create a few GUI forms with SWT and I have to say that it is very good.
I'm looking forward to return to this project for the 1.2 release and implementing even more awesome features and doing some refactoring on the components I did not quite get right the first time.
GUI Tests - Stress testing Vaadin and automating JVx applications
I was looking forward to this research project. I was always fascinated with the idea to have GUI unit tests, now I had the chance to actually do some research on them and implement everything necessary in JVx to make them possible.
After trying different possibilities, including the awesome Sikuli, we settled with AssertJ-Swing for Swing and Selenium for Vaadin. The first rough tests showed that testing was only reasonable possible if we would name all components by default and so we derived a default naming scheme and implemented it. While experimenting with AssertJ-Swing I realized that one important thing was missing from it, the possibility to easily record tests. Selenium already offers a simple recorder for most browsers, which simply records all events and exports them in the correct format, however AssertJ-Swing does not have such a facility unfortunately.
Swing itself is build on top of AWT, which allows to register a global event listener by using the Toolkit which means that one can see all events that are happening, which itself makes it rather easy to record these events and put them in an easy to use format. The format in our case would be Java code that can be copied and pasted into our test cases. To have a reasonable layer of abstraction, the recorder would filter and prepare the events and forward them to a "plugin" that is able to omit Java code. With this facility in place it was easy to record tests for Swing, however replaying them was not so easy at first. AssertJ-Swing has very concrete requirements when it comes to how it is launched and JVx has its own ideas regarding that. The solution to this was to derive a test harness, which would manage both, the AssertJ-Swing setup and also the start of the JVx application. The unit tests would then simply extend said test harness and would be able to launch the application on their own, executing the test case and then shutting it down again. This worked extremely well and we were even able to record and replay test cases for VisionX with ease.
These experiments have shown that it is very easy to perform automated GUI tests on JVx applications, no matter if Swing or Vaadin is used as frontend. The created code during these experiments is not public at the moment, as there is still quite a lot to do and it's in dire need of some refactoring. But I'm very confident that we will be able to return to it and one day provide you with the tools to easily create automated GUI tests for JVx.
JavaFX - Thee shall be my nemesis
JavaFX has been in the works for quite some time now and has been coming along greatly. It was overdue that JVx does support JavaFX as a frontend and with the beginning of this year the work started to make that happen.
Event though JavaFX has been coming along greatly, it is still quite rough around the edges and contains bugs that we needed to work around and some missing features. Currently we are monitoring over 40 requests in the bug tracker of JavaFX that are either directly or indirectly related to our JVx implementation, a little less than half of these were reported by us. Those span little bugs to quite big feature requests, some more critical than others.
One of the biggest missing features was the missing MDI system, which we simply need for ERP applications. There is RT-22856 which is concerned with creating such a system, but that hasn't moved in quite some time and so we set out to create our own. Our efforts are quite well covered by the blog post I linked to above, we managed to come up with a very nice implementation:
The FXInternalWindow can either be used with or without a desktop pane. They might as well live in a normal Pane (or any other).
The content of internal windows is not limited in any way (you could also nest another desktop pane into it).
The FXDesktopPane does offer various convenience features, like a pluggable window manager system.
Implementing a new and custom window manager is a breeze, there are already two implementations provided by us: The FXDesktopWindowManager and the FXTabWindowManager.
But the MDI system is not the only system or control that we created to aid in our implementation of JVx on top of JavaFX, there is a long list of controls that were created by us:
But one thing that really drove me up the wall several times was the usage of the "final" keyword and "package-private" modifiers. Multiple times problems could have been easily solved by overriding a method, which turned out to be final, or invoking a method or accessing a variable, which turned out to the be (package) private. Good API design dictates that both are used to protect the API from misuse, but for our work on the JVx/JavaFX project, most of the time it stood more in the way than helped. The take away for me personally is, that of course you need to design the API in a way that limits the possibility for abuse, but you also have to allow users to shoot themselves in the foot from time to time, that means that they can experiment and use the API for possibilities it might not have been intended for.
The look ahead
And now we're in the present, phew, what a year! There are already two projects waiting for me as soon as we're done with the first version of our JVx/JavaFX implementation.
I'm looking forward for another year with the awesome people at SIB Visions!
With version 8, Java has received support for lambda expressions and of course also JVx and its users directly profit from this new feature.
In case you do not know what a lambda expression is, it is basically the possibility to inline functions, sometimes also called "anonymous functions" and should not be confused with "anonymous classes", which Java has supported for quite some time now. Let's look at a simple example of anonymous classes:
newThread(newRunnable() { publicvoid run() { // your code } }).start();
This launches a thread that does something. The Runnable in our example is the anonymous class. Now with the new lambda support we don't need to write the interface implementation, but can directly tell it to run a function:
newThread(()->{/* your code */}).start();
The empty parentheses and the arrow indicate a new anonymous function. The parentheses contain the list of parameters of the function that is going to be invoked, in our case it is empty because Runnable.run() does not have any parameters. So the anatomy of a lambda looks like this:
newThread((optional explicit cast to target interface)(parameters)-> {
function body });
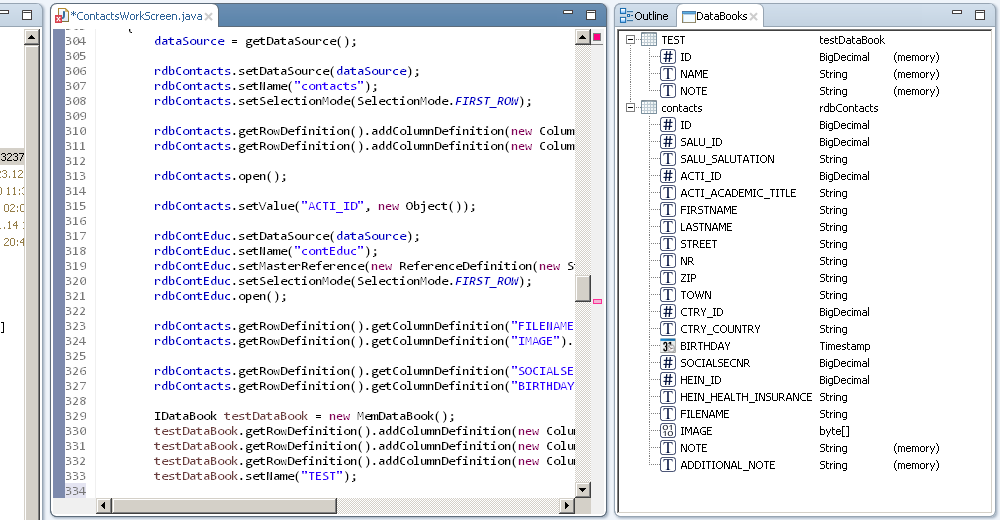
Internally this is still compiled into an anonymous class, but the code becomes a lot smoother and easier to read.
Additionally it is now possible to reference functions directly, like this:
The new lambda feature is backwards compatible and can easily be used in JVx. Here is a simple test window that shows the new lambda expressions in combination with JVx events:
For quite some time there has been the idea in our heads to run a stress test against a JVx/Vaadin installation to see if there are any major problems with performance and multithreading. We knew that Tomcat, Vaadin and JVx could serve a lot of users simultaneously, that's what all three were designed to do, that's what all three do well in many different environments, but we never really tried to stress it out. So we set out to change that.
The plan
Some weeks ago we started discussing and outlining how to perform such a stress test. After some research we came up with a plan:
Design a test case using Selenium for the DemoERP application
If necessary, design and create solutions to allow that
Set up a Selenium Grid which can be used for testing
Perform the actual test and fix anything that needs to be fixed
As simple as it sounds, it had quite some gotchas on the way and taught us some valuable lessons.
Name all the things
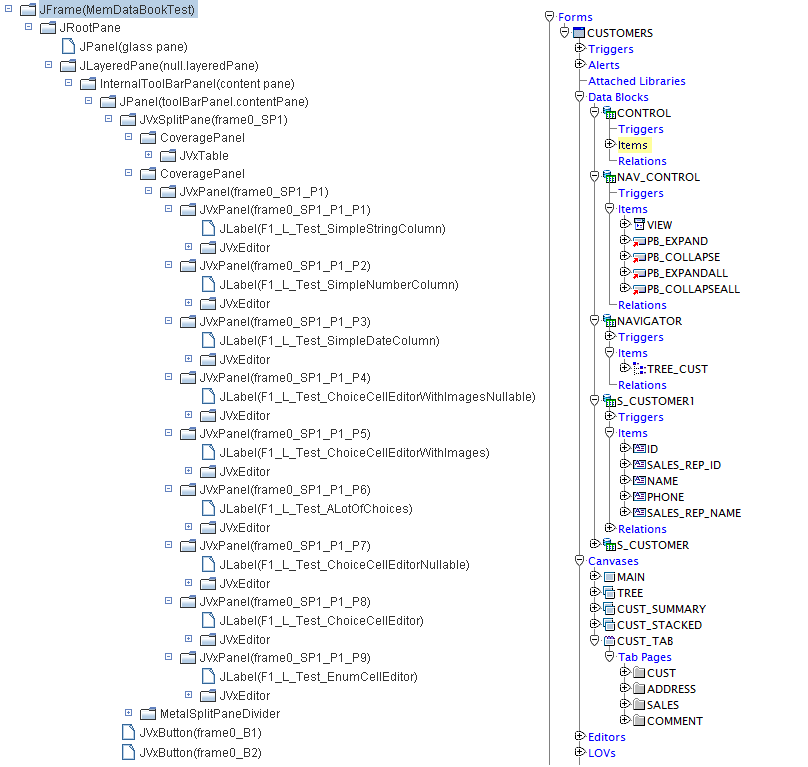
The first thing you need for automated testing are names, components need names so that they are easily identifiable by whatever you're using for testing. Already back in September we started to name components in a unique and easily recognizable fashion, our efforts are covered by ticket #1103. Of course you can still set your own names, if you want that, as the default names will only be applied if no other name is set.
In short, components are now receiving a name based on their position in the component tree. For example take this simple workscreen:
The naming starts with the "root" component and every child component does append it's name. So you can easily guess where a component is assigned to, simply from its name. Every name is guaranteed to be unique, either by its position in the tree or by incrementing a counter.
Additionally there are "special snowflakes" which are getting better names, like the name of a button which is only prefixed with the name of the workscreen and a "B" and then followed by the actions which are assigned to it, e.g.
The button "butUp" will get the name Das-WV_B_DOUP. The prefix Das is the short name for the DashboardWorkScreen, followed by -WV which is like a prefix checksum/number. The letter B stands for Button and the action name DOUP is the last part.
With such a naming scheme in place, it's easy to create automated UI tests as every component is uniquely identifiable in the component tree. In the case of Vaadin the names are also used as ID's on the elements
For everyone who does not know our DemoERP application, it is a simple ERP application which features customer, product, offer and order management together with a nice statistic screen. All this can either be run as Swing application or (powered by a Tomcat Server) as Vaadin application directly in the browser.
The test case that we designed is rather simple:
Load the application website and perform the initial login
Open the customer management screen and add a new customer
Open the offer management screen and search for an offer
Switch to the order of said offer and edit it
Open the statistic screen
Logout
This gives a nice workload for testing, as it touches close to all areas of the application, changes values nearly simultaneous and also adds data with every run. Also note that the testcase would perform these steps as fast as possible, without any artificial waiting in between.
Thanks to the Selenium IDE the test case was recorded within a matter of minutes, and quite fast copied into a unit test. The first round of testing happened with the Chromium WebDriver, which allowed us to watch the test case do its work and make tweaks wherever necessary to allow the test to succeed.
Setting up Selenium Grid
Selenium Grid (or Grid2) is a simple, scalable framework for distributed Selenium tests, allowing to control multiple browsers on different platforms. The central server is called a "hub" and the clients are called "nodes". The nodes are registering themselves at the hub, and from there a client (for example a unit test) can send a request to the hub and it will receive a node matching the requested requirements. On the client side this is happening by simply creating a new instance of a RemoteWebDriver provided by Selenium. It will automatically contact the hub, wait for a node to be ready for it and then forward all commands to that node.
This is useful if you want quickly test an application in multiple browsers on multiple platforms without leaving your IDE or to perform a simple stress test.
Setting it up is as easy as starting the hub on one machine, and starting the nodes on any other machines. We decided to go with PhantomJS as browser, as we intended to run many instances of said browser on one node and we also had a wide variety of machines, some without a GUI. PhantomJS does already have it's own built-in node, so we just needed to start PhantomJS on the machines and tell it where it can find the hub.
At the end of day we had 12 physical machines in place and we maxed them out to get a total of 82 nodes which can be used for our stress testing.
Sessions
One thing we noticed very quickly was that lingering sessions can be a real issue and the timeouts really need to be tailored to your environment. While testing we quickly noticed that sessions kept lingering on, this was less an issue for the server and Tomcat, as more for our MariaDB installation because at some point it simply stopped accepting new connections. So we needed to reduce the amount of time a session would linger on to not clog our test server.
There are two important settings controlling the amount of time a session will linger on in such a setup:
As said, these settings should be tailored to whatever environment the server is running in. In our test environment it didn't make any sense to keep sessions longer than a few minutes, because if the test case ended or was interrupted for some reason, the session would not resume. Armed with that knowledge we reduced the amount of time a session could linger on and we could finally start the real test.
Running the test
The server in our case would be a rather unspectacular laptop, with a Core-i7 (1.80GHz) and 16 GB of RAM. Tomcat 6 would deliver the application and the data would be provided by a local MariaDB/MySQL database (with an InnoDB engine).
The test itself, which ran several times for several hours, was rather boring to be honest. 82 clients swarmed the server as fast as it could answer requests without any noticeable effect on it's performance. The laptop, despite not being the typical server machine and for sure not intended as such, could easily handle the load that 82 clients produced. We did expect the application to stay in a usable state, however we did not expect that it wouldn't have any noticeable effect at all from a users perspective.
CPU peaked at 60%, but stood most of the time between 40% and 50%
Tomcat peaked at 4GB RAM, but would have been able to work with as little as 2GB
Over 21.000 datasets were created during the test run
The GUI was not noticeably slower during the test
Our setup could handle that amount of requests with ease. Unfortunately we could not get a hold of more machines to add further nodes for now.
We broke it, we fixed it
During the tests two nasty looking issues stood out, which kept happening in roughly 1% of all test runs with seemingly no pattern behind them.
The first was a simple NullPointerException which kept happening in UIImage, but that was fixed rather easily as certain methods where not synchronized and so destined to fail.
The second was a set of Exceptions which send us to our toes: NullPointerExceptions, "Object 'offer' was not found" and "Remote storage returned 15 value(s) but 22 were expected". Clearly there was something very wrong, and with the low volume with which these exceptions occurred, it could only be a race condition somewhere. Looking for possible causes send us to all corners of the codebase without any clue in sight what might cause them.
It only dawned upon us when we got a hold of the map which did not contain the object "offer", it only contained the objects "v_statistic_order_offer_year" and "v_statistic_order_offer_month". Looking at the lifecycle objects immediately showed the problem, the session did have a completely different lifecycle object. That did also explain the wrong amount of values, as two lifecycle objects happened to contain identical named objects. But how was that possible? We immediately checked the complete source code associated with creating a session, and in AbstractSession we found the culprit. Even though the complete code for creating a session was properly synchronized where necessary, one simple statement had slipped past:
For everyone not seeing the problem, here is a simplified explanation. If an object is instantiated, the fields are initialized even before the constructor is run, this is not and can't be directly synchronized. A simple increment operation (++) is compiled to six operations:
Load a reference to a variable onto the stack
Put into that reference the value of the static field (in our case lSessionCount)
Put the value "1" onto the stack
Add both values on the stack together
Duplicate the values
Put the new value into the static field
Six instructions, a lot of time for two threads to overtake each other and cause problems. Instantiating two sessions at once had the potential to give both the same ID. Of course we immediately fixed it and applied some other optimizations.
Another run verified that this had fixed all three issues at once and the tests were running without any further incidents for hours.
Conclusion
We were not even close to pushing the limits of what a JVx application/server can handle, and judging from the performance of the server I can only call our test setup "humble". Still it gave us a good measure of what is for sure possible and showed us that we need a bigger setup to really push the limits.
During the tests we also created various utilities to aid us with testing, unfortunately they are in a rather barebone state and can not be released by now. Also there is now a more important project awaiting, one that we think you've been waiting for for far too long.


 RSS-Feed