Let's talk about DataBooks, which allow access to data without any effort.
What is it?
DataBooks are an active model, which allow you to directly query and manipulate the data. Contrary to many other systems JVx does not map the data into objects, but instead allows you to directly access it in a table like fashion, exposing columns, rows and values.
One could say that it is like a three dimensional array, with these dimensions:
DataPages
DataRows
Columns/Values
With DataPages containing DataRows, which itself contain the values and everything is referencing the RowDefinition, which outlines how a row looks like.
RowDefinition
The RowDefinition defines what columns are available in the row and stores some additional information about them, like the names of the primary key columns. You can think of the RowDefinition as the headers of a table.
Its creation and usage is rather simple, and if you're working with RemoteDataBooks there is no need to create one at all, as it is automatically created when the DataBook is opened. A RowDefinition holds and manages ColumnDefinitions, which define the columns.
The ColumnDefinition defines and provides all necessary information about the column, like its DataType, its size and if it is nullable or not. You can think of it as one column in a table.
ColumnDefinition columnDefinition =new ColumnDefinition("NAME", new StringDataType());
columnDefinition.setNullable(false);
MetaData
Most of the ColumnDefinition is additional information about the column, like if it is nullable, the label of the column, default values, allowed values and similar information.
DataType
Of course we must define what type the value in the column has, this is done by setting a DataType on the ColumnDefinition. The DataType defines what kind of values the column holds, like if it is a String, or a Number or something else. We do provide the widest used DataTypes out of the box:
BigDecimal
BinaryData
Boolean
Long
Object
String
Timestamp
It is possible to add new DataTypes by simply implementing IDataType.
DataRow
The DataRow repesents a single row of data, it holds/references its own RowDefinition and of course provides access to the values of the row. Accessing the DataRow can be done either by column index or column name, and the methods do either return or accept Objects. Let's look at a simple usage example:
DataRow dataRow =new MemDataRow(rowDefinition);
String value =(String)dataRow.getValue("COLUMN_A");
dataRow.setValue("COLUMN_A", "New Value");
DataPage
The DataPage is basically a list of DataRows, it also holds its own RowDefinition which is shared with all the contained DataRows.
The main usage of DataPages is to allow paging in a master/detail relationship. If the master selects a different row, the detail databook does select the related DataPage.
DataBook
The DataBook is the main model of JVx, it provides direct access to its current DataPage and DataRow by extending from IDataRow and IDataPage.
By default, the DataBook holds one DataPage and only has multiple DataPages if it is the detail in a master/detail relationship.
Usage example
Here is a simple usage example of a MemDataBook, an IDataBook implementation which does only operate in memory:
IDataBook dataBook =new MemDataBook();
dataBook.setName("test");
dataBook.getRowDefinition().addColumnDefinition(new ColumnDefinition("ID", new LongDataType()));
dataBook.getRowDefinition().addColumnDefinition(new ColumnDefinition("COLUMN_STRING", new StringDataType()));
dataBook.open();
One of the major advantages of the DataBook concept is that there is no need to create new classes to represent each table, view or query result. One can always use the DataBook, directly and easily and model changes don't necessitate changes on the client side. The downside to this approach is that we lose compile time checks because we access the data dynamically. However, This can be mitigated by using EPlug, an Eclipse plugin which provides compile time checks and many more features.
No primitives, Objects only
We do not provide overloads to fetch primitives, that is because there are mainly three types of data inside a database:
Numbers
Text
Binary Data
Text and Binary Data are both objects (arrays of primitives are Objects after all) and Numbers are either primitives or Objects. Most of the time if we deal with numbers inside a database we want them to be of arbitrary precision, which means we must represent them as BigDecimal. Supporting double or float in these cases would be dangerously, because one might write a float into the database which might or might not end up with the correct value in the database. To completely eliminate such problems, we do only support Objects, which means that one is "limited" to the usage of Number extensions like BigLong and BigDecimal, which do not suffer from such problems.
Where are the DataPages?
What is not clear from this example is how and when DataPages are used. As a matter of fact, most of the time there is no need to think about DataPages because they are managed directly by the DataBook, and if used this like there is only one DataPage. Multiple DataPages will be used if there is a Master/Detail relationship defined in which case the DataBook does select the correct DataPage automatically.
Master/Detail
Master/Detail is something that occurs in nearly every data model. It means simply that there is one master dataset which is referenced by one or multiple detail datasets. Or to express it in SQL:
SELECT * FROM
MASTER m LEFTJOIN DETAIL d ON m.ID=d.MASTER_ID;
We can of course express a Master/Detail relationship when using DataBooks. For that we just create a ReferenceDefinition and assign it to the Detail DataBook:
IDataBook masterDataBook =new MemDataBook();
masterDataBook.setName("master");
masterDataBook.getRowDefinition().addColumnDefinition(new ColumnDefinition("ID", new LongDataType()));
masterDataBook.open();
IDataBook detailDataBook =new MemDataBook();
detailDataBook.setName("detail");
detailDataBook.getRowDefinition().addColumnDefinition(new ColumnDefinition("ID", new LongDataType()));
detailDataBook.getRowDefinition().addColumnDefinition(new ColumnDefinition("MASTER_ID", new LongDataType()));
detailDataBook.setReferenceDefinition(new ReferenceDefinition(new Streing[]{"MASTER_ID"}, masterDataBook, newString[]{"ID"});
detailDataBook.open();
Let's assume the following data for illustration purposes:
Now if we select the second row in the masterDataBook, the detailDataBook will just contain the rows with the corresponding MASTER_ID, so 3, 4 and 5.
MASTER DETAIL
====== =================
ID ID | MASTER_ID
------ ------|----------
1 3| 2
S 2 4| 2
3 5| 2
The detailDataBook is automatically adjusted according to the selection in the masterDatabook. Of course this can have an arbitrary depth, too.
Conclusion
The DataBook is the backbone of JVx, it provides a clean and easy way to access and manipulate data. At the same time, it is flexible and can be customized to specific needs with ease.
Let's talk about the basics, how a JVx application starts, works and how the connection strings together the client and server side.
Multitier Architecture
JVx is designed to be Multitier by default. It allows a clean and easy separation of processes and makes it easy to build, maintain and extend applications by separating the client, server and data storage.
Launchers
The following method is a simplified way to launch a JVx application. Normally, you'd use the technology specific launcher to launch the application. These launchers do know exactly what is required to set it up and start the technology and the application. However, covering the launchers is out of scope for this post, so we will review them and their mechanics in a follow-up.
The simplest JVx application: Just the GUI
But first, we will start without anything. The most simple application you can create with JVx is an application which does open a single window and only works with in memory data (if at all). This can be easily achieved by "just starting" the application.
With this little code we have initialized everything we need to create a simple Swing application. Now we can start to create and populate a window with something:
We can start to create and manipulate the GUI, in this case we are building a simple window with a label inside. Last but not least, we make sure that the JVM will exit when the window is closed.
A very good example and showcase for that is the JVx Kitchensink.
That's it. That is the most simple way to start a JVx application. We can use all controls and we can use MemDataBooks without any problem or limitation. And best of all, we can simply switch to another Technology by using another factory.
Anatomy of a remote JVx application
Of course JVx wouldn't be that useful if it would just provide static GUI components. Now, to explain what else is required for a remote JVx application I have to go far afield, so let's head down the rabbit hole.
What you are seeing here is a rough sketch of how the architecture of JVx looks like. Let's walk through the image step by step. We will look at each successive layer and work our way from the database on the server to the databook on the client.
DBAccess, accessing a database
Accessing a database is easy when using DBAccess. All we must do is to set the JDBC URL of the server and connect to it:
As a note, the instance returned by getDBAccess is the database specific DBAccess extension, which does know how to handle its database.
We can of course use DBAccess to directly access the database:
dbAccess.executeStatement("insert into SOME_TABLE values (?, ?);", BigDecimal.valueOf(1), "Some Value");
List<Bean> data = dbAccess.executeQuery("select * from SOME_TABLE");
...or manipulate the database, or query information about the database or execute procedures or do anything else.
DBStorage, preparing the database access for databooks
The downside of using DBAccess is that everything must be database specific. To become database agnostic we must use DBStorage. DBStorage does not care which database it is connected to and can operate on any of them:
We can use this to insert, update, delete and fetch data. Additionally the DBStorage does retrieve and manage the metadata of the table we've set, which means that we can query all column names, what type they are, we can even access the indexes and the default values. Short, the DBStorage leaves little to be desired when it comes to operating on a database.
If we query data from the DBStorage we receive a List of rows. The rows are are either represented as Object array, IBean or a POJO and we can easily manipulate the data, like this:
As one can see, it looks quite familiar to the DataBook, which isn't a coincidence. The DBStorage "powers" the DataBooks on the server side, a DataBook will get its data from and will send its modified data to the DBStorage.
I've been using the DBStorage here as an example, but actually the Storage is not dependent on a database. IStorage can be implemented to provide any sort of data provider, like reading from an XML or JSON file, scraping data from a website, fetching data from a different process or reading it directly from a hardware sensor.
Life Cycle Objects, the business objects with all the logic
Life Cycle Objects, or LCOs, are the server side business objects which contain and provide the business logic. They are created and destroyed as is requested by the client-side and are used to provide specific functionality to the client, like providing functionality specific to one screen or workflow. This is done by RPC, Remote Procedure Calls, which means that the client is directly calling the methods defined in the LCOs, which includes getting the Storages for the DataBooks.
There is also a security aspect to these, as you can permit one client access to a certain LCO but lock out everyone else, which means that only that client can use the functionality provided by the LCO.
But let's not get ahead of our selves, there are three important "layers" of LCOs which we will look at.
Application
The LCO for the application represents the application itself and provides functionality on the application layer. It is created once for the lifetime of the application and this instance is shared by all sessions.
publicclass Application extends GenericBean { }
Session
The LCO for the session represents one session, which most of the time also equals one client connection. It provides functionality which should be session-local, like providing the database connection which can be used.
publicclass Session extends Application { protected DBAccess getDBAccess()throwsException { // Code for initialization and caching of DBAccess goes here. } }
Sub-Session aka Screen
The sub-session, also known as screen, LCO is the last in the chain. It provides functionality specific to a certain part of the application, like a single screen, and provides the storages required to power the databooks and other functionality.
publicclass MySubSession extends Session { public DBStorage getTablename()throwsException { // Code for initialization and caching of DBStorage goes here. } }
Server, serving it up
There really isn't much to say about the server, it accepts connections and hands out sessions. Of course it is not that easy, but for this guide we will not go into any further detail.
Connection, connecting to a server
The connection which strings together the client and the server is used for the communication between them, obviously. It can be anything, from a simple direct connection which strings two objects together to a HTTP connection which talks with a server on the other side of the planet.
By default we provide different IConnection implementations, the DirectServerConnection, DirectObjectConnection, the HttpConnection and the VMConnection. The DirectServerConnection is a simple IConnection implementation which does simply forward method calls to known Objects - without serialization - and is used when the client and server reside inside the same JVM. The HttpConnection communicates with the server over a HTTP connection and is used whenever the client and server are not inside the same JVM. The DirectObjectConnection and VMConnection are used for unit tests.
As example we will use the DirectServerConnection, which serves as Server and Connection. It is used if the server and client reside in the same JVM.
IConnection connection =new DirectServerConnection(); // The connection will be automatically opened by the MasterConnection.
Master- and SubConnections, client-side lifecycle management
The MasterConnection is the main connection which is used to access the server and its functionality. When a MasterConnection is established, a Session LCO on the server is created.
A SubConnection is a sub connection of the MasterConnection and allows to access specific functionality encapsulated in an LCO. When a SubConnection is established, the requested/specified LCO on the server is created and can be accessed through the SubConnection.
DataSource, preparing the connection for the databook
To provide data to the databooks we can use the connection which we've described earlier. However, the DataBook does not directly know about the connection, it expects an IDataSource, which is used as an intermediate:
Of course the RemoteDataSource is just one possible implementation of IDataSource which can be used to provide data to the DataBook.
DataBook, accessing data
And now we are at the other end of the chain, at the databook on the client side. We just need to tell our databook what datasource to use, and we are done.
The name of the DataBook is used to access the DBStorage object in the LCO provided by the datasource. The mechanism for that is a simple search for a getter with the set name.
Interactive Demo
Here is an interactive demo which allows you to explore the connections between the client and server side. The complement classes are always highlighted and you can click on the names of the objects to receive additional information about them.
The JVx application: Manual example
Now that we have seen all layers that make up the architecture of JVx, let us put all of that into code:
// The DBAccess gives us access to the database.
DBAccess dbAccess = DBAccess.getDBAccess( "jdbc:h2:mem:database", "", "");
dbAccess.open();
// We'll insert some data for this example.
dbAccess.executeStatement("create table if not exists TEST(" +"ID int primary key auto_increment," +"NAME varchar(128) default '' not null);");
dbAccess.executeStatement("insert into TEST values (1, 'Name A');");
dbAccess.executeStatement("insert into TEST values (2, 'Name B');");
dbAccess.executeStatement("insert into TEST values (3, 'Name C');");
// For this example we are initializing a DirectObjectConnection, which // does not require a server. // It is designed to be used mainly for unit testing.
DirectObjectConnection connection =new DirectObjectConnection();
connection.put("test", testStorage);
// Perform cleanup of all opened objects here. } }
With this little example we have a completely working JVx application. We provide ways to create most of this out of the box and read most of it from configuration files, so there really is just little code to be written, see the JVx FirstApp as a perfect example for that. So there is rarely any need to write code like this, all you have to do is create a new application and start it.
Additionally, we could combine this long example with the simple one from before to initialize and create a GUI which could use our RemoteDataBook, like this:
// Insert after the RemoteDataBook has been created.
// Set the UI factory which should be used, in this case it is // the SwingFactory.
UIFactoryManager.getFactoryInstance(SwingFactory.class);
As you can see, you always have full control over the framework and can always tailor it to your needs. There is always the possibility to provide a custom implementation to fulfill your needs:
Accessing a not supported database can be achieved by extending DBAccess
Having a different service/way of providing data can be implemented on top of IStorage
Supporting a different connection can be implemented on top of IConnection
And a completely different way of providing data can be implemented on top of IDataSource
You can swap out every layer and provide custom and customized implementations which exactly work as you require it.
Just like that
Just like that we've walked through the whole stack of a JVx application, from the database which holds the data all the way to the client GUI. Of course there is much more going on in a full-blown JVx application, for example I've spared you here the details of the configuration, server, network and providing actual LCOs and similar. But all in all, this should get you going.
My year has been filled with a lot of non-public work, so please forgive me if I cannot go into details on various fronts.
Prototypes
Quite a few customers approached us and asked if we could implement prototypes for their projects, for one reason or another they all ended up on my table, the prototypes, that is. I like working on prototypes, because they allow me to quickly and easily explore new concepts and they have a definitive, narrow scope. Also we can finally use and show off all these cool new features we have built, like the new client-side layouts which we've created for our Vaadin implementation.
In the course of the year I've worked on over half a dozen prototypes for different customers. They all came with their own set of requirements and goals, obviously, and so they were very different to work on. The most interesting part about these prototypes is the vast spectrum of different designs and ideas. I unfortunately can't go into much detail here, but we've created application frames ranging from simple Swing input forms to highly customized Vaadin dashboards and information screens. Further down I'll talk a little more about these concepts and ideas.
Improved MySQL Fetching
Our MySQL implementation did suffer from a major problem, it fetched all records, always. That is not just an inconvenience as you can imagine, it might also lead to OutOfMemoryExceptions and similar problems. So one fine day we sat down and did take a deep look at our possibilities to either mitigate or completely fix this problem. As it turned out, the fix was far simpler and easier to implement than we imagined.
To cut an already told long story short, we are now utilizing the MySQL support to limit the fetched datasets (the LIMIT keyword). Which means that we are not only able to display initial data faster, but also fetching of more rows is now working as one would expect.
As you can see, we can now display initial data a lot quicker than before.
Since the beginning we had trouble to sculpt the Vaadin layouts into the necessary shape to support our ideas about layouts. Over a year ago we started to work an new layout implementations which would operate completely client-side, most of the work was based off earlier work to improve the FormLayout. These new layouts have no logic on the server-side, but instead operate completely client-side only using "hints" from the server. That means that one can implement quite complicated layout logic (like our FormLayout) with ease.
We've implemented a new component, the so called LayoutedPanel, which can have different layouts. It does provide the base component for the new layouts but does not provide any logic itself. Instead it delegates all the layouting logic to layout implementations, that means it basically works the same as the Panel from AWT/Swing. Performing the layout logic on the client has multiple upsides, for example that the actual size of the components is known and that you can do it with a lot less elements.
Let's have a short look at how the usage of the LayoutedPanel looks like in pure Vaadin:
// Assume the following classes: // com.sibvisions.rad.ui.vaadin.ext.ui.panel.LayoutedPanel // com.sibvisions.rad.ui.vaadin.ext.ui.panel.layout.FormLayout // com.vaadin.ui.Label
panel.addComponent(newLabel("Some label"), layout.getConstraints(0, 0));
panel.addComponent(newLabel("On the right side"), layout.getConstraints(-1, 0));
As you can see, it is quite easy to use and works nearly identical to our panel/layouts. Let's take a further look into what is happening on the server and what is happening on the client.
Server
On the server the LayoutedPanel manages the list of components which have been added, what layout is currently in use and the constraints of the added components. There are layout classes/implementations on the server, but they are mere placeholders (so that the LayoutedPanel on the client side knows which layout to use) and provide only limited logic (for example how to write the constraints into the state which is send to the client).
Client
On the client side there is the ClientSideLayoutedPanel, with some basic logic for adding the components to the DOM and layouting, but does otherwise delegate all the work to the current layout. The DOM structure created consists of two divs, the main element and the "canvas" element:
panel
canvas
child
child
child
child
As mentioned in my last years post, the panel must fulfill two seemingly contradicting properties:
It must resize itself to the size of/fill the parent container.
It must dictate its own size.
This is necessary because the panel always must fill the parent, but at the same time it must dictate its own size so that the parent does not collapse if it does not have a fixed size set. The next stumbling block on the road was that the children of that panel would be absolute positioned. That means that the panel itself would not have a size because absolute positioned children are skipped when it comes to calculating the size of an element. Quite complex, but there is a rather simple solution:
panel (width: 100%, height: 100%)
canvas (min-width: 100%, min-height: 100%)
child (position: absolute)
Additionally, the size of the canvas is always set to the same size as the panel, to prevent the element from collapsing. There is of course more logic in place to make it all feasible and usable, but I won't go into any further detail here.
The layouts itself are simple to implement, they have a list of components and the size of the container, and they set the location and size of each component.
Summary
For everyone adventurous and daring enough, the source for the new layouts is available in the com.sibvisions.rad.ui.vaadin.ext.ui.panel and com.sibvisions.rad.ui.vaadin.ext.ui.client.panel packages in the JVx.Vaadin project.
For those who want to give these new layouts a spin in their application, you must simply set a property on the VaadinFactory to enable them:
From that moment on, every layout created will use the client-side layouts. Of course you can always set it to false or true inside your code, to get either new or old layouts.
Swing GridLayout improvements
We've also improved the GridLayout in Swing, previously the Swing GridLayout would show gaps every time it is resized. After some back and forth, we've managed to implement a new way to prevent/fill these gaps. That means that the Swing GridLayout is now distributing "left over space" through out its entirety, instead of just to the last column. This creates a very "organic" feel when it is resized and it is barely noticeable that some elements are a pixel wider than others.
More databases
Hurray! Over the course of the year we've added two new databases to JVx!
SQLite
The first one is SQLite. In case you don't know what SQLite is, it is a simple, lightweight and easy to use database which is embedded into the application which uses it. That means there is no server or connection, not even a different thread for the database engine, there is just the driver which does everything. This is interesting for many reasons, but the main one is to allow embedded applications to use a lightweight database. It also supports an in-memory mode, which means that it never must write the data to any kind of storage.
We've added support for it to allow JVx applications to use it as fast and easy database backend whenever there are either system constraints (little memory or CPU power) or if there is no network connection. It can be easily used, like any other database which is supported by JVx:
// Or in-memory:
DBAccess dbAccess = DBAccess.getDBAccess("jdbc:sqlite:");
dba.setUrl("jdbc:sqlite::memory:");
dba.open();
Because SQLite is designed to be used in embedded applications (or at least embedded in applications) it has quite limited functionality, like no triggers, functions or sequences. But nothing beats the minimal footprint and ease of use it has.
H2
Another database which we now support is H2. H2 is a database written completely in Java, which can be started as a server or embedded into an application directly. Last but not least, it does also support an in-memory mode and nearly most features you got used to when using databases. It can be easily used, like any other database which is supported by JVx:
// Or in-memory:
DBAccess dbAccess = DBAccess.getDBAccess("jdbc:h2:");
dba.setUrl("jdbc:h2:mem:your-database");
dba.open();
Personally, I'm quite excited to support the H2, because it is a very easy to use and yet powerful and flexible database engine. I'm looking forward to use it in projects.
Intern
For the summer we actually had an intern which wanted to take a sneak peek into the world of software development. As it is with interns (at least around these parts), they are young, foolish and shy. What took me by surprise about this one was not only the eagerness with which he set to work, but also the will to learn new things as fast as possible. No matter how much information I threw at him (not literally, though, I was disallowed that, too) in the form of books and short lectures, he seemed to be able to digest and at least follow it, that impressed me very much. With very, very few exceptions ("Did you just fetch a Timestamp from a DataBook as String, parse that String to a Date and then convert it back to a Timestamp?") he was up to speed with Java and JVx in no time and wrote very good code. As I said, I am very impressed with how he held up.
More options to control the errors/warnings issued by EPlug
QuickFixes for misspelled column names
And various more improvements and bug fixes
The most important new feature in this release might be the extended and improved tooltips, which look like this:
For this to work we had to rewrite how tooltips were presented to the user. For those familiar with the Eclipse tooltip system, there is the IInformationControl interface which allows to display tooltips and similar. In previous versions we used an implementation which embedded a HTML renderer into the tooltip. That allowed the clients to have absolute control over the content, but it also meant that there were sever restrictions, for example autosizing the tooltip was tough.
With this version we used a new implementation which uses plain old SWT components and displays well prepared information, like this list of properties. This also has the upside that we now have absolute control over how images are treated, so they are now always fully displayed in the preview:
All that is accomplished by a rather simple system. It's nothing more than a control with an icon (top-left), a title (top) and the content, which can either be an object or an image. If it is an object there are just a few ifs which are determining how to display that information.
What I took away from that was a quite important lesson. The initial implementation tried to be as flexible as possible by using a HTML rendering engine, the new implementation is not as flexible, but has a clear and well defined behavior and does have definitive advantages. So my advice is one that has been repeated way too often: YAGNI, You Ain't Gonna Need It. Start out small, and start building up as the need arises.
In autumn we took another shot at it and improved the import system, so that it now recognizes and correctly imports an even more varied range of forms.
Some of the major changes are:
Better recognition of bound controls
Improved setup of cell editors
Various other layout fixes (for example checkboxes are now correctly size)
And other improvements (for example the table column order is now correct)
Importing a form is still quite because of the outlined differences between Forms and JVx, but I believe that we are on a very good track and the current solution works quite well for a wide variety of forms.
There are now all libraries and starters in place to get it to run
A new sample showing the FontAwesome icons
Improved the StyledTableSample and StyledTreeSample
Various minor improvements and more options
The Kitchensink is an Eclipse project, that means all you have to do is download or clone the source and import the project into Eclipse. With the included launchers you can now start it either with Swing or JavaFX frontend.
We are currently considering to embed a lightweight application server, so that testing the Vaadin frontend also becomes as easy as starting the Swing variant. That would mean that all three major frontends could be easily tested from the Kitchensink, which would be awesome.
Custom components
Some of our customers requested that we build custom components for them, these component should work in Swing and Vaadin in the same way. As I've outlined in a previous blog post, this is actually easily done depending on what your exact use-case is.
One of the most notable examples is a calendar which we've built on the technology layer. For Swing we've used the java-swing-calendar project and for Vaadin the Vaadin Calendar. Unfortunately, Vaadin has discontinued their Calendar for the time being. Anyway, we've implemented the calendar component and also added bindings for the databook to provide events, which was quite straight forward.
I do have to rant about the Vaadin Calendar, though. It does support two sources for the data, the Container interface and a calendar specific CalendarEventProvider interface. As we already had an implementation for a Container, I used that one and adjusted it so that it could be easily used with the Calendar. All fine and dandy, until I started to work with events, which are only providing a CalendarEvent as information on what event is affected. This CalendarEvent has zero information about the model, and I mean zero. There is no way to track the model from the CalendarEvent, you just don't know what event just was clicked or dragged. The only way is to not use a Container and instead use a CalendarEventProvider which returns custom CalendarEvent extensions which know about the model.
Otherwise implementing these components was very smooth.
EPlug 1.2.6
At the beginning of this year, we did some more work on EPlug and we could release EPlug 1.2.6 after a short time:
Cleaned up context menu
Resources (Images, etc.) are now also available from outside the source folders
Even better handling of DataBooks
Some bug fixes and other new features
The updates are available in the marketplace, so Eclipse can automatically update to it.
Out of the work on prototypes for our customers arose the idea to provide quite a few these new ideas to VisionX users in the form of demo projects. We've prepared these demo projects over the last few weeks and they will be released to the VisionX solution store within the next time.
Here is a sneak peek at those:
As said, these demo applications will be available in the VisionX Solution Store.
The look ahead
Wow, that has been an interesting year. A lot of things happened and we made a lot more happen, with even more stuff in the pipeline and yet even more stuff on the horizon. From where I'm sitting, the next year looks very interesting with a lot of new challenges, which we will for sure master.
Thanks to everyone at SIB Visions, it's been an awesome year and I'm looking forward to another one with all of you!
Let's talk about the UI layer, the implementations and the factory that powers it all.
The basics
For everyone who does not know, JVx allows you to write code once and run it on different GUI frameworks, without changing your code. This is achieved by hiding the concrete GUI implementations behind our own classes, the UI classes, and providing "bindings" for different GUI frameworks behind the scenes. Such a "Single Sourcing" approach has many advantages, and just one of them is that migrating to a new GUI framework requires only the change of a single line, the one which controls which factory is created.
The Factory Pattern
The Factory Pattern is an important pattern in Object-Oriented-Programming, it empowers us to delegate the creation of Objects to another Object which must not be known at design and/or compile time. That allows us to use Objects which have not been created by us but merely "provided" to us by an, for us unknown, implementation.
Like an onion
JVx is separated into different layers, with the UI layer being at the top and of the most concern to users.
Technology
Obviously, the first one in the chain is the so called "technology" layer. It represents the UI technology, for example Swing, JavaFX or Vaadin, which is used to power the JVx application.
To put it into a more simple term:
publicclassJButton{}
Extension
Next comes the extension layer, components from the technology are extended to support needed features of JVx. This includes creating bindings for the databook, additional style options and changing of behavior if necessary. From time to time this also includes creating components from scratch if the provided ones do not meet the needs or there simply are none with the required functionality. For the most part, we do our best that these layers can be used without JVx, meaning that they represent a solitary extension to the technology. A very good example is our JavaFX implementation, which compiles into two separate jars, the first being the complete JVx/JavaFX stack, the second being stand-alone JavaFX extensions which can be used in any application and without JVx.
Theoretically one can skip this layer and directly jump to the Implementation layer, but so far it has proven necessary (for cleanliness of the code and object structure and sanity reasons) to create a separate extension layer.
publicclass JExtendedButton extendsJButton{}
Implementation
After that comes the implementation layer. The extended components are extended to implement JVx interfaces. This is some sort of "glue" layer, it binds the technology or extended components against the interfaces which are provided by JVx.
publicclass SwingButton implements IButton {}
UI
Last but for sure not least is the UI layer, which wraps the implementations. It is completely Implementation independent, that means that one can swap out the stack underneath:
This is achieved because the UI layer is not extending the Implementation layer, but wrapping instances provided by the factory. It is oblivious to what Technology is actually underneath it.
It isn't, not at all. The Implementations could be used directly without any problems, but having yet another layer has two key benefits:
It allows easier usage.
It allows to add Technology independent features.
By wrapping it one more time we gain a lot of freedom which we would not have otherwise, when it comes to features as when it comes to coding. The user does not need to call the factory directly and instead just needs to create a new object:
IButton button =new UIButton();
Internally, of course, the Factory is called and an implementation instance is created, but that is an implementation detail. If we would use the implementation layer directly, our code would either need to know about the implementations, which doesn't follow the Single-Sourcing principle:
IButton button =new SwingButton();
It also would be possible to directly use the factory (but this isn't modern coding style):
Also it does provide us (and everyone else of course) with a layer which allows to rapidly and easily build compound components out of already existing ones, like this:
Of course that is not even close to sophisticated, or a good example for that matter. But it shows that one can build new components out of already existing ones without having to deal with the Technology or Implementation at all, creating truly cross-technology controls.
The Factory
The heart piece of the UI layer is the Factory, which is creating the Implemented classes. It's a rather simple system, a Singleton which is set at the beginning to the Technology specific factory which can be retrieved later:
// At the start of the application.
UIFactoryManager.setFactoryInstance(new SwingFactory()); // Or alternately:
UIFactory.getFactoryInstance(SwingFactory.class());
// Later inside the UI wrappers.
IButton button = UIFactory.getFactory().createButton();
The complexity of the implementation of the factory is technology dependent, but for the most part it is devoid of any logic:
It "just returns new objects" from the implementation layer. That's about it when it comes to the factory, it is as simple as that.
Piecing it together
With all this in mind, we know now that JVx has swappable implementations underneath its UI layer for each technology it utilizes:
Changing between them can be as easy as setting a different factory. I say "can", because that is only true for Swing, JavaFX and similar technologies, Vaadin, obviously, requires some more setup work. I mean, theoretically one could embed a complete application server and launch it when the factory for Vaadin is created, allowing the application to be basically stand-alone and be started as easily as a Swing application. That is possible.
What else?
That is how JVx works in regards to the UI layer. It depends on "technology specific stacks" which can be swapped out and implemented for pretty much every GUI framework out there. We currently provide support for Swing, JavaFX and Vaadin, but we also had implementations for GWT and Qt. Additionally we do support a "headless" implementation which allows to use lightweight objects which might be serialized and send over the wire without much effort.
Adding a new Technology
Adding support for a new Technology is as straightforward as one can imagine, simply creating the Extensions/Implementations layers and implementing the factory for that Technology. Giving a complete manual would be out for scope for this post, but the most simple approach to adding a new stack to JVx is to start with stubbing out the IFactory and implementing IWindow. Once that one window shows up, it's just implementing one interface after another in a quite straightforward manner. And in the end, your application can switch to yet another GUI framework without the need to change your code.
Let's talk about events and event handling in JVx.
What are events...
Events are an important mechanism no matter to what programming language or framework you turn to. It allows us to react on certain actions and "defer" actions until something triggered them. Such triggers can be anything, like a certain condition is hit in another thread, the user clicked a button or another action has finally finished. Long story short, you get notified that something happened, and that you can now do something.
...and why do I need to handle them?
Well, you can't skip events, they are a cornerstone of JVx. Theoretically, you could use JVx without using any of its events, but you would not only miss out on a lot of functionality but also be unable to do anything useful. But don't worry, understanding the event system is easy, using it even easier.
Terminology
For JVx the following terminology applies: An event is a property of an object, you can register listeners on that event which will get invoked if the event is dispatched (fired). Every event consists of the EventHandler class which allows to register, remove and manage the listeners and also dispatches the events, meaning invoking the listeners and notifying them that the event occurred. There is no single underlying listener interface.
Within the JVx framework, every event-property of an object does start with the prefix "event" to make it easily searchable and identifiable. But enough dry talk, let's get started.
Attaching listeners as class
The easiest way to get notified of events is to attach a class (which is implementing the listener interface) to an event as listener, like this:
publicclass MainFrame extends UIFrame { public MainFrame() { super();
What is happening here is that, internally, a listener is created which references the given object and the named method. This allows to easily add and remove listeners from events and keeping the classes clean by allowing to have all related event listeners in one place and without additional class definitions.
Attaching listeners as lambdas
Yet there is more, we can of course attach lambdas to the events as listeners, too:
publicclass MainFrame extends UIFrame { public MainFrame() { super();
Parameters or no parameters? To throw or not to throw?
By default we actually support two different classes of listeners, the specified event/listener interface itself, and (javax.rad.util.)IRunnable. Which means that you can also attach methods which do not have any parameters, like this:
publicclass MainFrame extends UIFrame { public MainFrame() { super();
Additionally, all listeners and IRunnable itself do support to throw Throwable, which is then handled inside the EventHandler. So you are very flexible when it comes to what methods you can attach and use as listeners.
Creating your own events
You can, of course, create your own EventHandlers and listeners to create your own events. All you need are two classes, an extension of EventHandler and a listener interface.
Now every time the event is dispatched, the somethingOtherHappened method will be invoked. Anyway, don't use this. The upside of having a "simple" listener interface with just one method (SAM-type) is that it allows to use lambdas with it. A listener interface with multiple methods won't allow this.
That's it for this short reference sheet, that is how our event system can and should be used. Of course, there is much more to it under the hood, for example listeners being wrapped in proxy classes, reflection used for invoking methods and some more stuff. If you feel adventurous, be my guest and have a good look at the internals of EventHandler, it is quite an interesting read.
If you work with JDBC and MySQL, you will most likely be aware of one shortcoming: MySQL can not stream the results from a query (well, actually it can, but the feature is quite limited). That means that up until now JVx has always received and stored the full result set in memory which it received from MySQL. No paging was performed as it was done in the Oracle implementation.
Limit to the rescue!
MySQL does support the limit clause, which allows to limit the results to either a certain number of rows, or a certain range of rows. How does it look like?
SELECT
ID,
NAME FROM
TEST WHERE
NAME LIKE'Hans%' LIMIT 5,10;
This will fetch the data starting by the 5th row up to the 15th row, so it will skip the first five rows and then return the next ten. As this is a database builtin, no additional data is send over the wire except the actual requested rows. This is perfect if you want to limit your queries, for example, because you know that you don't need more than 5 rows even though there are 50,000 rows.
Fetch all the things!
With the old behavior, without limit clause, the JDBC MySQL driver would fetch the complete result of the query and only we would do some cutting on it (mainly dropping not needed rows at the start). That meant that the complete result set was always loaded into memory, which itself might have caused that you were unable to execute certain queries, especially if they contained bigger blob columns.
Limit all the things!
With the new behavior, the limit clause is appended to the query as needed, which means that the JDBC MySQL driver has to load a lot less data and a lot less data is send over the wire.
The MySQL giveth, the MySQL taketh away...
But there is an additional cost associated with the usage of the limit clause. Because the fetches are separate statements, all rows leading up to the beginning row have to be selected, too. Let us return to our first example, the query of the TEST table. We only want 10 rows starting from the 5th row, that means our result set only contains 10 rows. However, MySQL has (obviously) to query, select and discard the first five rows so that it can start sending us the rows that we actually want. That means that the cost of selecting pages increases. Off to pretty graphics!
Note that the fetch time is accumulative.
Blue: The original implementation which does perform only one fetch of all data. In this case it is quite fast, but depending on the query and data you could wait a long time for the initial fetch, if it was possible at all.
Orange: The current implementation with quite a worst case scenario, it gradually fetches page after page with a row count of 50. As you can see the fetch time gradually increases, but as you can also see the initial fetches are fast.
Yellow: An optimization experiment which increases the fetched row count dynamically.
Let us look at this again in detail, to be exact the fetching of the first 1500 rows.
What we see here is quite good news, actually, because with the new implementation with the limit clause, you can consecutively fetch 600 rows in the same time as the fetching of the 4400 rows with the old implementation. The big difference here is that the first set of ~113 rows returns close to immediately and consecutive fetches are equally fast. This is awesome because we can now display initial data faster, even few it is fewer data in the end and slows down the more data is fetched afterwards.
Improve all the things!
As you can see from the charts, we already did a short experiment to improve this further, and we are confident that we can implement such a solution which dynamically fetches more rows to reduce the overall fetch time while still preserving that the first rows are displayed fast, further improving GUI responsiveness.
My last years post ended with a look at the work on our JavaFX implementation. That work was shortly after finished and we could release the version 1.0, which still has some rough edges but overall works quite well. There weren't many exciting things going on in the last cycle of development, only a lot of small bugs to be fixed.
In June the JavaFX project migrated from its own JIRA system to the OpenJDK bugtracker, something which sounds like a little and quite unimportant migration turned out to be quite a problem for people like us. The OpenJDK bugtracker is read-only for everyone who is not an OpenJDK author (I believe it is called "author"), tickets can only be created through the web interface for generic Java bugs. That means that we lost the possibility to contribute to the tickets which we created or tracked, we even lost the possibility to track tickets easily, and the forwarding from the old JIRA issues has been removed in the mean time, too. The only possibility to track the tickets which are of interest to us is now via RSS feeds...one feed for every single ticket. If you remember my last years post, that list had grown to over 50 tickets. Contributing to tickets and commenting is only possible through the mailing lists for us. Which is a quite sad state compared to the previous one, but I guess there isn't much one can do about.
Anyway, for our implementation we've already gathered a list of needed improvements which will come next, we just don't know when exactly that will happen, but it will.
The Kitchensink, plumbing not included
During the JavaFX implementation the necessity arose to quickly and easily test most features. The first test runs and verifications had been done using the FirstApp and the DemoERP, which are very good examples if you want to get it to work but lack the detail of most features for the most part. Out of this need the JVx Kitchensink was born.
The Kitchensink is a very, very simple application which doubles as a showcase and as a testbed for new implementations. It includes all controls and allows you to manipulate them on the fly, easily testing the features of every single one. Though, it does not use the Client/Server infrastructure and instead is a simple, stand-alone application which is launched directly using the factory.
This little application allowed us to rapidly test single features of controls and components in Swing and JavaFX without having to click through large applications or the need to change these applications to accommodate our tests. You can check it out, it runs completely standalone and allows you to see and test all of the controls which are offered by JVx.
One of the features that I personally found important is the DataBook View, it displays all databooks of the current file in a similar manner to the Outline. That means that you can now see which databooks and which columns are in use in the current file. I'm afraid that there isn't much more to say about working on these releases, implementing the new features worked like a charm and was uneventful.
During the summer my working assignments were widespread throughout all our projects. Bug fixes in JVx, maintenance in VisionX, new features in ProjX, you name it.
GUI Testing, an experiment
Back when we ran stress tests on our Vaadin implementation and server we had the idea that a generic GUI testing system for JVx should be possible. During the late summer we actually found the time to pursue this idea and started building a prototype. The goal was to provide an application which allows to record, replay, save/load and export GUI unit tests. Hooking into the toolkits, like Swing, proofed to be rather simple and with our naming scheme in place it was quite easy to gather events and ascribe them to components in a toolkit generic way. For example for Swing/AWT you can register a global event listener which will receive all events, ideal for such a usecase. For JavaFX you have to resort to register a filter for events on a scene level. Regarding Vaadin we opted to refer to the Selenium IDE which already allowed to record whole test cases in the browser. Additionally with our naming scheme we can record test cases in Swing/JavaFX and map them nearly one-to-one to Selenium test cases.
Processing the events which we received from the toolkit proofed to be more difficult than first thought, for example the window close button in Swing fires a single click event, unfortunately that button does not have any information associated with it which would allow us to figure out that it is the close button. Additionally that button might change from LaF to LaF. There were multiple such instances which made it quite hard for us to determine what event just fired and to which component it belonged to.
At the end we had a working prototype which could be launched with the application (basically wrapping the application to make it possible to hook into the event loops and similar), record events, replay these events and allowed us to save, load and export these as unit tests. Unfortunately we ran out of time before we could raise this prototype to a production ready software. But the long term goal is still to provide such a functionality to JVx users at some point.
eTV, a small side project
As I will explain further down, I was not happy with the last empty wall in the office and the idea to have some sort of information display was born. Additionally we could use this setup in our conference room as needed and even bring it to events and conferences. Now, if you want to display information you need two things:
A display to display the information on
A system which can power the display
As it turned out later, you also need information to display, but that is a different story. So the first step was to figure out what would display the information and what would power that. We settled quickly on a simple 41" TV and a Raspberry Pi 2. That means we have a low-power setup which is easily portable (unplug it, move the TV over, plug it in). We installed Raspbian and our first tests were promising.
After some tests it turned out that the easiest way would be to create a custom setup which was powered by JVx and utilized all the power the Linux system provided us with. The final stack looks like this:
That will launch a user session everytime the system boots. From there it simply launches X11 and executes the initial setup of the user session (like starting the window manager, setting a wallpaper, starting the JVx server etc.).
We chose i3 because it allows to be controlled from the command line and provides extensive customization options. In the mean time we've looked into replacing it with Sawfish as it provides even more options and provides more control.
The custom JVx system is also not that impressive as it might seem. It is a simple and slim JVx server which one can connect to and execute commands, like to show the next window or launch an application. This also includes the "glue" shell scripts, which basically provide another layer of abstraction between the JVx server and the system, for example if the next window should be displayed the server invokes the "next-window.sh" script which then sends the command to the window manager. That allows to easily tune or swap technologies without having to edit, recompile and restart the server.
One of the first usecases was to show videos and streams on the TV, as it turns out, the options you have when it comes to display videos on a Raspberry Pi are quite limited. The initial idea to use VLC quickly died because it does not support hardware acceleration on the Raspberry Pi, which renders it useless for showing videos. Even though 2.2.0 promised support, we did not get it to work on our device. That left us with OMXPlayer, which comes with a completely different set of problems. The first surprise for me was that OMXPlayer did not use a window, it directly paints to the screen, which means that it can't be controlled with window commands. The second problem is that it behaves very badly if the connection is bad, of course that is to be expected, however OMXPlayer quits at the first sign of a bad connection. If you want to display a livestream, which does not end, it is quite confusing to have the player quit on you without an obvious reason. The workaround to that problem was to wrap it in a while loop inside the shell script which starts it, a quite ugly hack, but unfortunately necessary.
There were other problems to be solved, for example that the USB WLAN dongle would go to sleep after some time, that the network manager would consider it a good idea to assign a completely different IP address and that our WLAN is really unpredictable in some circumstances, but otherwise it was not that bad. After we've figured these things out it was a smooth sailing. As you can see in the other blog post about it, we even built a simple demonstration system of the capabilities of JVx complete with a little gamification. The whole setup can now be controlled over a web interface (which is a JVx Vaadin application deployed to a Jetty) and with an app on a tablet, it can display pictures, videos, streams and of course run applications, including different dashboards (created with JVx) which provide us with information (some vital, some not so much, but who does not want to see the latest Garfield comics at a glance) or some nice views, like the live streams from the ISS.
All in all, we are very happy with how this turned out and we will keep improving this setup in the future. There is also now the Raspberry Pi 3 and the ODROID-C2 which offer even better performance in the same form factor, so there is definitely space for upgrades. Here are a few impressions from the project:
JVx and lambdas, let's do it right
With the release of Java 8, Java gained support for lambdas and method references, this is great! It means that a lot of code can be written simpler and more readable. The new method references are also very close to our implementation of listeners and actions, which means that it is only natural to make sure that we support them to the best of our abilities.
To make sure that our events, listeners and actions can be used with lambdas and method references and to provide a clean migration path if wanted, we had to make sure that these could be translated as easily as possible. For that we introduced a new interface called IRunnable, which is the same as Runnable except that the run method can throw any Throwable. With this new interface under our belt, we can now provide 1:1 migration path for everyone who wants to use lambdas instead of our listener scheme.
Vaadin, the new grid
With Vaadin 7.4 a new component was included, the Grid. The Grid set out to fix the shortcomings of the Table and provide more and better features, so of course we wanted to see how it actually performs and works. Thanks to the architecture of JVx, having multiple implementations of the same component is easily possible, all you need is a switch in the factory so that it provides you with the implementation you want.
The new Grid provides a lot of possibilities and integrating it into our implementation was quite painless and straightforward. For us, one of the best things about the new Grid are the custom renderers, that means that we can finally fine tune the representation of every cell in every way, something that was previously only with some hacks possible, but is now painless with our custom renderer. The only downside to the Grid is the missing inline editing support, but that is already remedied in later versions, to which we will update in time.
Prototype, my first
First, you have to know that I was hired as a framework coder, even though JVx is a business application framework, the whole "business application" part does not concern me as long as it is does not directly influence the framework work I'm doing. But at the beginning of this year I was required to create a prototype for a real business application, which is a very exciting opportunity to actually look on the other side of the fence (and as we all know, the grass is always greener on the other side, though in Eden it might be acid). With the power of VisionX strapped to my back it actually was a quite easy task to get the first draft up and running. As usual, the most time went into fine tuning the user interface and the styling.
A few misjudgments on my end included which were later on fixed, it was quite an experience working on this prototype. Even though I do not consider it a requirement, it is always a good idea to use the software that you create, it helps seeing problems early on and also provides a very simple reality and sanity check. But for me personally, I was happy when I was allowed to go back to work on the framework, it is my domain, in job and mind.
Vaadin, the new FormLayout
Since the beginning of the Vaadin implementation the FormLayout was a problematic child, never behaving as it should. The original implementation is based upon the GridLayout of Vaadin, which is nice but comes with quite heavy limitations, for example that components can not overlap. So it was finally time to put all these problems behind us and rewrite the FormLayout to behave the same as in the other implementations.
Implementing something in Vaadin is more complicated than doing it in, for example, Swing. It means that you have a server-side class, a client-side class and a connector stringing the two together. Technically the only touching area is the connector between the server and client side and that is one way only. This is very limiting when it comes to something like our FormLayout, but we found a way to send everything necessary to the client.
Additional problems we faced were that the new FormLayout is required to resize itself whenever its parent changes, something that is not necessarily easily achieved in HTML/CSS, not in the way we needed it. You see, these panel must fulfill two properties: First, it must resize itself to the size of its parent or the size it is set to by the parent. Second, it must resize itself according to its own preferred size. These two sound contradictory, but are very simply explained when put them into proper context. The panel must resize itself whenever the parent changes, this is obviously necessary to make sure that the panel is always correctly layouted. Everyone who does know a little about HTML/CSS will now say "set the width and height to 100%", this is correct, however it also means that the panel inside a container which itself does not have a fixed size will collapse. That is not what we want, we want the panel to dictate a size if the parent does not have one, and everyone will say again "then don't set a width and height", this is also correct, but means that it won't resize itself anymore with the parent. To make the matter even more complicated, all children are positioned absolute, which means that the panel can not have a size of its own. So how can we eat our cake and have it?
The answer is, at least to me, some form of black magic (sacrificing a goat might also help, not sure, we only tried with sheep): You set the minimum width and height of the panel to 100% and you have a second element inside which has an actual size, like this:
Panel, minimum-height: 100%, minimum-width: 100%
Canvas, height: 500px, width: 500px
Child, absolute position
Child, absolute position
All children will be added to the canvas instead of the panel itself. This means that the panel will always be the size of the parent but still has its own size dictated by the size of the canvas. The size of the canvas is updated at every layout pass with the values calculated from the children. As this wasn't confusing enough, we had to make sure that certain children behave correctly, for example the TabSheet would only recalculate its size correctly if it was set to 100% on the server side. But Vaadin has some server side checks which make sure that you can't set the size of a component to 100% if the parent (or some parent in the chain) hasn't an absolute size. I have to say that this took some time until I figured that one out. The workaround for this last bit is quite ugly but works, simply set the size of the panel to Float.POSITIVE_INFINITY and PICAS, and then override beforeClientResponse(boolean) and set 100% hardcoded into the state. This disables the Vaadin server side check completely. Additionally we also included and provided a mechanism to allow the server side to set minimum, preferred and maximum sizes for each component, as most people will know from Swing.
The last bit was the positioning of the elements themselves, which was surprisingly easy to do after all these little obstacles had been overcome.
The latest nightlies of JVx are already containing this new FormLayout, which can be activated by setting a property on the factory.
Vaadin, the new Panel and Layouts
As an extension to the work on the FormLayout, we experimented with creating a panel which does accept a layout, just like in Swing. With most of the hard work already done during the rewrite of the FormLayout we could start quickly with a solid base. Implementing the panel itself which does accept a layout and does forward all layout operations to that layout was quickly done, this panel together with the layouts can be found in Vaadin package, as pure Vaadin classes.
The new LayoutedPanel does work very simply: It gets a layout set and all layout operations are forwarded to that layout. The layouts themselves only need to handle constraint creation and how the components are positioned on the client side. A very simple and nice solution.
However, integrating this new Panel into the Vaadin implementation for incorporation into JVx proofed to be difficult. The constraint that it is possible to switch between the old and new panel is necessary to guarantee that already existing applications are not broken, but exactly this became a difficulty. The Vaadin implementation assumes from the first moment that the layout implementations are Vaadin components, which they no longer were. Normally you'd do a big rewrite to change these underlying assumptions, but that was out of the question...a tough nut to crack. In the end we had to postpone any further work on this for a more important project.
On the upside, we've come very, very close to be able to implement the layouts independent of the UI implementation, which means that we will only have the logic ones, not duplicated anymore. Of course this needs some more thinking and work, but I'm very confident that this is actually going to happen.
Office customization
One of the things that I find important is that I feel comfortable in the office and at my workplace, I'm going to spend well over 8 hours a day there so I might as well enjoy the time. Luckily, here at SIB Visions quite relaxed rules are applied when it comes to what is allowed in the office and what is not. Giving me free reign over the decorations in the office made me wish that I would have more walls than just three to put things on.
That is also how our eTV came to be, it was hard to find something for the space between the doors, as most of the time half of the wall would be covered by the door. A TV which would display something seemed like a logical choice here.
And for those of you wondering what we're doing the whole day, here is a timelapse video of nearly a whole week:
A week @ SIB Visions
The look ahead
That was quite an eventful year, a lot of smaller but very interesting projects. What does the future hold? Well, it for sure ain't going any slower, that I can tell you.
Thanks to everyone at SIB Visions for this wonderful year, I'm looking forward to another awesome year with all of you!
Wir sind wieder auf Achse und wenn du in der Nähe bist bietet sich die Gelegenheit mit uns über JVx, VisionX und Technologie im allgemeinen, zu sprechen.
The first day at SIB Visions was filled with getting familiar with the JVx application framework, including a crash course through the complete architecture of it. I have to be honest here and say that I have maybe understood half of what I was told, but it was an awesome and extremely useful overview over the framework.
Right after that I made myself roughly familiar with the framework by looking through the code, I got assigned my first tickets, simple feature requests and bugs, easy enough to do. The next weeks I read through quite many areas of the codebase and learned to navigate through it. Nothing too exciting.
FMB Importer - Oracle Forms to JVx
The first really big task I was assigned to was writing an FMB importer from scratch. In case you don't not know what FMB is, it is the file format used by Oracle Forms Builder to save the created forms. It basically comes in two flavors, binary and XML. The goal was to be able to import a form created with Oracle Forms Builder directly into VisionX, preserving as much information as possible and making the migration of the GUI as seamless as possible.
Reading the XML file is easy, processing its content not so much. The concepts of JVx UI and Oracle Forms UI are quite different. In JVx the controls are forming a tree structure/hierarchy, with the inheritance dictating the size and location of a control. Oracle Forms uses a coordinate approach, with each control knowing its exact coordinates and size on the form. This can be clearly seen in the following picture:
On the left is the JVx control tree (Swing), on the right the Summit example in Oracle Forms Builder, the XML format looks quite the same as the view in the designer. After some trial and error, I decided to take a two step approach to converting this structure:
Convert the XML nodes into custom objects and place them in a tree structure.
Convert the custom objects to JVx classes and perform the layouting in this step.
Step 1 starts rather easy, I encapsulated the XML nodes in a custom class to have a thin interface over them, that allowed me to be able to provide support methods and yet still have all the information of the XML node easily accessible. The tricky part becomes the creation of the tree structure and the conversion to the custom objects, because the controls of the form do not have any sort of structure and are split in two groups, graphical elements (lines, circles, etc.) and controls (text fields, radio button, etc.). The best working solution I found was to create a processor object that does know everything necessary to create the custom objects and also builds the tree structure. That processor starts with the window and finds all canvases that can be on that window, then it finds all controls and graphics that can be on these canvases. From there it recurses through all controls and graphical elements, always finding the children of the current one by checking their coordinates and size. Extremely simplified it looks like this:
function Container createContainer(Object parent)
current = new Container
foreach child on canvas if child is inside parent then if child is container then
current.add(createContainer(child)) else
current.add(child)
return current
"Extremely simplified" might be an understatement, because there are a lot of edge cases that need to be taken into account and you can't treat all elements the same, but basically that's the core principle of the processor. If you also go with naming your functions after what they are doing, don't be surprised if you end up with a function named transformItemNodesOnCanvasOnTabPageInBoundary. In the same step as the creation of the tree is the creation of a custom object hierarchy. I decided against converting them directly into JVx classes, because that would add a lot of logic to the processor and would mix two tasks, creating the tree structure and converting the objects.
Now that we have a nice tree of objects, converting them to JVx classes is easy. Ideally all custom objects that were created in the previous step would inherit from one base, and that base ideally would have a method like toJVxComponent(). With that in place converting the custom objects becomes only a matter of calling root.toJVxComponent() after the tree was generated. Again, the second part of this step is what gets you, the layouting. A lot of trial and error went into this one and while Oracle Forms does only support one layout, coordinates, JVx has multiple:
Pane
SplitPane
BorderPane
FormPane
So we need some form of heuristic approach to determine what layout we will be using for each container based on:
The number of children.
The position and size of these children.
Again, very simplified the approach might look like this:
function Layout determineLayout(Container container) if container.#children == 0 then returnnull elseif container.#children == 1 then return container.firstChildren elseif container.#children == 2 then return SplitPane else return FormPane
Again, this misses quite a few edge cases and optimizations. But now the really hard part is missing, how do we convert a coordinate base layout to a FormPane layout?
I tried many multiple methods but ended up using a Sweep line algorithm. The basic idea is to have a line sweep from left to right/top to bottom and creating anchors on the go as necessary. We'll sweep from left to right, for example, and create a new anchor everytime we encounter the start of a new element and and element has ended before. Assume the following layout:
We'll sweep from left to right, create anchors and stretch all components to their respective anchors:
Even though the layout looks quite nice already, there are two problems here. First, the second/third and fourth/fifth anchors are empty, they do not contain a component ("contain" as in a component that does start and end in that anchor). So we can eliminate all anchors that do not contain a component.
The second problem are the overlapping components in the middle. We can easily fix that by pushing the components around.
All that is missing now is to two a second pass from top to bottom. So we now have everything in place to import the UI. Of course there are still some parts missing, like data binding and wiring up events. But that wraps up the approach to importing FMB files.
EPlug - JVx Eclipse Plugin
I enjoyed working on the plugin very much. The Eclipse environment was a completely new system to work with and I had never before written a plugin for a development environment. After the basic functionality was determined, I set to work and made myself familiar with Eclipse. As it turns out, the Eclipse plugin system is quite huge, but once you know the basics it is very easy to use. Every plugin consists of a simple "core" of files:
plugin.xml
Manifest.mf
Activator
The plugin.xml contains all the needed information for the Eclipse runtime to load and run the plugin. Also this is where you register all the extensions you want either to use or provide. The Manifest.mf contains some additional information and the Activator is the main lifecycle class for the plugin. Registering extensions is as easy as implementing the interface required by the extension point and then adding your implementation to the list of the extension point. Your class will be automatically instantiated and used from the class it is registered at.
The first big obstacle was implementing auto completion for various code parts, for example our listeners. As it turned out JDT (Java Development Tools) does only have limited support for it. If you use their parser, you can only have complete lines, it was not possible to get incomplete statements. So we had to rely on internal classes provided by the "JavaCompletionProposalComputer" and the "JavaContentAssistInvocationContext" which also allowed us to get the information needed for incomplete statements.
The other big part of the plugin is launching an application in a container, that allows to extract information about it (like lifecycle objects, server metadata, etc.). That part is quite big and complicated, so let me shortly outline the approach for it:
Create a new Server.
Gather all necessary dependencies for the application.
Create a ClassLoader that contains all these dependencies and inject it into the ObjectProvider of the server.
Create yourself a new session.
Obviously this is only a rough outline, for example there's the security manager. We took the approach to change the configuration of the application on the fly and inject our own security manager that way, which obviously allowed us to do everything within the application. Also our session is a custom implementation that can never expire.
From there it is only a small step to receiving metadata and other information needed to provide auto completion and compile time errors. Speaking of compile time errors, implementing those was as easy as eating a cake. The only two things needed are to register a build watcher, which will be notified of every file that is touched by the build process, and to run the file you want through the parser to receive the AST. Walking the AST is thanks to the visitor pattern very easy and you can quickly select only those parts of the AST that you're interested in.
One of the biggest features we can offer is auto completion and compile time support of DataBook columns. From a technical point of view, the support for RemoteDataBooks is kinda boring, we simply query the server for the metadata. However the support for MemDataBooks was a challenge. Because of the very nature of MemDataBooks, there only were two options to receive the needed MetaData:
Run the code and extract the needed information.
Parse the code/AST.
The first possibility got axed extremely quickly, as it would be too hard, if not impossible to do it in a sane manner. So we ended up with parsing the code/AST directly for any information about the MemDataBook which we tried to provide support for. This is a tedious work, as you basically have to consider all the permutations of creating a MemDataBook and everything related with it, for example the following code:
If we now need to get the metadata for this MemDataBook, it would be roughly the following steps:
Find the variable that contains the MemDataBook.
Find the declaration or last assignment of that variable.
Find all usages of that variables.
Get all values from the .getRowDefinition().addColumnDefinition calls.
This is quite some work and that does not take into account that the row definition might be put into a variable, or might be provided by a different variable altogether. In the end, it comes down to implementing all the edge cases that you run across, and I think we did that very well.
Also we had to create a few GUI forms with SWT and I have to say that it is very good.
I'm looking forward to return to this project for the 1.2 release and implementing even more awesome features and doing some refactoring on the components I did not quite get right the first time.
GUI Tests - Stress testing Vaadin and automating JVx applications
I was looking forward to this research project. I was always fascinated with the idea to have GUI unit tests, now I had the chance to actually do some research on them and implement everything necessary in JVx to make them possible.
After trying different possibilities, including the awesome Sikuli, we settled with AssertJ-Swing for Swing and Selenium for Vaadin. The first rough tests showed that testing was only reasonable possible if we would name all components by default and so we derived a default naming scheme and implemented it. While experimenting with AssertJ-Swing I realized that one important thing was missing from it, the possibility to easily record tests. Selenium already offers a simple recorder for most browsers, which simply records all events and exports them in the correct format, however AssertJ-Swing does not have such a facility unfortunately.
Swing itself is build on top of AWT, which allows to register a global event listener by using the Toolkit which means that one can see all events that are happening, which itself makes it rather easy to record these events and put them in an easy to use format. The format in our case would be Java code that can be copied and pasted into our test cases. To have a reasonable layer of abstraction, the recorder would filter and prepare the events and forward them to a "plugin" that is able to omit Java code. With this facility in place it was easy to record tests for Swing, however replaying them was not so easy at first. AssertJ-Swing has very concrete requirements when it comes to how it is launched and JVx has its own ideas regarding that. The solution to this was to derive a test harness, which would manage both, the AssertJ-Swing setup and also the start of the JVx application. The unit tests would then simply extend said test harness and would be able to launch the application on their own, executing the test case and then shutting it down again. This worked extremely well and we were even able to record and replay test cases for VisionX with ease.
These experiments have shown that it is very easy to perform automated GUI tests on JVx applications, no matter if Swing or Vaadin is used as frontend. The created code during these experiments is not public at the moment, as there is still quite a lot to do and it's in dire need of some refactoring. But I'm very confident that we will be able to return to it and one day provide you with the tools to easily create automated GUI tests for JVx.
JavaFX - Thee shall be my nemesis
JavaFX has been in the works for quite some time now and has been coming along greatly. It was overdue that JVx does support JavaFX as a frontend and with the beginning of this year the work started to make that happen.
Event though JavaFX has been coming along greatly, it is still quite rough around the edges and contains bugs that we needed to work around and some missing features. Currently we are monitoring over 40 requests in the bug tracker of JavaFX that are either directly or indirectly related to our JVx implementation, a little less than half of these were reported by us. Those span little bugs to quite big feature requests, some more critical than others.
One of the biggest missing features was the missing MDI system, which we simply need for ERP applications. There is RT-22856 which is concerned with creating such a system, but that hasn't moved in quite some time and so we set out to create our own. Our efforts are quite well covered by the blog post I linked to above, we managed to come up with a very nice implementation:
The FXInternalWindow can either be used with or without a desktop pane. They might as well live in a normal Pane (or any other).
The content of internal windows is not limited in any way (you could also nest another desktop pane into it).
The FXDesktopPane does offer various convenience features, like a pluggable window manager system.
Implementing a new and custom window manager is a breeze, there are already two implementations provided by us: The FXDesktopWindowManager and the FXTabWindowManager.
But the MDI system is not the only system or control that we created to aid in our implementation of JVx on top of JavaFX, there is a long list of controls that were created by us:
But one thing that really drove me up the wall several times was the usage of the "final" keyword and "package-private" modifiers. Multiple times problems could have been easily solved by overriding a method, which turned out to be final, or invoking a method or accessing a variable, which turned out to the be (package) private. Good API design dictates that both are used to protect the API from misuse, but for our work on the JVx/JavaFX project, most of the time it stood more in the way than helped. The take away for me personally is, that of course you need to design the API in a way that limits the possibility for abuse, but you also have to allow users to shoot themselves in the foot from time to time, that means that they can experiment and use the API for possibilities it might not have been intended for.
The look ahead
And now we're in the present, phew, what a year! There are already two projects waiting for me as soon as we're done with the first version of our JVx/JavaFX implementation.
I'm looking forward for another year with the awesome people at SIB Visions!
Some days ago, vaadin released a Tutorial for Swing developers. It's a hitchhiker's guide to convert a Swing app to modern web app. It's a must-read if you plan to replace/migrate or modernize your Swing application.
We were mentioned in the last paragraph with our JVx framework, as possible conversion strategy. Thanks for that!
I want to hook in at this paragraph, because I totally agree with the rest of the tutorial.
It's true that a wrapper has pros, cons and limitations. You can't wrap everything. Sure you could try, but it needs so many developers and doesn't make sense because a wrapper shouldn't copy the underlying technology. The more features the wrapper has, the more problems will occur with new (different) technologies. The wrapper should be a subset of all technologies. But a subset is limited in functionality!
A wrapper should be focused on a specific domain, e.g. database/data driven applications or game development. A wrapper for multiple domains will fail!
I don't know many working wrappers. There were many attempts to create (UI) wrappers, in the past, but most were stopped because of complexity or the developers had other interests (if project was open source).
JVx is one working solution and in my opinion the most complete one because it contains an UI wrapper, has implementations for different technologies like Swing, JavaFX, Headless and Vaadin. The APIs are bulletproof and there are native applications for Android and iOS. JVx is a generic solution and doesn't generate additional source code.
But it has more than that, because it's full-stack and comes with different application frames for desktop, web and mobile applications.
But what is your advantage if you're using a wrapper?
You're (GUI) technology independent.
An example:
Your current business application is a Swing application and you plan the migration to a modern technology.
Your first migration decision should be: Desktop or Web Next decision: which UI framework Optional: Mobile support?
If your platform decision was: Desktop, then it's very simple to find the right UI framework: JavaFX and try JavaFXPorts for mobile support. Fact: No real web and possible problems with mobile support
If your platform decision was: Web, then it's not an easy task to find the right UI framework, but vaadin should be the first choice because it's comparable to Swing and hides web technology for you! Fact: No desktop but mobile support
Every decision has pros and cons. If you bet on one technology stack, you're fixed to this technology stack. In our example it was JavaFX or vaadin. And what will be the next preferred UI technology after JavaFX or vaadin?
You'll have the same problems again and it's never easy to migrate a (business) application.
You should bet on a technology independent solution, to be prepared for the future!
Means, you should use a wrapper. But don't use a wrapper which hides the technology from you. It should be possible to access the technology directly - if needed or if it's not important to be technology independent.
Sometimes it's not possible to be technology independent, e.g. some custom controls aren't available for all technologies.
The wrapper should allow technology dependent and independent development without any limitations!
Does it make sense to use the same application with different technologies?
Yes, but...
It's not a good idea to use e.g. Swing AND JavaFX because both technologies are desktop toolkits. But it makes sense to use JavaFX for your backend application and vaadin for your frontend or your mobile devices.
It's also a good idea to create only one application that works as desktop, web and mobile application - the same application. But show different screens/views on different platforms.
There's no big difference between desktop and a standard browser because resolution of a desktop pc is the same. A mobile browser has limited space and you shouldn't use the same screen/view on a mobile device as on the desktop pc.
Example
We use an ERP backend application to manage vacations. The appliation has about 10 screens for resource management, master data management and accounting. The application runs as desktop application with JavaFX. The same application runs in desktop browsers with 3 screens because the web frontend doesn't offer master data management and accounting. The same application runs on mobile devices with only 1 screen because mobile devices are used from employees to enter and view vacations.
We have only one application, started with different UI technologies and with different screens/views.
It would be possible to create 3 different applications with different screens and with dependencies between the applications and ... (complex to maintain, 3 different projects, application frame x 3).
If you'll create a "native" vaadin application and a JavaFX application you'll need different development teams with different know-how.
Don't waste time and resources, focus on the real problems of your application. A wrapper hides technology problems and allows fast development with few developers: Win-win situation!
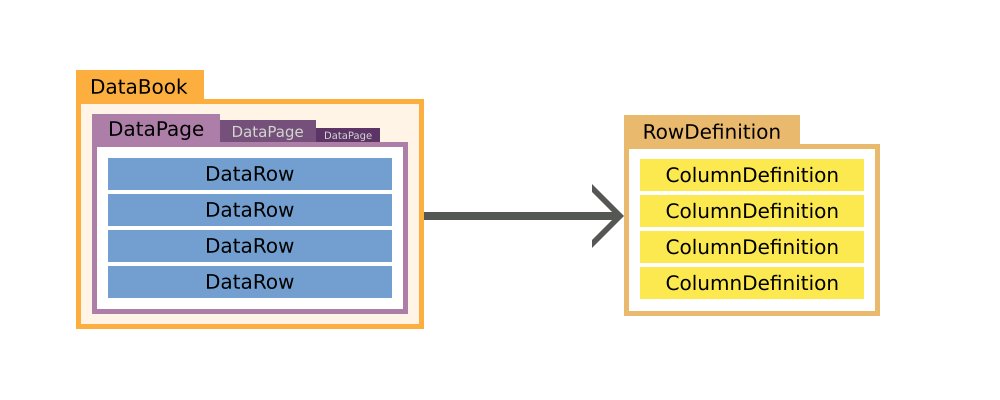
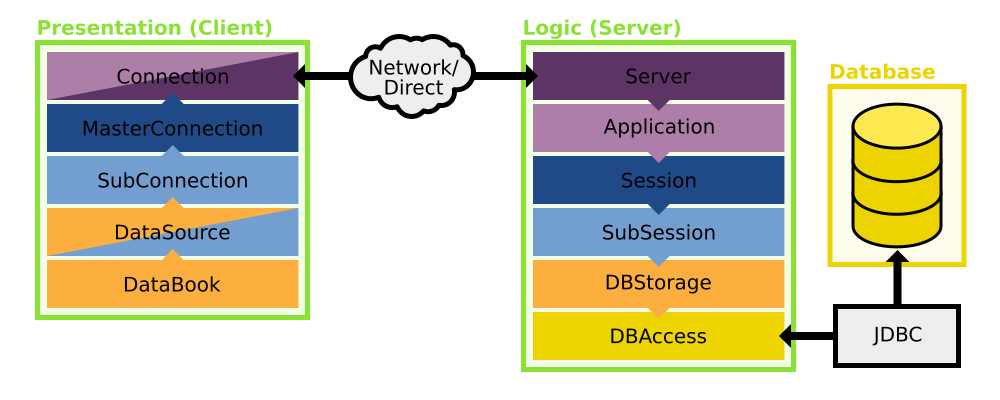
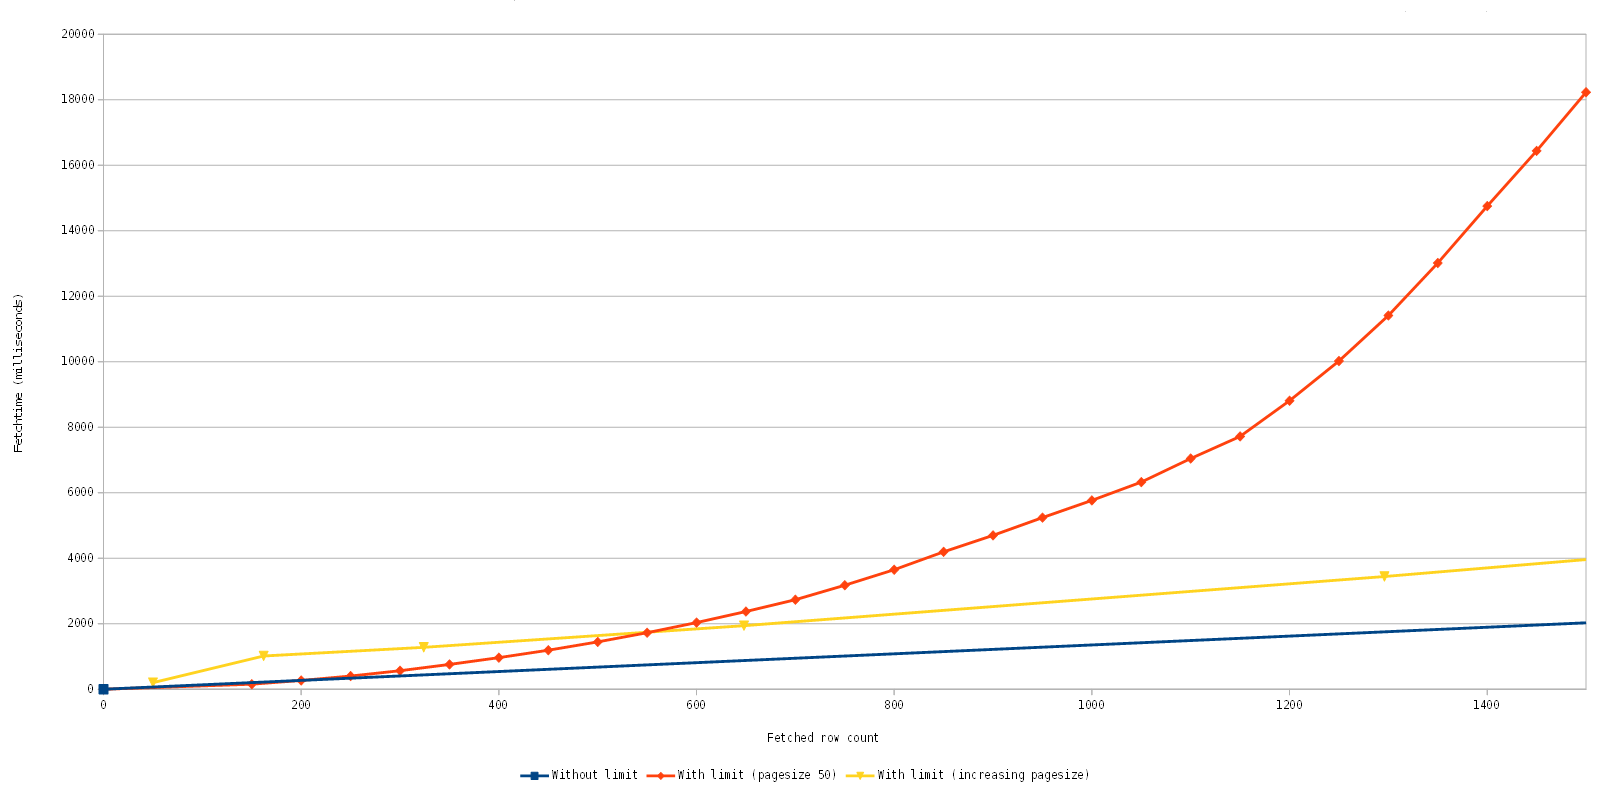
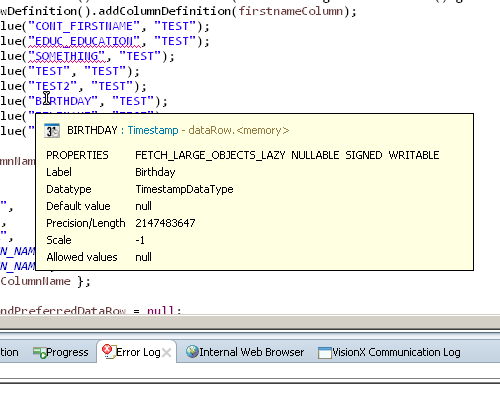
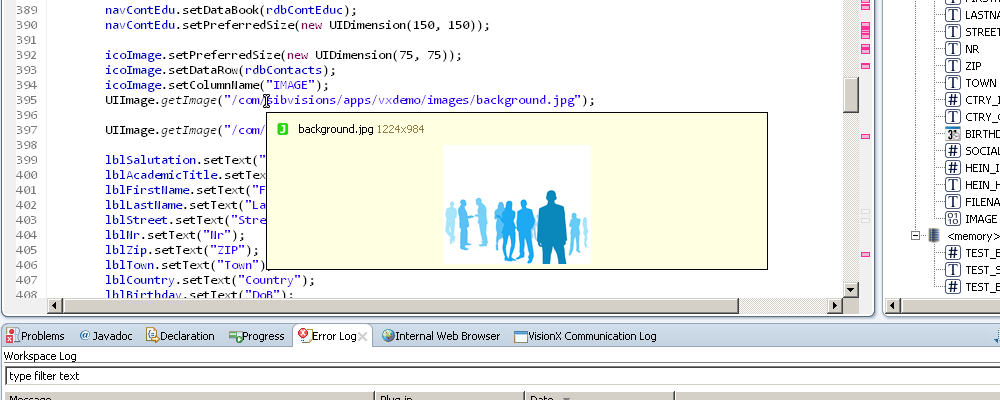
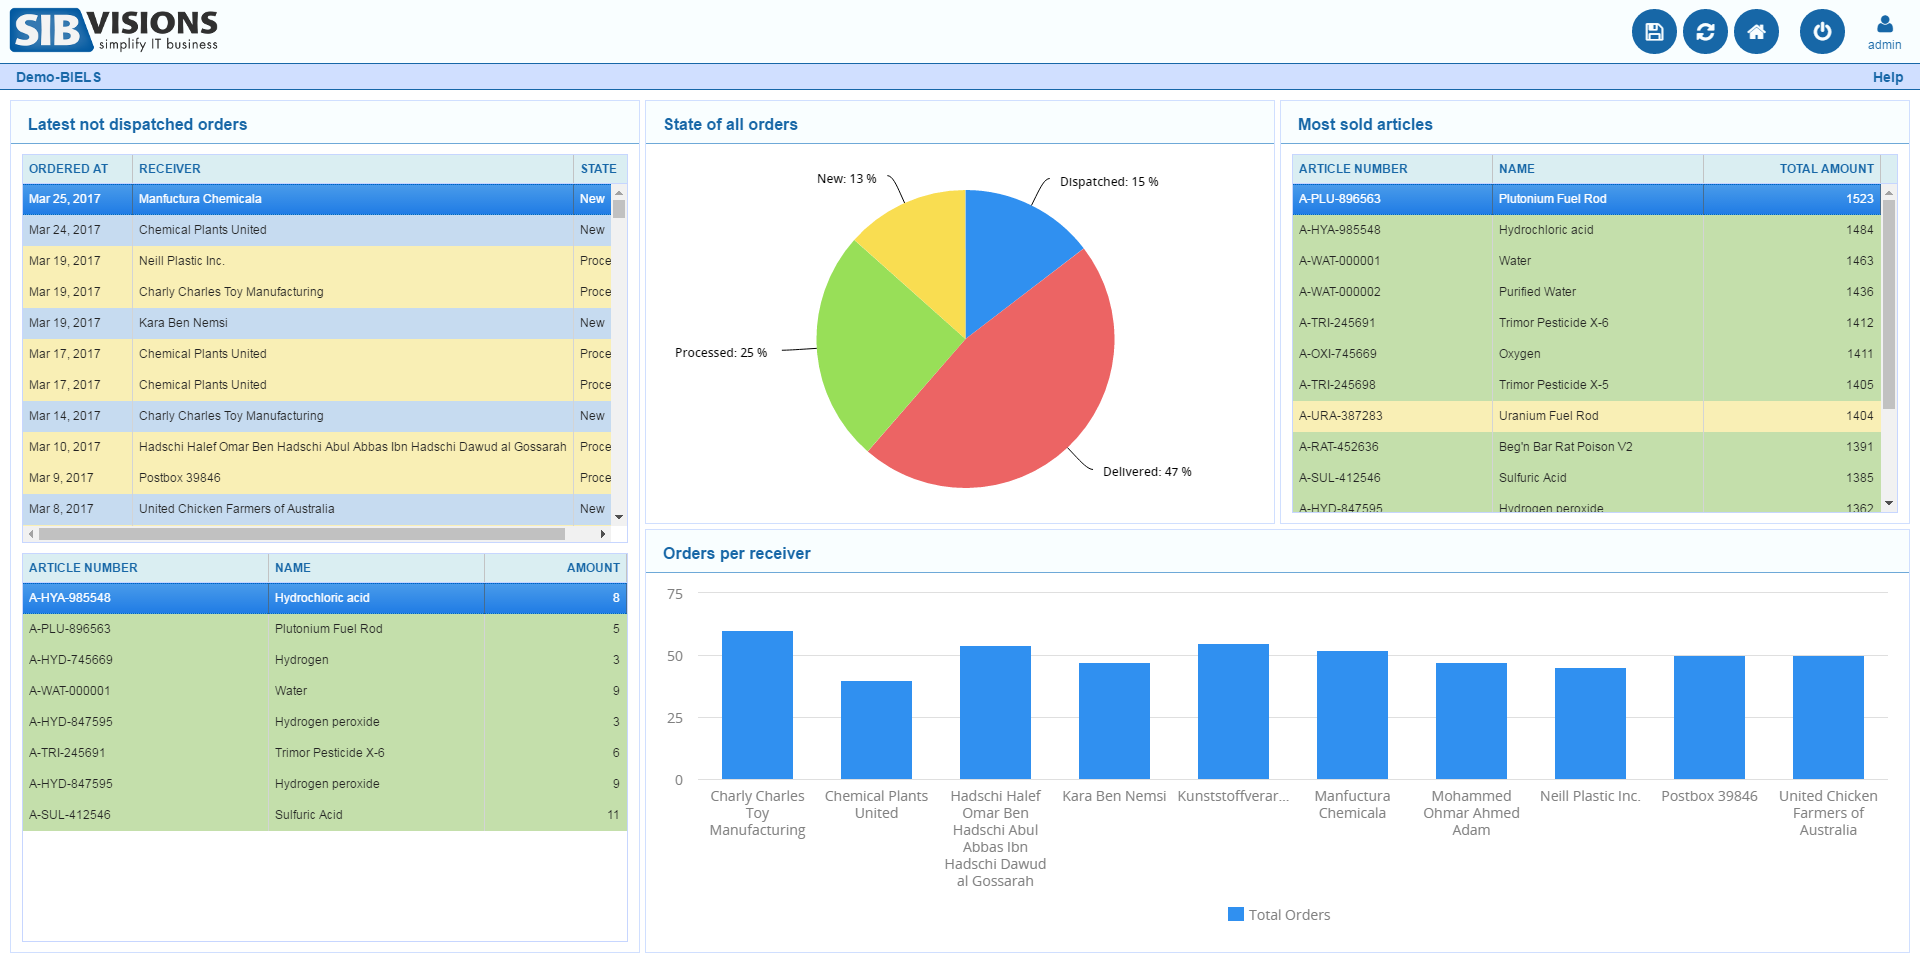
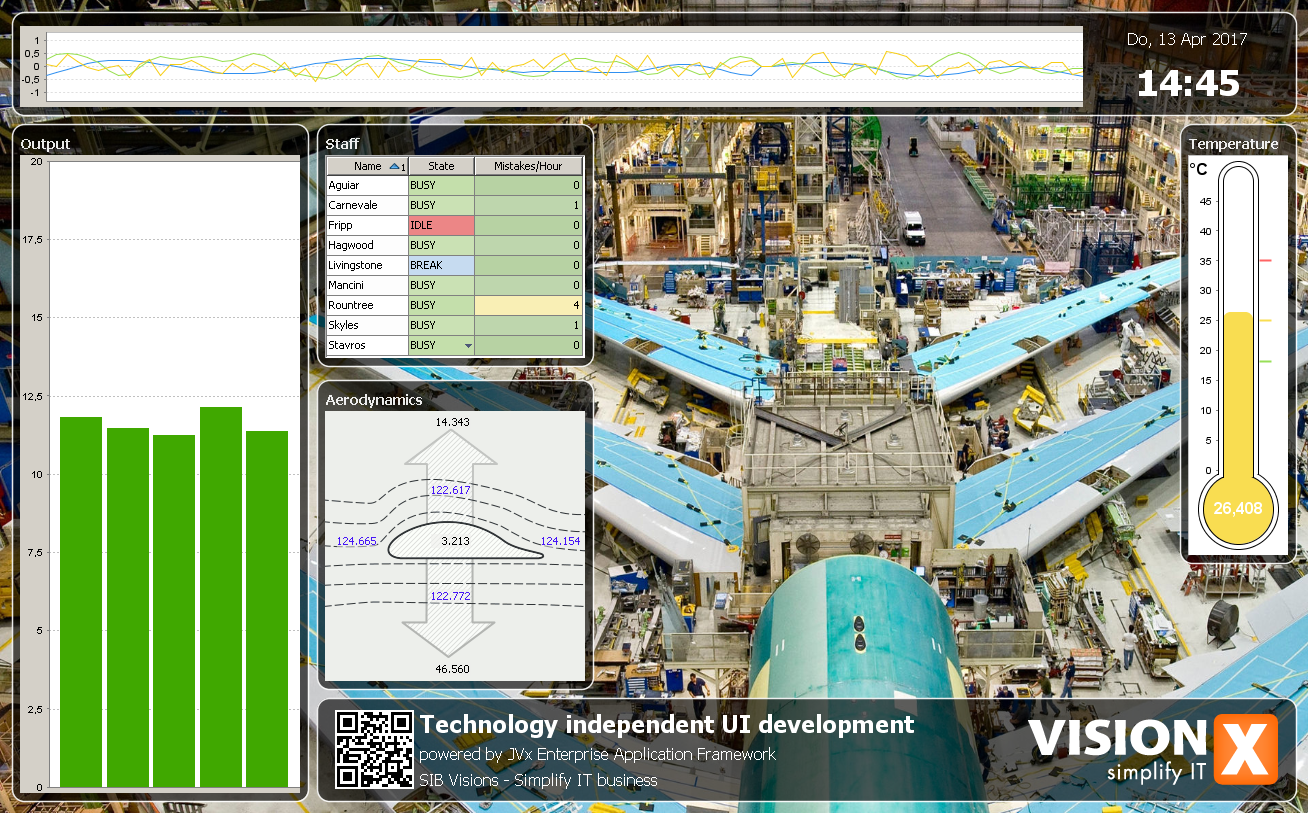
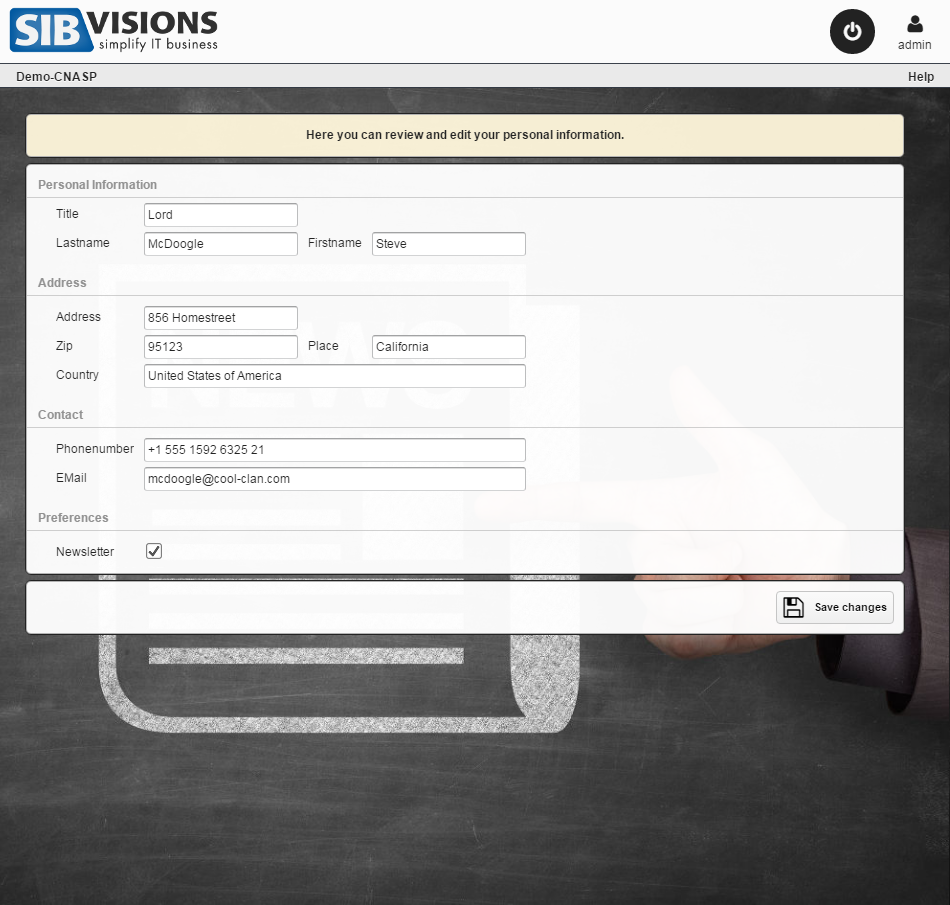
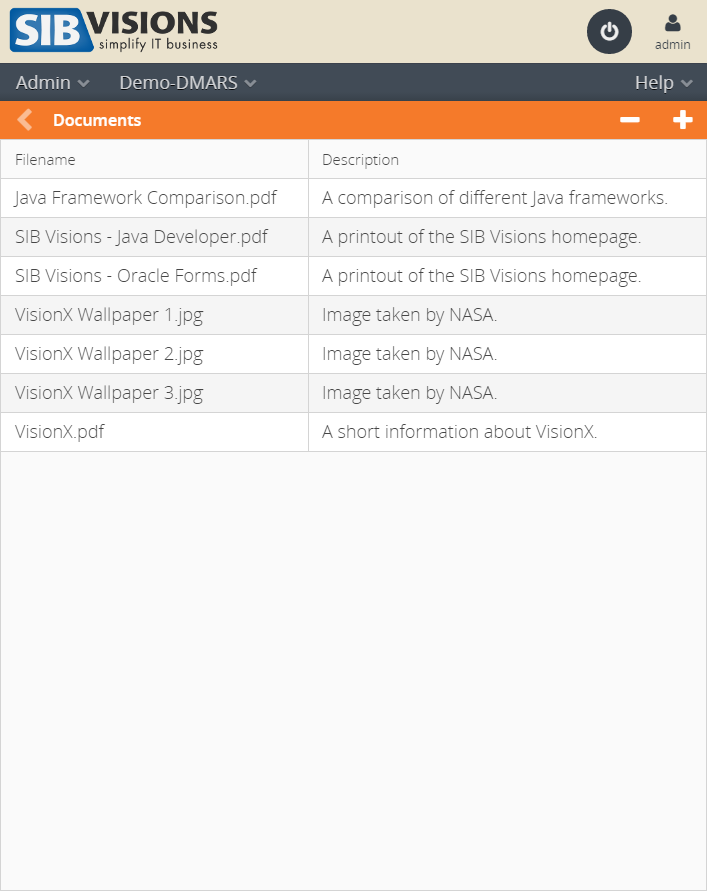
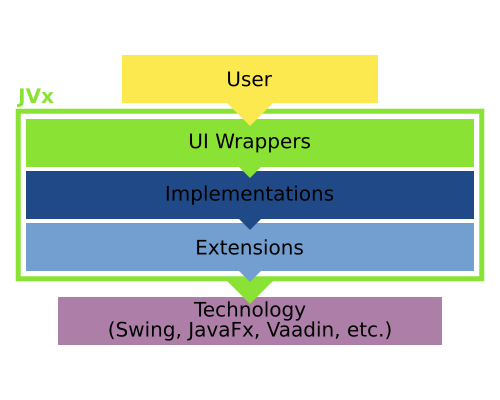
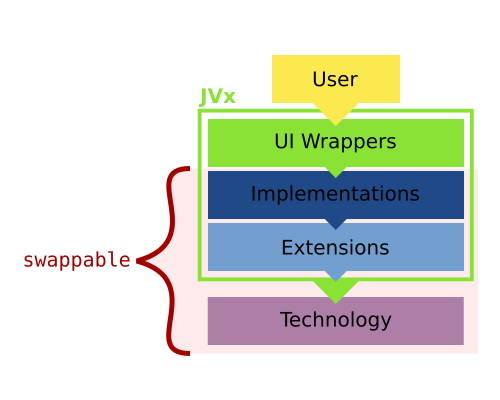
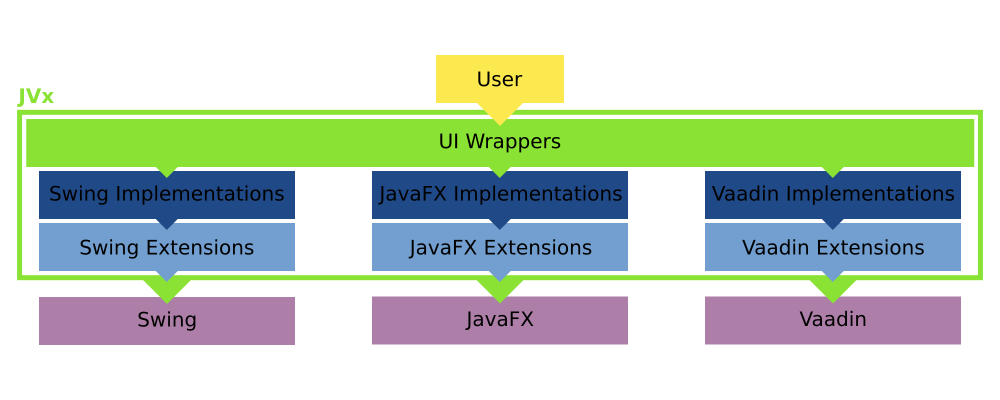
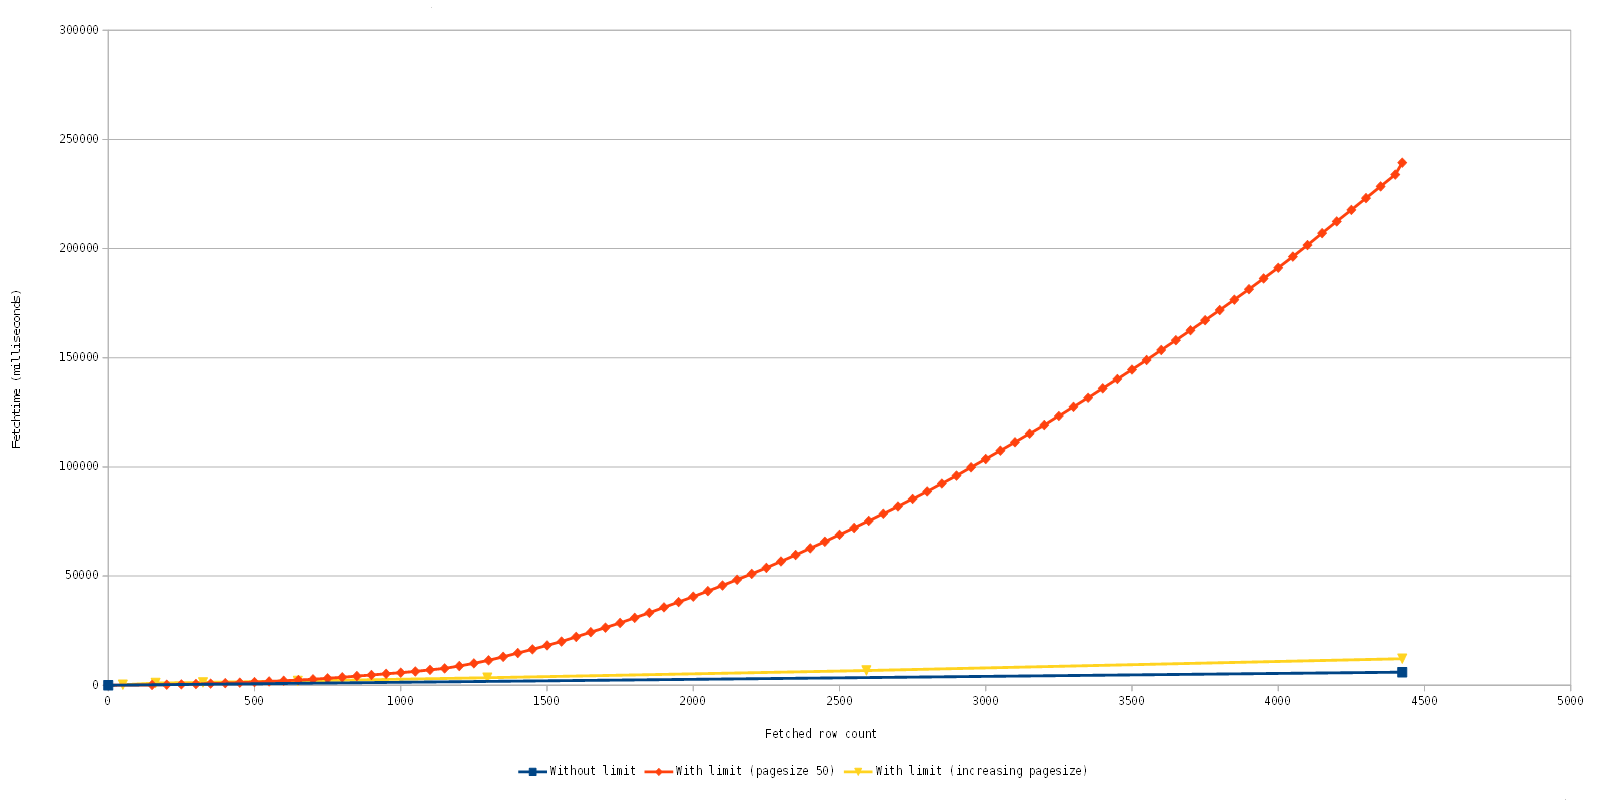

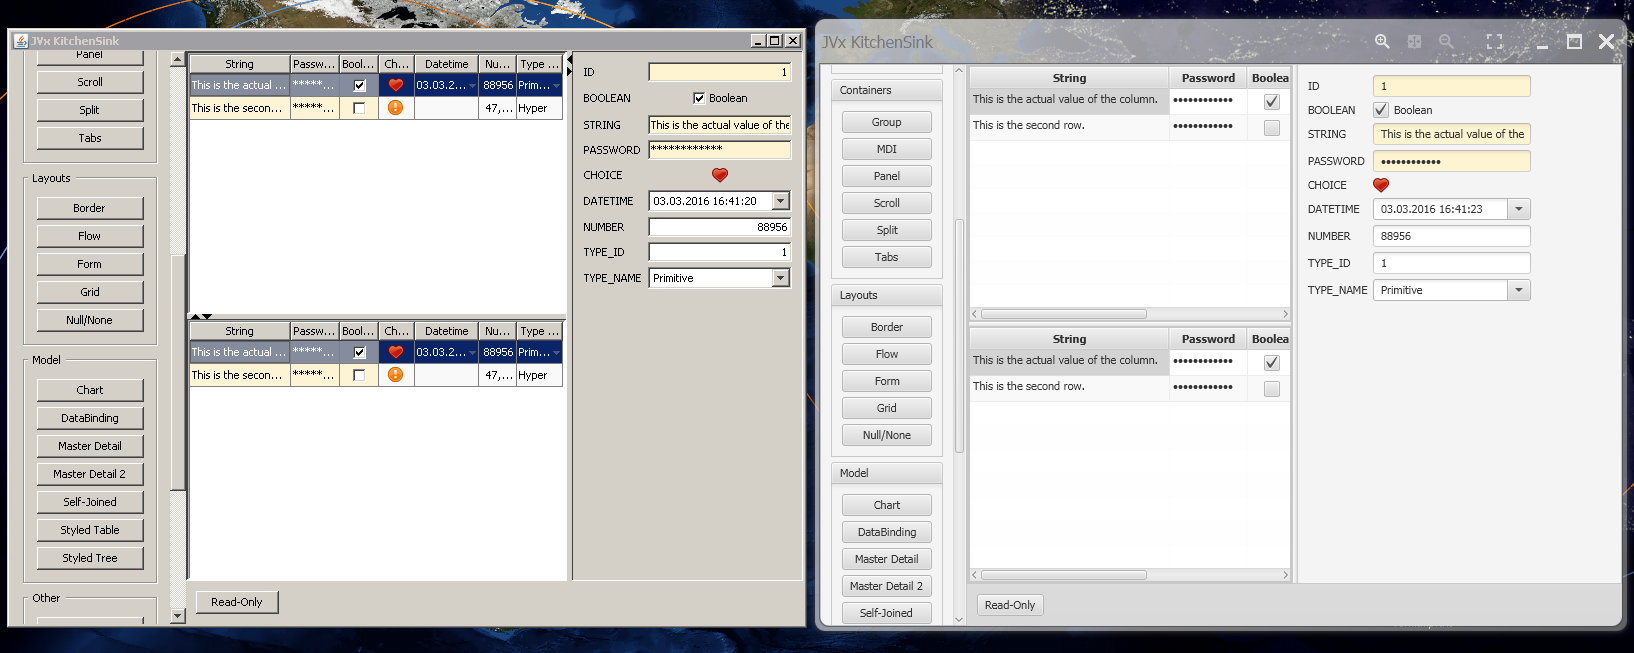
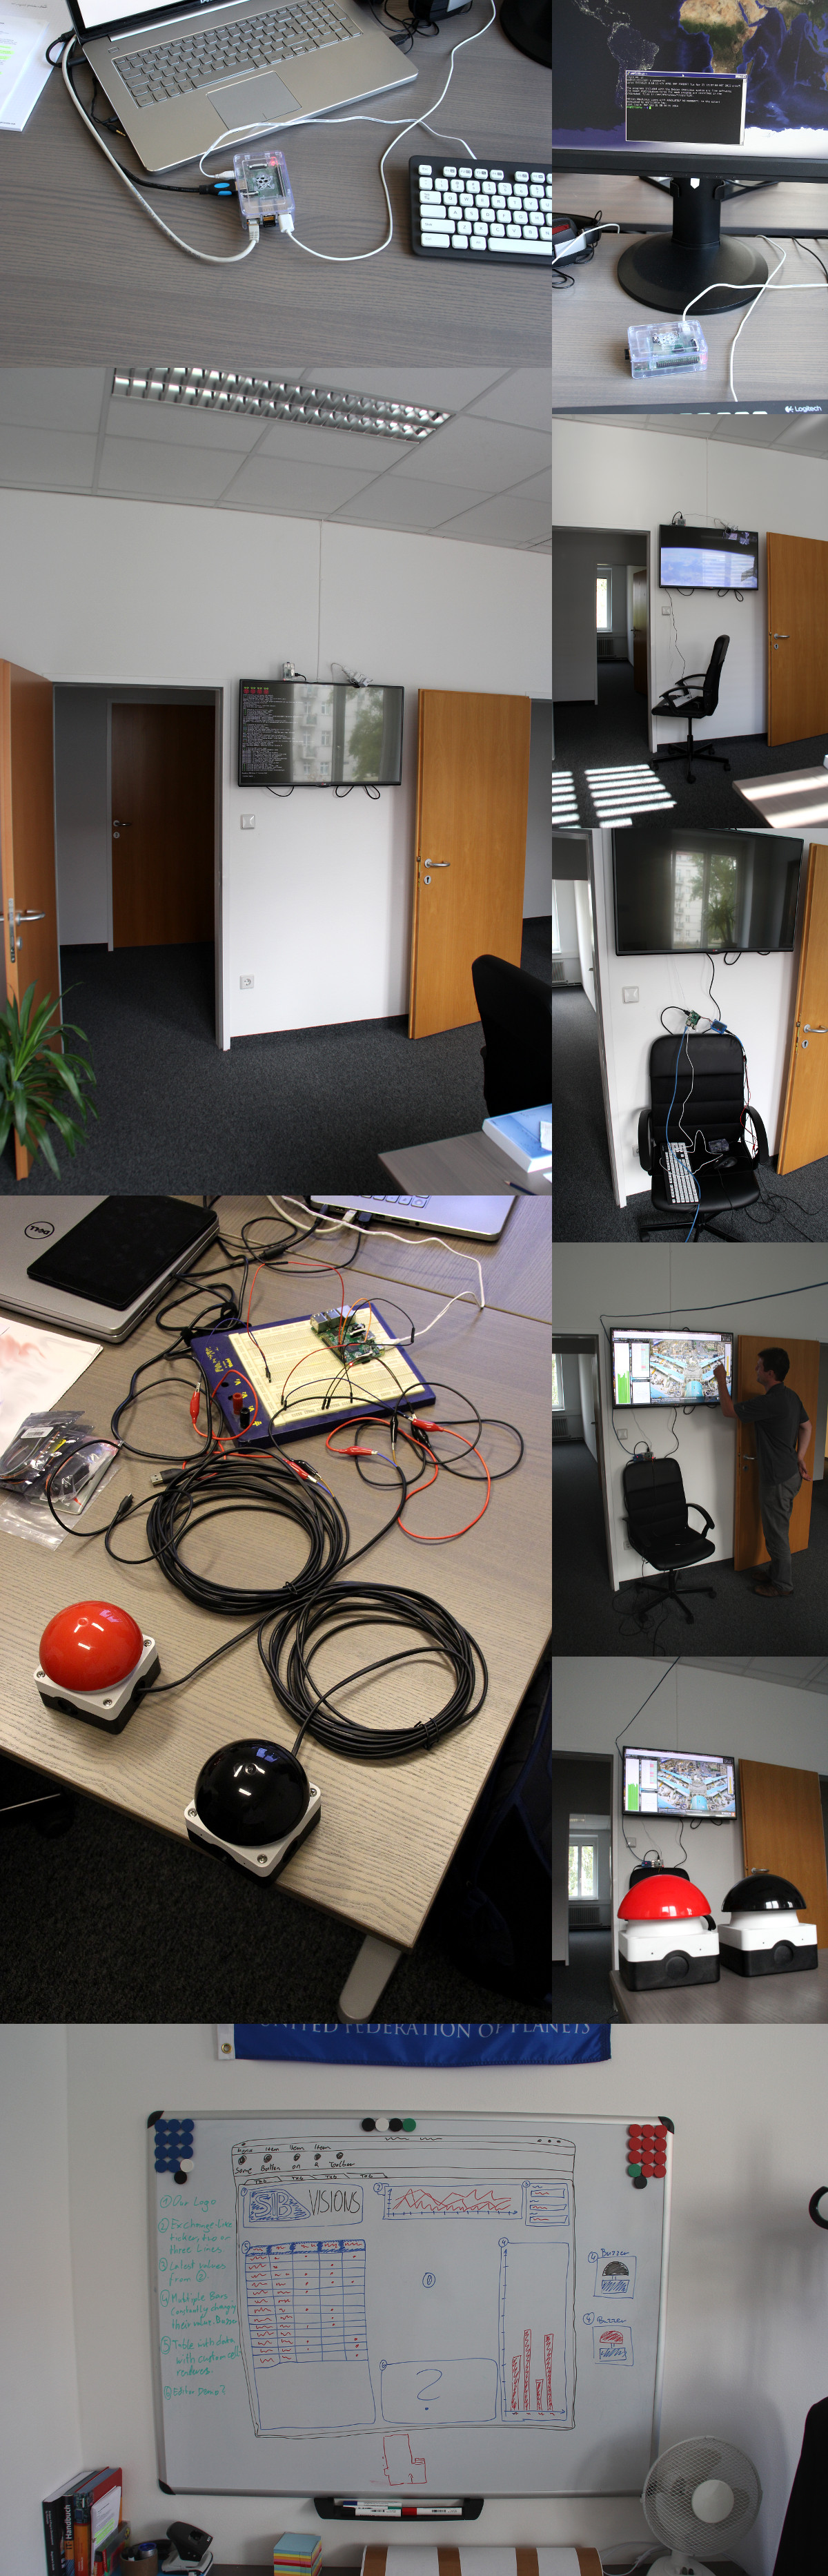
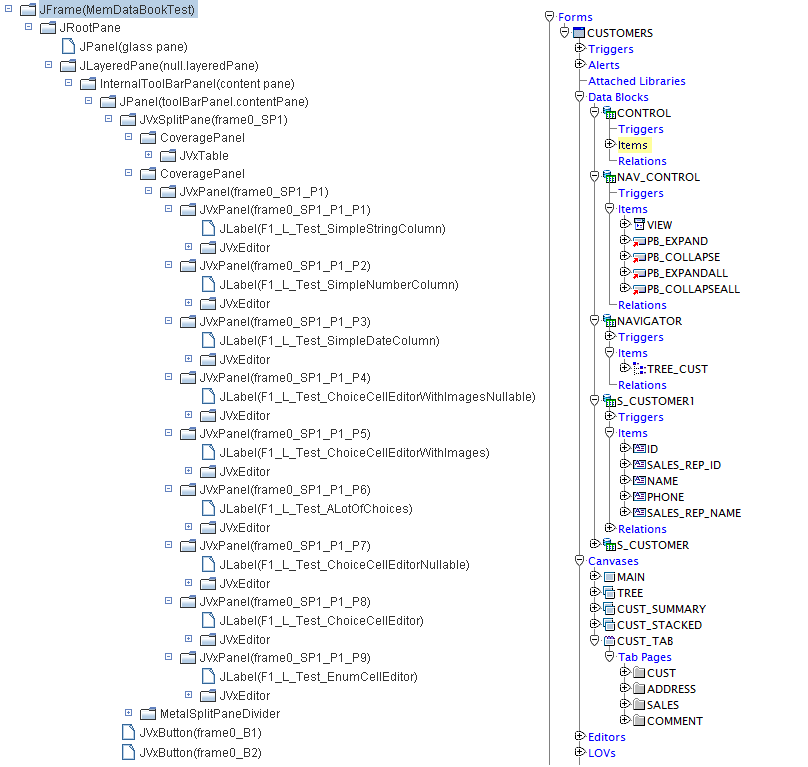
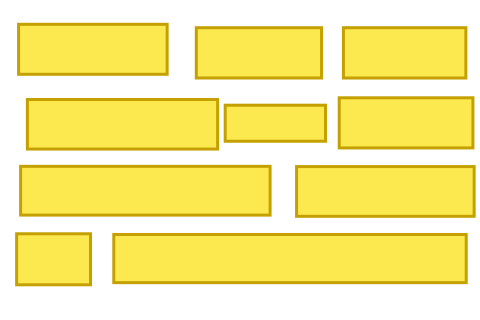
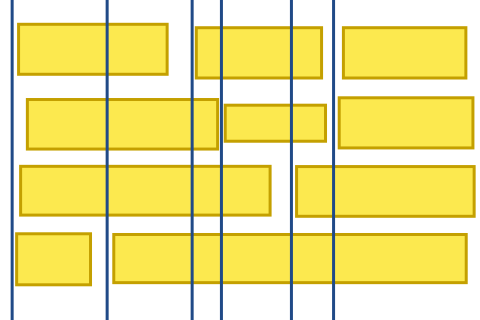
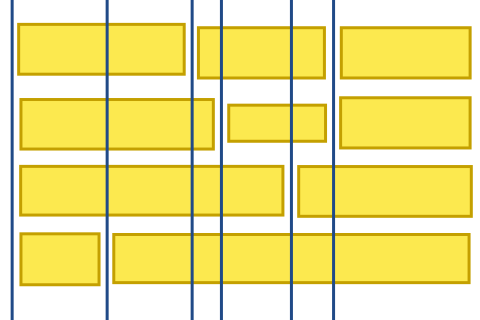
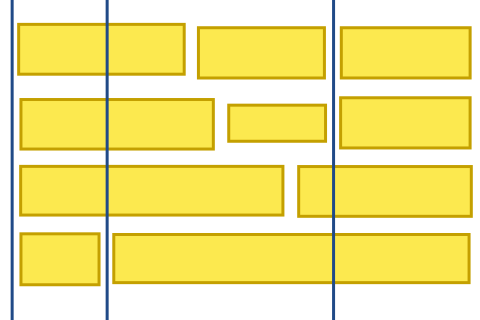
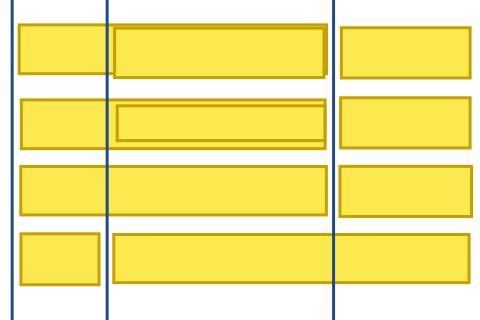
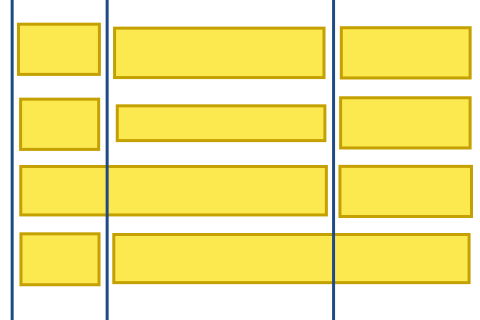
 RSS-Feed